1. Produto rematadoview
The Tera Pro Extreme Performance 2D Ring Barcode Scanner is a compact, wearable device designed for efficient and flexible barcode scanning. Its innovative ring design allows for hands-free operation, making it ideal for various applications including retail, warehousing, and logistics. This scanner supports multiple connection modes and is capable of reading a wide range of 1D and 2D barcodes.

Figure 1: Tera Pro Ring Barcode Scanner highlighting its design principles.
Características principais:
- Deseño de anel portátil: Allows for comfortable, hands-free operation and 330° rotation for optimal scanning angles.
- Modos de conexión múltiples: Supports Bluetooth, 2.4G wireless, and USB wired connections for versatile compatibility.
- Broad Barcode Compatibility: Decodes most 1D, 2D, and QR codes from paper, labels, and digital screens, including damaged or fuzzy barcodes.
- Alerta de vibración: Provides tactile feedback for successful scans, useful in noisy or quiet environments.
- Dous modos de carga: Instant upload for real-time data transfer and storage mode for up to 50,000 barcodes.
2. Guía de configuración
2.1 Contido do paquete
Before starting, ensure all items are present in the package:
- Tera Pro Ring Barcode Scanner x1
- USB x1 Cabo
- 2.4G Wireless Dongle x1
- User Manual x1 (This document and the included PDF)
2.2 Carga do escáner
To ensure optimal performance, fully charge the scanner before first use. Use the provided USB cable for charging.
- Connect the USB cable to the scanner and a compatible power source.
- O vol. de carga recomendadotage/current is 5 V/1 A. The maximum charging voltage/current is 5 V/1.2 A.
- Importante: Do not use quick charge adapters or USB Power Delivery (USB PD) standard power adapters and data cables to charge this product. It is recommended to use the original USB cable included in the package.

Figure 2: Charging recommendations for the scanner.
2.3 Modos de conexión
The scanner offers three versatile connection options:
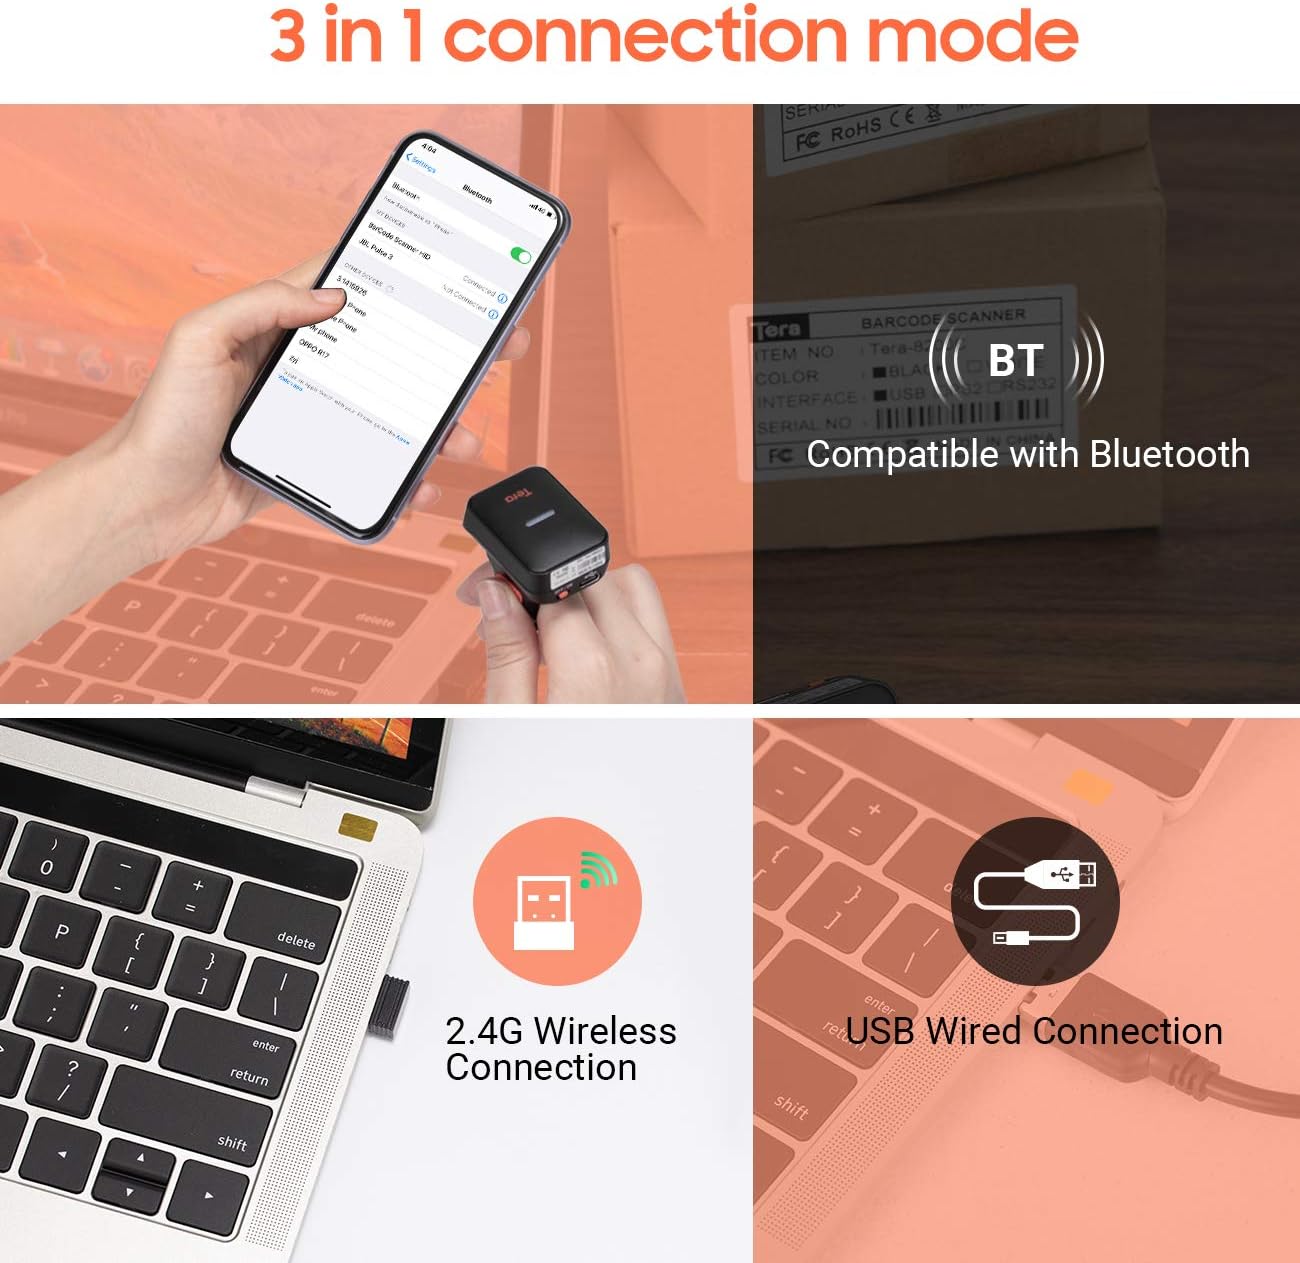
Figura 3: Máisview of the three connection modes.
- Conexión Bluetooth:
Ideal for connecting to Bluetooth-enabled devices such as smartphones, tablets, and laptops. Supports Bluetooth HID, SPP, and BLE protocols.
- Asegúrate de que o escáner estea acendido.
- Activate Bluetooth on your host device (e.g., phone, tablet, computer).
- Scan the Bluetooth pairing barcode (refer to the full user manual PDF for specific pairing barcodes).
- Select "Tera Barcode Scanner" or similar from your device's Bluetooth settings to pair.
- Conexión sen fíos 2.4G:
Provides a stable wireless connection via the included USB dongle, suitable for PCs and laptops without built-in Bluetooth.
- Insert the 2.4G wireless dongle into an available USB port on your computer.
- The scanner should automatically connect to the dongle. If not, scan the 2.4G pairing barcode (refer to the full user manual PDF).
- Conexión por cable USB:
A direct and reliable connection using the USB cable, offering plug-and-play functionality.
- Conecte o escáner ao seu ordenador mediante o cable USB proporcionado.
- The scanner will function as a USB HID keyboard device, and no drivers are typically required.
The scanner is compatible with Windows XP/7/8/10, Linux, iOS, Android, and Mac OS systems.

Figure 4: Compatible devices and operating systems.
3. Instrucións de funcionamento
3.1 Como usar o escáner
The scanner is designed to be worn on your finger for maximum convenience and efficiency.
- Slide the scanner onto your index finger, ensuring the scanning window faces away from your palm.
- Adjust the strap for a secure yet comfortable fit.
- The scanner can rotate 330° on your finger, allowing you to adjust the scanning angle as needed for different barcode orientations.

Figure 5: Proper way to wear the ring scanner.

Figure 6: The 330° rotation feature for flexible scanning.
3.2 Escaneado de códigos de barras
Para escanear un código de barras:
- Point the scanning window towards the barcode.
- Press the scan button (typically located on the side or top of the scanner).
- A successful scan will be indicated by a beep (if enabled) and/or a vibration.
The scanner supports a wide variety of 1D and 2D barcode symbologies, including but not limited to:
- Códigos de barras 1D: EAN, UPC, Code 39, Code 128, Industrial 25, etc.
- Códigos de barras 2D: QR Code, DataMatrix, Aztec, Maxicode, PDF417, etc.
It can scan barcodes from various surfaces, including paper, labels, and digital screens. It is also capable of reading some special barcodes like colorful, fuzzy, or damaged ones.

Figura 7: Examples of readable 1D and 2D barcode types.

Figure 8: Scannable environments for different scanning technologies.
3.3 Modos de subida de datos
O escáner admite dous modos principais de carga de datos:
- Modo de carga instantánea: Data is transmitted to your connected device immediately after each successful scan. This is the default mode and is suitable for real-time inventory management or POS systems.
- Modo de almacenamento: Barcodes are stored in the scanner's built-in memory (up to 50,000 barcodes). This mode is useful when working out of range of your host device. Data can be uploaded in bulk later by scanning a specific command barcode (refer to the full user manual PDF for details).

Figure 9: Data upload modes.
3.4 Vibration Alert
The scanner features a vibration alert function. This can be particularly useful in environments where audible beeps are undesirable or difficult to hear. You can configure the scanner to vibrate upon a successful scan. Refer to the full user manual PDF for instructions on enabling or disabling the vibration and sound alerts.
4. Mantemento
4.1 Coidado e limpeza xerais
- Keep the scanner clean and free from dust and debris. Use a soft, dry cloth to wipe the exterior.
- For the scanning window, use a lens cleaning cloth or a soft, lint-free cloth lightly dampened with water or a mild, non-abrasive cleaner. Avoid harsh chemicals.
- Do not immerse the scanner in water or expose it to excessive moisture.
- Garde o escáner nun lugar fresco e seco cando non o use.
4.2 Coidado coa batería
- Para prolongar a duración da batería, evite descargala completamente con frecuencia.
- Recharge the scanner when the battery indicator shows low power.
- If the scanner will not be used for an extended period, charge it to about 50% before storing and recharge every few months to prevent deep discharge.
- Always use the provided USB cable and adhere to the recommended charging voltage/current (5V/1A).
5 Solución de problemas
This section addresses common issues you might encounter. For more detailed troubleshooting steps and advanced configurations, please refer to the comprehensive User Manual PDF provided with your product.
5.1 Scanner Not Responding / Not Powering On
- Ensure the scanner is fully charged. Connect it to a power source and allow it to charge for at least 30 minutes.
- Mantén premido o botón de acendido durante uns segundos para asegurarte de que está a tentar acenderse.
- If charging lights do not appear, try a different USB cable or power adapter (within specified voltage/corrente).
5.2 Unable to Scan Barcodes
- Check if the scanner is powered on and connected to your device.
- Asegúrate de que o código de barras estea limpo, claro e non estea excesivamente danado.
- Adjust the distance and angle between the scanner and the barcode. Try scanning from different distances (typically 2-16 inches).
- Verify the barcode symbology is supported by the scanner.
- Clean the scanning window if it appears dirty or smudged.
- If scanning from a screen, ensure the screen brightness is sufficient and there's no glare.
5.3 Connection Issues (Bluetooth/2.4G Wireless)
- Bluetooth: Ensure Bluetooth is enabled on your host device. Forget the scanner from your device's Bluetooth list and attempt to re-pair. Make sure the scanner is in Bluetooth pairing mode.
- Sen fíos 2.4G: Ensure the USB dongle is securely inserted into a working USB port. Try a different USB port. Re-pair the scanner with the dongle by scanning the appropriate pairing barcode (found in the full user manual PDF).
- Move closer to the host device to rule out range issues.
- Try connecting via USB wired mode to confirm the scanner's basic functionality.
5.4 Saída de datos incorrecta
- Ensure the correct keyboard layout is selected on your host device (e.g., US keyboard layout).
- If you are experiencing extra characters or missing digits, you may need to configure the scanner's data formatting settings. Refer to the full user manual PDF for programming barcodes related to prefix/suffix, adding/hiding digits, etc.
- Confirm the scanner is in the desired upload mode (Instant vs. Storage).
6. Especificacións
| Característica | Detalle |
|---|---|
| Dimensións do produto | 5 x 4.2 x 1.7 polgadas |
| Peso do elemento | 4.2 onzas |
| ASIN | B08GWSL4Y5 |
| Data de primeira dispoñibilidade | 28 de agosto de 2020 |
| Fabricante | Tera |
| País de Orixe | China |
| Dispositivos compatibles | Tablet, Smartphone, PC, Laptop, POS |
| Fonte de enerxía | Alimentado por batería |
| Tecnoloxía de conectividade | Bluetooth, sen fíos 2.4G, cable USB |
| Vol. Operativotage | 5 voltios |
7. Garantía e soporte
Tera products are designed and manufactured to high-quality standards. For detailed warranty information and terms, please refer to the official User Manual PDF or contact Tera customer support.
7.1 Manual oficial do usuario
A comprehensive user manual in PDF format is available for download. This manual contains detailed instructions, advanced configuration options, and extensive troubleshooting guides.
Descargar o manual de usuario completo (PDF)
7.2 Atención ao cliente
For any questions, technical assistance, or support inquiries, please visit the official Tera website or contact their customer service department. Contact information can typically be found in the full user manual or on the product packaging.
Tera is an international brand specializing in barcode scanners, with research centers in Berlin and Munich, and a U.S.-based company. They are committed to providing quality products and support.


