1. Introdución
This manual provides comprehensive instructions for the installation, operation, and maintenance of your AZZA CSAZ-340F CELESTA ATX Mid Tower Gaming Case. Please read this manual thoroughly before beginning installation to ensure proper setup and to maximize the performance and longevity of your system components.

Figura 1: The AZZA CSAZ-340F CELESTA Mid Tower ATX Case, showcasino seu deseño e factor de forma.
2. Información de seguridade
- Always disconnect the power supply from the wall outlet before installing or removing any components inside the case.
- Handle all components with care to prevent damage from electrostatic discharge (ESD). Consider using an anti-static wrist strap.
- Keep the case and components away from liquids and excessive moisture.
- Asegúrate de que haxa unha ventilación axeitada arredor da carcasa para evitar o sobrequecemento.
- Do not attempt to modify the case structure or components, as this may void your warranty and pose safety risks.
- Keep small parts and packaging materials out of reach of children.
3. Contido do paquete
Verifique que todos os elementos que se indican a continuación estean presentes no seu paquete:
- AZZA CSAZ-340F CELESTA ATX Mid Tower Gaming Case
- Caixa de accesorios (que contén parafusos, separadores, bridas para cables, etc.)
- Manual de usuario (este documento)
4. Especificacións
The following table details the technical specifications of the AZZA CSAZ-340F CELESTA case:
| Característica | Especificación |
|---|---|
| Marca | AZZA |
| Nome do modelo | CSAZ-340F CELESTA |
| Tipo de caso | Torre media |
| Compatibilidade da placa base | ATX, Micro ATX, Mini ITX |
| Cor | Negro |
| Material | Metal |
| Tipo de montaxe da fonte de alimentación | Montaxe inferior |
| Método de arrefriamento | Aire |
| Fan Size (Included/Supported) | 120mm (Rear included), Supports 120mm/140mm |
| Lonxitude máxima da GPU | 320 mm |
| Altura máxima do refrigerador da CPU | 165 mm |
| Lonxitude máxima da PSU | 160 mm |
| 3.5" HDD Support | 2 |
| 2.5" SSD Support | 4/6 (depending on configuration) |
| Soporte de ventilador frontal | 3 x 120 mm ou 3 x 140 mm |
| Top Fan Support | 2 x 120 mm ou 2 x 140 mm |
| Rear Fan Support | 1 x 120 mm |
| Soporte radiador frontal | Up to 280mm/360mm |
| Soporte de radiador superior | 2 x 120mm (from image) |
| Soporte radiador traseiro | 1 x 120mm (from image) |
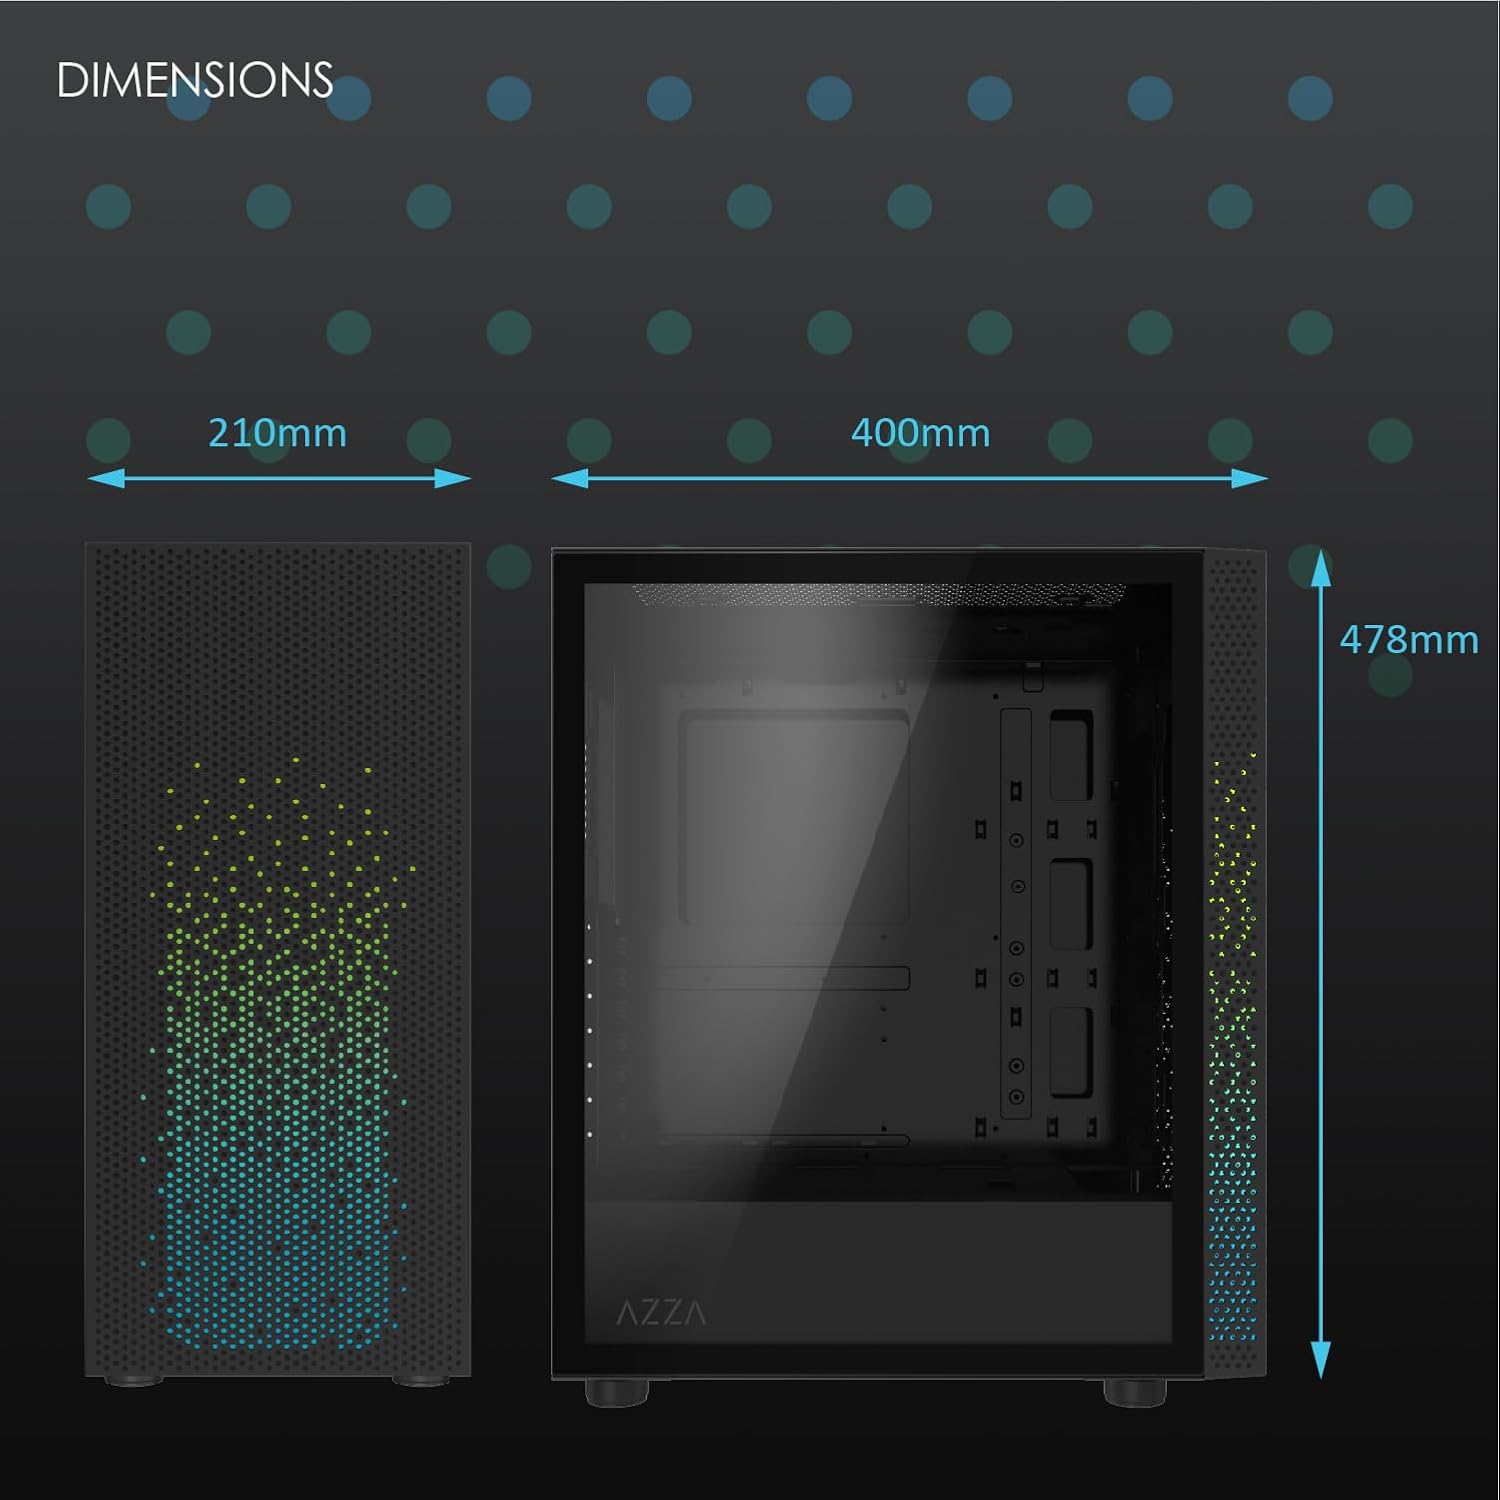
Figura 2: Physical dimensions of the AZZA CSAZ-340F CELESTA case: 210mm (width), 400mm (depth), 478mm (height).

Figura 3: Diagram illustrating fan and radiator mounting options for the AZZA CSAZ-340F CELESTA case, including front, top, and rear configurations.

Figura 4: Internal component support diagram for the AZZA CSAZ-340F CELESTA, showing maximum dimensions for CPU cooler, GPU, and PSU, along with drive bay locations.
5. Configuración e instalación
Follow these steps to install your components into the AZZA CSAZ-340F CELESTA case.
5.1 Preparación do caso
- Coloque a caixa sobre unha superficie plana e estable.
- Remove the side panels. Typically, these are secured with thumbscrews at the rear of the case.
5.2 Instalación da placa base
- Install the I/O shield (if not pre-installed) into the rear opening of the case.
- Ensure the correct standoffs are installed for your ATX, Micro-ATX, or Mini-ITX motherboard. Adjust or add standoffs as needed using the provided tools.
- Coloca con coidado a placa base sobre os separadores, aliñando os orificios dos parafusos.
- Secure the motherboard with the appropriate screws from the accessory box. Do not overtighten.
5.3 Instalación da Unidade de Alimentación (PSU).
- Position the PSU in the bottom rear compartment of the case, ensuring the fan faces downwards (if there's a filtered vent) or upwards.
- Secure the PSU to the case with the provided screws from the rear.
- Route the necessary power cables through the cable management cutouts.
5.4 Instalación da unidade de almacenamento (HDD/SSD)
- Discos duros de 3.5 polgadas: Locate the drive cage. Slide the 3.5" HDDs into the drive trays and secure them, often tool-less or with screws.
- SSD de 2.5 polgadas: Mount 2.5" SSDs to the dedicated mounting points on the motherboard tray or drive cage using screws.
- Connect SATA data and power cables to the installed drives.
5.5 Instalación da tarxeta gráfica (GPU)
- Retire as tapas das ranuras PCIe necesarias da parte traseira da caixa.
- Carefully insert your graphics card into the appropriate PCIe slot on the motherboard until it clicks into place.
- Fixa a tarxeta gráfica á carcasa con parafusos.
- Connect any required PCIe power cables from the PSU to the graphics card.
5.6 Instalación do refrigerador da CPU
Install your CPU cooler according to its specific manufacturer instructions. Ensure it does not exceed the maximum height of 165mm.
5.7 Instalación do ventilador e do radiador
A carcasa admite varias configuracións de ventiladores e radiadores:
- Fronte: Up to 3 x 120mm or 3 x 140mm fans, or radiators up to 280mm/360mm.
- Arriba: Up to 2 x 120mm or 2 x 140mm fans, or 2 x 120mm radiators.
- Traseira: 1 x 120mm fan (pre-installed) or 1 x 120mm radiator.
Mount fans and radiators using the appropriate screws and ensure proper airflow direction.
5.8 Xestión de cables
Utilize the cable management cutouts and tie-down points behind the motherboard tray to route and secure cables. This improves airflow and aesthetics.
5.9 Asemblea final
- Double-check all connections and ensure no cables are obstructing fans.
- Reattach the side panels.
- Connect external peripherals (monitor, keyboard, mouse, etc.) and the power cable.
6. Funcionamento do sistema
Once all components are installed and connected, you can power on your system. The front panel features power and reset buttons, along with USB and audio ports for convenient access.

Figura 5: Close-up of the AZZA CSAZ-340F CELESTA's front panel, highlighting the integrated lighting effects.
7. Mantemento
- Filtros de po: Regularly clean the dust filters (if present) to maintain optimal airflow and cooling performance.
- Limpeza de interiores: Periodically open the case and use compressed air to remove dust from components and fans. Ensure the system is powered off and unplugged before cleaning.
- Limpeza exterior: Limpe as superficies exteriores cun suave, damp pano. Evite produtos químicos agresivos.
8 Solución de problemas
Se tes problemas, ten en conta os seguintes pasos habituais para a súa resolución:
- O sistema non se acende:
- Ensure the power cable is securely connected to both the PSU and the wall outlet.
- Check that the PSU switch is in the "ON" position.
- Verify all internal power connections (24-pin ATX, 8-pin CPU, PCIe power) are seated correctly.
- Confirm front panel power button cables are correctly connected to the motherboard.
- Sen saída de visualización:
- Asegúrate de que o monitor estea conectado á tarxeta gráfica (non aos portos gráficos integrados da placa base, a non ser que esteas a usar gráficos integrados).
- Volva colocar a tarxeta gráfica na súa ranura PCIe.
- Check monitor input selection.
- Sobrequecemento:
- Verify all case fans are spinning and oriented correctly for airflow.
- Clean any dust filters and internal components.
- Ensure CPU cooler is properly seated and making good contact with the CPU.
9. Garantía e soporte
Para obter información sobre a garantía e asistencia técnica, consulte a páxina oficial de AZZA website or contact AZZA customer service directly. Keep your proof of purchase for warranty claims.
Oficial de AZZA Websitio: www.azza.com


