1. Información importante de seguridade
Lea este manual atentamente antes de usar o aparello e gárdeo para futuras consultas. O incumprimento destas instrucións pode provocar descargas eléctricas, incendios ou lesións graves.
- Asegúrate de que a fonte de alimentación coincida coa etiqueta de clasificación da unidade.
- Non faga funcionar o deshumidificador cun cable ou unha ficha danados.
- Desenchufe sempre a unidade antes de limpar ou reparar.
- Non bloquee a entrada ou saída de aire.
- Keep the unit on a stable, level surface to prevent water spillage.
- Este aparello só é para uso interior.
- Do not use in areas where flammable gases or liquids are stored.
- Os nenos deben ser supervisados para asegurarse de que non xogan co aparello.
2. Produto rematadoview
The ARGO DRY NATURE 21 is a high-efficiency dehumidifier designed to reduce humidity levels in your living spaces. It features a sleek, slim design with a pure white finish and a silver top control panel.

Figura 2.1: Fronte view of the ARGO DRY NATURE 21 Dehumidifier. This image shows the overall slim and elegant design of the unit in pure white.
2.1 Panel de control
The control panel features soft-touch buttons and an LED display for easy operation. The air outlet flap is motorized for efficient air distribution.

Figura 2.2: Arriba view of the control panel. It includes buttons for speed, timer, humidity settings, swing function, and power, along with an LED display.
2.2 Características principais
- Capacidade de deshumidificación: Up to 21 liters per 24 hours (at 32°C, 80% RH).
- Hidrostato: High-precision humidistat with adjustable humidity settings (40% – 80%).
- Temporizador: 1-24 hour ON/OFF timer.
- Filtro de ar: Removable and washable air filter for improved air quality.
- Depósito de auga: 3.8-liter capacity with a full tank alarm.
- Drenaxe continua: Quick connection for continuous condensate drainage.
- Temperatura de funcionamento: Functions effectively in low temperatures, from 5°C to 35°C.
- Desconxelación automática: Integrated automatic defrost system.
- Función de memoria: Automatic restart after power outage, retaining previous settings.
- Portabilidade: Equipped with multi-directional wheels and integrated handles for easy transport.
3. Configuración
3.1 Desembalaxe
- Retire con coidado o deshumidificador da súa embalaxe.
- Retire todos os materiais de embalaxe e asegúrese de que non falten compoñentes nin estean danados.
- Keep the packaging for future storage or transportation.
3.2 Colocación
- Coloque o deshumidificador sobre unha superficie firme e nivelada.
- Asegúrate de que haxa polo menos 20 cm (8 polgadas) de espazo arredor da unidade para un fluxo de aire axeitado.
- Evite colocar a unidade preto de fontes de calor ou baixo a luz solar directa.
- For optimal performance, position the unit in the center of the room or area requiring dehumidification.
3.3 Drenaxe continua (opcional)
For continuous operation without needing to empty the water tank, you can connect a drainage hose.
- Locate the continuous drainage outlet on the back or side of the unit.
- Remove the rubber stopper (if present).
- Connect a suitable drainage hose (not included) to the outlet. Ensure the connection is secure to prevent leaks.
- Direct the other end of the hose to a floor drain or a larger container, ensuring the hose is sloped downwards for gravity drainage.
4. Instrucións de funcionamento
4.1 Encendido/apagado
- Enchufe o cable de alimentación a unha toma eléctrica conectada a terra.
- Preme o POTENCIA button on the control panel to turn the unit ON or OFF.
4.2 Axuste do nivel de humidade desexado
- Preme o Humidade button (often indicated by a water droplet icon or up/down arrows) to adjust the desired humidity level.
- The LED display will show the current humidity, then flash the set humidity. Use the Up e Abaixo arrows to select a target humidity between 40% and 80%.
- A unidade funcionará ata que se alcance o nivel de humidade axustado e, a continuación, acenderase e apagarase para mantelo.
4.3 Axuste da velocidade do ventilador
- Preme o VELOCIDADE button (often indicated by a fan icon) to cycle between two fan speeds: Low and High.
- Higher fan speed results in faster dehumidification.
4.4 Función de temporizador
- Preme o TEMPORIZADOR botón (a miúdo indicado por unha icona de reloxo).
- Usa o Up e Abaixo arrows to set the desired operating time (1-24 hours) for automatic ON or OFF.
- If the unit is OFF, setting a timer will turn it ON after the set hours. If the unit is ON, setting a timer will turn it OFF after the set hours.
4.5 Función de oscilación
- Preme o SWING button to activate the motorized air flap, which oscillates to distribute dehumidified air more evenly.
- Press again to stop the swing function at a desired angle.
4.6 Water Tank Full Alarm
When the 3.8-liter water tank is full, the unit will automatically stop operating, and an alarm or indicator light (e.g., "POWER FULL" or a water droplet icon) will illuminate on the control panel. Empty the tank as described in the Maintenance section.
5. Mantemento
Un mantemento regular garante un rendemento óptimo e prolonga a vida útil do deshumidificador. Desconecte sempre a unidade antes de realizar calquera mantemento.
5.1 Baleirado do depósito de auga
When the water tank is full, the unit will stop operating. The tank has a capacity of 3.8 liters.
- Gently pull out the water tank from the front or side of the unit.
- Leva o tanque con coidado a un sumidoiro ou a un sumidoiro.
- Baleirar a auga recollida.
- Slide the empty tank back into the unit until it clicks into place. Ensure it is properly seated to resume operation.

Figura 5.1: Image showing the water tank being removed from the side of the dehumidifier for emptying.
5.2 Limpeza do filtro de aire
The air filter should be cleaned regularly (e.g., every two weeks or as needed) to maintain efficiency and air quality.
- Localice o filtro de aire na parte traseira ou lateral da unidade.
- Gently remove the filter from its housing.
- Clean the filter using a vacuum cleaner to remove dust, or wash it with lukewarm water and a mild detergent.
- Rinse thoroughly and allow the filter to air dry completely before reinserting it. Do not expose to direct sunlight or high heat.
- Reinsert the dry filter into its housing.
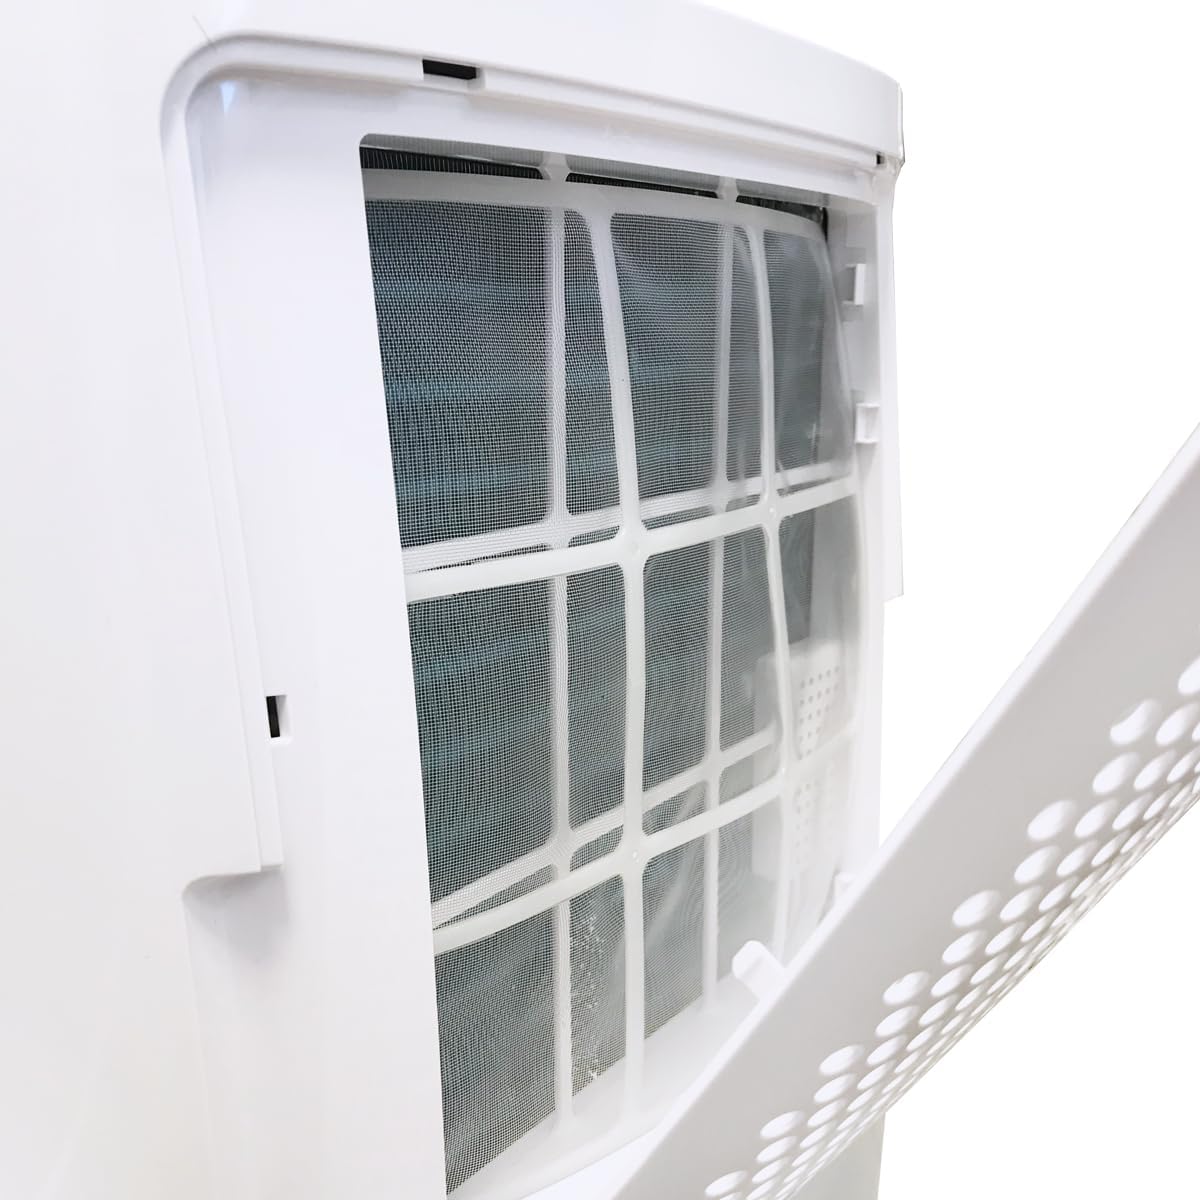
Figura 5.2: Primeiro plano view of the removable air filter located on the side of the dehumidifier, shown partially open for access.
5.3 Limpeza do exterior
- Limpe o exterior da unidade cun suave, damp pano.
- Non empregues produtos químicos agresivos, limpadores abrasivos nin solventes, xa que poden danar a superficie.
- Asegúrate de que non entre auga nos compoñentes internos.
5.4 Almacenamento
- Se garda a unidade durante un período prolongado, asegúrese de que o depósito de auga estea baleiro e limpo.
- Limpa o filtro de aire e déixao secar.
- Cubra a unidade cunha bolsa de plástico para protexela do po.
- Store the dehumidifier in a cool, dry place.
6 Solución de problemas
Antes de contactar co servizo de atención ao cliente, consulta a seguinte guía de resolución de problemas para coñecer os problemas máis habituais.
| Problema | Causa posible | Solución |
|---|---|---|
| A unidade non se acende. | Sen fonte de alimentación. Cable de alimentación non conectado correctamente. O depósito de auga está cheo ou non está inserido correctamente. | Comproba a toma de corrente. Asegúrate de que o cable de alimentación estea conectado correctamente. Baleirar o depósito de auga e volver a colocalo correctamente. |
| Sen recollida de auga ou baixa deshumidificación. | O filtro de aire está obstruído. A temperatura ambiente é demasiado baixa (inferior a 5 °C). A configuración de humidade é demasiado alta. As portas/fiestras están abertas. O tamaño da unidade é demasiado pequeno para a habitación. | Limpar o filtro de aire. The unit may not operate efficiently below 5°C. Baixa o axuste de humidade desexado. Pecha todas as portas e fiestras. Consider using multiple units for larger spaces. |
| A unidade é ruidosa. | A unidade non está sobre unha superficie nivelada. O filtro de aire está obstruído. | Coloque a unidade sobre unha superficie plana e estable. Limpar o filtro de aire. |
| A auga sae da unidade. | Depósito de auga non inserido correctamente. Continuous drainage hose is loose or blocked. | Reinsert the water tank correctly. Check the continuous drainage hose connection and ensure it is not blocked. |
7. Especificacións
Technical specifications for the ARGO DRY NATURE 21 Dehumidifier.
| Característica | Detalle |
|---|---|
| Marca | ARGO |
| Número de modelo | NATUREZA SECA 21 |
| Capacidade de deshumidificación | 21 Liters/24h (at 32°C, 80% RH) |
| Volume do depósito de auga | 3.8 litros |
| Consumo de enerxía | 310 vatios |
| Superficie recomendada | Ata 24 metros cadrados |
| Rango de temperatura de funcionamento | 5°C a 35°C |
| Rango de humidade axustable | 40% - 80% |
| Número de velocidades | 2 |
| Dimensións (D x W x H) | 234 mm x 342 mm x 560 mm |
| Peso | 8 quilogramos |
| Características especiais | Automatic Defrost, Timer, Auto Restart, Continuous Drainage, Motorized Flap, Humidistat, Memory Function, Multidirectional Wheels, Transport Handles |
| Refrixerante | Natural refrigerant with zero impact on global warming |

Figura 7.1: Dimensional diagram of the ARGO DRY NATURE 21 Dehumidifier, showing height (560 mm), width (342 mm), and depth (234 mm).
8. Garantía e soporte
This product comes with a standard manufacturer's warranty. Please refer to the warranty card included with your purchase for specific terms and conditions.
For technical assistance, troubleshooting beyond this manual, or to inquire about spare parts, please contact ARGO customer support. Contact information can typically be found on the manufacturer's websitio ou na embalaxe do produto.


