1. Introdución
This manual provides comprehensive instructions for the installation, operation, and maintenance of the SINOTIMER TM919B 30A Programmable Electronic Timer Switch. This device is designed to automatically control the ON/OFF switching of various electrical appliances based on user-defined daily or weekly programs. Please read this manual carefully before installation and use to ensure proper function and safety.
2. Información de seguridade
WARNING: Risk of electric shock. Installation should only be performed by a qualified electrician or trained personnel.
- Always disconnect power at the circuit breaker before installing or servicing the timer switch.
- Asegúrese de que todas as conexións de cableado estean seguras e cumpran cos códigos eléctricos locais.
- Do not exceed the maximum load rating of 30A.
- Este dispositivo está deseñado só para uso en interiores. Evite a exposición á humidade ou a temperaturas extremas.
- Non intente desmontar nin reparar a unidade vostede mesmo. Póñase en contacto co persoal de servizo cualificado.
3. Produto rematadoview
The SINOTIMER TM919B is a digital timer switch featuring a large LCD display, multiple programming options, and a manual override function. It is designed for DIN rail mounting.
3.1. Compoñentes e controis
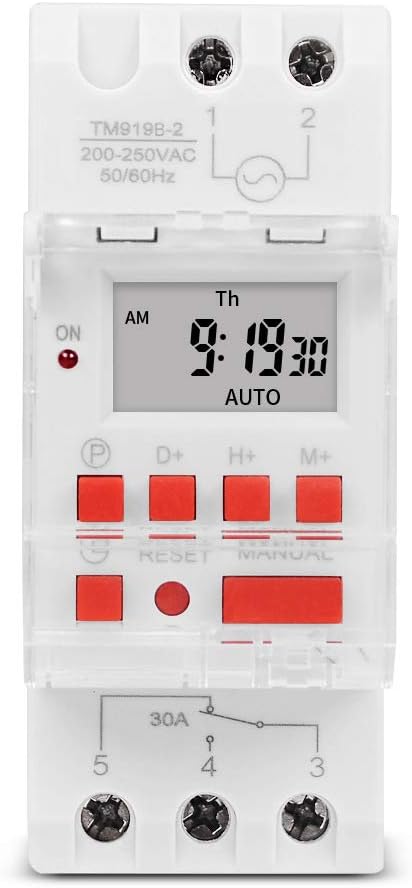
Figura 1: Fronte view of the TM919B timer switch, showing the LCD display, control buttons, and terminal connections.

Figura 2: En ángulo view of the TM919B with the transparent protective cover open, revealing the programming buttons (P, D+, H+, M+, RESET, MANUAL).
- Pantalla LCD: Mostra a hora, o día e o estado do programa actuais.
- P (Program) Button: Enters/exits program setting mode.
- D+ (Day) Button: Adjusts day of the week in setting modes.
- H+ (Hour) Button: Adjusts hour in setting modes.
- M+ (Minute) Button: Adjusts minute in setting modes.
- Botón RESET: Clears all settings and resets the timer to factory defaults.
- Botón MANUAL: Alterna entre os modos ON, AUTO e OFF.
- Conexións de terminal: For power input and load output.
4. Especificacións
| Característica | Especificación |
|---|---|
| Modelo | TM919B |
| Voltage | 220V (AC200-250V) |
| Frecuencia | 50/60 Hz |
| Carga máxima | 30A (carga resistiva) |
| Programas | 16 ON/OFF programs per day/week |
| Intervalo mínimo | 1 minuto |
| Copia de seguridade da batería | Built-in rechargeable battery (for memory retention) |
| Montaxe | Carril DIN de 35 mm |
| Dimensións | Consulte a Figura 3 |

Figura 3: Detailed dimensions of the TM919B timer switch, showing height, width, and depth measurements.
5. Configuración e instalación
Follow these steps for safe and correct installation of your timer switch.
5.1. Montaxe
- Asegúrese de que a alimentación estea desconectada no disxuntor principal.
- Mount the TM919B onto a standard 35mm DIN rail. The device features a clip mechanism on the back for secure attachment.
- Press the orange clip at the bottom of the unit to release it from the DIN rail if removal is necessary.

Figura 4: Lado view of the TM919B, highlighting the orange DIN rail mounting clip.

Figura 5: De volta view of the TM919B, illustrating the DIN rail mounting mechanism.
5.2. Diagrama de cableado
Refer to the diagram below for correct wiring connections. Ensure all connections are tight and insulated.

Figura 6: Lado view of the TM919B showing the wiring diagram printed on the casing. Terminals 1 and 2 are for power input (L and N). Terminals 3, 4, and 5 are for load output (Common, Normally Open, Normally Closed).
- Terminais 1 e 2: Power Input (L - Live, N - Neutral). Connect your 220V AC supply here.
- Terminal 3: Common (COM) for the output relay.
- Terminal 4: Normally Open (NO) output. The load will be powered when the timer is ON.
- Terminal 5: Normally Closed (NC) output. The load will be powered when the timer is OFF.
For typical applications where the load is switched ON by the timer, connect the load between Terminal 3 (COM) and Terminal 4 (NO).
6. Instrucións de funcionamento
6.1. Configuración inicial e reinicio
- After connecting power, the display may be blank or show random characters. Press the RESET button with a pointed object (e.g., a pen tip) to clear all memory and reset the timer. The display will show "0:00" and "MO".
- Allow the internal battery to charge for at least 30 minutes before programming for optimal performance and memory retention during power outages.
6.2. Axuste da hora e do día actuais
- Manteña premido o D+ button to set the current day of the week (MO, TU, WE, TH, FR, SA, SU).
- Manteña premido o H+ button to set the current hour (0-23).
- Manteña premido o M+ button to set the current minute (0-59).
- Release the buttons when the correct time and day are displayed. The timer will automatically save the settings.
6.3. Programación de ciclos de acendido/apagado
The TM919B supports up to 16 ON/OFF programs. Each program consists of an ON time and an OFF time.
- Preme o P button once. The display will show "1 ON". This is for the first ON program.
- Use D+ to select the day(s) for this program. Options include:
- MO TU WE TH FR SA SU (Every day)
- MO (Monday only)
- TU (Tuesday only)
- ...
- MO TU WE TH FR (Weekdays)
- SA SU (Weekends)
- MO TU WE (Mon-Wed)
- TH FR SA (Thu-Sat)
- MO WE FR (Mon, Wed, Fri)
- TU TH SA (Tue, Thu, Sat)
- MO TU WE TH FR SA (Mon-Sat)
- Use H+ e M+ to set the desired ON hour and minute.
- Preme o P button again. The display will show "1 OFF". This is for the first OFF program.
- Use D+, H+, e M+ to set the desired OFF day, hour, and minute. Ensure the OFF time is after the ON time for the same program.
- Repeat steps 1-5 for additional ON/OFF programs (up to 16). If you don't need all 16 programs, simply press P to cycle through unused programs until you return to the current time display.
- To exit programming mode and save settings, press the clock button (usually labeled with a clock icon, or simply wait for 30 seconds without input).
6.4. Anulación manual
Preme o MANUAL botón para cambiar polos modos de funcionamento:
- ACTIVADO: The timer output is continuously ON, ignoring all programs.
- AUTOMÁTICO: The timer operates according to the programmed ON/OFF cycles. This is the standard operating mode.
- OFF: The timer output is continuously OFF, ignoring all programs.
Asegúrate de que o temporizador estea configurado para AUTO for programmed operation.
7. Mantemento
- The TM919B is designed for maintenance-free operation.
- Limpa o exterior cun pano suave e seco. Non empregues produtos de limpeza abrasivos nin solventes.
- Ensure the internal battery is charged by keeping the unit powered for at least 24 hours initially, and periodically thereafter, to maintain time and program memory during power outages.
8 Solución de problemas
| Problema | Causa posible | Solución |
|---|---|---|
| A pantalla está en branco. | No power supply; internal battery discharged. | Check power connections. Allow unit to charge for 30 minutes. |
| O temporizador non conmuta a carga. | Incorrect wiring; timer in MANUAL ON/OFF mode; incorrect program settings. | Verify wiring (refer to Figure 6). Ensure timer is in AUTO mode. Check program times and days. |
| Programs are lost after power outage. | Internal battery not fully charged or faulty. | Ensure unit is powered for at least 24 hours to fully charge the battery. If problem persists, contact support. |
| Os botóns non responden. | Unit frozen; temporary glitch. | Preme o RESET botón. |
9. Garantía e soporte
Os produtos SINOTIMER fabrícanse con estándares de alta calidade. Para obter información sobre a garantía ou asistencia técnica, consulte a documentación proporcionada coa súa compra ou visite o sitio web oficial de SINOTIMER. websitio. Garde o recibo da compra como xustificante da mesma.
For further assistance, you may contact SINOTIMER customer service through their official channels.


