1. Introdución
This manual provides essential information for the safe and efficient installation, operation, and maintenance of your Onforu 100W 14000lm LED Shop Lights. Please read this manual thoroughly before use and retain it for future reference.
2. Información de seguridade
Siga sempre as precaucións básicas de seguridade para reducir o risco de incendios, descargas eléctricas e danos persoais.
- Asegúrese de desconectar a alimentación antes da instalación ou do mantemento.
- Do not look directly into the LED light when it is on, as it may cause eye damage.
- Manter o produto lonxe de materiais inflamables.
- This product is IP66 waterproof, suitable for outdoor use, but avoid submerging it in water.
- Se non tes ningunha dúbida, a instalación debe realizala un electricista cualificado.
- Asegúrate de que a superficie de montaxe poida soportar o peso da luminaria.
3. Contido do paquete
Verifique que todos os compoñentes estean presentes e estean intactos ao abrir o envase:
- LED Shop Light (2 units)
- Lamp Brackets (2 pairs)
- M6 Hex Screw Key (1 unit)
- M6 Screws (2 units)
- Plastic Expansion Nails (2 units)
- Screws for Mounting (2 units)
- Additional connectors for linking (as shown in assembly video)

4. Configuración e instalación
The Onforu LED Shop Lights are designed for easy installation and can be mounted in various configurations (wall, ground, or ceiling) and can also be linked horizontally or vertically.
4.1 Single Unit Installation
- Coloque os soportes: Asegure o lamp brackets to the sides of the LED light fixture using the provided M6 screws and hex key. Do not overtighten initially to allow for angle adjustment.
- Montar o aparello: Choose your desired mounting location (wall, ground, or ceiling). Use the plastic expansion nails and mounting screws to firmly attach the brackets to the surface.
- Axustar ángulo: Once mounted, adjust the angle of the light fixture to direct illumination as needed. The fixture allows for 180° adjustment. Tighten the M6 screws on the brackets to secure the angle.
- Conectar enerxía: Plug the power cord into a standard 120V AC outlet. The light features an in-line switch for convenient power control.

Vídeo 1: Unha breve presentaciónview demonstrating the installation process and adjustable features of the Onforu LED Flood Light.
4.2 Vincular varias unidades
The lights can be connected horizontally or vertically to create a longer or wider lighting solution. Use the provided connectors and hex key to secure the units together.
- Horizontal Connection: Align two light units side-by-side. Use the small connecting brackets and screws to join them securely. Ensure the power cables are routed appropriately.
- Vertical Connection: Align two light units one above the other. Use the small connecting brackets and screws to join them securely.
Video 2: An official product video from Onforu demonstrating the various installation methods, including linking multiple units horizontally and vertically, and showcasing the included hardware.
5. Instrucións de funcionamento
Operating your Onforu LED Shop Light is straightforward:
- Once installed and plugged into a power outlet, locate the in-line switch on the power cord.
- Press the switch to turn the light ON.
- Press the switch again to turn the light OFF.

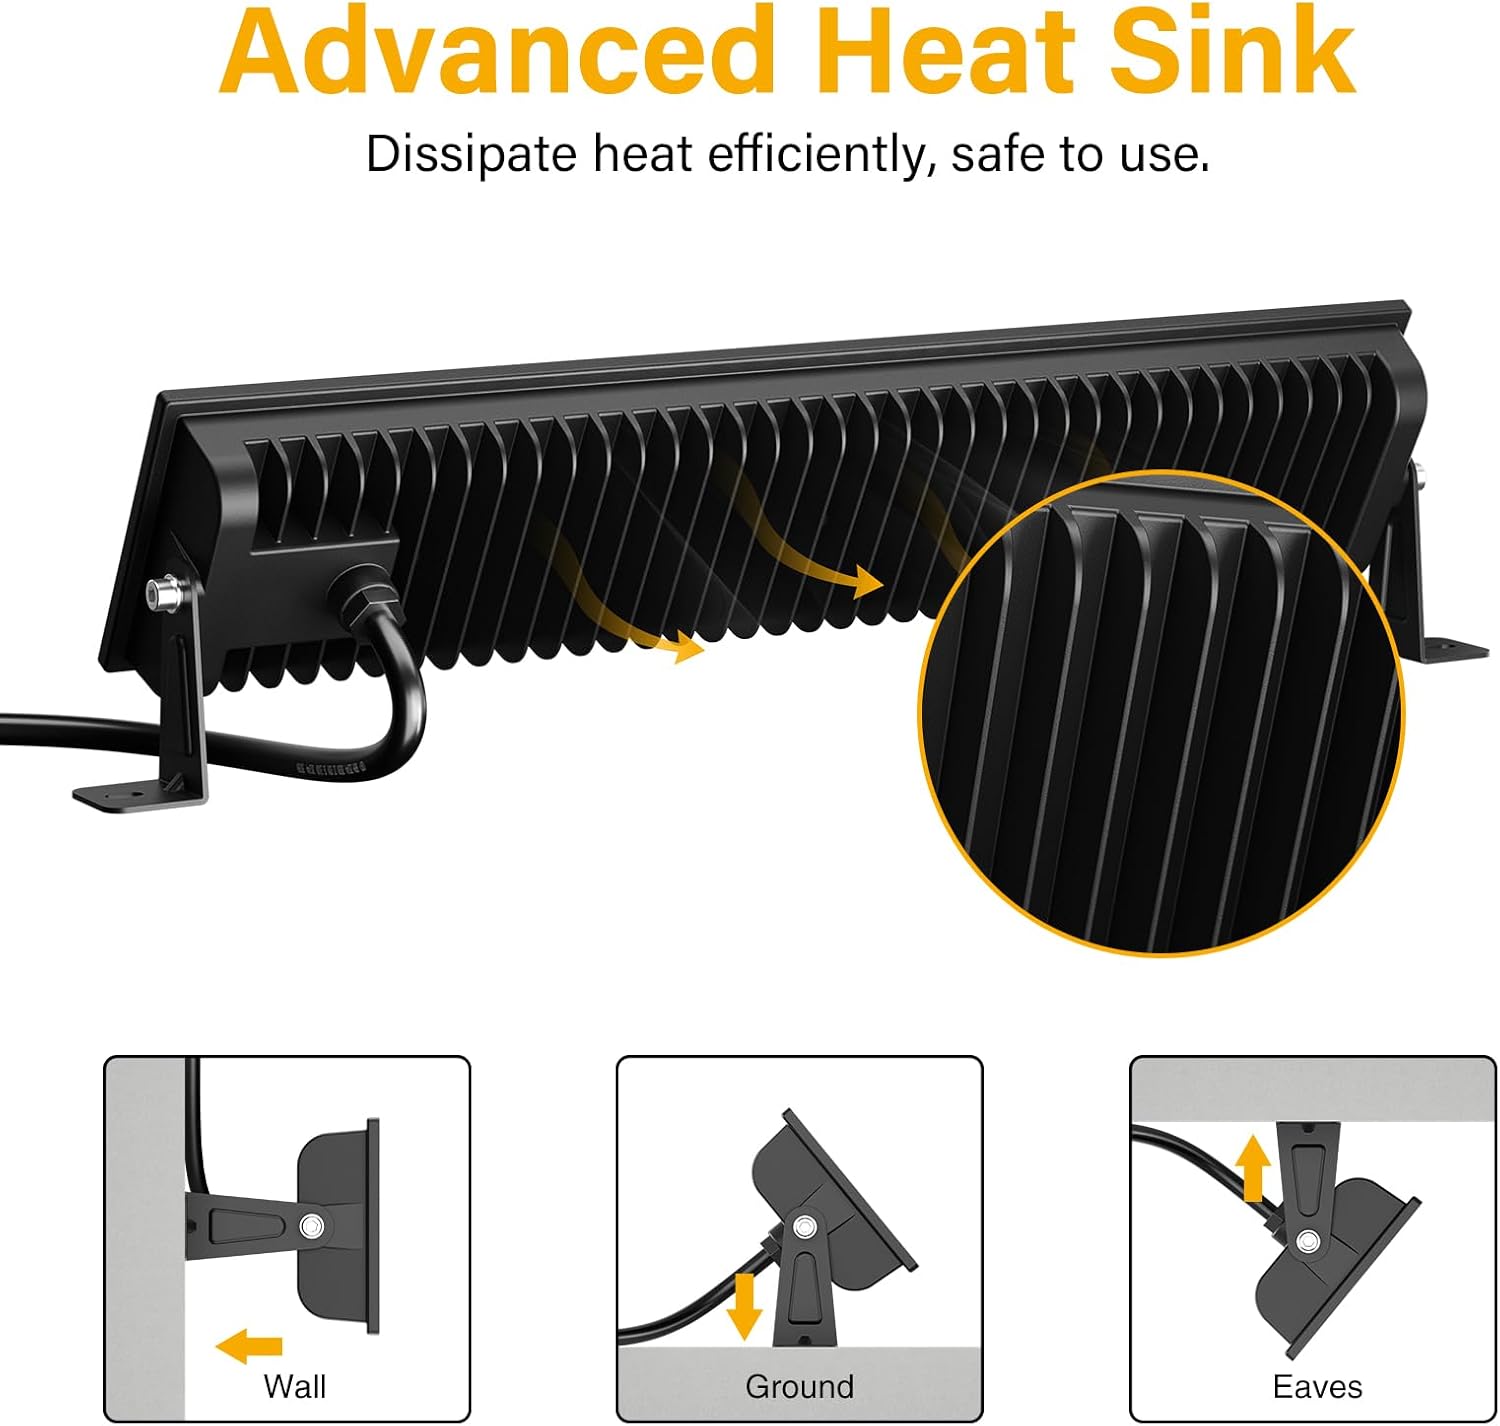
6. Mantemento
To ensure optimal performance and longevity of your LED Shop Lights:
- Limpeza: Periodically clean the glass cover with a soft, damp pano. Evite produtos de limpeza abrasivos ou solventes que poidan danar a superficie.
- Inspección: Regularly check the power cord and plug for any signs of damage. Ensure all mounting screws remain tight.
- Disipación de calor: The fixture is designed with a fin-type heat sink. Ensure it is not obstructed to allow for efficient heat dissipation.
7 Solución de problemas
If you encounter issues with your LED Shop Light, refer to the following common solutions:
| Problema | Causa posible | Solución |
|---|---|---|
| A luz non acende. | No power supply; faulty switch; loose connection. | Check if the plug is securely inserted and the power outlet is functional. Ensure the in-line switch is ON. Inspect the power cord for damage. |
| Luz parpadea. | Fonte de alimentación inestable; conexión solta. | Ensure the power supply is stable. Check all connections for tightness. |
| Brillo reducido. | Dirt or debris on the glass cover. | Clean the glass cover with a soft, damp pano. |
8. Especificacións
| Característica | Detalle |
|---|---|
| Marca | Onforu |
| Número de modelo | CT08 |
| Wattage | 100 vatios |
| Brillo | 14000 lúmenes |
| Temperatura da cor | 6500 Kelvin (Branco de luz do día) |
| Material | Aluminum, Tempered Glass |
| Nivel de resistencia á auga | Impermeable IP66 |
| Dimensións do produto | 15.27 cm de longo x 1.37 cm de ancho x 3.46 cm de alto |
| Ángulo do feixe | 120° |
| Característica especial | With Plug, Thick die-cast aluminum, Waterproof, Not Dimmable |
9. Garantía e soporte
Onforu products come with a limited warranty. For specific warranty details or technical support, please refer to the official Onforu websitio ou póñase en contacto co servizo de atención ao cliente.
Optional protection plans are available for purchase separately:
- Plan de protección a 3 anos
- Plan de protección a 4 anos
- Protección completa (subscrición mensual)
Para obter máis asistencia, visite o Tenda Onforu en Amazon.


