1. Introdución
This manual provides essential information for the safe and efficient operation of your Bomann GSP 7407 freestanding dishwasher. Please read these instructions thoroughly before installation, use, or maintenance to ensure proper function and to prevent potential hazards. Keep this manual for future reference.
2. Instrucións de seguridade
Siga sempre as seguintes pautas de seguridade para reducir o risco de incendio, descarga eléctrica, lesións ou danos no aparello.
- Asegúrese de que o lavalouzas estea correctamente conectado á terra antes de usalo.
- Non faga funcionar o lavalouzas se o cable de alimentación está danado. Póñase en contacto co persoal de servizo cualificado.
- Keep children away from the dishwasher, especially when it is operating or when the door is open. Detergents can be corrosive.
- Empregue só deterxentes e abrillantadores deseñados especificamente para lavalouzas automáticas.
- Non laves artigos de plástico a menos que estean marcados como "aptos para lavalouzas".
- Avoid opening the door during operation, as hot water may spray out.
- Always turn off the power and disconnect the appliance from the mains before cleaning or performing maintenance.
- Non tamper with the controls or safety mechanisms.
3. Produto rematadoview
The Bomann GSP 7407 is a freestanding dishwasher designed for efficient dish cleaning. It features a user-friendly control panel and adjustable racks.
3.1 Externo View

This image displays the front of the Bomann GSP 7407 dishwasher, highlighting its sleek black finish and the integrated control panel at the top of the door.
3.2 Panel de control

Un detallado view of the dishwasher's control panel, featuring an LED display showing the remaining time, power button, program selection buttons, and indicators for salt and rinse aid.
3.3 Compoñentes interiores
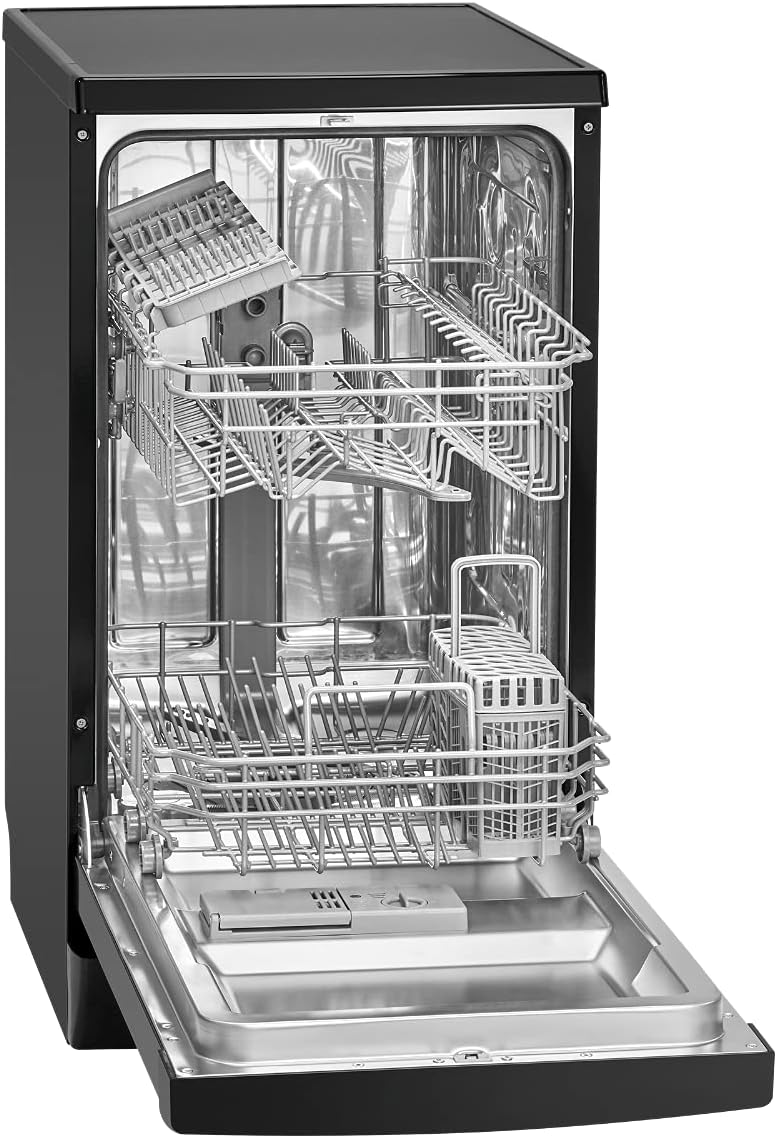
This image shows the interior of the dishwasher with the door open, revealing the empty upper and lower dish racks, and the cutlery basket, ready for loading.
- Rack superior: For delicate items, glasses, and smaller plates.
- Rack inferior: For larger plates, pots, and pans.
- Cesta de cubertos: Para garfos, coitelos e culleres.
- Dispensador de deterxente: Located on the inner door.
- Dispensador de abrillantador: Located next to the detergent dispenser.
- Salt Container: Located at the bottom of the wash tub.
4. Configuración e instalación
Unha instalación axeitada é fundamental para o rendemento e a seguridade do lavalouzas. Recoméndase que a instalación sexa realizada por un técnico cualificado.
4.1 Positioning the Dishwasher
- Place the dishwasher on a firm, level surface.
- Asegúrate de que haxa espazo suficiente para que a porta se abra completamente.
- Locate the dishwasher near a water supply, drain, and electrical outlet.
4.2 Conexión de auga
- Entrada de auga: Connect the water inlet hose to a cold water supply tap with a 3/4 inch thread. Ensure the connection is secure to prevent leaks.
- Mangueira de drenaxe: Connect the drain hose to a suitable drain pipe or sink trap. Ensure the hose is not kinked or obstructed. The drain hose should be positioned at a height between 40 cm and 100 cm from the floor.
4.3 Conexión eléctrica
- Connect the dishwasher to a grounded electrical outlet. The voltagO requisito é de 240 V.
- Non use cables de extensión ou adaptadores.
- Ensure the electrical circuit is protected by a fuse or circuit breaker of appropriate rating.
4.4 Configuración inicial
- Filling the Salt Dispenser: Unscrew the cap of the salt container located at the bottom of the wash tub. Using a funnel, pour approximately 1 kg of dishwasher salt into the container, then fill with water until full. Replace the cap securely.
- Enchendo o dispensador de abrillantador: Open the rinse aid dispenser cover. Pour rinse aid into the dispenser until it reaches the maximum level indicator. Close the cover firmly.
- Axuste da dureza da auga: Refer to your local water supplier for water hardness information. Adjust the dishwasher's water softener setting according to the water hardness level.
5. Instrucións de funcionamento
Siga estes pasos para un lavado eficaz e eficiente dos pratos.
5.1 Carga do lavalouzas

This image illustrates the proper loading of dishes into the Bomann GSP 7407 dishwasher, showing plates, glasses, and cutlery arranged in the racks for optimal cleaning.
- Raspa os restos grandes de comida dos pratos antes de cargalos.
- Coloque vasos, cuncas e artigos máis pequenos no estante superior.
- Arrange larger plates, bowls, and pots in the lower rack.
- Coloca os cubertos na cesta para cubertos cos mangos cara abaixo para os garfos e as culleres, e os mangos cara arriba para os coitelos para garantir a seguridade.
- Ensure that no items block the spray arms from rotating freely.
5.2 Engadir deterxente
- Open the detergent dispenser cover.
- Add the appropriate amount of dishwasher detergent according to the program selected and the soil level of the dishes.
- Close the dispenser cover firmly until it clicks.
5.3 Selección dun programa
Press the program selection button on the control panel to cycle through the available wash programs. The LED display will indicate the selected program or its duration.
- Intensivo: Para pratos e potas moi sucias.
- 90 min: A standard program for normally soiled dishes.
- Economy (Eco): Programa de baixo consumo para pratos normalmente sucios.
- Glass/Delicate: For lightly soiled, delicate items and glassware.
- Preenxágüe: Para lavar pratos que se lavarán despois.
- Enxágüe: A quick rinse cycle.
5.4 Inicio dun ciclo
- Pecha a porta do lavalouzas con seguridade.
- Prema o botón Inicio/Pausa para iniciar o programa seleccionado.
- The LED display will show the remaining cycle time.
5.5 Funcións especiais
- Media carga: Use esta función cando o lavalouzas non estea completamente cargado para aforrar auga e enerxía.
- Inicio atrasado: Allows you to postpone the start of a wash cycle by a set number of hours.
5.6 Fin de ciclo
Once the program is complete, the dishwasher will signal with an audible alert or display "End". Open the door slightly to allow steam to escape and dishes to cool before unloading.
6. Mantemento e Limpeza
Un mantemento regular garante un rendemento óptimo e prolonga a vida útil do seu lavalouzas.
6.1 Limpeza dos filtros
- The filter system, located at the bottom of the wash tub, should be cleaned regularly.
- Twist and remove the coarse filter, then separate the fine filter and microfilter.
- Enxágüe todos os compoñentes do filtro con auga corrente para eliminar as partículas de comida. Use un cepillo suave se é necesario.
- Volva montar os filtros e colóqueos de volta no lavalouzas, asegurándose de que estean ben fixados no seu lugar.
6.2 Limpeza dos brazos pulverizadores
- Comprobe periodicamente se as boquillas do brazo pulverizador están atascadas.
- If blocked, remove the spray arms (they usually unclip or unscrew) and clear the nozzles with a thin wire or toothpick.
- Enxágüe e volva colocar os brazos pulverizadores de forma segura.
6.3 Limpeza exterior e interior
- Limpe as superficies exteriores cun suave, damp pano. Non use produtos de limpeza abrasivos.
- Limpe o selo da porta regularmente con anuncioamp cloth to remove food residues.
- For interior cleaning, run an empty cycle with a dishwasher cleaner periodically.
6.4 Reposición de sal e abrillantador
- The salt indicator light on the control panel will illuminate when the salt container needs refilling. Follow the instructions in Section 4.4.
- The rinse aid indicator light will illuminate when the rinse aid dispenser needs refilling. Follow the instructions in Section 4.4.
7 Solución de problemas
Antes de contactar co servizo de atención ao cliente, consulte a seguinte táboa para ver os problemas comúns e as súas solucións.
| Problema | Causa posible | Solución |
|---|---|---|
| O lavalouza non se pon en marcha. | Sen subministración eléctrica; Porta non pechada correctamente; Programa non seleccionado. | Check power connection and fuse; Ensure door is latched; Select a wash program and press Start. |
| Os pratos non están limpos. | Improper loading; Clogged spray arms; Insufficient detergent; Incorrect program. | Reload dishes correctly; Clean spray arm nozzles; Use adequate detergent; Select a more intensive program. |
| Auga que non drena. | Filtro atascado; mangueira de drenaxe dobrada; bomba de drenaxe atascada. | Clean the filter system; Check and straighten the drain hose; Contact service if pump is blocked. |
| White streaks on dishes. | Too much rinse aid; Water hardness setting incorrect. | Reduce rinse aid dosage; Adjust water softener setting. |
| O lavalouzas fai ruído. | Items hitting spray arms; Improper loading; Foreign object in pump. | Rearrange dishes; Check for and remove any foreign objects. |
Se o problema persiste despois de intentar estas solucións, póñase en contacto co persoal de servizo cualificado.
8. Especificacións técnicas
Key technical data for the Bomann GSP 7407 dishwasher.
| Característica | Especificación |
|---|---|
| Nome do modelo | GSP 7407 |
| Factor de forma | Autónomo |
| Dimensións (L x W x H) | 61 x 44.8 x 84.5 cm |
| Peso | 35 quilogramos |
| Voltage | 240 voltios |
| Poder | 2100 vatios |
| Consumo Enerxético Anual | 76 quilovatios-hora por cada 100 ciclos |
| Capacidade | 10 Place Settings (45 Liters) |
| Nivel de ruído | 49 decibeis |
| Tipo de visualización | LED |
| Tipo de control | Control frontal |
| Material | Aceiro inoxidable |
| Características especiais | Water softener, Delay start timer, Half load, Overflow protection, Salt indicator, Rinse aid indicator |
| Programas | 90min, Economy, Glass/delicate, Intensive, Pre-rinse, Rinse |
9. Garantía e soporte
For warranty information and customer support, please refer to the warranty card included with your product or visit the official Bomann websitio. Garda o comprobante de compra para calquera reclamación de garantía.
In case of technical issues or questions not covered in this manual, contact Bomann customer service or an authorized service center.


