Introdución
Grazas pola compraasing the Power Dynamics PV240BT 4-Zone HiFi Stereo Amplificador. Este manual proporciona información esencial para o funcionamento seguro e eficiente do seu amplifier. Please read this manual thoroughly before using the device to ensure proper setup and to maximize its performance. Keep this manual for future reference.
Instrucións de seguridade
Always observe the following safety precautions to avoid electric shock, fire, or damage to the unit.
- Non expoña a unidade á choiva nin á humidade.
- Non abras a c.asing. Non hai pezas que o usuario poida reparar no interior. Encomende calquera mantemento a persoal cualificado.
- Asegúrese de que haxa unha ventilación axeitada arredor da unidade. Non bloquee as aberturas de ventilación.
- Coloque a unidade nunha superficie estable e nivelada.
- Disconnect the power cord from the mains before cleaning or when not in use for extended periods.
- Use só a fonte de alimentación especificada.
- Keep the unit away from heat sources, direct sunlight, and excessive dust.
Contido do paquete
Ao desembalar, asegúrese de que todos os elementos enumerados a continuación estean presentes e en bo estado:
- Power Dynamics PV240BT AmpUnidade lificadora
- Manual de instrucións
- Control remoto
- Cable de alimentación
Características do produto
Power Dynamics PV240BT amplifier offers a range of features designed for versatile audio applications:
- Multi-zone HiFi stereo amplifier with 4x 100W output across four separate zones, each with independent volume control.
- Built-in Bluetooth 4.2 receiver for reliable wireless audio streaming from smartphones, tablets, or laptops.
- Integrated USB/SD MP3 player and FM radio with digital LCD display.
- Entrada AUX para conectar dispositivos de son externos.
- Dual microphone inputs with separate volume dials and echo effect, plus talkover function.
- Optical/coaxial ports, dual RCA in/out, and subwoofer output for comprehensive connectivity.
- Includes a remote control for convenient operation.
Produto rematadoview

Figura 1: Fronte view of the Power Dynamics PV240BT ampvidador, mostrarasing its controls and display.

Figura 2: The 400W amplifier features four independent zones, each with its own volume control for multiroom audio distribution.
Configuración
1 Colocación
Coloca o amplifier on a flat, stable surface with adequate ventilation. Ensure there is enough space around the unit for heat dissipation. Avoid placing it near heat sources or in direct sunlight.
2. Conexión de alimentación
Connect the supplied power cable to the AC IN socket on the rear panel of the amplifier and then to a suitable mains power outlet. Ensure the power switch on the front panel is in the OFF position before connecting.
3. Conexións de altofalantes
Connect your speakers to the corresponding speaker terminals on the rear panel. The PV240BT features four speaker output zones. Ensure correct polarity (+ to + and - to -) for each speaker. Use appropriate gauge speaker wire for optimal performance.

Figura 3: Acabadoview da amplifier's front and back panels, highlighting various input and output connections including speaker terminals.
Instrucións de funcionamento
1. Acendido/apagado
Preme o POTENCIA botón no panel frontal para activar o ampactivar ou desactivar o activador. A pantalla iluminarase cando a unidade estea acendida.
2. Selección da fonte de entrada
Usa o MODO button on the front panel or remote control to cycle through available input sources: Bluetooth, USB, SD, FM, AUX, Optical, Coaxial.
3. Control de volume
O amplifier features independent volume controls for each of the four zones (VOLUME 1-4). Adjust these knobs to set the desired output level for each connected speaker zone. The main MÚSICA VOL knob controls the overall music volume.
4. Control de ton
Axustar o Bass e TREBLE knobs to fine-tune the low and high frequencies of your audio output. The ECO knob controls the echo effect for microphone inputs.

Figura 4: Close-up of the tone control section, showing knobs for Treble, Bass, Music Volume, and Echo.
5. Transmisión por Bluetooth
Para conectarse mediante Bluetooth:
- Select "Bluetooth" as the input source using the MODO botón.
- No teu dispositivo con Bluetooth (teléfono intelixente, tableta, etc.), busca os dispositivos dispoñibles.
- Select "PV240BT" from the list to pair. Once paired, you can stream audio wirelessly.

Figura 5: O amplifier supports Bluetooth 4.2 for seamless wireless audio streaming from compatible devices.
6. USB/SD Media Player
Insira unha unidade USB ou unha tarxeta SD na ranura correspondente do panel frontal. O ampO lifer cambiará automaticamente ao modo USB/SD e comezará a reproducir audio compatible files (e.g., MP3). Use the playback controls (REPRODUCIR/PAUSA, PREV, SEGUINTE) to navigate your media.

Figura 6: The integrated media player features USB and SD card slots for direct playback of audio files.
7. Radio FM
Select "FM" as the input source. Use the PREV e SEGUINTE buttons to tune to radio stations. The digital LCD display will show the current frequency.
8. Microphone Inputs
Conecta os micrófonos ao MIC 1 or MIC 2 inputs. Adjust the individual MIC VOL knobs for each microphone. The DISCUTIR function automatically lowers the music volume when a microphone is in use.
Mantemento
Para garantir a lonxevidade e o rendemento óptimo do seu amplifer, siga estas pautas de mantemento:
- Limpeza: Desconecte a alimentación antes de limpala. Use un pano suave e seco para limpar o exterior da unidade. Non empregue produtos de limpeza líquidos nin aerosois.
- Ventilación: Comprobe regularmente que as aberturas de ventilación estean libres de po e residuos para evitar o sobrequecemento.
- Almacenamento: Se garda a unidade durante un período prolongado, desconéctea da corrente e gárdea nun lugar fresco e seco, lonxe da luz solar directa e de temperaturas extremas.
Resolución de problemas
Se tes problemas co teu amplifier, refer to the following table for common problems and their solutions:
| Problema | Causa posible | Solución |
|---|---|---|
| Sen poder | Cable de alimentación non conectado; interruptor de alimentación apagado; toma de corrente avariada. | Ensure power cable is securely connected. Turn power switch ON. Test power outlet with another device. |
| Sen saída de son | Incorrect input source selected; Volume too low; Speakers not connected or faulty; Mute function active. | Select correct input source. Increase master and zone volumes. Check speaker connections and ensure speakers are functional. Deactivate mute if applicable. |
| Bluetooth non se conecta | AmpO actualizador non está en modo Bluetooth; o dispositivo está demasiado lonxe; o dispositivo xa está conectado a outra unidade. | Garantir amplifier is in Bluetooth mode. Move device closer to amplificador. Desconectar doutros dispositivos Bluetooth. |
| Non se reproduce o USB/SD | Incorrecto file format; USB/SD card faulty or empty; Amplifier not in USB/SD mode. | Garantir files are compatible (e.g., MP3). Try another USB/SD card. Select USB/SD input mode. |
| Son distorsionado | Volume too high; Incorrect impedance speakers; Poor cable connections. | Reduce volume. Ensure speakers match amplifier impedance. Check all audio cable connections. |
Se o problema persiste despois de probar estas solucións, póñase en contacto co servizo de atención ao cliente.
Especificacións
| Característica | Detalle |
|---|---|
| Número de modelo | PV240BT |
| Potencia de saída | 4 x 100 W (400 W en total) |
| Zonas | 4 independent zones with volume control |
| Versión Bluetooth | 4.2 |
| Reproductor multimedia | USB/SD MP3 player, FM Radio |
| Entradas | AUX/RCA, Optical, Coaxial, 2x Microphone (6.3mm jack) |
| Saídas | RCA Line Out, Subwoofer Out, Speaker Terminals (4 zones) |
| Dimensións (L x W x H) | 38.5 x 30.6 x 14 cm |
| Peso | 4.6 kg |
| Fonte de alimentación | 220-240 VCA 50 Hz |
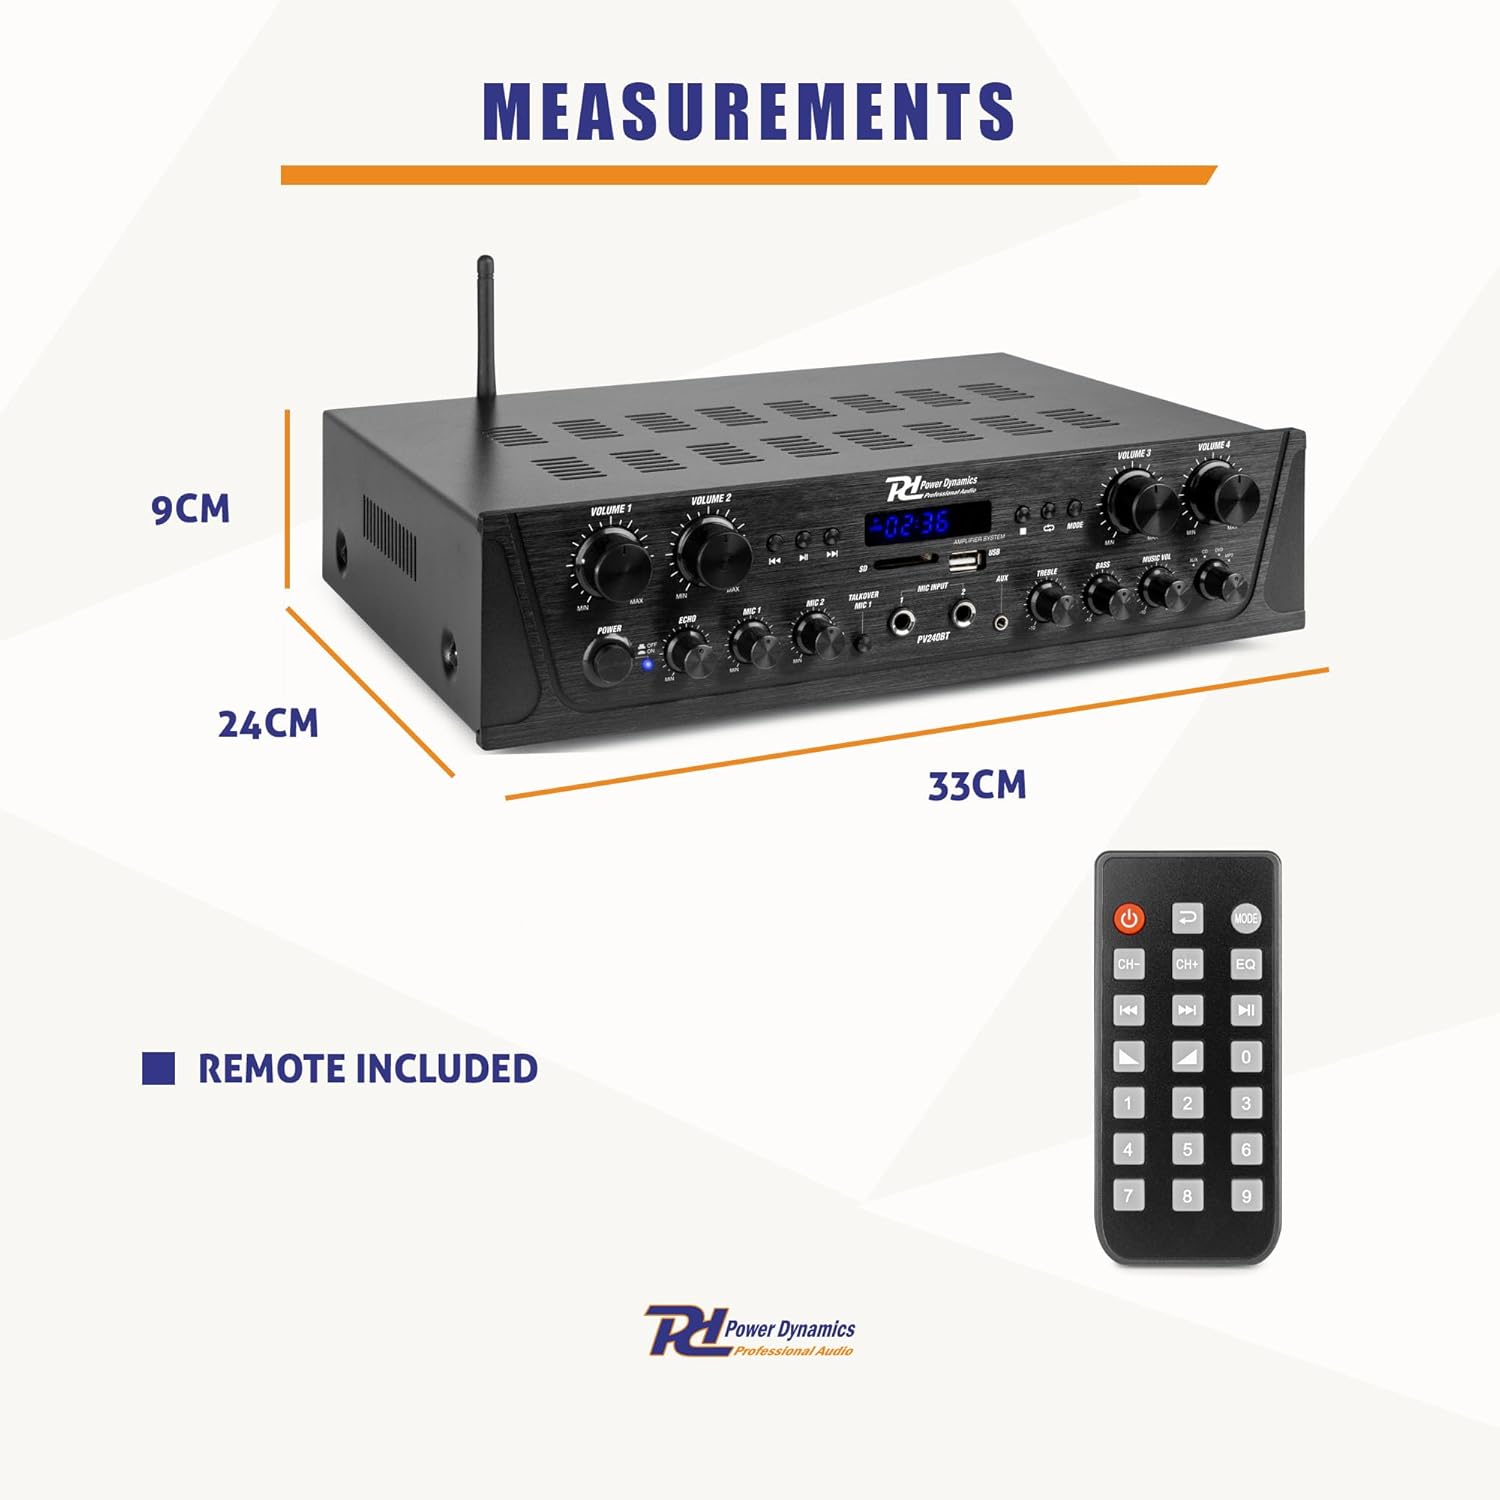
Figura 7: Physical dimensions of the amplifier and the included remote control.
Garantía e Soporte
This Power Dynamics PV240BT amplifier comes with a standard manufacturer's warranty. Please refer to the warranty card included in your package for specific terms and conditions. For technical support, service, or warranty claims, please contact your retailer or the Power Dynamics customer service department. Keep your proof of purchase for warranty validation.
For further assistance, visit the official Power Dynamics websitio web ou póñase en contacto cos seus canais de asistencia.


