1. Introdución
This manual provides instructions for the installation, operation, and maintenance of the Grandstream GRP2604 IP Phone. The GRP2604 is a 3-line, 6-SIP account IP phone designed for ease of use and advanced functionality, featuring a 2.7-inch LCD display and dual-port Gigabit Ethernet.
2. Información de seguridade
- Use only the power adapter supplied with the phone.
- Non expoña o dispositivo á auga nin á humidade.
- Evite colocar o teléfono preto de fontes de calor ou da luz solar directa.
- Non intente abrir nin reparar o dispositivo vostede mesmo. Encargue calquera mantemento a persoal cualificado.
- Asegúrate de que haxa unha ventilación axeitada arredor do teléfono.
3. Contido do paquete
Verifique que o seu paquete conteña os seguintes elementos:
- GRP2604 IP Phone Unit
- Auricular con cable
- Soporte para teléfono
- Cable Ethernet
- Adaptador de alimentación
- Quick Installation Guide (this manual serves as the full guide)
4. Produto rematadoview
4.1. Disposición do teléfono

Figura 4.1: Fronte view of the Grandstream GRP2604 IP Phone. This image displays the phone's main body, handset, 2.7-inch LCD display, numeric keypad, function keys, and programmable line keys.
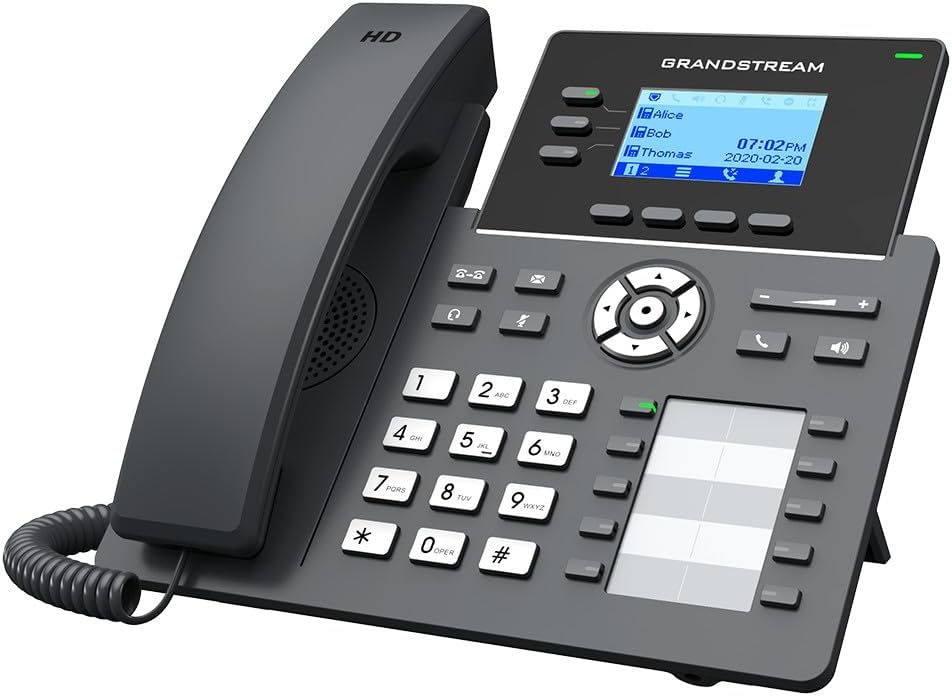
Figura 4.2: En ángulo view of the Grandstream GRP2604 IP Phone. This perspective highlights the ergonomic design of the handset and the slight tilt of the main unit, providing a clearer view of the display and keypad.

Figura 4.3: Lado view of the Grandstream GRP2604 IP Phone with its stand attached. This image illustrates how the phone is positioned for desktop use, showing the angle provided by the stand.
4.2. Panel traseiro e portos

Figura 4.4: Traseira view of the Grandstream GRP2604 IP Phone, showing the various ports and connections. From left to right, these include the handset port, headset port, two Gigabit Ethernet ports (LAN and PC), and the DC 5V power input.
The rear panel of the GRP2604 features essential connection ports:
- Porto do teléfono: Conecta o cable en espiral do auricular.
- Porto dos auriculares: For connecting a wired headset.
- PC Port (LAN Out): Connects to a computer or other network device.
- LAN Port (Network In): Connects to your network switch or router.
- Entrada de alimentación DC 5 V: Conecta o adaptador de alimentación.
5. Configuración
- Fixar o soporte do teléfono: Align the stand with the slots on the back of the phone and slide it into place until it clicks securely.
- Conecta o teléfono: Plug one end of the coiled handset cord into the handset and the other end into the handset port on the rear of the phone.
- Conectarse á rede:
- Connect one end of the Ethernet cable to the LAN port on the phone.
- Conecte o outro extremo do cable Ethernet a un conmutador ou enrutador de rede.
- If connecting a computer, use another Ethernet cable to connect the PC port on the phone to your computer.
- Conectar enerxía: Plug the DC 5V power adapter into the power input port on the phone, then plug the adapter into a power outlet. The phone will automatically power on and begin the boot-up sequence.
- Configuración inicial: Once the phone boots up, it will attempt to obtain an IP address via DHCP. You may need to access the phone's web interface for further SIP account configuration, as instructed by your VoIP service provider or network administrator.
6. Instrucións de funcionamento
6.1. Facer chamadas
- Marcación con descolgado: Colla o teléfono ou prema o botón Altavoz button. Dial the number and press the Marque soft key or wait a few seconds.
- Marcación con descolgado: Dial the number first, then pick up the handset or press the Altavoz botón.
- Usando as teclas de liña: Press an available line key, dial the number, and press the Marque tecla de función.
6.2. Recepción de chamadas
- Answer with Handset: Colle o auricular.
- Answer with Speakerphone: Preme o Altavoz botón.
- Answer with Headset: Preme o Auriculares button (if a headset is connected).
6.3. Funcións de chamada
- Manter: Durante unha chamada activa, prema o botón Manteña button. Press it again to resume the call.
- Transferencia: Durante unha chamada activa, prema o botón Transferencia button. Dial the transfer destination number and press the Transferencia soft key again (attended transfer) or hang up (blind transfer).
- Conferencia: Durante unha chamada activa, prema o botón Conferencia button. Dial the second party's number and press the Conferencia soft key to join all parties. The GRP2604 supports 5-way voice conferencing.
- Correo de voz: Preme o Mensaxe button to access your voicemail.
6.4. Axuste do volume
Usa o Volume +/- buttons located on the phone to adjust the ringer volume when idle, or the handset/speaker/headset volume during a call.
7. Mantemento
- Limpeza: Use a soft, dry cloth to clean the phone's surface. Do not use liquid cleaners or aerosol sprays.
- Almacenamento: If storing the phone for an extended period, disconnect it from power and network, and store it in a cool, dry place.
- Actualizacións de firmware: Revise regularmente o Grandstream websitio para actualizacións de firmware para garantir un rendemento e unha seguridade óptimos.
8 Solución de problemas
| Problema | Posible Solución |
|---|---|
| O teléfono non se acende. |
|
| Sen ton de marcación. |
|
| Non se poden facer nin recibir chamadas. |
|
| A pantalla está en branco ou conxelada. |
|
9. Especificacións
- Modelo: GRP2604
- Liñas: 3
- Contas SIP: 6
- Visualización: 2.7-inch (132x48) LCD
- Portos Ethernet: Ethernet Gigabit de dobre porto
- Voice Conferencing: 5 vías
- Dimensións (L x W x H): 3.94 x 3.94 x 3.94 polgadas
- Peso do artigo: 1.1 libras (500 gramos)
- Material: Plástico
- Fonte de enerxía: Eléctrico con cable (CC 5 V)
- Cor: Negro
10. Garantía e soporte
The Grandstream GRP2604 IP Phone comes with a manufacturer's warranty. For detailed warranty information, please refer to the warranty card included with your product or visit the official Grandstream website. For technical support, product inquiries, or service, please contact Grandstream customer support through their official channels.
Grandstream Networks Inc.
www.grandstream.com


