1. Introdución
Welcome to the user manual for your new LTC NB681 Nimbleback Wired 65% Mechanical Keyboard. This guide provides detailed instructions on setting up, operating, maintaining, and troubleshooting your keyboard to ensure optimal performance and longevity. Please read this manual thoroughly before using the product.

Figure 1: LTC NB681 Nimbleback Wired 65% Mechanical Keyboard
Video 1: LTC NB681 65% Hot Swappable Keyboard OverviewEste vídeo ofrece unha visión xeralview of the keyboard's features and design.
Video 2: LTC Nimbleback NB681 Keyboard. This video showcases the keyboard's aesthetics and some functionalities.
2. Características clave
The LTC NB681 Nimbleback Keyboard is designed with a range of features to enhance your typing and gaming experience:
- Compact but Practical 65% Layout: Ultra-compact design with 68 keys, balancing functionality with space-saving. Includes practical arrow, navigation, and control keys.
- Interruptores intercambiables en quente: Features a hot-swap PCB, allowing free replacement of 3-pin/5-pin MX-style switches (e.g., Gateron, Kailh). Equipped with quiet linear red switches for nimble reactions and quiet typing.
- 2 USB 2.0 Ports and Type-C Wired Connection: Two built-in USB passthrough ports for connecting peripheral devices like a mouse or flash drive, or for charging mobile devices. The Type-C wired connection ensures high-speed and stable data transmission.
- Retroiluminación RGB dinámica: Offers 18 preset backlight modes with 5 adjustable brightness and flowing speed levels, providing gorgeous color schemes and reactive effects.
- Professional Software Support: Customize keypress combinations, assign macros, and personalize RGB lighting effects using the powerful LTC drive software. Compatible with Windows 7/8/10, iOS, and Mac systems.
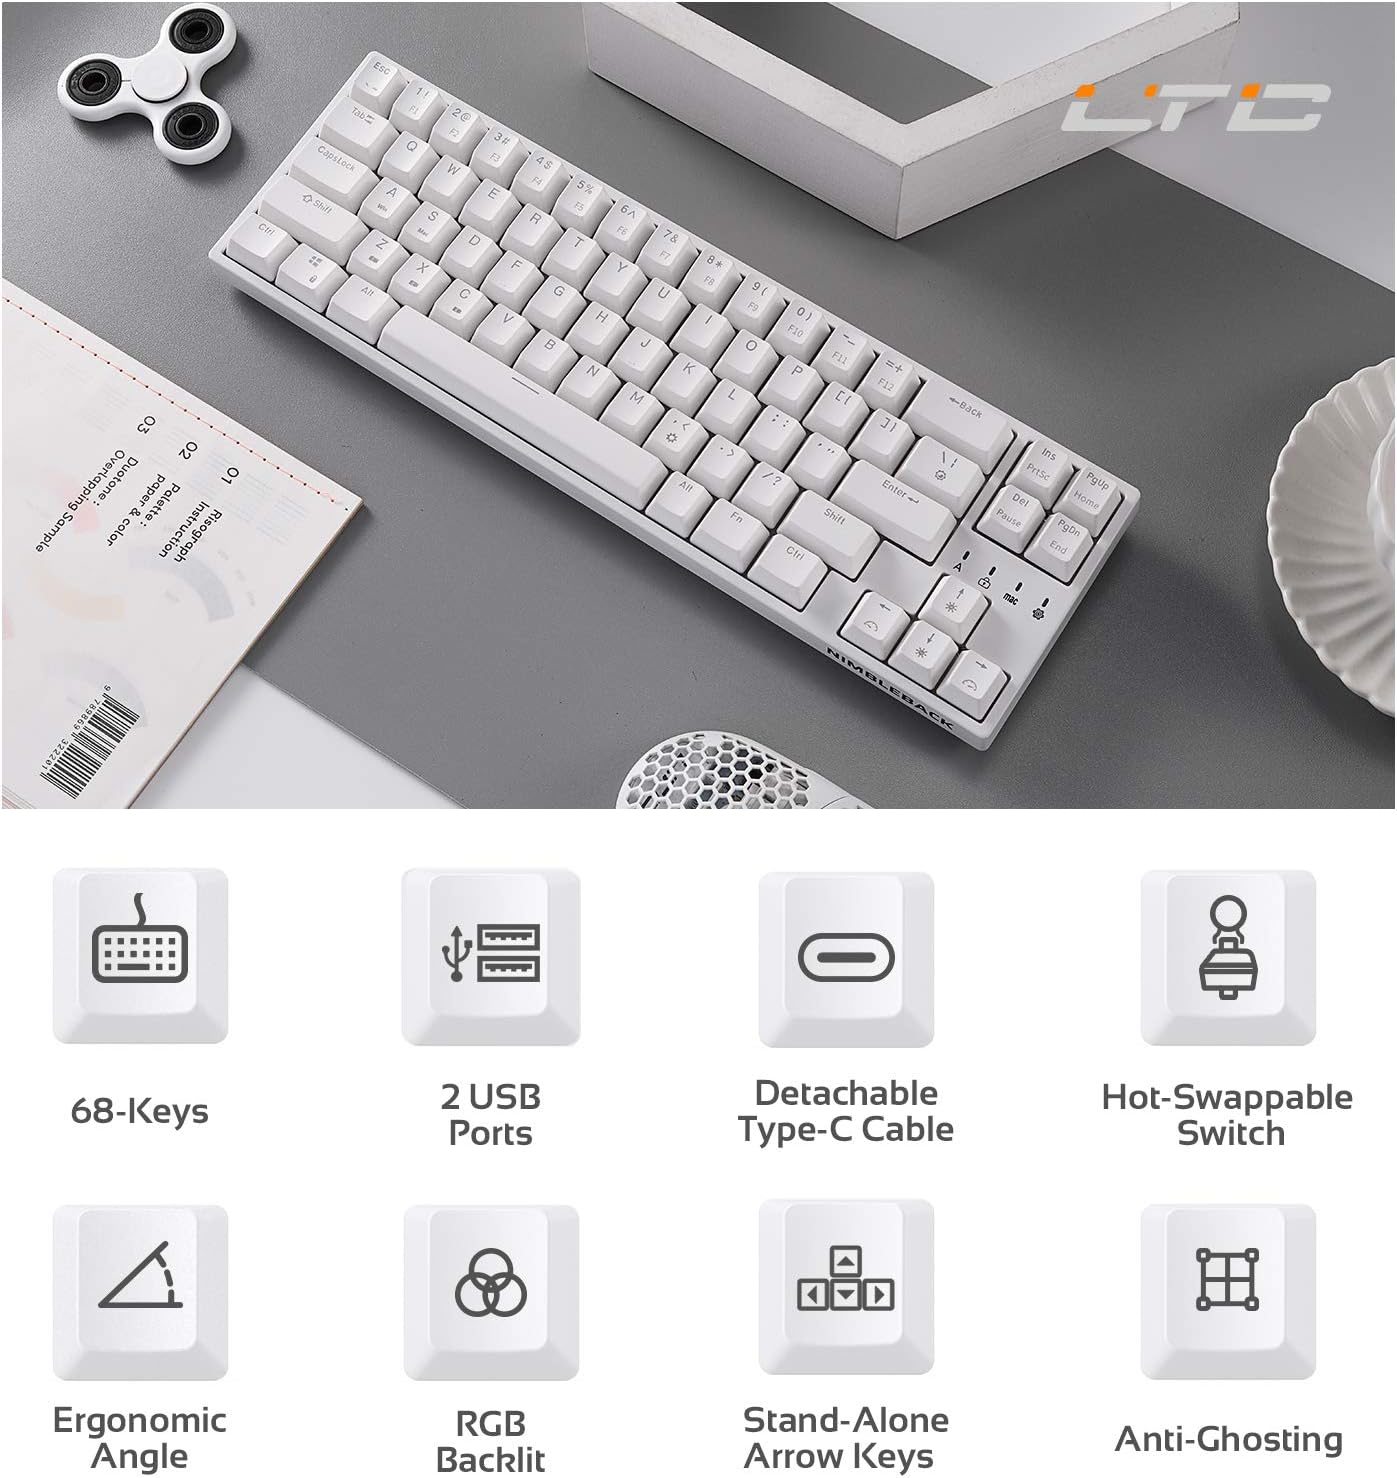
Figure 2: Visual representation of key features including 68-keys, 2 USB ports, detachable Type-C cable, hot-swappable switch, ergonomic angle, RGB backlit, stand-alone arrow keys, and anti-ghosting.
3. Configuración
Follow these steps to set up your LTC NB681 keyboard:
- Desembalaxe: Carefully remove the keyboard and all accessories from the packaging. Ensure you have the keyboard, USB-C cable, and any included tools (e.g., keycap puller, switch puller).
- Conecta o cable USB-C: Plug the USB-C end of the provided cable into the Type-C port on the keyboard. Connect the other end (USB-A) to an available USB port on your computer.
- Recoñecemento inicial: O teu ordenador debería detectar e instalar automaticamente os controladores necesarios. Isto pode tardar uns intres.
- Posicionamento: Place the keyboard on a stable, flat surface. You can adjust the typing angle using the foldable feet on the underside of the keyboard for ergonomic comfort.
- Instalación do software (opcional pero recomendada): For advanced customization, download the LTC drive software from the official LTC website. Install it on your Windows or Mac system to remap keys, assign macros, and customize RGB lighting.
Video 3: LTC NB681 Keyboard Unboxing! This video demonstrates the unboxing process and shows the included accessories.

Figure 3: Close-up of the keyboard's 2 built-in USB 2.0 passthrough ports and the detachable Type-C wired connection port.
4. Uso do teclado
4.1 Funcións básicas
- Escritura estándar: The keyboard functions as a standard QWERTY keyboard.
- Arrow, Navigation, and Control Keys: Despite its compact size, the NB681 includes dedicated arrow keys and essential navigation/control keys for convenience.
Control de retroiluminación RGB 4.2
The NB681 features dynamic RGB backlighting with multiple customization options:
- Cambio de modos: Preme Fn + \| (pipe key) to cycle through 18 preset backlight modes.
- Axuste do brillo: Use Fn + Frecha cara arriba para aumentar o brillo e Fn + frecha cara abaixo para diminuír o brillo (5 niveis).
- Velocidade de axuste: Use Fn + Frecha esquerda to decrease flowing speed and Fn + Frecha dereita to increase flowing speed (5 levels).

Figura 4: A presentación do tecladoasing its dynamic 16.8 million RGB backlight with 19 modes and 5 brightness/speed levels.
4.3 Interruptores intercambiables en quente
The hot-swappable design allows you to easily change switches without soldering:
- Eliminar a tapa das teclas: Usa o extractor de teclas incluído para retirar con coidado a tecla desexada.
- Eliminar interruptor: Usa o extractor de interruptores incluído para agarrar con coidado o interruptor e tirar del cara arriba.
- Inserir novo interruptor: Align the pins of the new 3-pin or 5-pin MX-style switch with the holes on the PCB. Press firmly until it clicks into place.
- Substituír a tapa das teclas: Volva colocar a tapa da tecla no novo interruptor.

Figure 5: Close-up demonstrating the hot-swappable switch feature, allowing easy replacement of 3-pin or 5-pin mechanical switches.
Video 4: LTC NB681 Red Switch Keyboard Sound Test. This video provides an audio demonstration of the keyboard's red switches.
4.4 Professional Software Customization
The dedicated software allows for in-depth customization:
- Reasignación de claves: Change the function of any key to suit your preferences.
- Asignación de macros: Create and assign complex macros for gaming or productivity tasks.
- Personalización da iluminación RGB: Design your own lighting effects, colors, and patterns beyond the preset modes.

Figure 6: Screenshot showing the professional software interface for customizing RGB backlight, remapping keys, and assigning macros.
5. Mantemento
Un mantemento axeitado garante a lonxevidade e o rendemento do teu teclado:
- Limpeza regular: Use a soft brush or compressed air to remove dust and debris from between the keycaps. For deeper cleaning, remove keycaps and wipe the surface with a slightly damp cloth. Ensure the keyboard is disconnected before cleaning.
- Coidado do interruptor: The hot-swappable design makes switch replacement easy if a switch becomes faulty or if you wish to try different switch types. Avoid excessive force when inserting or removing switches to prevent damage to the PCB sockets.
- Xestión de cables Keep the USB-C cable untangled and avoid sharp bends to prevent internal wire damage.
6 Solución de problemas
If you encounter issues with your LTC NB681 keyboard, try the following steps:
- O teclado non responde:
- Asegúrate de que o cable USB-C estea conectado correctamente tanto ao teclado como ao ordenador.
- Tenta conectar o teclado a un porto USB diferente do teu ordenador.
- Proba o teclado noutro ordenador para determinar se o problema é do teclado ou do ordenador orixinal.
- Luces RGB non funcionan/incorrectas:
- Comprobe os axustes de brillo usando Fn + Frecha arriba/abaixo.
- Cambia por diferentes modos de iluminación usando Fn + \|.
- If using the software, ensure the lighting profiles are correctly applied and the software is up to date.
- Keys Not Registering/Double Typing:
- This could indicate a faulty switch. Use the switch puller to remove the problematic switch and replace it with a spare or a known good switch.
- Asegúrate de que o interruptor estea completamente asentado na súa toma.
- O software non recoñece o teclado:
- Ensure the keyboard is connected directly to the computer (avoiding USB hubs if possible).
- Reinicie o computador e o software.
- Reinstall the LTC drive software.
If these steps do not resolve the issue, please contact LTC customer support for further assistance.
7. Especificacións
| Característica | Descrición |
|---|---|
| Número de modelo | NB681 |
| Maquetación | 65% (68 teclas) |
| Conectividade | USB Type-C Wired |
| Interruptores | Hot-Swappable (3-pin/5-pin MX-style compatible) |
| Retroiluminación | RGB (18 preset modes, 5 brightness/speed levels) |
| Passthrough USB | 2 x portos USB 2.0 |
| Compatibilidade | Windows 7/8/10, iOS, Mac |
| Peso do elemento | 2 libras |
| Dimensións | 14.96 x 6.14 x 1.92 polgadas |
| Fabricante | LTC |
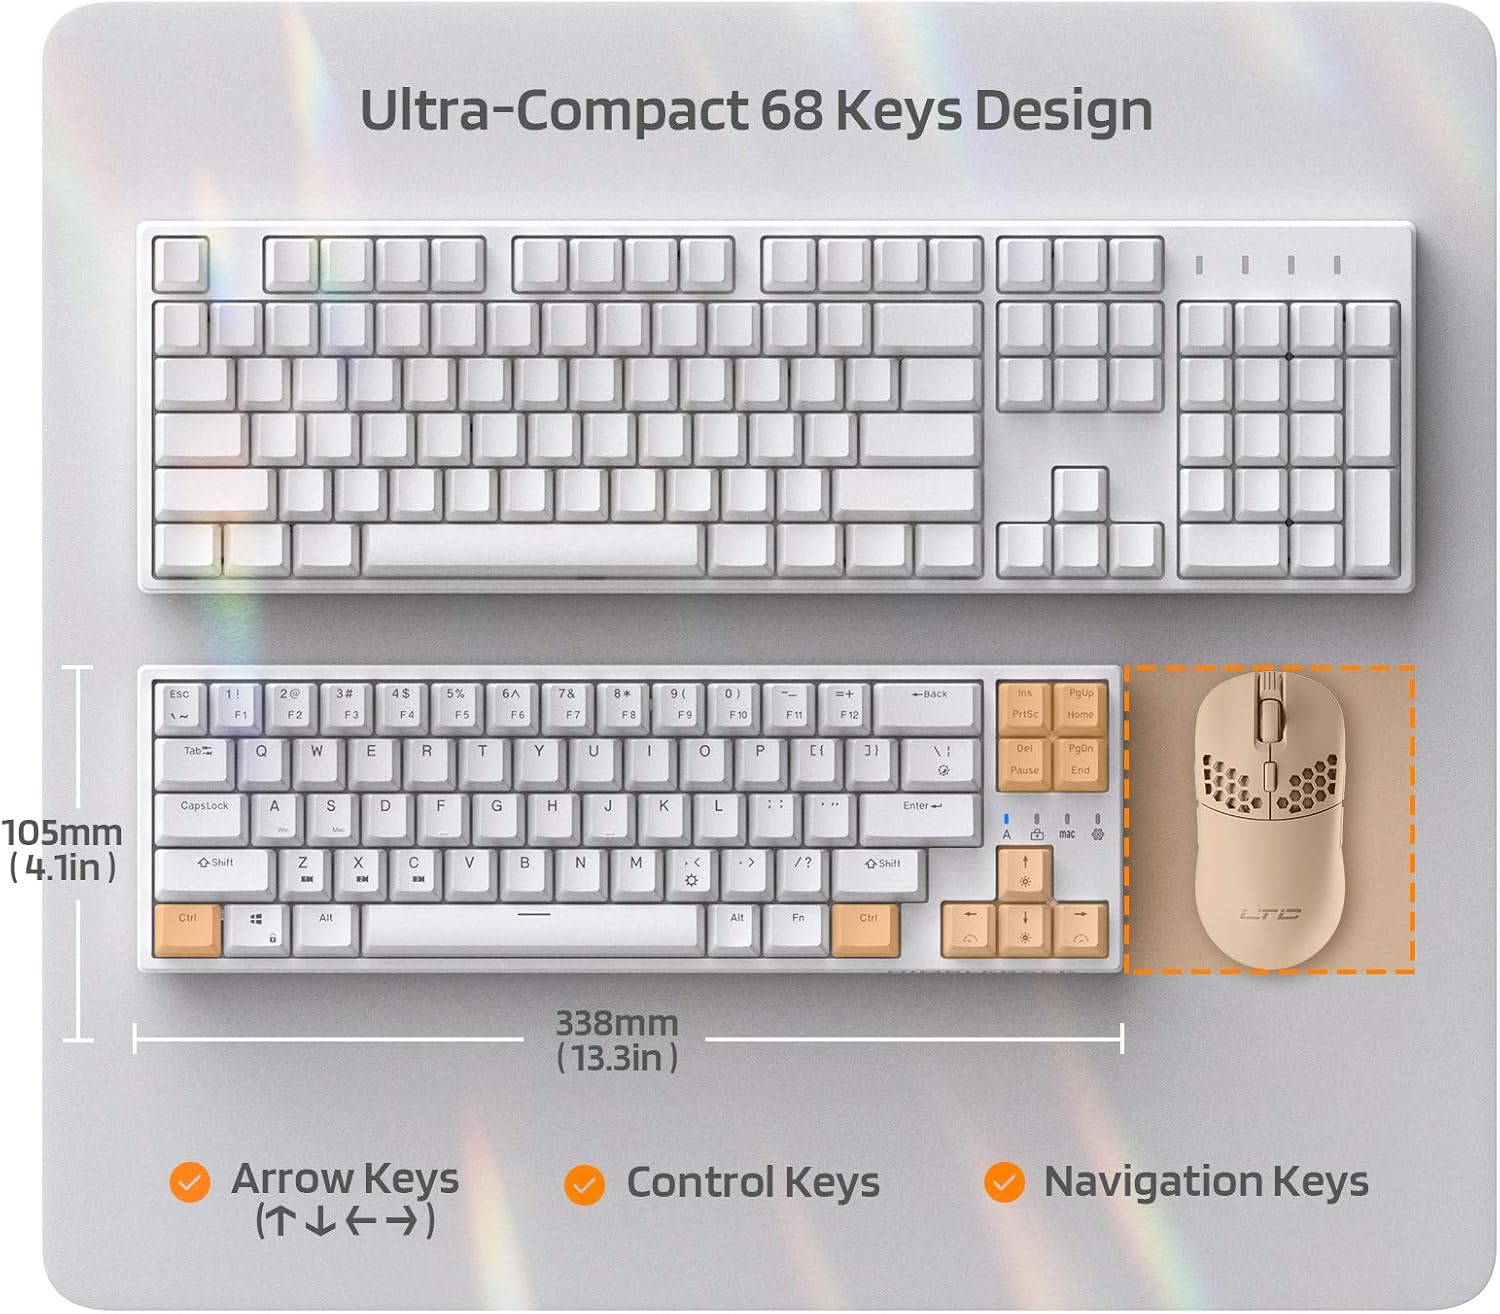
Figure 7: Comparison of the ultra-compact 68-key design with a full-size keyboard, highlighting its space-saving benefits.

Figure 8: Illustration of the ergonomic design with foldable feet for 10-degree and 5-degree typing angles, and anti-slip pads.
8. Garantía e soporte
For detailed warranty information and customer support, please refer to the official LTC websitio web ou a documentación da súa compra.
You can also find additional resources and a downloadable PDF user manual here: Manual de usuario oficial (PDF)
For more products and support, visit the LTC Store on Amazon.


