1. Introdución
This manual provides detailed instructions for the assembly, operation, and maintenance of your MUSETEX G05MN6-HW ATX Mid-Tower PC Gaming Case. Designed for optimal airflow and aesthetic appeal, this case features pre-installed ARGB fans, tempered glass panels, and efficient cable management solutions. Please read this manual thoroughly before beginning installation to ensure proper setup and safe operation.
2. Características clave
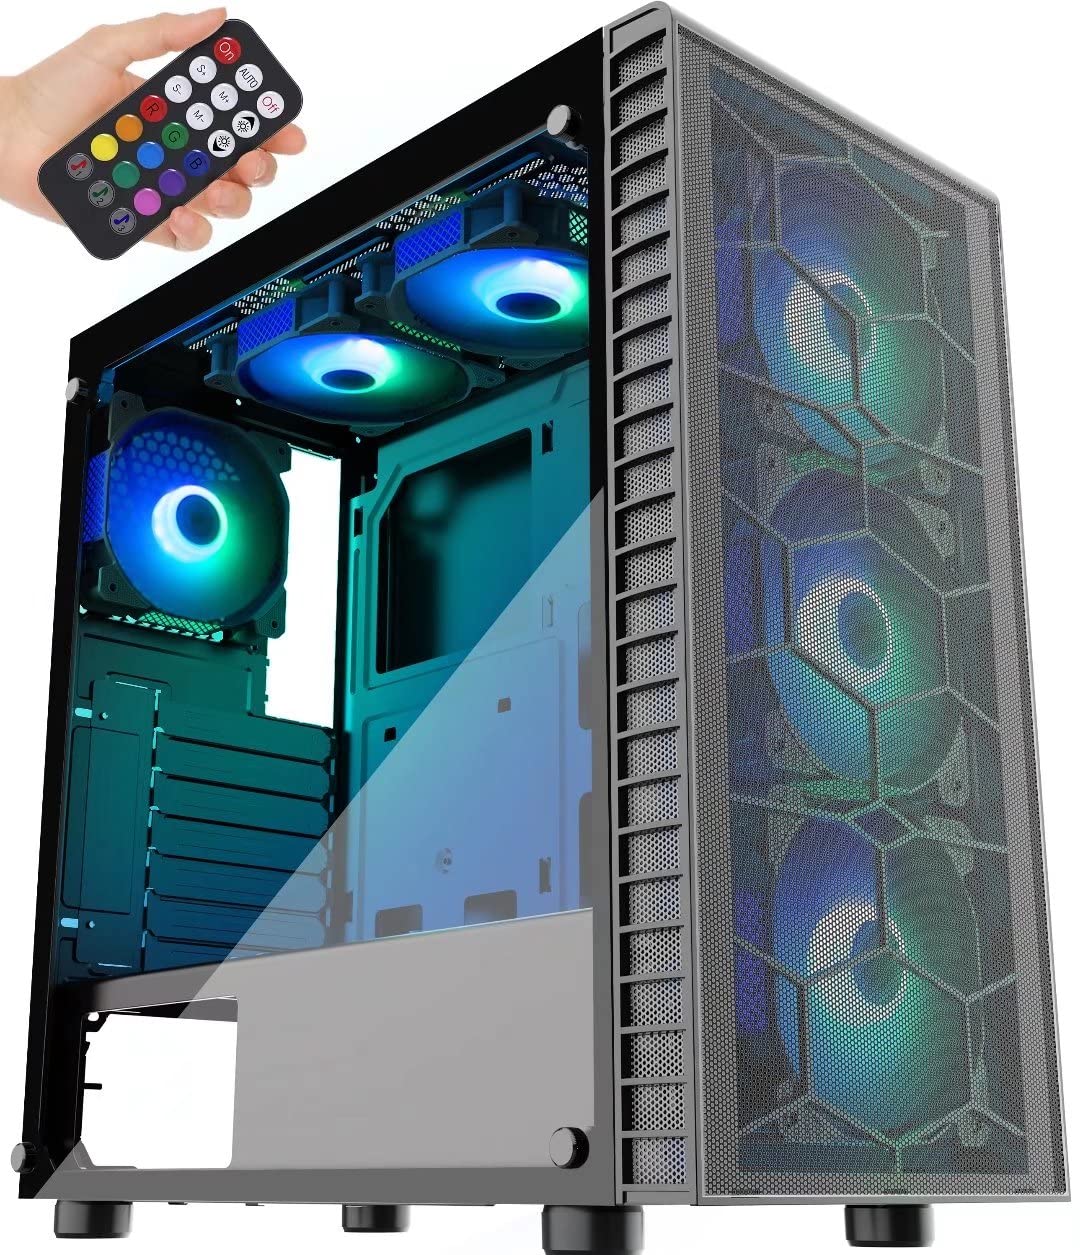
- Outstanding Airflow: Equipped with a large front panel metal mesh and 6 pre-installed 120mm ARGB fans to ensure efficient cooling and lighting.
- Multiple ARGB Modes: Features button control with 19 lighting modes. Supports motherboard control via a 5V 3-PIN header for expanded ARGB fan modes. Note: 12V 4-PIN motherboards are not compatible with motherboard control mode; use button control only.
- Interior amplo: Two 4mm-thick tempered glass full-view side panels. Supports ATX, Micro ATX, and ITX motherboards. Accommodates 120mm water cooling, GPUs up to 380mm, CPU air coolers up to 160mm, and PSUs up to 245mm (with removable hard disk holders).
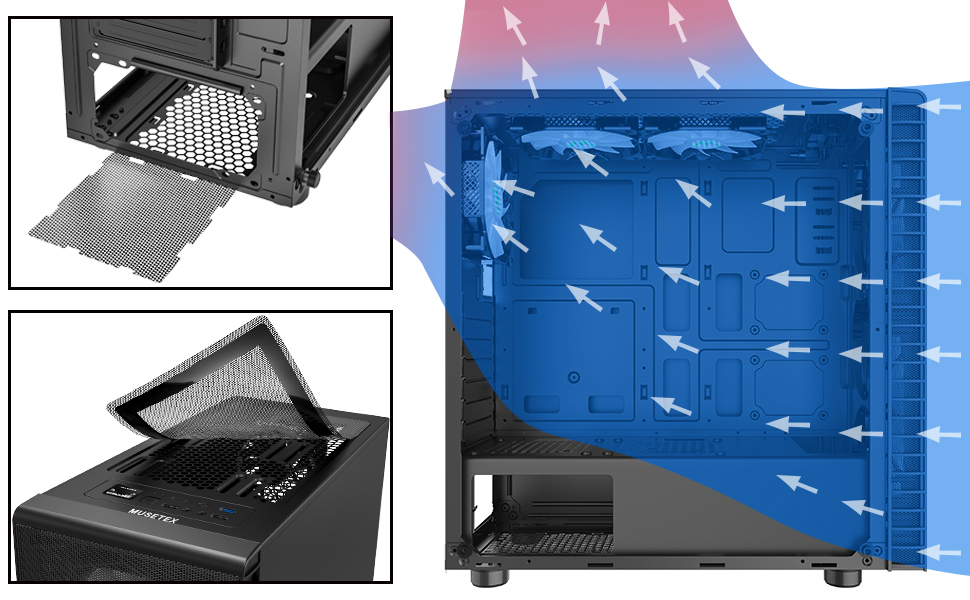
- Deseño a proba de po: Includes two dust filters; a top magnetic strip dust filter and a bottom PSU dust filter for easy installation and cleaning.
- Convenient Top I/O Panel: Features 1 x USB 3.0 Port, 2 x USB 2.0 Ports, 1 x HD Audio jack, LED Button, and Power/Reset buttons. The USB cable is shielded for interference-free data transmission.

3. Contido do paquete
Please verify that all components are present and undamaged upon opening the package. If any items are missing or damaged, contact MUSETEX customer support.
- MUSETEX G05MN6-HW ATX Mid-Tower PC Gaming Case
- 6 x 120mm ARGB Fans (pre-installed)
- 2 x Tempered Glass Side Panels (pre-installed)
- 1 x Remote Control for ARGB Lighting
- 1 x Accessory Box (containing screws, cable ties, and other small parts)
- 1 x Manual de usuario (este documento)

4. Configuración e instalación
Before starting, ensure you have a clean, static-free workspace. Refer to your component manuals for specific installation instructions.
4.1 Preparación do caso
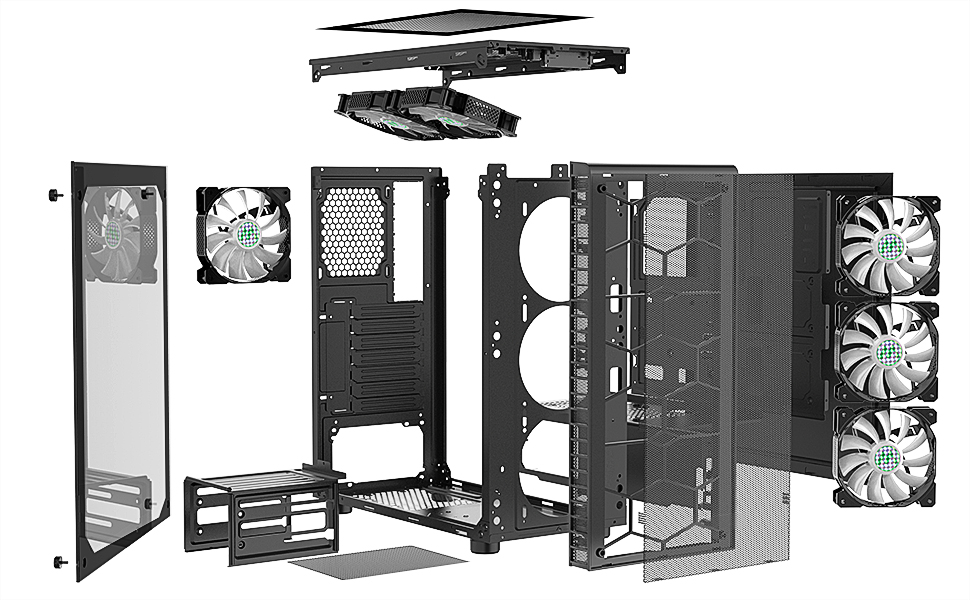
- Carefully remove the tempered glass side panels by unscrewing the thumb screws. Place them on a soft, flat surface to prevent scratches or damage.
- Identify the accessory box inside the case, which contains all necessary screws and mounting hardware.
4.2 Instalación da placa base
- Instala a protección de E/S (se non está preinstalada na placa base) na abertura traseira da caixa.
- Align your ATX, Micro ATX, or ITX motherboard with the standoffs inside the case. Ensure all standoffs match the screw holes on your motherboard.
- Fixe a placa base cos parafusos axeitados da caixa de accesorios.
4.3 Instalación da Unidade de Alimentación (PSU).
- Deslice a fonte de alimentación no compartimento correspondente na parte inferior traseira da caixa.
- Fixe a fonte de alimentación con parafusos na parte traseira da caixa.
- Route PSU cables through the cable management cutouts to the motherboard and other components.
4.4 Storage Drive Installation (SSDs/HDDs)
- SSD de 2.5 polgadas: Mount SSDs to the dedicated SSD trays or mounting points as shown in Figure 4.
- Discos duros de 3.5 polgadas: Install HDDs into the removable hard disk holders located in the PSU shroud area. These holders can be removed to accommodate longer PSUs.
4.5 Instalación da tarxeta gráfica (GPU)
- Remove the necessary expansion slot covers at the rear of the case.
- Insira a GPU na ranura PCIe axeitada da placa base.
- Secure the GPU with screws. The case supports GPUs up to 380mm in length.
4.6 Connecting Front Panel I/O and ARGB Fans
- Conecta os cables do panel frontal (software de alimentación, software de reinicio, LED do disco duro, LED de alimentación) aos pines correspondentes da túa placa base. Consulta o manual da túa placa base para ver a disposición dos pines.
- Conecte o cable USB 3.0 á cabeceira USB 3.0 da placa base.
- Connect the USB 2.0 cables to the USB 2.0 headers on your motherboard.
- Connect the HD Audio cable to the audio header on your motherboard.
- The pre-installed ARGB fans are connected to a central controller. For motherboard ARGB control, connect the controller's 5V 3-PIN ARGB cable to your motherboard's 5V 3-PIN ARGB header. Do not connect to a 12V 4-PIN RGB header, as this can damage the fans.


4.7 Xestión de cables
Utiliza os recortes para o paso de cables e os puntos de suxeición que hai detrás da bandexa da placa base para organizar os cables. Isto mellora a circulación do aire e a estética.

5. Funcionamento
5.1 Acendido
After all components are securely installed and cables connected, replace the side panels. Connect your power cable to the PSU and press the power button on the top I/O panel to start your system.
5.2 Control do ventilador ARGB
- Control de botón: Use the dedicated LED button on the top I/O panel to cycle through 19 pre-set ARGB lighting modes.
- Motherboard Control: If the ARGB controller is connected to a 5V 3-PIN ARGB header on your motherboard, you can use your motherboard's RGB software (e.g., ASUS Aura Sync, MSI Mystic Light Sync, Gigabyte RGB Fusion) to customize fan lighting. This offers a wider range of lighting effects.
- Control remoto: The included remote control provides additional options for changing lighting modes, colors, and fan speed.
6. Mantemento
Un mantemento regular axuda a garantir un rendemento óptimo e unha maior duración dos compoñentes do teu PC.
- Limpeza do filtro de po: The case is equipped with a top magnetic dust filter and a bottom PSU dust filter. Regularly remove and clean these filters to prevent dust buildup inside the case, which can hinder airflow and component cooling.
- Limpeza de interiores: Periodically open the side panels and use compressed air to remove dust from internal components and fans. Ensure the system is powered off and unplugged before cleaning.
- Coidados do vidro temperado: Clean tempered glass panels with a soft, lint-free cloth and a mild glass cleaner. Avoid abrasive materials that could scratch the surface.
7 Solución de problemas
Esta sección aborda problemas comúns cos que podes atoparte.
- Q: Fans are not lighting up or spinning.
- A: Check all fan power connections to the ARGB controller and ensure the controller is receiving power from the PSU. If using motherboard control, verify the 5V 3-PIN ARGB cable is correctly connected and your motherboard's RGB software is configured.
- Q: Front panel USB ports are not working.
- A: Ensure the USB 3.0 and USB 2.0 cables from the front panel are securely connected to the correct headers on your motherboard.
- Q: Audio jacks on the front panel are not working.
- A: Verify that the HD Audio cable from the front panel is correctly connected to the audio header on your motherboard.
- Q: System does not power on.
- A: Check that the PSU is switched on and properly connected to the wall outlet. Ensure the power button cable from the front panel is correctly connected to the motherboard's power switch pins. Verify all internal power connections (24-pin ATX, CPU, GPU, etc.) are secure.
- Q: ARGB lighting is not syncing with my motherboard.
- A: Confirm that your motherboard has a 5V 3-PIN ARGB header and that the controller is connected to it. This case is not compatible with 12V 4-PIN RGB headers for motherboard control. If connected correctly, ensure your motherboard's RGB software is installed and updated.
8. Especificacións
| Característica | Detalle |
|---|---|
| Nome do modelo | G05MN6-HW |
| Tipo de caso | Torre media |
| Compatibilidade da placa base | ATX, MicroATX, ITX |
| Dimensións (LxWxH) | 17.7 x 17.6 x 8.3 polgadas (449.58 x 447.04 x 210.82 mm) |
| Peso do elemento | 16.02 libras (7.27 kg) |
| Material | Acrylonitrile Butadiene Styrene (ABS), Metal, Tempered Glass |
| Ventiladores preinstalados | 6 ventiladores ARGB de 120 mm |
| Método de arrefriamento | Aire |
| Lonxitude máxima da GPU | 380 mm |
| Altura máxima do refrigerador da CPU | 160 mm |
| Lonxitude máxima da PSU | 245mm (with HDD cage removed) |
| Ranuras de expansión | 7 |
| Portos de E / S dianteiros | 1 x USB 3.0, 2 x USB 2.0, 1 x HD Audio, LED Button, Power/Reset |

9. Garantía e soporte
MUSETEX products are designed and manufactured to the highest quality standards. For specific warranty information regarding your G05MN6-HW PC case, please refer to the warranty card included with your purchase or visit the official MUSETEX websitio.
If you encounter any issues or have questions not covered in this manual, please contact MUSETEX customer support through their official website or the retailer where you purchased the product. Please have your model number (G05MN6-HW) and proof of purchase ready when contacting support.
Recursos en liña: For additional support, FAQs, and driver downloads (if applicable), please visit the MUSETEX official websitio: MUSETEX Store on Amazon


