Introdución
This manual provides detailed instructions for the installation, operation, and maintenance of your Weiser Amador x Casey Matte Black Front Door Lock and Handleset. This handleset is designed for exterior doors, offering both keyed entry and enhanced security. It features a modern design and includes a matching deadbolt with a 1-inch throw. The locking mechanism operates with a key from the outside and a turn piece or key from the inside.

Imaxe: Máis deview of the Weiser Amador x Casey Matte Black Front Door Lock and Handleset, showcasing its modern design and matte black finish.
Que está incluído
Carefully unpack your Weiser Amador x Casey Handleset and verify that all components are present:
- Exterior Door Handle Assembly
- Conxunto de palanca interior
- Deadbolt Assembly
- Pestillos e golpes
- Fasteners and Accessories (screws, pins)
- 2 chaves
- Ferramenta SmartKey
- Manual de instrucións

Image: A detailed layout of all components included with the Weiser Amador x Casey Handleset, including the exterior handle, interior lever, deadbolt, keys, and installation hardware.
Configuración e instalación
The Weiser Amador x Casey Handleset is designed for easy installation, typically requiring only a screwdriver. It features an adjustable latch to accommodate standard door preparations and a reversible design for both right-handed and left-handed doors.
Pasos clave da instalación:
- Prepara a porta: Ensure your door is properly prepped for a handleset installation.
- Install the Adjustable Latch: Screw the adjustable latch into the door edge.
- Position the Handleset: Place the exterior handleset and interior lever onto the door. The design includes vertical screw holes to prevent interference with the handle during securing, and anti-drop tabs to hold the lever in place.
- Asegurar con parafusos: Fasten the handleset components securely with the provided screws.
- Instalar a placa de peche: Screw the strike plate into the door frame.

Image: A visual guide illustrating the easy 3-step installation process for the handleset, highlighting the adjustable latch, lever placement, and strike plate installation.

Image: Diagram showing the reversible design of the handleset, indicating its compatibility with both left-handed and right-handed doors.

Imaxe: Lateral view of the handleset components being installed on a door, showing the alignment of the deadbolt and handle mechanisms.
Instrucións de funcionamento
The Weiser Amador x Casey Handleset provides secure entry and exit for your home.
Bloqueo e desbloqueo:
- Desde o exterior: Use the provided key to lock or unlock the deadbolt.
- Desde o interior: Use the turn piece on the interior side of the deadbolt to lock or unlock. The interior lever operates independently for easy exit.
Tecnoloxía SmartKey:
Your handleset is equipped with Weiser's SmartKey Technology, which allows you to re-key the lock yourself in seconds. This feature provides enhanced security against advanced break-in techniques and offers convenience in various situations, such as:
- When you move into a new home.
- If you lose your keys.
- To consolidate multiple Weiser locks to a single key.
To re-key your lock, insert your functioning key, turn it 90 degrees clockwise, insert the SmartKey tool into the small hole on the cylinder, remove the old key, insert the new key, and turn it 90 degrees counter-clockwise.
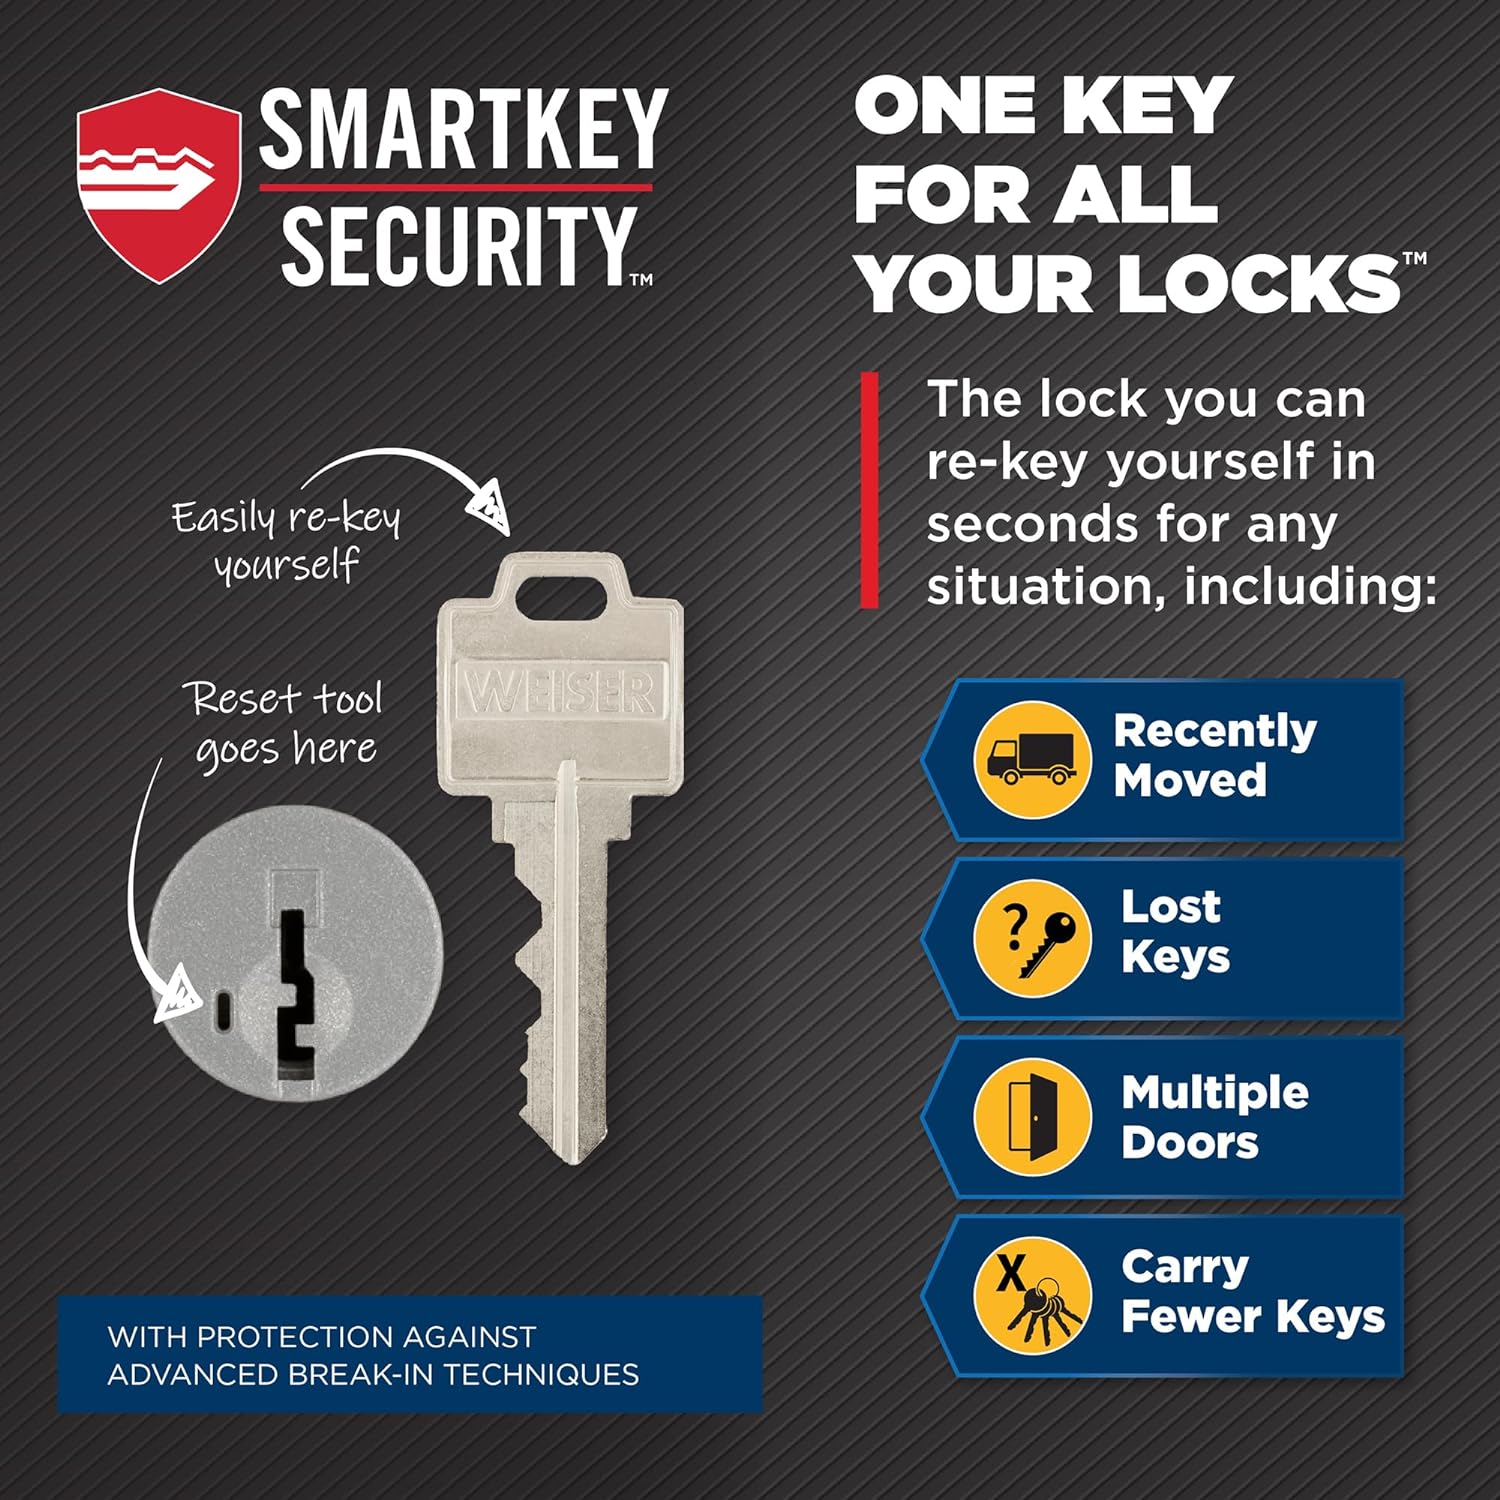
Image: Illustration detailing the SmartKey Security feature, showing how to use the reset tool to re-key the lock with a new key.
Mantemento
To ensure the longevity and smooth operation of your Weiser handleset, follow these maintenance guidelines:
- Limpeza: Limpar as superficies exteriores cun pano suave eamp cloth. Avoid abrasive cleaners or solvents, as these can damage the matte black finish.
- Lubricación: Periodically apply a silicone-based lubricant to the keyway and latch mechanisms to maintain smooth operation. Do not use oil-based lubricants.
- Comprobación de fixación: Periodically check all mounting screws and fasteners to ensure they are tight. Loose fasteners can affect the security and function of the handleset.
Resolución de problemas
If you encounter issues with your Weiser Amador x Casey Handleset, consider the following common solutions:
- Key Difficult to Insert/Turn: Ensure the key is fully inserted. Apply a small amount of silicone-based lubricant to the keyway. Check for any debris in the keyway.
- O pestillo non encaixa: Verify that the strike plate on the door frame is properly aligned with the latch bolt. Adjust the strike plate if necessary. Check if the latch screws are tight.
- Deadbolt Not Extending Fully: Ensure the deadbolt hole in the door frame is deep enough and clear of obstructions. Check for proper alignment of the deadbolt assembly.
- Handleset Feels Loose: Tighten all visible mounting screws. If the issue persists, re-check the installation steps to ensure all components are correctly seated.
For persistent issues, refer to the detailed installation guide or contact Weiser customer support.
Especificacións
| Característica | Detalle |
|---|---|
| Fabricante | Weiser |
| Número de modelo | 9GLC94710-021 |
| Dimensións do produto | 19.92 x 13.83 x 13.83 cm |
| Peso do elemento | 2.38 kg |
| Cor | Negro Mate |
| Estilo | Amador x Casey |
| Remate | Mate |
| Material | Aceiro de aliaxe |
| Método de instalación | Integrado |
| Características especiais | SmartKey, SmartKey Technology, ANSI/BHMA Grade 3 Certified Deadbolt |
| Uso | Portas exteriores |
| Pilas necesarias | Non |
Garantía e Soporte
Your Weiser Amador x Casey Handleset is backed by a Garantía limitada de por vida. This warranty covers defects in material and workmanship for the original residential user for as long as they own the product.
For warranty claims, technical assistance, or further support, please refer to the contact information provided in your product packaging or visit the official Weiser websitio.


