1. Introdución
Thank you for choosing the CREATE THERA RETRO PRO Semi-Automatic Espresso Machine. This machine is designed to provide you with high-quality espresso, cappuccino, and latte beverages using ground coffee. Featuring a 20-bar high-pressure pump, NTC temperature control, and an integrated milk tank, it offers convenience and excellent results. Please read this manual carefully before first use to ensure proper operation and maintenance.

Imaxe 1.1: Fronte view of the CREATE THERA RETRO PRO Espresso Machine in Cream White.
2. Instrucións de seguridade
Siga sempre as precaucións de seguridade básicas ao usar electrodomésticos para reducir o risco de incendio, descarga eléctrica e/ou lesións ás persoas, incluíndo as seguintes:
- Le todas as instrucións antes de usar o aparello.
- Non toque superficies quentes. Use asas ou botóns.
- Para protexerse contra incendios, descargas eléctricas e lesións ás persoas, non mergulle o cable, os enchufes ou o aparello en auga ou noutro líquido.
- É necesaria unha estreita supervisión cando calquera aparello é usado por nenos ou preto de eles.
- Desenchufe da toma cando non estea en uso e antes de limpalo. Deixar arrefriar antes de poñer ou quitar pezas e antes de limpar o aparello.
- Non faga funcionar ningún aparello cun cable ou enchufe danados ou despois de que o aparello funcione mal, ou teña danado de calquera xeito.
- O uso de accesorios non recomendados polo fabricante do aparello pode provocar incendios, descargas eléctricas ou lesións ás persoas.
- Non use ao aire libre.
- Non deixes que o cable colgue do bordo da mesa ou do mostrador nin toque superficies quentes.
- Non o coloque sobre ou preto dun queimador eléctrico ou de gas quente, nin nun forno quente.
- Conecte sempre primeiro o enchufe ao aparello e despois enchufe o cable á toma de corrente. Para desconectar, desactiva calquera control e, a continuación, retira o enchufe da toma de corrente.
- Non use o aparello para outros usos que os previstos.
3. Compoñentes do produto
Familiarize yourself with the parts of your CREATE THERA RETRO PRO Espresso Machine.
- Unidade principal con panel de control
- Depósito de auga (capacidade de 1.5 L)
- Tanque de leite
- Portafiltro
- Filter Baskets (for 1 and 2 cups)
- Culler medidora con Tamper
- Bandexa de goteo axustable
- Bandexa para quentar vasos

Image 3.1: Included accessories: Portafilter, two filter baskets, and a measuring scoop with integrated tamper.

Image 3.2: Detail of the control panel, showing beverage selection buttons and the temperature gauge.
4. Configuración
4.1 Desembalaxe e limpeza inicial
- Retire con coidado todos os materiais de embalaxe e coloque a máquina sobre unha superficie estable, plana e resistente á calor.
- Wash the water tank, milk tank, portafilter, filter baskets, and drip tray with warm, soapy water. Rinse thoroughly and dry.
- Limpe o exterior da máquina cun anuncioamp pano.
4.2 Enchendo o depósito de auga
Retire o depósito de auga da parte traseira da máquina. Énchao con auga fría e fresca ata a liña MÁX. Volva colocar o depósito de forma segura.
4.3 Preparing the Milk Tank
If making milk-based drinks, fill the milk tank with desired milk (dairy or plant-based) between the MIN and MAX lines. Ensure the milk frothing tube is properly inserted into the tank.

Image 4.1: Removing the milk tank for filling or cleaning.
4.4 Primeiro uso / Cebado da máquina
Before first use, or if the machine has not been used for a long time, it needs to be primed:
- Asegúrese de que o depósito de auga estea cheo.
- Coloque un recipiente grande debaixo da boquilla de café e da boquilla para espumar o leite.
- Turn on the machine. It will start heating up.
- Once heated, press the Espresso button and let water flow through until the tank is almost empty. Repeat this process with the milk frothing function (if applicable, by selecting a milk-based drink without coffee grounds) to prime the milk system.
5. Instrucións de funcionamento
5.1 Preparing Ground Coffee
Use freshly ground coffee for best results. We recommend using naturally roasted ground coffee. Avoid sugar-roasted mixed coffee as it can clog the filters over time.
- Seleccione a cesta do filtro axeitada (de dose simple ou dobre) e colóquea no portafiltro.
- Fill the filter basket with ground coffee. Use the measuring scoop provided.
- Tamp the coffee firmly and evenly using the tamper end of the scoop.
- Limpa o exceso de café do bordo do portafiltro.
- Insira o portafiltro no cabezal de infusión e xireo cara á dereita ata que estea ben bloqueado.
5.2 Elaboración de espresso
- Ensure the machine is heated and ready (temperature gauge indicates optimal temperature).
- Place your cup(s) on the drip tray under the portafilter spouts.
- Preme o Espresso button. The machine will dispense the programmed amount of espresso.
- To adjust the volume, press and hold the Espresso button until the desired volume is reached, then release. The machine will remember this setting for future use.

Image 5.1: Preparing two cups of espresso simultaneously.
5.3 Preparación de capuchino ou café con leite
The machine features an integrated milk tank for automatic milk frothing.
- Ensure the milk tank is filled with milk and properly attached.
- Place your cup under both the coffee spout and the milk frothing nozzle.
- Para o capuchino, prema a tecla Capuccino button. The machine will first dispense frothed milk, then coffee.
- For Latte, press the Latte button. The machine will dispense frothed milk, then coffee, with a different milk-to-coffee ratio.
- To adjust the volume of milk foam, use the foam adjustment dial on the milk tank.
- To adjust the total volume of the drink, press and hold the respective button until the desired volume is reached, then release.
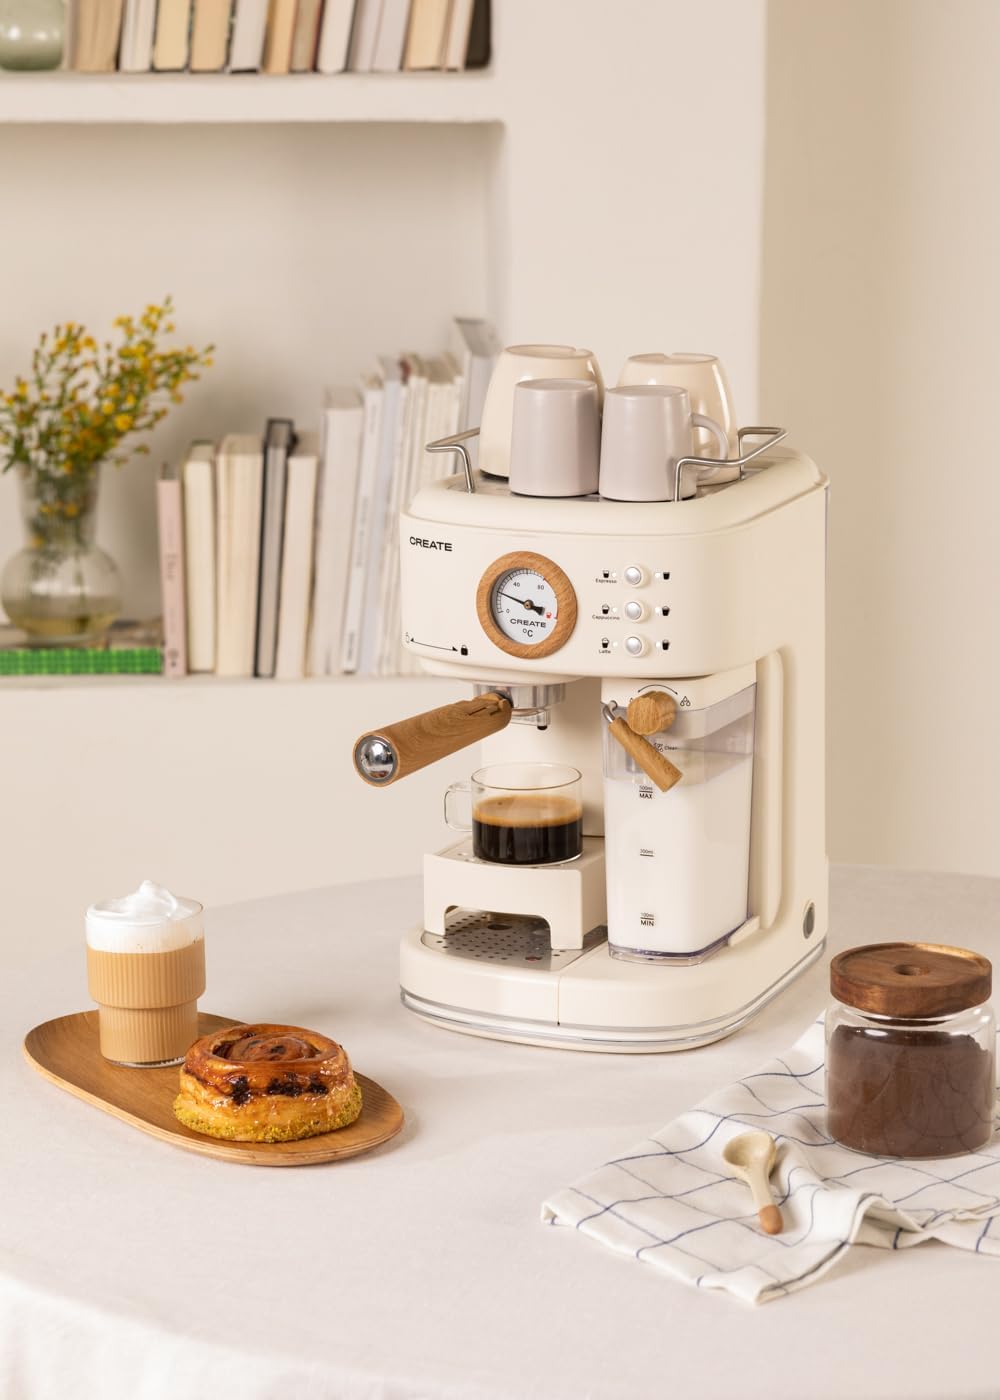
Image 5.2: User interacting with the control panel to select a beverage.
5.4 Adjustable Drip Tray
The drip tray can be adjusted to accommodate different cup sizes. Simply lift or lower the tray as needed to fit your cup comfortably and minimize splashing.

Image 5.3: The adjustable drip tray, designed to fit various cup sizes.
6. Mantemento
6.1 Limpeza diaria
- Bandexa de goteo: Empty and clean the drip tray daily or when the indicator shows it's full. Wash with warm, soapy water and rinse.
- Milk Tank and Frothing Nozzle: After each use, remove the milk tank and clean it thoroughly. Run the "Clean" function (if available, or dispense hot water through the nozzle) to clear any milk residue from the frothing system. This is crucial to prevent blockages and maintain hygiene.
- Portafiltros e cestos de filtro: Remove spent coffee grounds. Rinse the portafilter and filter baskets under running water. Use a brush to remove any stubborn coffee residue.
- Exterior: Limpe o exterior da máquina cun suave, damp pano. Non utilice produtos de limpeza abrasivos nin estropajos.
6.2 Descalcificación
Regular descaling is essential to maintain machine performance and extend its lifespan, especially in areas with hard water. The frequency depends on water hardness and usage. Refer to the machine's indicator (if any) or descale every 2-3 months.
- Use a descaling solution specifically designed for coffee machines. Follow the instructions on the descaling solution packaging.
- Empty the water tank and fill it with the descaling solution mixed with water according to the solution's instructions.
- Coloque un recipiente grande debaixo da boquilla de café e da boquilla para espumar o leite.
- Run the descaling cycle as per your machine's specific instructions (often involves pressing and holding certain buttons, or a dedicated descaling program).
- After the descaling solution has run through, rinse the water tank and fill it with fresh water. Run several cycles of plain water through the machine to thoroughly rinse out any descaling solution.
7 Solución de problemas
| Problema | Causa posible | Solución |
|---|---|---|
| Non saca café nin o fluxo é lento. | Water tank empty; machine not primed; coffee too finely ground or over-tamped; brewing head clogged. | Fill water tank; prime the machine; use coarser grind or less coffee; clean brewing head. |
| Milk not frothing properly or no milk dispensed. | Milk tank empty; milk frothing nozzle clogged; milk too cold/warm or type of milk. | Fill milk tank; clean frothing nozzle thoroughly; use cold milk (4-6°C); try different milk types. |
| O café non está o suficientemente quente. | Machine not fully preheated; cups not preheated. | Allow machine to fully preheat; preheat cups using hot water or the cup warming tray. |
| A máquina perde auga. | Depósito de auga non asentado correctamente; bandexa de goteo chea; problemas de selado. | Asegúrese de que o depósito de auga estea inserido correctamente; baleire a bandexa de goteo; póñase en contacto co servizo de asistencia se o problema persiste. |
| Small coffee portions. | Programmed volume is too low. | Reprogram the desired volume by holding the button until the cup is filled to your preference. |
8. Especificacións
| Característica | Detalle |
|---|---|
| Marca | CREAR |
| Modelo | THERA RETRO PRO |
| Cor | Branco crema |
| Dimensións do produto (L x W x H) | 22.8 x 32.5 x 36 cm |
| Peso do elemento | 5 quilogramos |
| Volume (Water Tank) | 1.5 litros |
| Voltage | 240 voltios |
| Presión | 20 bar |
| Tipo Café | Café Moído |
| Característica especial | Integrated Milk Frother, Adjustable Drip Tray, NTC Temperature Control, Quick Heating |

Image 8.1: Product dimensions: 36cm height, 22.81cm width, 32.51cm depth.
9. Garantía e soporte
Your CREATE THERA RETRO PRO Espresso Machine comes with a standard manufacturer's warranty. For detailed warranty information, please refer to the warranty card included with your product or visit the official CREATE website. For technical support, spare parts, or service inquiries, please contact CREATE customer service directly. Ensure you have your model number (THERA RETRO PRO) and purchase details ready when contacting support.
For further assistance, please visit the official CREATE brand store: CREATE Brand Store


