1. Introdución
This manual provides essential instructions for the safe and efficient operation, installation, and maintenance of your Hydra-Kool KGL-RM-60-S Grab-N-Go Open Over-Under Self-Contained Refrigerated Merchandiser. Please read this manual thoroughly before installation and use, and retain it for future reference.
1.1 Información de seguridade
- Desconecte sempre a alimentación antes de limpar, reparar ou realizar mantemento.
- Ensure proper ventilation around the unit to prevent overheating and maintain cooling efficiency.
- Non almacene neste aparello substancias explosivas, como latas de aerosol con propelente inflamable.
- Este aparello está pensado só para uso comercial.
- Manter todas as aberturas de ventilación libres de obstáculos.
- Non dane o circuíto de refrixerante.
2. Configuración
2.1 Desembalaxe
Carefully remove all packaging materials, including any protective films or tapes. Inspect the merchandiser for any shipping damage. Report any damage to the carrier immediately.
2.2 Colocación
- Place the unit on a strong, level surface capable of supporting its weight (approximately 750 lbs). Use the leveling feet to ensure stability.
- Ensure adequate clearance around the unit for proper air circulation, especially at the rear and sides where the condenser is located. Avoid placing the unit near heat sources or in direct sunlight.
- Maintain an ambient temperature between 60°F (15°C) and 75°F (24°C) for optimal performance.

Figura 1: Fronte view of the Hydra-Kool KGL-RM-60-S Refrigerated Merchandiser. This image shows the overall design with the open front, adjustable shelves, and LED lighting in the canopy.
2.3 Conexión eléctrica
- Verifique que a fonte de alimentación voltage matches the requirements specified on the unit's data plate.
- Connect the merchandiser to a dedicated, properly grounded electrical outlet. Do not use extension cords or adapter plugs.
- Allow the unit to stand for at least 2 hours after moving before plugging it in to allow refrigerants to settle.
2.4 Limpeza inicial
Before first use, clean the interior and exterior surfaces with a mild soap and water solution. Rinse thoroughly and dry completely.
3. Instrucións de funcionamento
3.1 Acendido e arrefriamento inicial
After connecting to power, the unit will begin to cool. Allow several hours for the merchandiser to reach its set temperature before loading products.
3.2 Control dixital da temperatura
The merchandiser is equipped with a digital temperature control system. Refer to the specific controller's manual (if provided separately) for detailed programming instructions. Generally, the display shows the current internal temperature. Buttons allow for adjusting the set point, initiating manual defrost cycles, and viewestado do sistema.
3.3 Carga de produtos
- Load products evenly on the adjustable shelves. Do not overload shelves beyond their weight capacity.
- Ensure that products do not block the air circulation vents inside the merchandiser. Proper airflow is crucial for maintaining consistent temperatures.
- The unit features (2) locking rear loading doors for convenient stocking and a key locking manual front shutter for security when closed.
3.4 Iluminación LED
The merchandiser includes LED lighting in the canopy and under all shelves to illuminate products. These lights are typically controlled by a switch, often located near the digital controller or on the unit's exterior.
4. Mantemento
4.1 Limpeza diaria
- Limpar as superficies interiores e exteriores con anunciosamp un pano e un limpador suave e non abrasivo.
- Clean the tempered side glass regularly to maintain visibility.
4.2 Condenser Coil Cleaning (Monthly/Quarterly)
The condenser coil, located at the bottom rear of the unit, should be cleaned regularly to ensure efficient operation. Always disconnect power before cleaning the condenser. Use a stiff brush or vacuum cleaner to remove dust and debris from the fins. A dirty condenser coil can significantly reduce cooling efficiency and increase energy consumption.
4.3 Desconxelación
This self-contained unit typically features an automatic defrost cycle. If excessive ice buildup is observed, consult the digital controller manual for instructions on initiating a manual defrost or contact a qualified service technician.
4.4 Gasket Inspection
Regularly inspect the gaskets around the rear loading doors for cracks or damage. Damaged gaskets can lead to air leaks and reduced cooling efficiency. Replace worn gaskets promptly.
5 Solución de problemas
Antes de contactar co servizo técnico, volva aview os seguintes problemas comúns e as súas posibles solucións:
| Problema | Causa posible | Solución |
|---|---|---|
| A unidade non arrefría |
|
|
| Ruído excesivo |
|
|
| Auga no chan |
|
|
Se o problema persiste despois de intentar estas solucións, póñase en contacto cun técnico de servizo cualificado.
6. Especificacións
Detailed technical specifications for the Hydra-Kool KGL-RM-60-S Refrigerated Merchandiser:
| Característica | Detalle |
|---|---|
| Número de modelo | KGL-RM-60-S |
| Dimensións (ancho x profundo x alto) | 60-5/8" x 36" x 65" (60.63"W x 36"D x 65"H) |
| Peso | 750 libras |
| Tipo de refrixeración | Autocontenido |
| potencia do compresor | 3 / 4 HP |
| Estantes | (2) Baldas axustables |
| Portas | (2) Locking rear loading doors |
| Iluminación | LED lighting in canopy & under all shelves |
| Acabado Exterior | Gray PVC coated steel |
| Acabado interior | Gray PVC coated steel |
| Paneis Laterais | Tempered side glass, black foamed polystyrene end panels |
| Certificacións | ETL-Sanitation, cETLus |
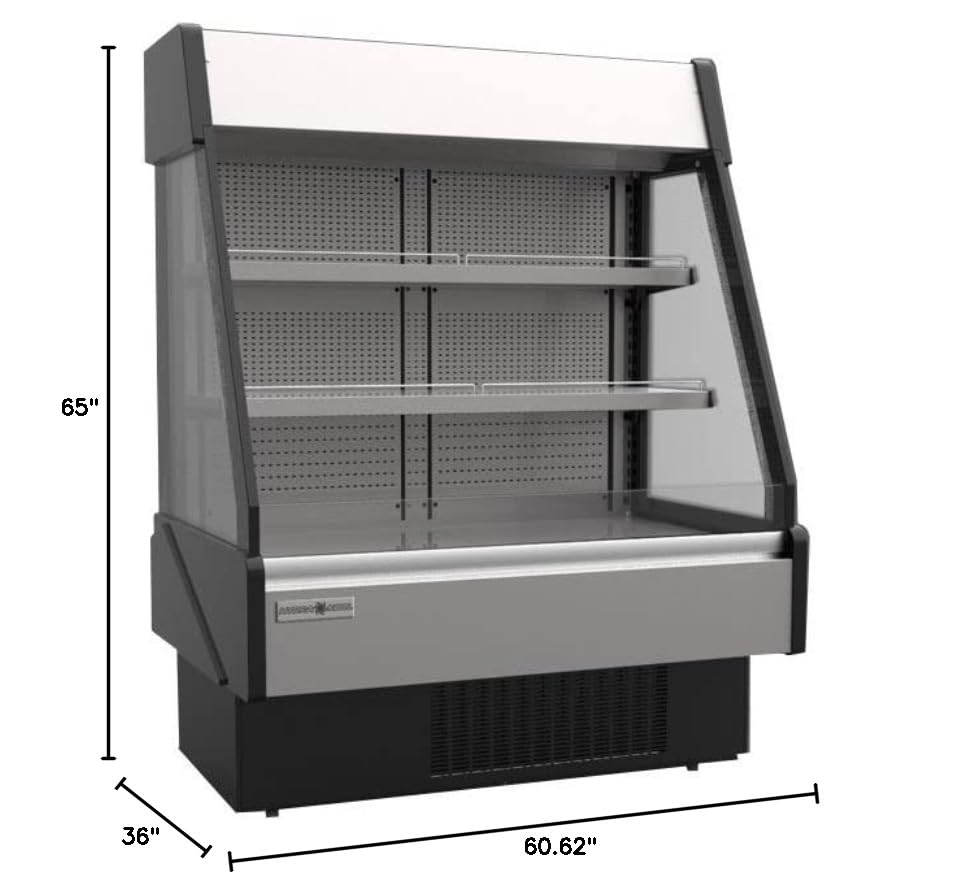
Figura 2: Dimensional view of the Hydra-Kool KGL-RM-60-S, illustrating its width (60.62"), depth (36"), and height (65").
7. Garantía e soporte
For warranty information and technical support, please refer to the documentation provided at the time of purchase or contact your authorized Hydra-Kool dealer. Ensure you have your model number (KGL-RM-60-S) and serial number ready when contacting support.
Manufacturer: MVP Group


