1. Introdución
Welcome to the user manual for your Ulefone Armor X9 Rugged Phone. This guide provides essential information on setting up, operating, maintaining, and troubleshooting your device. The Ulefone Armor X9 is designed for durability and performance, featuring robust protection and advanced functionalities.
Key features of your Ulefone Armor X9 include:
- IP68/IP69K Grade 360 All Round Protection: Construído para soportar ambientes duros.
- Sistema operativo Android 11: Enjoy the latest Android experience.
- 4 GB de RAM + 128 GB de memoria ROM: Ample memory and storage for your applications and data.
- 16MP Triple Rear Camera: Capture high-quality photos and videos.
- Massive 5580mAh Battery Capacity: Extended usage time.
- Triple Navigation System: Enhanced positioning accuracy.
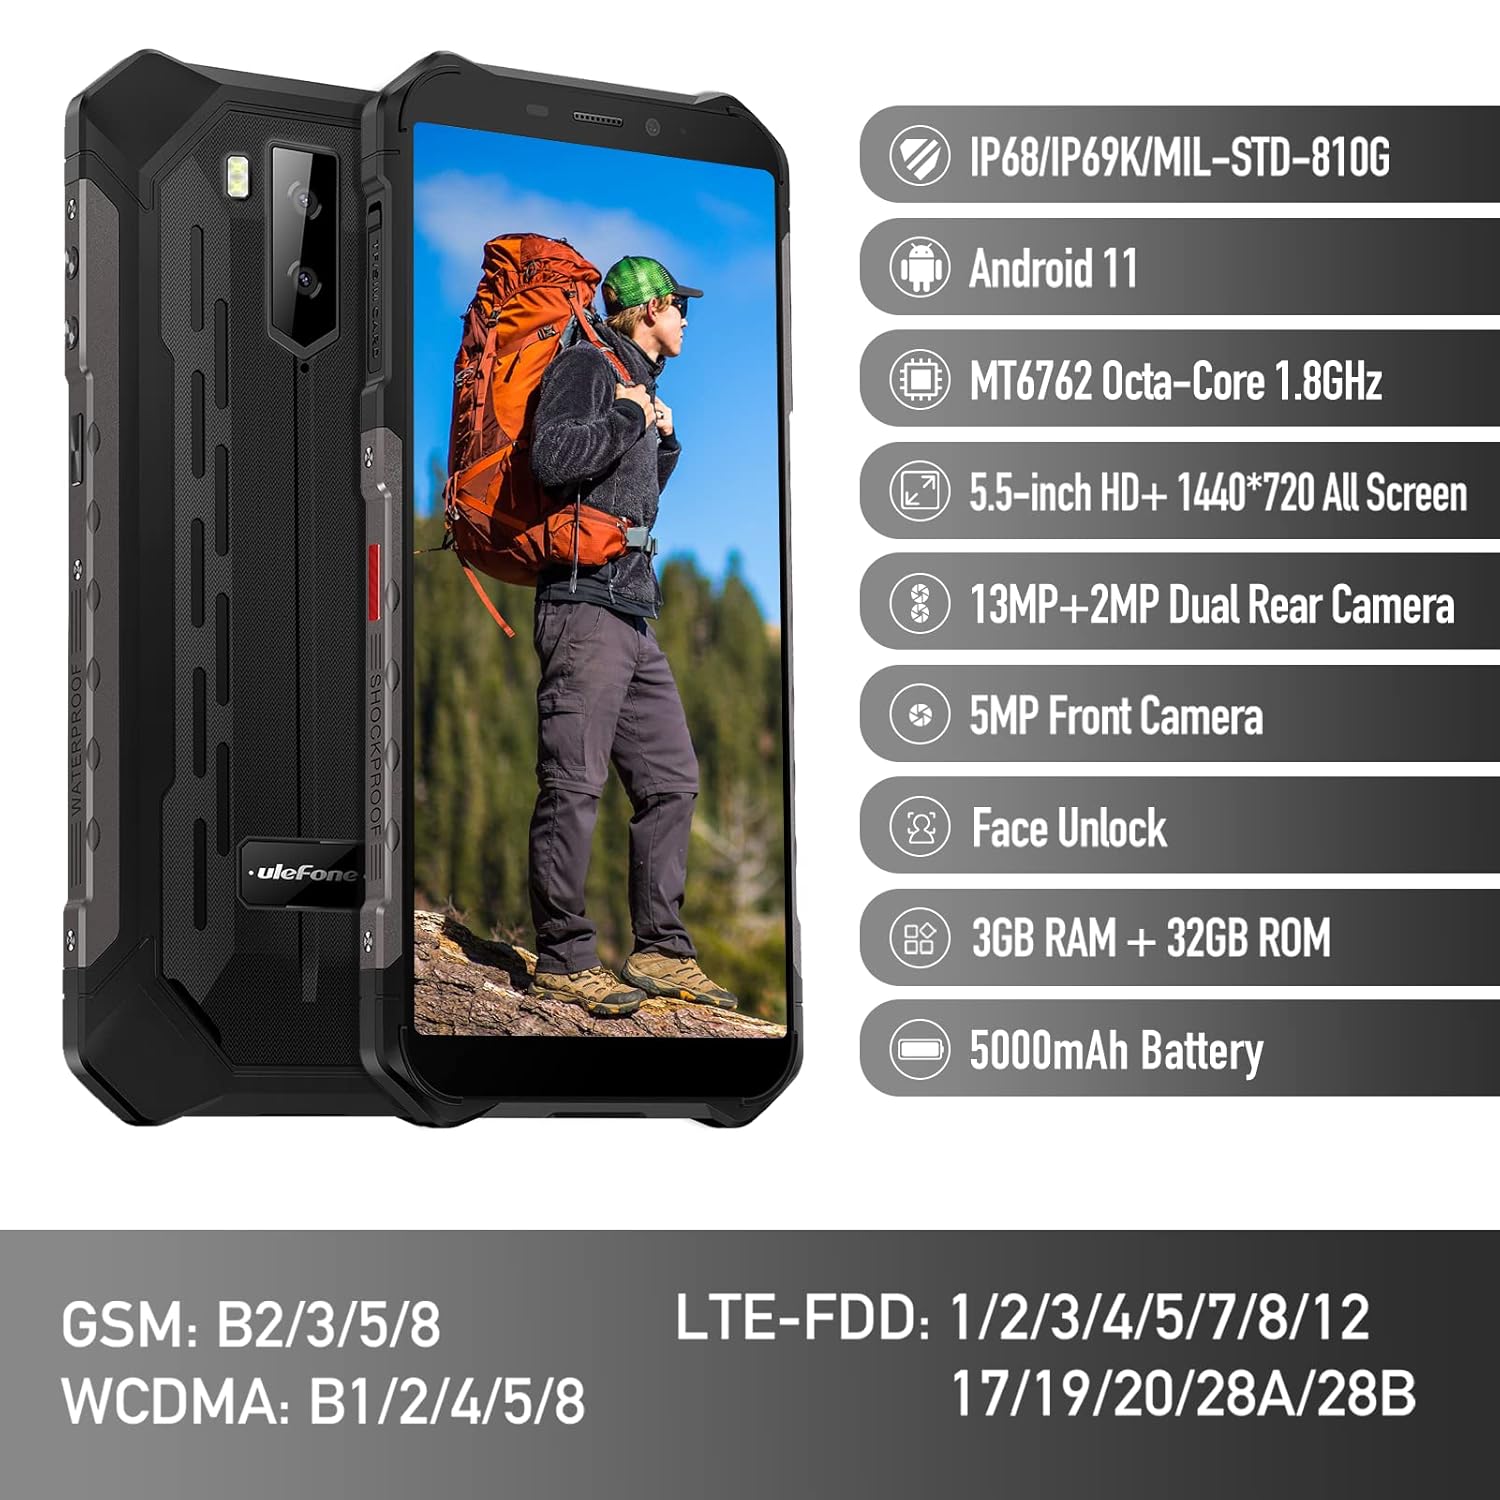
Figure 1: Ulefone Armor X9 Rugged Phone overview, highlighting its robust design and core specifications like IP68/IP69K rating, Android 11, Octa-Core processor, 5.5-inch HD+ screen, 13MP+2MP dual rear camera, 5MP front camera, Face Unlock, 3GB RAM + 32GB ROM, and 5000mAh battery.
2. Configuración
2.1. Instalación da tarxeta SIM e da tarxeta TF
The Ulefone Armor X9 supports dual SIM cards and a TF (microSD) card for expandable storage. Follow these steps to install them:
- Localiza a bandexa da tarxeta SIM no lateral do teléfono.
- Usa a ferramenta de expulsión da tarxeta SIM fornecida para abrir a bandexa.
- Carefully place your Nano-SIM cards into the designated slots (SIM1 and SIM2).
- If using a TF card, place it into the dedicated TF card slot. Note that some configurations may share a slot between SIM2 and the TF card.
- Gently push the tray back into the phone until it is flush with the device body. Ensure the tray is properly sealed to maintain water and dust resistance.

Figure 2: Illustration of the dual SIM and TF card tray, showing how to insert SIM1, SIM2, and a TF card into the Ulefone Armor X9.
2.2. Carga inicial
Before first use, it is recommended to fully charge your Ulefone Armor X9. Use the provided USB cable and power adapter.
- Conecta o cable USB ao porto de carga do teu teléfono.
- Conecte o outro extremo do cable USB ao adaptador de alimentación.
- Enchufe o adaptador de alimentación a unha toma de corrente.
- O indicador de carga aparecerá na pantalla. Deixa que o teléfono se cargue ata que a icona da batería se mostre como chea.
2.3. Acendido/apagado
- Para acender: Mantén premido o botón de acendido (normalmente no lado dereito) ata que apareza o logotipo de Ulefone.
- Para apagar: Press and hold the Power button until the power options menu appears on the screen. Select "Power off" and confirm.
- Para reiniciar: No menú de opcións de enerxía, selecciona "Reiniciar" e confirma.
3. Instrucións de funcionamento
3.1. Navegación básica (Android 11)
Your Ulefone Armor X9 runs on Android 11, offering an intuitive user interface. Common gestures and navigation include:
- Pasa o dedo cara arriba: Accede ao caixón da aplicación.
- Pase o dedo cara abaixo: Abre o panel de notificacións e a configuración rápida.
- Toca: Selecciona un elemento ou abre unha aplicación.
- Prensa longa: Acceder a menús contextuais ou mover iconas.
- Pinch-to-Zoom: Achegar ou afastar imaxes e web páxinas.

Figure 3: Screenshots of the Android 11 interface on the Ulefone Armor X9, showing settings menus, quick toggles, and the sound recorder application.

Figure 4: The 5.5-inch 18:9 All Screen display of the Ulefone Armor X9, showcasing its immersive viewing experience with an image of a skier.
3.2. Uso da cámara
Your phone is equipped with a 16MP Triple Rear Camera and a Front Camera. To use the camera:
- Abre a aplicación "Cámara" desde a pantalla de inicio ou o caixón de aplicacións.
- Toca o botón do obturador para sacar unha foto.
- Cambia entre os modos de foto e vídeo segundo sexa necesario.
- Tap the icon to switch between the front and rear cameras.
- Explora os distintos modos e axustes da cámara para obter resultados óptimos.
3.3. Conectividade
The Ulefone Armor X9 supports various connectivity options:
- Wi-Fi: Vaia a Configuración > Rede e internet > Wi-Fi para conectarse ás redes dispoñibles.
- Bluetooth: Go to Settings > Connected devices > Bluetooth to pair with Bluetooth devices.
- GPS: The phone features AGPS for accurate location services. Ensure location services are enabled in Settings > Location.
- USB: Connect your phone to a computer using a USB cable for data transfer or charging.
3.4. Desbloqueo facial
For convenient and secure unlocking, your Ulefone Armor X9 supports Face Unlock:
- Vaia a Configuración > Seguridade > Desbloqueo facial.
- Sigue as instrucións en pantalla para rexistrar a túa cara.
- Ensure good lighting and hold the phone at eye level during registration.
- Unha vez rexistrado, podes desbloquear o teléfono simplemente mirando a cámara frontal.
4. Mantemento
4.1. Limpeza e coidado
To maintain the performance and appearance of your rugged phone:
- Limpe a pantalla e o corpo cun pano suave e sen fiapos.
- Para a sucidade teimosa, use un lixeiramente damp pano. Evite produtos químicos agresivos ou materiais abrasivos.
- Ensure all port covers are securely closed to maintain water and dust resistance, especially after charging or using headphones.

Figure 5: The Ulefone Armor X9's 360° All Protection Design, showcasing its superior materials and superb durability against impacts and harsh conditions.
4.2. Resistencia á auga e ao po (IP68/IP69K)
The Ulefone Armor X9 is rated IP68/IP69K, meaning it is resistant to dust and water immersion. However, this resistance is not permanent and may decrease over time with normal wear. To ensure optimal protection:
- Do not intentionally submerge the phone in water for extended periods or beyond specified depths.
- Avoid exposing the phone to high-pressure water or extreme temperatures.
- Ensure all port covers are tightly sealed before exposure to water or dust.
- If the phone gets wet, dry it thoroughly before charging or opening any ports.
4.3. Coidado da batería
To prolong the life of your 5580mAh Lithium Polymer battery:
- Evita temperaturas extremas (calor ou frío) xa que poden prexudicar o rendemento da batería.
- Use only the original charger and cable or certified compatible accessories.
- Non deixes que a batería se descargue por completo con frecuencia. Cárgaa antes de que alcance niveis moi baixos.
5 Solución de problemas
If you encounter issues with your Ulefone Armor X9, try the following troubleshooting steps:
5.1. O teléfono non se acende
- Asegúrate de que a batería estea cargada. Conecta o teléfono a un cargador durante polo menos 30 minutos.
- Mantén premido o botón de acendido/apagado durante 10-15 segundos para forzar un reinicio.
5.2. Problemas de carga
- Verify that the charging cable and adapter are working correctly. Try a different charger if available.
- Asegúrese de que o porto de carga estea limpo e libre de residuos.
- Make sure the charging cable is fully inserted into the port. Some rugged phone ports may require a firm connection due to protective covers.
5.3. SIM/TF Card Not Detected
- Ensure the SIM/TF card is correctly inserted into the tray and the tray is fully seated.
- Reinicie o teléfono.
- Check if the SIM card is active with your network provider.
5.4. Fallos ou conxelación da aplicación
- Pecha e volve abrir a aplicación problemática.
- Limpa a caché e os datos da aplicación (Configuración > Aplicacións > [Nome da aplicación] > Almacenamento e caché).
- Asegúrate de que a aplicación estea actualizada á última versión.
- Reinicie o teléfono.
5.5. Restablecemento de fábrica
Se os problemas persisten, un restablecemento de fábrica pode resolvelos. Aviso: Isto borrará todos os datos do teu teléfono. Fai unha copia de seguridade dos datos importantes antes de continuar.
- Vaia a Configuración > Sistema > Restablecer opcións.
- Selecciona "Borrar todos os datos (restablecemento de fábrica)".
- Confirma a túa decisión e introduce o teu PIN/contrasinal se se che solicita.
6. Especificacións
Below are the detailed specifications for the Ulefone Armor X9:

Figure 6: Details of the Ulefone Armor X9's Octa-Core Processor, highlighting its power-efficient yet powerful performance, along with 3GB RAM and 32GB ROM, and support for up to 256GB TF card extendable storage.
| Característica | Especificación |
|---|---|
| Sistema Operativo | Android 11.0 |
| RAM | 3 GB (Note: Feature bullets mention 4GB RAM, please verify actual model) |
| Capacidade de almacenamento da memoria | 32 GB (Expandable with TF card up to 256GB. Feature bullets mention 128GB ROM, please verify actual model) |
| Modelo CPU | MT6762 Octa-Core 1.8GHz (Note: Specifications list 'Snapdragon', but image indicates MT6762. Please verify actual model) |
| Dimensións do produto | 15.8 x 7.75 x 1.38 cm |
| Peso do elemento | 472 g |
| Baterías | 1 batería de polímero de litio (5580 mAh, incluída) |
| Comunicación sen fíos | Cellular, Bluetooth, USB, Wi-Fi |
| GPS | AGPS |
| Características especiais | Rear Camera, Face Unlock, IP68/IP69K, MIL-STD-810G |
| Mostrar | 5.5-inch HD+ 1440*720 All Screen |
| Cámara traseira | 13MP+2MP Dual Rear Camera (Note: Feature bullets mention 16MP Triple Rear Camera, please verify actual model) |
| Cámara frontal | Cámara frontal de 5 MP |
| Cor | Negro |
| Fabricante | Ulefone |
Note: Specifications are based on available product data and may vary slightly. Please refer to your product packaging for the most accurate information. There are discrepancies between feature bullets, specifications, and image text regarding RAM, ROM, CPU, and camera megapixels. This manual uses the most frequently cited or detailed information, with notes for clarification.
7. Garantía e soporte
7.1. Información da garantía
Your Ulefone Armor X9 is covered by a manufacturer's warranty. The specific terms and duration of the warranty may vary by region and retailer. Please refer to the warranty card included in your product packaging or contact your point of purchase for detailed information regarding warranty coverage and claims.
7.2. Atención ao cliente
For technical assistance, troubleshooting beyond this manual, or warranty inquiries, please contact Ulefone customer support or your authorized dealer. You can typically find contact information on the official Ulefone websitio web ou na documentación do produto.
- Visita a páxina oficial de Ulefone website for FAQs, software updates, and support contact details.
- Garda á man o recibo da compra e o número de serie do produto cando contactes co servizo de asistencia.


