1. Introdución
Thank you for choosing the MOES 3 Gang WiFi Wall Touch Smart Switch. This device is designed to enhance your home lighting control with smart features, including touch control, app control, voice control, and multi-control association. Please read this manual carefully before installation and use to ensure safe and correct operation.
2. Información importante de seguridade
- Fío neutro necesario: This smart switch requires a neutral wire in your switch box for proper operation. Please confirm its presence before installation.
- Rede WiFi de 2.4 GHz: The switch only supports 2.4 GHz WiFi networks. It is not compatible with 5 GHz networks.
- Non é un interruptor regulador: This is an ON/OFF switch and does not support dimming functionality.
- Non é un interruptor tradicional de 3 vías: This switch uses multi-control association via the app for 3-way functionality, not traditional wiring.
- Apagado antes da instalación: Always turn off the circuit breaker before performing any wiring or installation to prevent electric shock.
- Instalación profesional recomendada: Se non ten dúbidas sobre o cableado eléctrico, consulte cun electricista cualificado.
- Evitar Damp Ambientes: Do not install the switch in damp ou lugares húmidos.
- Do Not Exceed Maximum Load: Ensure the connected load does not exceed the switch's maximum rating (10 Amps, 2200W/Gang).

Image: Key considerations for MOES smart switch installation, highlighting 2.4GHz WiFi, neutral wire requirement, and non-compatibility with traditional 3-way or dimming functions.
3. Contido do paquete
- MOES 3 Gang WiFi Wall Touch Smart Switch
- Parafusos de montaxe
- Guía de instalación rápida
4. Especificacións
| Característica | Descrición |
|---|---|
| Modo de operación | Off, Smart Switch |
| Valoración actual | 10 Amps |
| Vol. Operativotage | 250 voltios |
| Tipo de contacto | Touch-sensitive Mechanical Switch |
| Tipo de conector | Sen fíos |
| Marca | MOES |
| Terminal | Parafuso |
| Tipo de circuíto | Tridireccional (mediante asociación de aplicacións) |
| Tipo de actuador | Toca |
| Material de contacto | Vidro |
| Clasificación de protección internacional | IP54 |
| Número de postos | 3 |
| Tipo de controlador | Amazon Alexa, Android, Asistente de Google, iOS |
| Método de control | Mando a distancia |
| Protocolo de conectividade | Bluetooth, WiFi |
| Cor | Branco |
| Número de modelo do artigo | WS-EU3-LW-N |
5. Configuración e instalación
5.1 Tools Used
- Decapante de arame
- Pluma eléctrica (Vol.tagprobador electrónico)
- Cinta eléctrica
- Terminal de cableado (conectores Wago ou similares)
- Desaparafusador
5.2 Wiring Diagram and Preparation
Before starting, ensure the circuit breaker is turned off to prevent electric shock. This switch requires a neutral wire. The diagram below illustrates the wiring connections.

Imaxe: Traseira view of the MOES smart switch with labeled terminals for Live (L), Neutral (N), and Load (L1, L2, L3) connections.
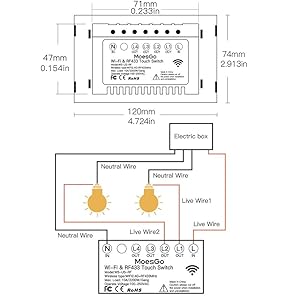
Image: Detailed wiring diagram illustrating the connection of Live, Neutral, and three separate lamp wires to the MOES 3 Gang smart switch.
5.3 Instalación física
- Apagar a enerxía: Locate your circuit breaker and turn off the power to the switch you are replacing. Verify power is off using an electric pen.
- Eliminar o interruptor antigo: Carefully remove the faceplate and unscrew the old switch from the wall box. Disconnect the wires, noting their positions.
- Conecte cables: Connect the Live wire, Neutral wire, and the three Lamp wires to the corresponding terminals on the MOES smart switch as shown in the wiring diagram. Ensure all connections are secure.
- Montar un novo interruptor: Gently push the wired switch into the wall box and secure it with screws. Attach the glass panel faceplate.
- Restaurar enerxía: Volva a conectar o interruptor.
Video: Step-by-step installation guide for the MOES touch switch, demonstrating how to safely replace an old switch with the new smart switch.
5.4 App Pairing (WiFi Link Method)
To enable smart features, you need to pair the switch with the Smart Life/Tuya app.
- Descarga a aplicación: Download the Smart Life or Tuya Smart app from your mobile app store.
- Enable Bluetooth & WiFi: Ensure your phone is connected to a 2.4GHz WiFi network and Bluetooth is enabled.
- Entrar no modo de emparellamento: Press and hold any button on the smart switch for approximately 6 seconds until the blue indicator light flashes rapidly.
- Engadir dispositivo na aplicación: Open the Smart Life/Tuya app, tap the '+' icon to add a device. The app should automatically discover the switch. Follow the on-screen prompts to connect.
Video: Demonstrates the WiFi link method for pairing the smart switch with the Smart Life/Tuya app, including steps for entering pairing mode and connecting.
5.5 RF Pairing (RF Link Method)
This switch supports RF433 remote control (remote not included). To pair with an RF remote:
- Ensure Switch is Off: Confirma que o interruptor intelixente estea no estado APAGADO.
- Acceder ao modo de emparellamento RF: Press and hold the desired button on the smart switch for approximately 8 seconds until you hear two 'Di-Di' sounds.
- Prema o botón do mando a distancia: Immediately press the corresponding button on your RF433 remote control. The light connected to the smart switch will toggle ON/OFF, indicating successful pairing.
Note: The key of the remote controller can control the switching of the state of the switch on and off corresponding to the position of the switch.
6. Instrucións de funcionamento
6.1 Control táctil
Simply touch the circular icons on the glass panel to toggle the connected lights ON or OFF. The blue backlight indicates the status of each gang.
6.2 Control de aplicacións (Smart Life/Tuya)
Once paired, you can control your lights from anywhere using the Smart Life/Tuya app on your smartphone. Each gang can be controlled independently.

Image: A smartphone displaying the Smart Life app, demonstrating remote control of the MOES smart switch.
6.3 Control por voz (Alexa e Google Home)
Integrate your MOES smart switch with Amazon Alexa or Google Home for hands-free voice control. After linking your Smart Life/Tuya account in the Alexa or Google Home app, you can use commands like: "Alexa, turn on the living room light" or "Hey Google, turn off the kitchen lights."

Image: Illustration of voice control functionality with Amazon Alexa and Google Home, showing smart speakers interacting with the MOES smart switch.
6.4 Multi-Control Association (3-Way Functionality)
To achieve 3-way control (two switches controlling one light) without traditional wiring, use the multi-control association feature in the Smart Life/Tuya app. This allows multiple smart switches to control the same light.
- Ensure both smart switches are added to the same Smart Life/Tuya app.
- In the app, select the main switch that is wired to the light.
- Go to its settings and find "Multi-Control Association".
- Add the second smart switch (the one not wired to the light) to the multi-control group.
- Now, both switches can control the same light.
Video: Detailed demonstration of how to set up multi-control association in the Smart Life/Tuya app for 3-way switch functionality.
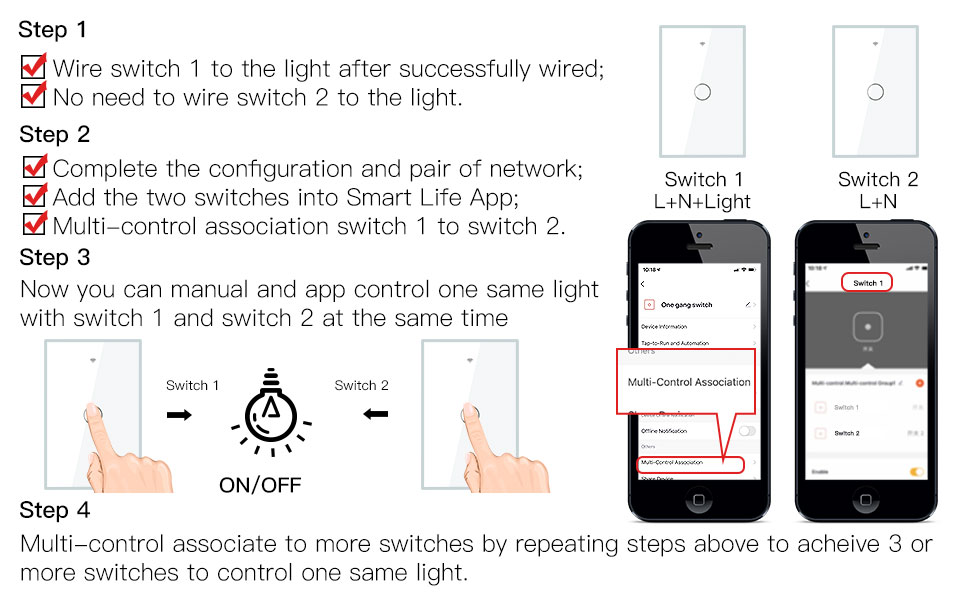
Image: Visual guide for setting up multi-control association between two smart switches to operate a single light source.
6.5 Timer and Countdown
Use the Smart Life/Tuya app to set schedules, timers, and countdowns for your lights. This allows for automated control, such as turning lights ON at sunset or OFF after a set duration.

Image: The Smart Life app displaying options for setting timers and countdowns to automate light control with the MOES smart switch.
6.6 Relay Status Adjustable
In the app settings, you can configure the relay status after a power outage. Options include ON, OFF, or 'Remember last status' to restore the state prior to the power interruption.

Image: App screenshot showing the relay status setting, allowing users to choose the switch's state after a power interruption.
6.7 Backlight ON/OFF Control
The backlight of the touch buttons can be turned ON or OFF via the app settings. This is useful for bedrooms or areas where you prefer no light from the switch.

Image: The MOES smart switch demonstrating the backlight ON and OFF feature, with the corresponding setting visible in the Smart Life app.
6.8 Device Share & Group Control
Share control of your smart switch with family members through the app. You can also create groups to control multiple switches or lights simultaneously with a single command.

Image: The Smart Life app illustrating how to share device control with family and create groups for simultaneous control of multiple MOES smart switches.
6.9 Automatización intelixente
Create custom automation routines based on various conditions (e.g., time, weather, device status) to make your home truly smart. For example, turn on lights when a motion sensor is triggered.
Vídeo: Rematadoview of the functions and features of the MOES smart switch, including smart automation capabilities.
7. Mantemento
- Limpeza: Limpe o panel de vidro cun pano suave e seco. Evite produtos de limpeza abrasivos ou solventes.
- Actualizacións de firmware: Keep the Smart Life/Tuya app updated to receive the latest firmware for your switch, ensuring optimal performance and security.
- Comprobacións periódicas: Periodically check the switch for any signs of damage or loose connections.
8 Solución de problemas
- O interruptor non responde: Check if the circuit breaker is ON. Ensure the neutral wire is correctly connected.
- Non se pode conectar á wifi:
- Confirm your WiFi network is 2.4GHz.
- Ensure your phone is connected to the same 2.4GHz WiFi network.
- Bring the switch closer to your WiFi router during pairing.
- Reset the switch to pairing mode (press and hold any button for 6 seconds until the blue indicator flashes rapidly).
- RF Remote Not Working: Ensure the switch is in the OFF state before attempting RF pairing. Repeat the RF pairing steps carefully.
- Luces parpadeantes: This switch is not a dimmer. Ensure you are using compatible non-dimmable bulbs.
8.1 How to Reset/Re-pair WiFi Code
If you need to reset the WiFi connection or re-pair the switch:
- Press the switch button for 6 times.
- On the 6th press, hold the button.
- Release the button when you hear 'Di-Di-Di' (3 times).
- The blue indicator on the switch will flash fast after 3 seconds, indicating it's in pairing mode.
9. Garantía e soporte
MOES products come with a standard manufacturer's warranty. For specific warranty details, technical support, or further assistance, please refer to the warranty card included with your product or visit the official MOES website. You can also contact MOES customer service through the Smart Life/Tuya app or their official support channels.