Introdución
This manual provides essential instructions for the safe and effective operation, setup, maintenance, and troubleshooting of your ESAB EMP 210 Multi-Process Welder. Please read this manual thoroughly before using the equipment to ensure proper function and safety.

Figura 1: The ESAB EMP 210 Multi-Process Welder shown with its complete set of accessories, including MIG gun, TIG torch, electrode holder, ground clamp, gas regulator, and welding wire spool. This image illustrates the comprehensive package provided for various welding applications.
Precaucións de seguridade
Always prioritize safety when operating welding equipment. Failure to follow safety guidelines can result in serious injury or death. Refer to relevant safety standards and regulations in your region.
- Usar o equipo de protección individual (EPI) axeitado, incluíndo casco de soldadura, luvas, roupa protectora e calzado de seguridade.
- Asegúrese de que haxa unha ventilación axeitada para evitar a inhalación de fumes de soldadura.
- Protexer os transeúntes dos raios de arco e das faíscas.
- Nunca solde preto de materiais inflamables.
- Asegúrese de que a máquina de soldar teña unha conexión a terra axeitada.
- Desconecte a alimentación antes de realizar calquera mantemento ou cambiar consumibles.
Configuración
1. Desembalaxe e inspección
Retire con coidado a soldadora e todos os accesorios da embalaxe. Inspeccione se houbo danos durante o envío. Informe de calquera dano ao seu provedor inmediatamente.
2. Conexión de alimentación
The ESAB EMP 210 operates on both 120V and 230V AC power. The machine automatically detects the input voltage. Ensure the power source is properly rated for the welder's requirements.
- Funcionamento 120 V: Use a dedicated 20A circuit.
- Funcionamento 230 V: Use a dedicated 30A circuit.
3. Gas Connection (MIG/TIG)
For MIG and TIG welding, connect the appropriate shielding gas cylinder (e.g., Argon, C25) to the regulator provided. Attach the gas hose from the regulator to the gas inlet on the rear of the welder.
4. Welding Lead Connections
Conecte a terra clamp to the appropriate terminal on the welder and secure it to the workpiece. Connect the MIG gun, TIG torch, or electrode holder to their respective terminals as required for the chosen welding process.

Figura 2: Un de arriba abaixo view of the ESAB EMP 210 welder, highlighting its compact design and integrated handle for portability. This perspective shows the overall form factor of the unit, which is designed for easy transport and setup.
Instrucións de funcionamento
The ESAB EMP 210 offers MIG, Stick (MMA), and TIG (Lift TIG) welding capabilities. Select the desired process using the control panel.
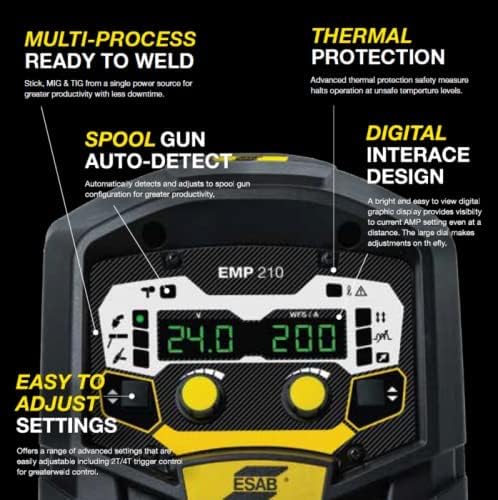
Figura 3: Detallado view of the ESAB EMP 210's digital control panel. This image shows the clear display for voltage e amperage, along with the intuitive adjustment knobs and process selection buttons, emphasizing the "Digital Interface Design" and "Easy to Adjust Settings" features.
1. Panel de control rematadoview
The digital interface allows for precise control over welding parameters. Use the large dial and buttons to navigate menus and adjust settings such as ampera, voltage, e velocidade de alimentación do fío.
2. MIG Welding (GMAW)
- Install the appropriate welding wire spool and feed it through the MIG gun.
- Select MIG mode on the control panel.
- Axustar voltage and wire feed speed according to the material thickness and wire type.
- Ensure gas flow is set correctly (typically 15-25 CFH for solid wire).
3. Stick Welding (MMA/SMAW)
- Conecte o portaelectrodos e o clavixón de terraamp.
- Select Stick mode.
- Introduza o eléctrodo axeitado no soporte.
- Axustar amperage based on electrode type and diameter.
4. TIG Welding (GTAW - Lift TIG)
- Conecte a tocha TIG e o cable de terraamp.
- Seleccione o modo TIG.
- Ensure pure argon shielding gas is connected and flowing.
- Axustar amperage for the material and tungsten electrode size.
- Initiate arc using the Lift TIG method.

Figura 4: An individual performing welding operations with the ESAB EMP 210 Multi-Process Welder. The welder is visible in the background, and the operator is focused on the workpiece, demonstrating the machine in an active work environment.
Mantemento
Regular maintenance ensures the longevity and optimal performance of your ESAB EMP 210 welder.
- Diario: Clean the MIG gun nozzle, contact tip, and diffuser. Check ground clamp and cable connections.
- Semanal/Mensual: Inspect all cables for damage. Clean the wire feed mechanism. Check gas hose for leaks.
- Periodicamente: Use compressed air to blow dust and debris from inside the machine (ensure power is disconnected). Inspect cooling fan for obstructions.
- Replace worn consumables (contact tips, nozzles, electrodes, tungsten) as needed.
Resolución de problemas
Refer to the following table for common issues and their potential solutions. If a problem persists, contact ESAB customer support.
| Problema | Causa posible | Solución |
|---|---|---|
| Sen arco | No power, poor ground connection, incorrect settings, faulty torch/electrode holder. | Check power supply, ensure solid ground, verify settings, inspect connections. |
| Mala calidade de soldadura | Incorrect settings, contaminated material, improper technique, worn consumables. | Adjust parameters, clean workpiece, review technique, replace consumables. |
| Problemas de alimentación de arame (MIG) | Incorrect tension, clogged liner, wrong contact tip, tangled wire. | Adjust drive roll tension, clean/replace liner, use correct contact tip, untangle wire. |
| Overheating (Thermal Protection) | Superando o ciclo de traballo, mala ventilación. | Allow machine to cool, ensure adequate airflow around the unit. |
Especificacións
| Característica | Detalle |
|---|---|
| Marca | ESAB |
| Número de modelo | 0324-0075 (EMP 210) |
| Vol. De entradatage | 120 V / 230 V CC (detección automática) |
| Procesos de Soldadura | MIG (GMAW), Stick (MMA/SMAW), TIG (GTAW - Lift TIG) |
| Corriente de saída máxima | 200A |
| Peso do elemento | 43 libras |
| Dimensións do produto | 23 x 18.5 x 18 polgadas |
| Data de primeira dispoñibilidade | 28 de outubro de 2021 |
Garantía e Soporte
Información da garantía
For detailed warranty terms and conditions, please refer to the official ESAB warranty statement included with your product or visit the official ESAB websitio. A cobertura da garantía adoita incluír defectos de materiais e man de obra durante un período especificado a partir da data de compra.
Atención ao cliente
If you encounter any issues or have questions regarding your ESAB EMP 210 welder, please contact ESAB customer support. You can find contact information on the official ESAB websitio web ou a través do seu distribuidor autorizado.
ESAB Official Websitio: www.esab.com


