1. Introdución
Thank you for choosing an Indesit appliance. This user manual provides essential information for the safe and efficient operation, installation, and maintenance of your Indesit TWE 71252 S EU front-loading washing machine. Please read these instructions carefully before using the appliance and keep them for future reference. Proper use and maintenance will ensure optimal performance and extend the lifespan of your washing machine.
2. Información de seguridade
Seguridade xeral:
- Este aparello está pensado só para uso doméstico.
- Do not allow children to play with the appliance. Supervise children to ensure they do not climb into the drum.
- Desconecte sempre o aparello antes de limpalo ou realizar calquera mantemento.
- Do not operate the washing machine if the power cord or plug is damaged, or if the appliance itself is faulty. Contact qualified service personnel.
- Asegúrese de que o aparello estea correctamente conectado a terra.
Seguridade da instalación:
- Remove all transit bolts and packaging materials before use. Failure to do so can cause severe damage.
- Install the appliance on a firm, level floor. Adjust the feet to ensure stability.
- Garantir unha ventilación adecuada ao redor do aparello.
- Conecta a mangueira de entrada de auga a unha billa de auga fría. Asegúrate de que todas as conexións estean ben axustadas para evitar fugas.
- The drain hose must be securely fixed to prevent displacement during operation.
3. Produto rematadoview
Your Indesit TWE 71252 S EU washing machine features a user-friendly design with essential components for efficient laundry care.

Figura 3.1: Fronte view of the Indesit TWE 71252 S EU washing machine. This image shows the overall design, including the control panel at the top, the detergent dispenser on the left, and the main loading door in the center.
Compoñentes clave:
- Panel de control: Located at the top, featuring digital touch controls, push buttons, and a rotary knob for program selection.
- Dispensador de deterxente: A pull-out drawer for adding detergent and fabric softener.
- Loading Door: Front-loading door for adding and removing laundry.
- Tambor: Interior de aceiro inoxidable onde se lava a roupa.
- Filtro de drenaxe: Situado na parte inferior frontal, accesible para a súa limpeza.

Figura 3.2: Close-up of the detergent dispenser and control panel. This view highlights the various compartments within the dispenser for pre-wash, main wash, and softener, along with the program selection knob and digital display.

Figura 3.3: Interior view of the stainless steel drum. This image shows the perforated surface of the drum, designed for effective washing and rinsing, and the agitator paddles.
4. Instalación e configuración
Unha instalación axeitada é crucial para o rendemento e a lonxevidade da túa lavadora.
4.1 Desembalaxe:
- Retire con coidado todos os materiais de embalaxe, incluída a base de poliestireno e calquera película protectora.
- Remove the transit bolts located at the rear of the machine. These bolts secure the drum during transport and must be removed before operation. Keep them for future transport if needed.
4.2 Positioning:
- Place the washing machine on a flat, stable surface, away from direct sunlight or heat sources.
- Axuste os pés axustables na parte inferior da máquina para asegurarse de que estea perfectamente nivelada. Use un nivel de burbulla para verificar.
- Ensure there is sufficient space around the machine for ventilation and ease of access.
4.3 Conexión de auga:
- Connect the supplied water inlet hose to the cold water tap. Hand-tighten the connection, then use a wrench for a quarter turn.
- Connect the other end of the inlet hose to the water inlet valve at the back of the washing machine.
- Position the drain hose into a standpipe or over the edge of a sink, ensuring it is securely fixed to prevent it from falling out during draining. The height of the drain point should be between 65 cm and 100 cm from the floor.
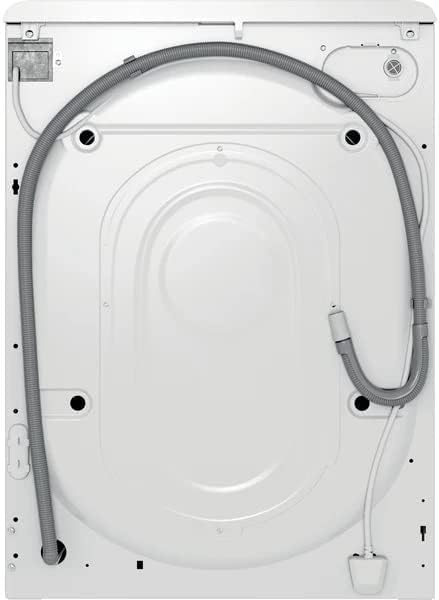
Figura 4.1: Traseira view of the washing machine. This image illustrates the connections for the water inlet hose (typically blue or white) and the drain hose, along with the power cable.
4.4 Conexión eléctrica:
- Plug the power cord into a properly earthed electrical socket.
- Non empregues cables de extensión nin enchufes múltiples.
4.5 First Wash Cycle:
- Before washing clothes, run an empty wash cycle to clean the drum and remove any manufacturing residues.
- Add a small amount of detergent to the main wash compartment.
- Select a short, hot wash program (e.g., 60°C cotton cycle) and start the machine.
5. Instrucións de funcionamento
Siga estes pasos para un funcionamento eficaz e seguro da súa lavadora.
5.1 Carga da roupa:
- Abre a porta de carga.
- Clasifica a roupa por tipo de tecido, cor e grao de sucidade.
- Load laundry loosely into the drum, ensuring not to overload. The 7kg capacity refers to dry laundry weight.
- Peche a porta firmemente ata que faga clic.
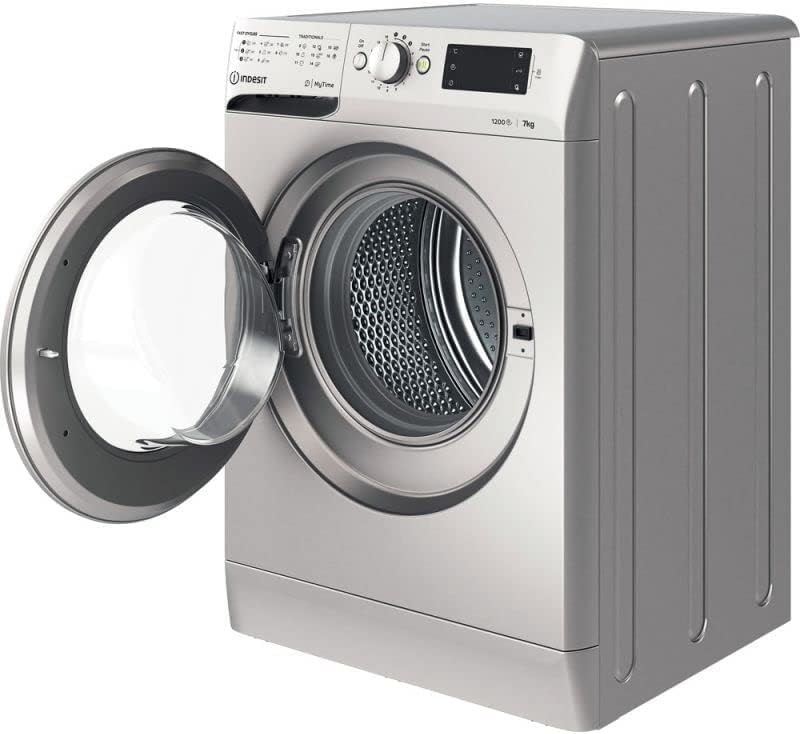
Figura 5.1: Fronte view of the washing machine with the door open. This image shows the wide opening for easy loading and unloading of laundry into the drum.
5.2 Adding Detergent and Additives:
- Tire do caixón do dosificador de deterxente.
- Add the appropriate amount of detergent to the main wash compartment (usually marked 'II' or 'Main Wash').
- If using fabric softener, pour it into the designated compartment (usually marked with a flower symbol or 'Softener'). Do not exceed the 'MAX' level.
- Pecha o caixón do dispensador suavemente.
5.3 Selecting a Program:
- Turn the rotary knob on the control panel to select the desired wash program. The machine offers various programs for different fabric types and soil levels, including a 'Quick Wash' option.
- Use the digital touch controls and push buttons to adjust additional settings such as temperature, spin speed (up to 1200 RPM), or delay start, if available for the selected program.
5.4 Starting a Cycle:
- Press the 'Start/Pause' button to begin the wash cycle. The indicator light will illuminate.
5.5 Pausing/Canceling a Cycle:
- To pause a cycle, press the 'Start/Pause' button. The indicator light will flash.
- To cancel a cycle, press and hold the 'Start/Pause' button for a few seconds, or turn the program selector knob to 'Off' and then back to a new program.
5.6 End of Cycle:
- The machine will signal the end of the cycle (e.g., with an audible alert or a specific display message).
- Open the door and remove the laundry promptly to prevent creasing and odors.
- Deixa a porta lixeiramente entreaberta para que o tambor seque ao aire.
6. Mantemento e Limpeza
Un mantemento regular garante un rendemento e unha hixiene óptimos.
6.1 Cleaning the Detergent Dispenser:
- Tire completamente do caixón dosificador.
- Retire calquera peza extraíble e enxágüea con auga corrente.
- Limpar a carcasa do caixón cun cepillo.
- Volva montar e volver inserir o caixón.
6.2 Cleaning the Drum:
- Run a maintenance wash cycle (e.g., a hot cycle with a drum cleaning agent or white vinegar) every few months to prevent odor and residue buildup.
6.3 Cleaning the Door Seal:
- Wipe the rubber door seal after each wash to remove lint, dirt, and moisture. This prevents mold and odors.
6.4 Cleaning the Drain Filter:
- Periodically clean the drain filter to prevent blockages and ensure proper drainage.
- Open the cover at the bottom front of the machine.
- Coloca un recipiente pouco profundo debaixo para recoller a auga residual.
- Slowly unscrew the filter, allowing water to drain.
- Remove any lint, coins, or foreign objects from the filter and its housing.
- Rinse the filter under running water and screw it back in firmly. Close the cover.

Figura 6.1: Close-up of the drain filter access. This image shows the removable cap that covers the drain filter, which needs to be regularly cleaned to prevent blockages.
6.5 External Cleaning:
- Limpe o exterior da máquina cun suave, damp pano. Non use produtos de limpeza ou disolventes abrasivos.
7 Solución de problemas
Before contacting customer service, try these simple solutions for common issues.
| Problema | Causa posible | Solución |
|---|---|---|
| A máquina non arranca | No power; Door not closed; Program not selected; Start/Pause button not pressed. | Comprobe a subministración eléctrica; asegúrese de que a porta estea ben pechada; seleccione un programa; prema Inicio/Pausa. |
| Auga que non enche | Billa da auga pechada; mangueira de entrada dobrada; presión da auga demasiado baixa. | Abrir a billa da auga; endereitar a mangueira; comprobar a presión da auga da casa. |
| A auga non drena | Drain hose kinked or blocked; Drain filter blocked. | Straighten or clear drain hose; Clean the drain filter (see Section 6.4). |
| Vibración / ruído excesivos | Parafusos de transporte non retirados; Máquina non nivelada; Carga desigual. | Remove transit bolts (if not already); Adjust feet to level machine; Redistribute laundry evenly. |
| Residuos de deterxente na roupa | Too much detergent; Detergent dispenser blocked; Insufficient rinse. | Reduce detergent amount; Clean dispenser; Select an extra rinse option if available. |
8. Especificacións
Detailed technical specifications for the Indesit TWE 71252 S EU washing machine.
| Característica | Especificación |
|---|---|
| Modelo | TWE 71252 S EU |
| Marca | Indesit |
| Capacidade | 7 kg |
| Velocidade de xiro máxima | 1200 RPM |
| Dimensións (H x W x D) | 85 cm x 59.5 cm x 54 cm |
| Peso | 66.5 kg |
| Eficiencia Enerxética | A+++ 90% |
| Material do tambor | Aceiro inoxidable |
| Tipo de control | Digital Touch, Push Button, Rotary Knob |
| Tipo de instalación | Autónomo |
| Cor | Prata |
| Características especiais | Durable, Quick Wash Option |
| Compoñentes incluídos | Lavadora |
9. Garantía e soporte
For warranty information, please refer to the warranty card provided with your appliance or contact your retailer. Keep your proof of purchase (receipt or invoice) as it will be required for any warranty claims.
If you encounter issues that cannot be resolved using the troubleshooting guide, please contact Indesit customer service or an authorized service center. Do not attempt to repair the appliance yourself, as this may void your warranty and pose safety risks.


