1. Introdución
This manual provides detailed instructions for the safe and efficient operation of your InFocus P120 INL412 Multimedia Projector (Model INL4128). Please read this manual thoroughly before using the projector and keep it for future reference. This projector is designed for high-quality image projection, suitable for various applications including presentations, home entertainment, and gaming.
2. Información de seguridade
Observe as seguintes precaucións de seguridade para evitar danos no proxector e garantir a seguridade do usuario:
- Ventilación: Ensure adequate ventilation around the projector. Do not block ventilation openings. Maintain a minimum distance of 30 cm (12 inches) from walls or other objects.
- Fonte de enerxía: Empregue só a fonte de alimentación e o volume especificadostage. Connect the power cord securely.
- Calor: The projector generates heat during operation. Do not touch the projector's vents or exhaust areas directly after use.
- Saída de luz: Non mire directamente á lente do proxector cando estea aceso.amp está acendido, xa que a luz intensa pode causar danos nos ollos.
- Colocación: Place the projector on a stable, level surface. Avoid placing it in direct sunlight, near heat sources, or in areas with high humidity or dust.
- Limpeza: Desconecte o cable de alimentación antes de limpar. Use un pano suave e seco. Non empregue produtos de limpeza líquidos nin en aerosol.
- Servizo: Non intente realizar o mantemento do proxector vostede mesmo. Encargue calquera mantemento a persoal de servizo cualificado.
3. Produto rematadoview
3.1 Top Panel and Lens Area
The top panel features the control buttons for basic operation and the lens area with focus and zoom adjustments.

Figura 3.1: Arriba view of the InFocus P120 INL412 projector, highlighting the control panel on the right and the lens adjustment area on the left. The InFocus logo is visible on the top surface.
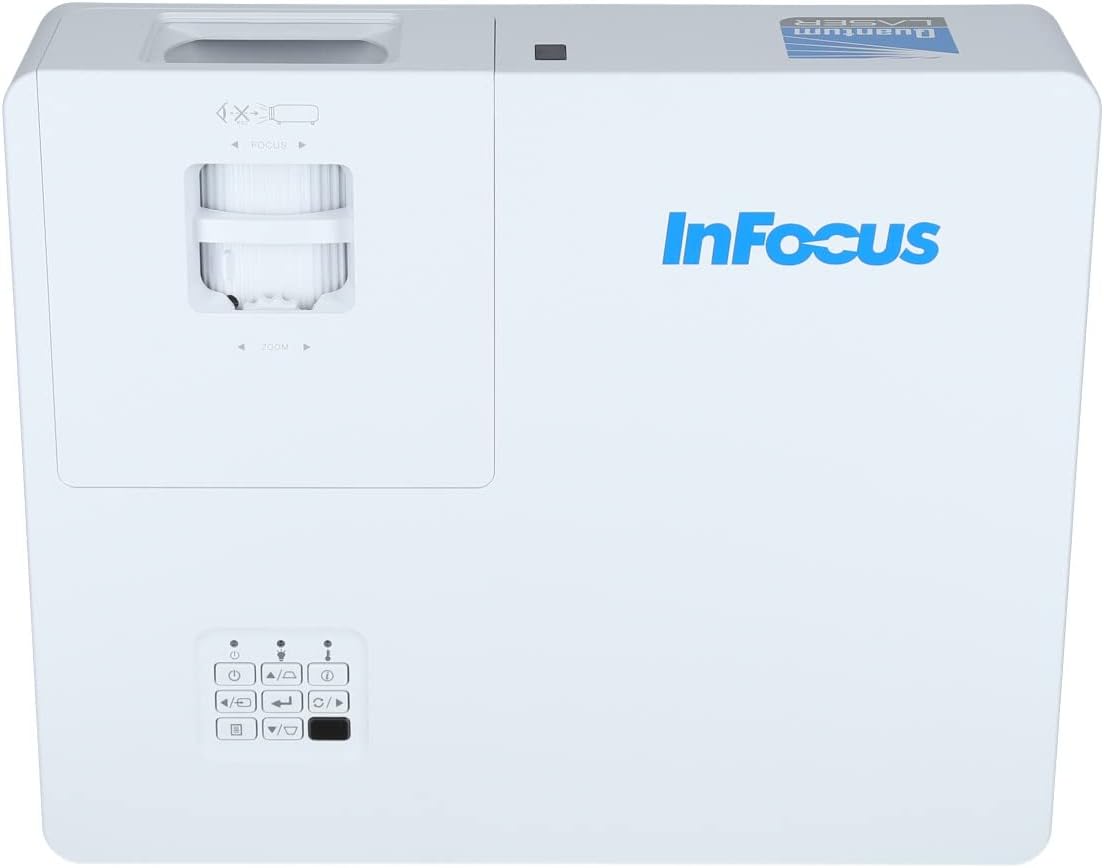
Figura 3.2: Un peche view of the projector's top panel, showing the focus and zoom rings near the lens opening and the array of control buttons for power, menu, source selection, and navigation.
3.2 Conexións do panel traseiro
The rear panel provides various input and output ports for connecting external devices.

Figure 3.3: Rear panel of the InFocus P120 INL412 projector, displaying a comprehensive array of connectivity options including HDMI (x2), USB, S-Video, Ethernet (LAN), VGA In (x2), VGA Out, RS232, and Audio In/Out ports. The power input is located on the bottom left.
Os portos clave inclúen:
- HDMI 1 e 2: For connecting high-definition digital video and audio sources.
- USB: For connecting USB devices, potentially for media playback or firmware updates.
- Vídeo S: For connecting older video sources.
- VGA IN 1 & 2: Para conectar ordenadores ou outros dispositivos con saída VGA.
- SAÍDA VGA: Para conectar a un monitor externo.
- Ethernet (LAN): Para a conectividade e o control da rede.
- Audio IN 1 & 2 / Audio OUT: Para conexións de audio analóxicas.
- RS232: Para control en serie.
- Entrada de enerxía: Para conectar o cable de alimentación CA.
3.3 Front and Side Panels
The front panel houses the projection lens and front ventilation, while the side panels feature additional ventilation grilles.

Figura 3.4: Fronte view of the InFocus P120 INL412 projector, displaying the main projection lens on the right and the extensive front ventilation grille on the left, crucial for heat dissipation.

Figura 3.5: Lateral view of the InFocus P120 INL412 projector, illustrating the side ventilation grilles that contribute to maintaining optimal operating temperature.
4. Configuración
4.1 Colocación do proxector
Position the projector on a stable, flat surface or mount it securely. Ensure the projector is within the optimal projection distance for your screen size. Maintain clear space around the projector for proper ventilation.
4.2 Conexión de dispositivos
Before connecting any cables, ensure the projector and all source devices are powered off.
- Conexión HDMI: Connect an HDMI cable from your source device (e.g., laptop, Blu-ray player, gaming console) to either the HDMI 1 or HDMI 2 port on the projector.
- Conexión VGA: Connect a VGA cable from your computer to either VGA IN 1 or VGA IN 2. For audio, connect a separate audio cable from your computer's audio output to the corresponding Audio IN port on the projector.
- Conexión USB: Insert a USB drive into the USB port for media playback (if supported by firmware) or service functions.
- Conexión Ethernet (LAN): Connect an Ethernet cable to the LAN port for network control or updates.
- Saída de audio: If using external speakers, connect an audio cable from the Audio OUT port on the projector to your audio system.
4.3 Conexión de alimentación
Connect the power cord to the projector's power input and then plug the other end into a grounded electrical outlet.
5. Instrucións de funcionamento
5.1 Acendido/Apagado
- Encendido: Preme o Poder button on the projector's control panel or the remote control. The power indicator light will change.
- Apagado: Preme o Poder button again. A confirmation message may appear. Press the button a second time to confirm shutdown. Allow the projector to cool down before unplugging it.
5.2 Axustar o foco e o zoom
Xira o anel de enfoque arredor da lente ata que a imaxe apareza nítida e clara. Usa o anel de zoom para axustar o tamaño da imaxe á pantalla.
5.3 Selección da fonte de entrada
Preme o Fonte button on the control panel or remote control to cycle through available input sources (HDMI 1, HDMI 2, VGA 1, VGA 2, S-Video, USB). Select the input corresponding to your connected device.
5.4 Navegación por menús
Usa o Menú button to access the on-screen display (OSD) menu. Use the arrow buttons to navigate through menu options and the Entra button to select. Press Menú de novo para saír.
6. Mantemento
6.1 Limpeza da lente
Gently wipe the lens with a soft, lint-free cloth specifically designed for optical surfaces. Do not use abrasive cleaners or excessive force, as this can scratch the lens.
6.2 Cleaning the Projector Exterior
Use un pano suave e seco para limpar a parte traseira do proxector.asing. For stubborn dirt, dampen the cloth slightly with water, then wipe dry immediately. Avoid getting liquids into the projector's openings.
6.3 Ventilation Care
Regularly check the projector's ventilation grilles for dust accumulation. Use a soft brush or a vacuum cleaner with a brush attachment to gently remove dust from the vents to ensure proper airflow and prevent overheating.
7 Solución de problemas
7.1 Non se mostra ningunha imaxe
- Ensure the projector is powered on and the power indicator light is solid.
- Verify that the video cable (HDMI, VGA, etc.) is securely connected to both the projector and the source device.
- Comprobe que estea seleccionada a fonte de entrada correcta no proxector.
- Confirm that the source device (laptop, player) is powered on and outputting a signal.
7.2 A imaxe está borrosa ou desenfocada
- Axusta o anel de enfoque da lente do proxector ata que a imaxe sexa nítida.
- Asegúrate de que o proxector estea á distancia correcta da pantalla.
- Limpe a lente do proxector se parece sucia.
7.3 Sen son
- If using HDMI, ensure the source device's audio output is set to HDMI.
- If using VGA, ensure a separate audio cable is connected from the source to the projector's Audio IN port.
- Comprobe a configuración de volume tanto no proxector como no dispositivo fonte.
- If using external speakers, ensure they are properly connected to the Audio OUT port and powered on.
8. Especificacións
| Característica | Detalle |
|---|---|
| Marca | Enfoque |
| Fabricante | En Foco |
| Nome do modelo | P120 INL412 |
| Número de modelo | INL4128 |
| Ano | 2023 |
| Interface de hardware | Ethernet, HDMI, S-Video, USB |
| Número de elementos | 1 |
| Relación de aspecto | 16:9 |
| Wattage | 341 vatios |
| Pilas incluídas | Non |
| Pilas necesarias | Non |
| Factor de forma | Escritorio |
| Tipo de montaxe | Soporte de mesa |
| Control remoto incluído | Si |
| Dimensións do produto | 56.13 x 46.48 x 25.15 cm |
| Peso do elemento | 5.5 kg |
| Tamaño máximo da imaxe | 308.28 polgadas |
| Tamaño mínimo da imaxe | 910.63 milímetros |
| Primeira data dispoñible | 5 de xaneiro de 2022 |
9. Garantía e soporte
For warranty information and technical support, please refer to the documentation included with your purchase or visit the official InFocus websitio. Garda o comprobante de compra para reclamacións de garantía.


