Introdución
This instruction manual provides detailed guidance for the safe installation, operation, and maintenance of your Troy Lighting Tristan 12-Light Semi-Flush Mount fixture, Model C2812-PBR. Please read all instructions carefully before beginning installation and retain this manual for future reference.
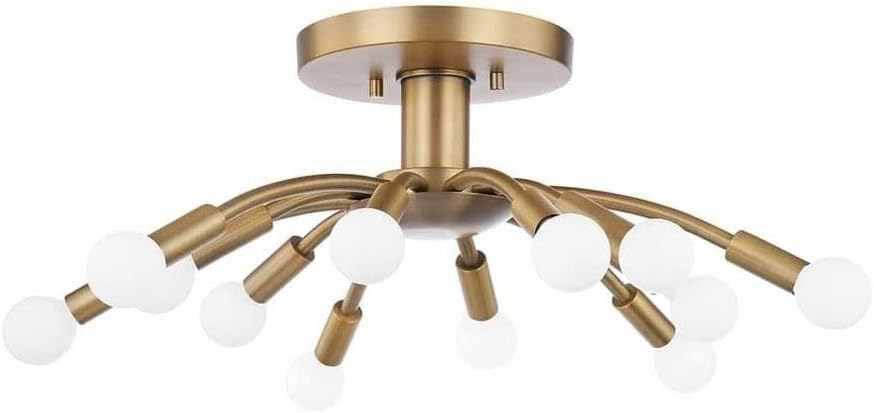
This image displays the complete Troy Lighting Tristan 12-Light Semi-Flush Mount fixture. It features a central brass canopy that attaches to the ceiling, with twelve radiating arms of varying lengths, each terminating in a bulb socket. The fixture has a modern, sputnik-like design, showcasing its brass finish and the arrangement of its light sources.
Información de seguridade
AVISO: Risco de descarga eléctrica. Desconecte a alimentación na caixa de fusibles ou no disyuntor antes da instalación ou do mantemento.
- Todas as conexións eléctricas deben cumprir cos códigos e ordenanzas locais ou co Código Eléctrico Nacional (NEC). Consulte cun electricista cualificado se non está familiarizado coas conexións de cableado eléctrico axeitadas.
- Este aparello está destinado só para uso en interiores.
- Asegúrate de que a superficie de montaxe poida soportar o peso da luminaria.
- Non exceda a potencia máximatage specified for each bulb socket.
- Use lentes e luvas de seguridade durante a instalación.
- Never connect the fixture to a power source while it is still in the packaging.
Contido do paquete
Verify that all components are present before discarding packaging materials.
- Fixture Body (with pre-attached arms and wiring)
- Mounting Plate/Crossbar
- Parafusos de montaxe e porcas de arame
- Manual de instrucións
Nota: Light bulbs are not included and must be purchased separately. This fixture requires 12 incandescent bulbs, maximum 60 watts each.
Ferramentas necesarias
- Destornillador Phillips
- Destornillador de cabeza plana
- Pelacables
- Cinta eléctrica
- Escada (se é necesario)
- Gafas de seguridade
Configuración e instalación
Follow these steps carefully to install your semi-flush mount fixture.
- Apagar a enerxía: Locate the circuit breaker or fuse box that supplies power to the fixture location. Turn off the main power switch. Verify power is off using a voltagprobador.
- Preparación para a instalación: Carefully unpack the fixture and its components. Lay them out on a clean, soft surface to prevent scratches.
- Instalación da placa de montaxe: Attach the mounting plate (crossbar) to the electrical junction box in the ceiling using the provided mounting screws. Ensure it is securely fastened.
- Realizar conexións eléctricas:
- Conecta o negro cable desde o aparello ata o negro cable (contento) da caixa de conexións usando unha porca para cables.
- Conecta o branco cable desde o aparello ata o branco cable (neutro) da caixa de conexións usando unha agarradera para cables.
- Conecta o chan cable (cobre espido ou verde) desde a luminaria ata o chan cable da caixa de conexións (ou ao parafuso verde de terra da placa de montaxe) usando unha porca para cables.
- Ensure all wire nuts are tightly secured and wrap connections with electrical tape for added safety.
- Montar o aparello: Carefully tuck all wires into the junction box. Align the fixture's canopy with the mounting plate and secure it using the provided screws or nuts, ensuring it sits flush against the ceiling.
- Instalar lámpadas: Screw the appropriate incandescent bulbs (max 60W each) into the 12 sockets. Do not overtighten.

Un detallado view of the Troy Lighting Tristan fixture, focusing on several of its brass-finished arms and the white, spherical bulbs installed in their sockets. This close-up highlights the construction of the arms and the connection points for the bulbs, providing a clearer look at the fixture's material and design elements.
Importante: After installation, restore power at the circuit breaker and test the fixture.
Instrucións de funcionamento
The Troy Lighting Tristan fixture operates via a standard wall switch connected to the electrical circuit. Simply toggle the wall switch to turn the light fixture on or off.
Mantemento
Limpeza
To clean the fixture, ensure the power is turned off at the circuit breaker. Use a soft, dry, or slightly damp cloth. Do not use abrasive cleaners, solvents, or polishes as they may damage the finish. Avoid spraying cleaners directly onto the fixture.
Substitución da lámpada
Before replacing bulbs, turn off the power to the fixture at the circuit breaker and allow bulbs to cool completely. Unscrew the old bulb and screw in a new incandescent bulb (max 60W). Ensure the replacement bulb matches the specified wattage para evitar o sobrequecemento.
Resolución de problemas
| Problema | Causa posible | Solución |
|---|---|---|
| A luminaria non se acende. | Non hai potencia para o dispositivo. | Comprobe o disxuntor ou o fusible. Asegúrese de que o interruptor de parede estea acendido. |
| Cableado solto ou incorrecto. | Turn off power. Check all wire connections. Re-secure if loose. | |
| Defective bulb(s). | Substitúa a(s) lámpada(s) por unhas novas. | |
| As luces parpadean. | Conexión da lámpada ou do cableado solta. | Turn off power. Tighten bulbs. Check wire connections. |
| As lámpadas apáganse rapidamente. | Wat incorrectotage bulbo. | Ensure bulbs do not exceed 60W. |
Especificacións
| Número de modelo | C2812-PBR |
| Marca | Iluminación Troy |
| Dimensións (L x W x H) | 25 cm de longo x 9 cm de ancho x 25 cm de alto |
| Acabado Cor | Latón |
| Material | Aluminum, Stainless Steel, Glass |
| Tipo de fonte de luz | Incandescente |
| Número de fontes de luz | 12 |
| Max Wattage por bulbo | 60 vatios |
| Voltage | 120 voltios |
| Tipo de montaxe | Ceiling Mount (Semi-Flush) |
| Uso interior/exterior | Interior |
| Requírese montaxe | Si |
| Peso do elemento | 8.62 libras |
Garantía
This Troy Lighting fixture is covered by a Garantía limitada do fabricante dun ano from the date of purchase. This warranty covers defects in materials and workmanship under normal use. It does not cover damage resulting from improper installation, accident, misuse, abuse, or unauthorized modifications. Please retain your proof of purchase for warranty claims.
Apoio
If you encounter any issues not covered in the troubleshooting section or require further assistance, please contact Troy Lighting customer support. For the most up-to-date contact information, please visit the official Troy Lighting websitio web ou consulte a documentación da súa compra.
When contacting support, please have your model number (C2812-PBR) and proof of purchase readily available.


