1. Introdución
Thank you for choosing the Conentool 21V Cordless Drill Driver Set. This manual provides essential information for the safe and effective use of your new tool. Please read all instructions carefully before operation to ensure proper handling, maximize performance, and prevent injury. Keep this manual for future reference.
2. Instrucións de seguridade
Observe sempre as precaucións de seguridade básicas ao usar ferramentas eléctricas para reducir o risco de incendio, descarga eléctrica e lesións persoais.
Avisos xerais de seguridade das ferramentas eléctricas
- Seguridade na zona de traballo: Manteña a súa área de traballo limpa e ben iluminada. As zonas desordenadas ou escuras invitan aos accidentes. Non manexe ferramentas eléctricas en atmosferas explosivas, como en presenza de líquidos, gases ou po inflamables.
- Seguridade eléctrica: Evite o contacto corporal con superficies conectadas á terra ou con toma de terra, como tubaxes, radiadores, fogóns e frigoríficos. Non expoña as ferramentas eléctricas á choiva nin á humidade.
- Seguridade persoal: Usa sempre protección ocular. Usa o equipo de seguridade axeitado, como máscaras antipo, calzado de seguridade antideslizante, cascos ou protección auditiva cando sexa necesario. Vístete axeitadamente; evita roupa folgada ou xoias.
- Uso e coidado da ferramenta: Non force a ferramenta eléctrica. Empregue a ferramenta eléctrica axeitada para a súa aplicación. Desconecte o enchufe da fonte de alimentación e/ou retire a batería antes de facer axustes, cambiar accesorios ou gardar ferramentas eléctricas.
- Uso e coidado da batería: Recargue só co cargador especificado polo fabricante. Non empregue baterías con outras ferramentas eléctricas.
3. Contido do paquete
Your Conentool 21V Cordless Drill Driver Set includes the following items:
- 1x Taladro inalámbrico
- 1x Maletín de transporte
- 2 baterías de ións de litio de 1500 mAh
- 1 x cargador
- 9x Socket Wrenches ( 4-12mm)
- 12x Screwdriver Bits
- Conventional Drill Bits
- Tile Drill Bit
- Long Screwdriver Bit
- 1x Flexible Drill Shaft

Image: Complete Conentool 21V Cordless Drill Driver Set with all accessories laid out.
Imaxe: Primeiro plano view of the various accessories included in the set, such as the drill, batteries, charger, and different types of bits and wrenches.
4. Produto rematadoview
The Conentool 21V Cordless Drill Driver is a versatile and powerful tool designed for various drilling and screwing tasks. It features a robust motor, ergonomic design, and multiple adjustable settings for optimal performance.
Características principais:
- 45N.m Max Torque: Proporciona ample poder para aplicacións esixentes.
- Axuste de par 18+1: Allows precise control for different materials and tasks, from delicate screwing to heavy-duty drilling.
- Two-Speed Setting: Offers flexibility with a low speed (0-400rpm) for high torque applications and a high speed (0-1500rpm) for faster drilling.
- Baterías duales de 1500 mAh: Ensures extended operation time with quick charging.
- Deseño compacto e lixeiro: Minimizes user fatigue during prolonged use.
- Luz LED incorporada: Ilumina a área de traballo para mellorar a visibilidade en condicións de pouca luz.
- 3/8" (10mm) Self-Locking Chuck: Permite cambios de brocas rápidos e sinxelos.
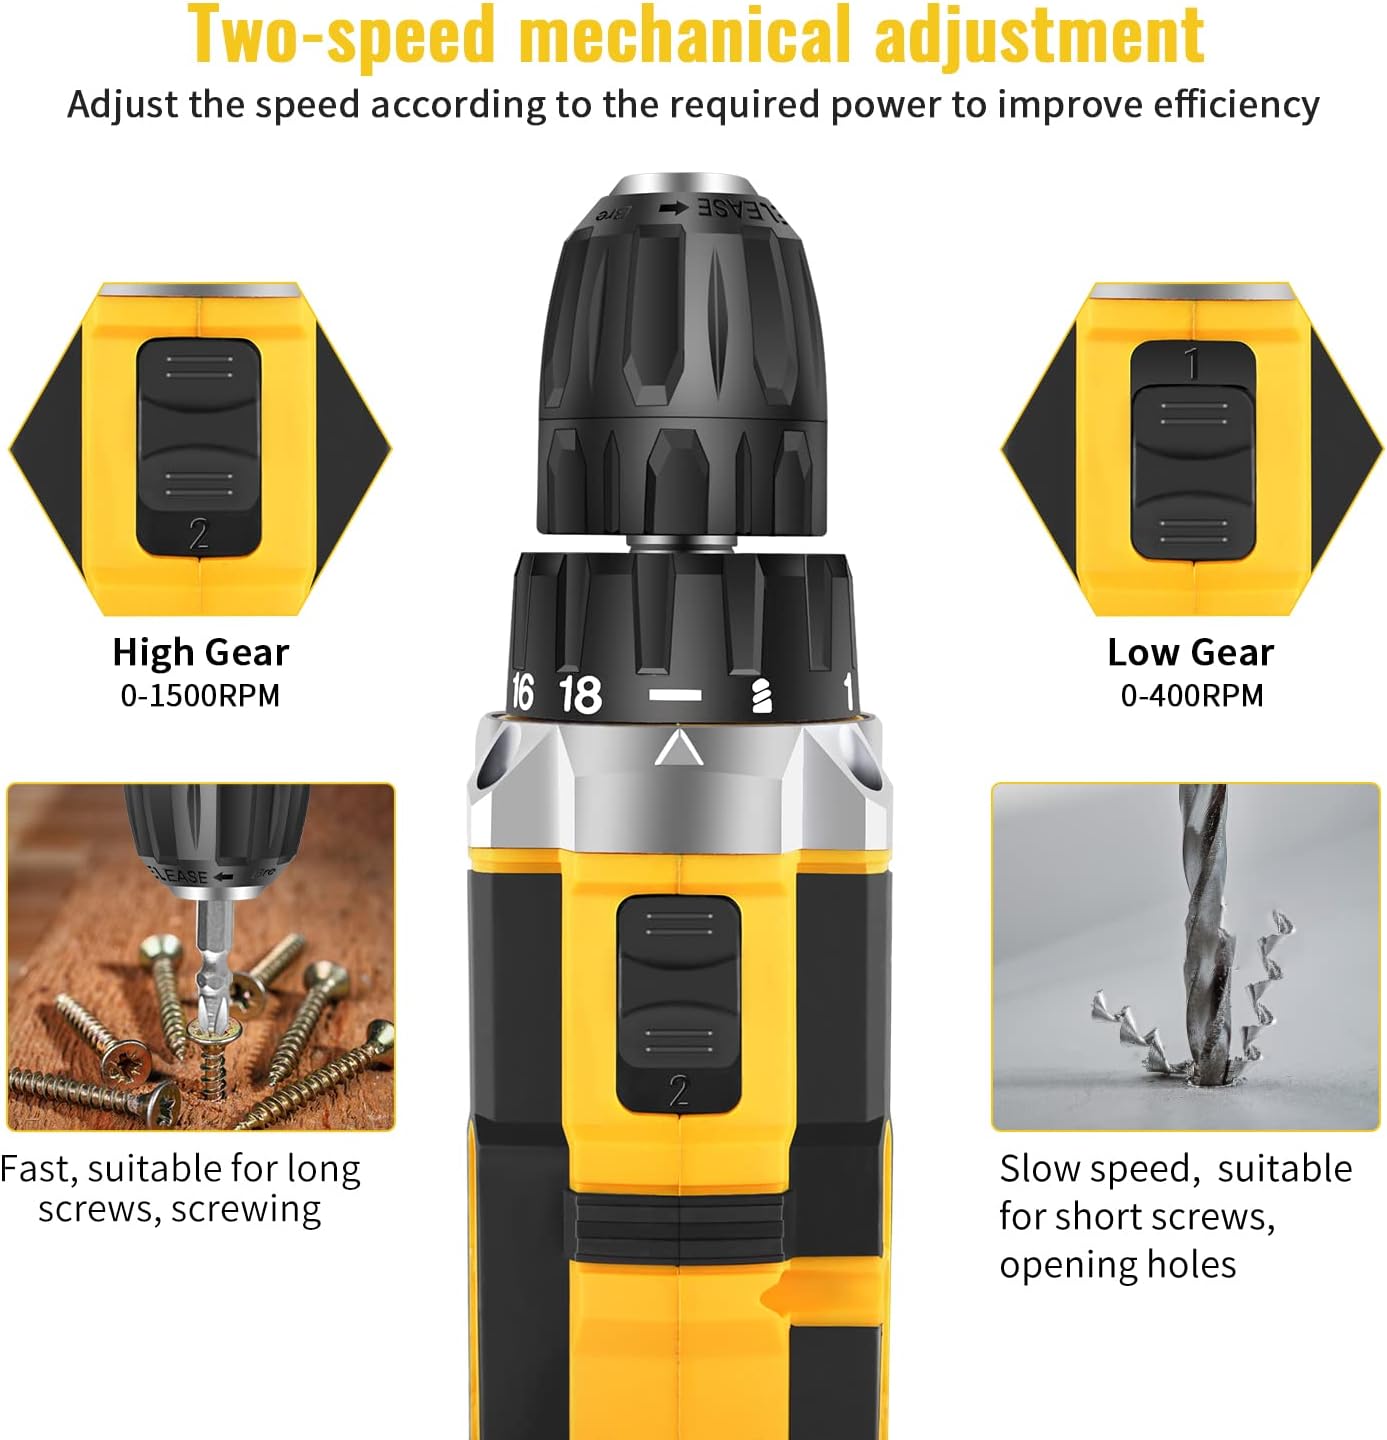
Image: Detailed diagram pointing out various features of the drill, including torque settings, speed selector, ventilation, LED light, and grip.

Image: Visual representation of the drill's internal motor, highlighting its 45N.m maximum torque and efficient heat dissipation.

Image: The drill depicted as lightweight and compact, designed to reduce user fatigue.

Image: Illustration of the drill's motor cooling system, demonstrating effective heat dissipation.

Image: Close-up of the integrated LED light, designed to illuminate the work area.
5. Configuración
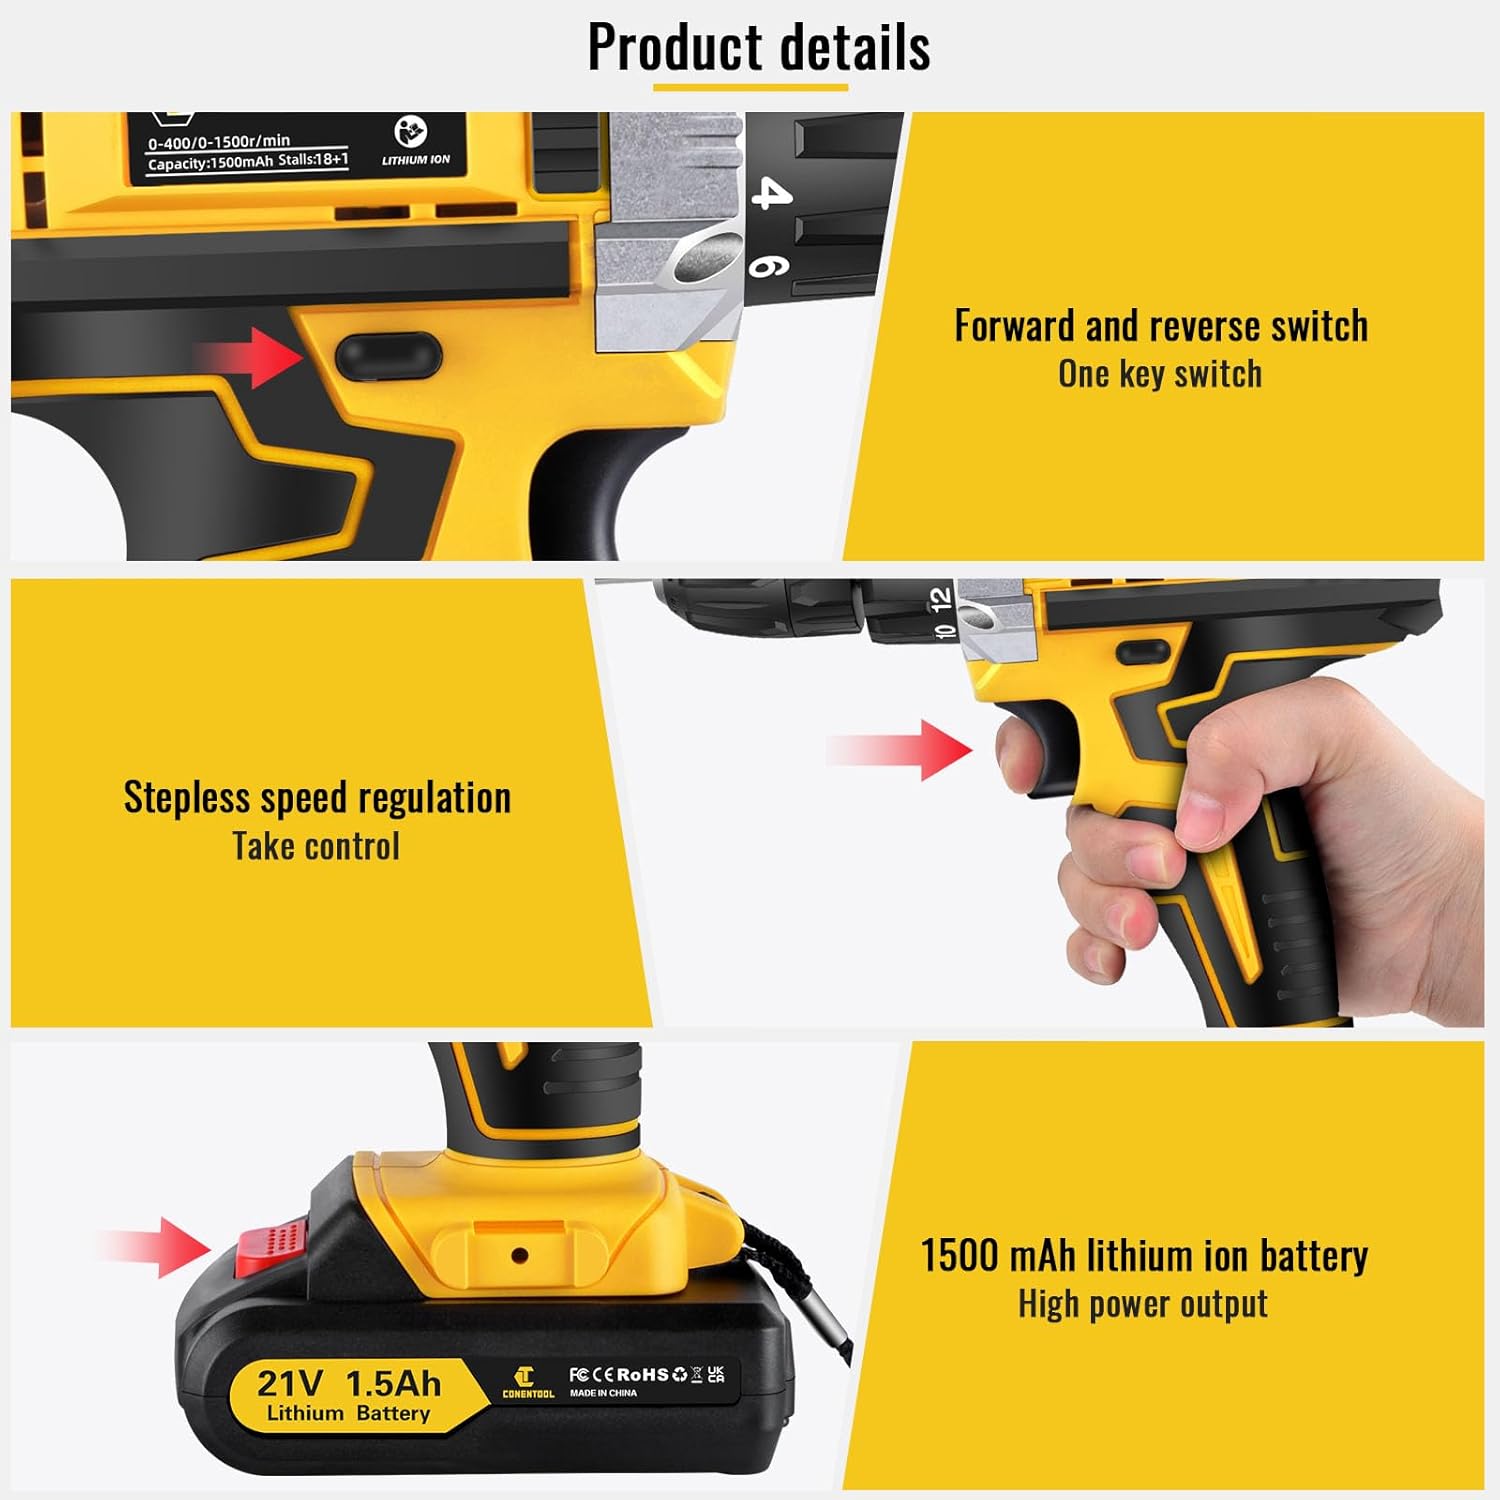
5.1 Carga da batería
The drill comes with two 1500mAh lithium-ion batteries. Before first use, fully charge both batteries. A fast charger is included, and a full charge typically takes about 1 hour.
- Conecta o cargador a unha toma de corrente estándar.
- Deslice a batería no cargador ata que encaixe no seu lugar.
- The charger indicator light will show the charging status (refer to charger manual for specific light indications).
- Unha vez cargada por completo, retire a batería do cargador.
5.2 Instalación/extracción da batería
- Para instalar: Aliñe a batería coa base do mango da furadeira e deslícea cara a dentro ata que encaixe firmemente no seu lugar.
- Para eliminar: Press the battery release button located on the front of the battery pack and slide the battery out of the drill handle.

Image: Details on battery installation and removal, along with trigger and switch controls.
5.3 Installing Drill Bits/Screwdriver Bits
The drill features a 3/8" (10mm) self-locking chuck for quick and easy bit changes.
- Xire o mandril en sentido antihorario para abrir as mordazas.
- Insert the desired drill bit or screwdriver bit into the chuck, ensuring it is seated firmly.
- Rotate the chuck clockwise to tighten the jaws securely around the bit. Ensure the bit is centered and tight before operation.

Image: Close-up of the drill chuck, showing how to insert and secure bits.
6. Instrucións de funcionamento
6.1 Acendido/apagado e disparador de velocidade variable
The drill is activated by pressing the variable speed trigger. The speed of rotation increases as you press the trigger further.
- To start the drill, press the trigger.
- To increase speed, press the trigger further.
- Para deter a furadeira, solte o gatillo.

Image: Illustration of the variable speed trigger and the forward/reverse button.
6.2 Two-Speed Mechanical Adjustment
The drill has two mechanical speed settings, selected via a switch on top of the drill housing.
- Gear 1 (Low Speed: 0-400rpm): Provides higher torque, ideal for driving screws or drilling into harder materials.
- Gear 2 (High Speed: 0-1500rpm): Provides lower torque but faster rotation, suitable for drilling into softer materials or for quick tasks.

Image: Diagram showing the two-speed selector switch and its corresponding RPM ranges.
6.3 Torque Adjustment (18+1 Settings)
The torque collar allows you to adjust the amount of rotational force the drill applies. This prevents over-tightening screws or damaging materials.
- Rotate the torque collar to select the desired setting from 1 to 18. Lower numbers are for smaller screws and softer materials, higher numbers for larger screws and harder materials.
- The drill icon setting is for drilling applications, providing maximum torque.

Image: The torque adjustment ring with settings for different materials.
6.4 Interruptor de avance/retroceso
The forward/reverse switch is located above the trigger and controls the direction of rotation.
- Empurre o interruptor cara á esquerda para a rotación cara adiante (para furar e apertar parafusos).
- Push the switch to the right for reverse rotation (for loosening screws or removing bits).
- Cando o interruptor está na posición central, o gatillo está bloqueado, o que evita o arranque accidental.
6.5 Uso da luz LED
A luz LED integrada ilumínase automaticamente ao premer o gatillo, o que proporciona visibilidade en zonas de traballo con pouca luz.

Image: The LED light in action, illuminating the work surface, and the onboard bit holder.
7. Mantemento
Un mantemento regular garante a lonxevidade e o rendemento óptimo da súa furadeira.
- Limpeza: Manteña as aberturas de ventilación limpas e despexadas. Use un pano suave eamp un pano para limpar a ferramenta. Non empregue produtos químicos agresivos nin produtos de limpeza abrasivos.
- Coidado da batería: Garda as baterías nun lugar fresco e seco, lonxe da luz solar directa. Non gardes as baterías completamente descargadas durante períodos prolongados. Cárgaas periodicamente se non as estás a usar.
- Almacenamento: Store the drill and all accessories in the provided carry case in a dry, secure location, out of reach of children.
8 Solución de problemas
If you encounter issues with your Conentool drill, refer to the following common problems and solutions:
| Problema | Causa posible | Solución |
|---|---|---|
| A furadeira non arranca | Batería non cargada; batería non inserida correctamente; interruptor de avance/retroceso na posición central (bloqueada). | Charge battery; Re-insert battery securely; Move switch to forward or reverse position. |
| Perda de potencia durante o funcionamento | Batería baixa; Sobrecarga. | Recharge battery; Reduce pressure on the drill or use a lower speed/higher torque setting. |
| A broca treme ou cae | Chuck not tightened sufficiently; Bit shank damaged. | Re-tighten chuck firmly; Replace damaged bit. |
| Sobrequecemento | Uso intenso prolongado; Ventilación bloqueada. | Deixar que a ferramenta arrefríe; Limpar as aberturas de ventilación. |
If the problem persists after attempting these solutions, please contact Conentool customer support.
9. Especificacións
| Característica | Especificación |
|---|---|
| Número de modelo | P000125 |
| Voltage | 21 V |
| Tipo de batería | Ion de litio |
| Capacidade da batería | 1500 mAh (1.5 Ah) |
| Par máximo | 45 Nm |
| Configuración de par | 18+1 |
| Velocidade sen carga (baixa) | 0-400 RPM |
| Velocidade sen carga (alta) | 0-1500 RPM |
| Tamaño de Chuck | 3/8" (10 mm) |
| Fonte de enerxía | Alimentado por batería |
| Material | Metal |
| Peso do elemento | 2.5 kg |
| Dimensións do produto | 30.5 x 27 x 10.5 cm |
10. Garantía e soporte
Conentool is committed to providing high-quality tools. For any product-related inquiries, technical assistance, or warranty claims, please contact Conentool customer support. Refer to your purchase documentation for specific warranty terms and contact information.
You can also visit the official Conentool store on Amazon for more information and support: Conentool Store


