Introdución
Thank you for choosing the Senicare Digital LED Alarm Clock. This manual provides detailed instructions for setting up, operating, and maintaining your new alarm clock. Please read this manual thoroughly before use to ensure proper functionality and to maximize your experience with its features, including dual alarms, a 7-color night light, a dimmable display, and a convenient USB charging port.
Información de seguridade
- Ensure the power adapter is compatible with your local power supply (100-240V AC).
- Non expoñas o dispositivo á auga nin a humidade excesiva.
- Evite colocar o reloxo baixo a luz solar directa ou preto de fontes de calor.
- Use só o adaptador de alimentación proporcionado.
- Manter fóra do alcance dos nenos pequenos.
- Non intente desmontar nin reparar o dispositivo vostede mesmo. Póñase en contacto co servizo de atención ao cliente se xorden problemas.
- Insert batteries correctly, observing polarity (+/-).
Contido do paquete
- Senicare Digital LED Alarm Clock (Model KT279)
- Adaptador de alimentación
- Cable de carga USB
- Manual de usuario (este documento)

Figure 1: Senicare Digital LED Alarm Clock and included accessories.
Produto rematadoview
Fronte View
The front of the clock features a large LED display for time, and indicators for PM, Alarm 1, and Alarm 2.
Arriba View (Controis)
The top panel houses the main control buttons and the integrated night light bar.
- ALT SET: Alarm 1 Set button.
- AL2 SET: Alarm 2 Set button.
- HORA: Time setting button.
- COR: Night light color selection button.
- POSPRENDER / LUZ: Snooze function and night light on/off.
- HOUR +: Adjusts hour, increases alarm volume.
- MIN -: Adjusts minute, decreases alarm volume.
Lado View (Ports & Dimmer)
The side of the clock includes the power input, USB charging port, and display dimmer slider.
- Porto de alimentación DC 5V: Conéctase ao adaptador de alimentación.
- USB Charging Port (5V-1A): Para cargar dispositivos externos.
- DIMMER DE PANTALLA: Slider to adjust the brightness of the time display (0-100%).
Abaixo View (Battery Compartment)
The bottom of the clock contains the battery compartment for backup power.

Figura 2: Traseira view highlighting the USB charging port and power input.

Figure 3: Battery compartment for backup power.
Configuración
1. Conexión de alimentación
- Connect the provided power adapter to the DC 5V Power Port on the back of the clock.
- Plug the power adapter into a standard 100-240V AC wall outlet.
- A pantalla LED acenderase, indicando que o reloxo está acendido.
2. Batería de reserva (opcional)
Para poder outage protection, install 2 x AAA batteries (not included) into the battery compartment on the bottom of the clock. This will preserve time and alarm settings during a power interruption, though the display will go black.

Figure 4: The clock retains settings during power outages with battery backup.
Instrucións de funcionamento
1. Axustar a hora
- Manteña premido o TEMPO botón ata que os díxitos das horas comecen a parpadear.
- Preme o HOUR + botón para axustar a hora.
- Preme o MIN - botón para axustar o minuto.
- Preme o TEMPO de novo para confirmar e saír do modo de axuste da hora.
2. Setting Dual Alarms (Alarm 1 & Alarm 2)
The clock features two independent alarms for different schedules.

Figura 5: Example of dual alarm functionality.
- To Set Alarm 1: Manteña premido o ALT SET button until the hour digits for Alarm 1 flash.
- Usa o HOUR + e MIN - botóns para axustar a hora de alarma desexada.
- Preme ALT SET again to confirm and activate Alarm 1. The Alarm 1 indicator will appear on the display.
- To Set Alarm 2: Follow the same steps using the Axuste AL2 botón.
- To turn an alarm on or off, briefly press the corresponding ALT SET or Axuste AL2 button. The alarm indicator will appear/disappear.
3. Función de repetición da alarma
Cando soe unha alarma, prema o botón grande SNOOZE / LUZ button on top of the clock to activate the 9-minute snooze function. The alarm will sound again after 9 minutes.

Figure 6: The SNOOZE / LIGHT button for snooze functionality.
4. Axustar o brillo da pantalla
The clock features a 0-100% full-range dimmer for the LED time display. Use the DIMMER DE PANTALLA slider located on the side of the clock to adjust the brightness to your preference.

Figure 7: Adjusting display brightness with the dimmer slider.
5. Night Light Features
The integrated night light offers 7 different colors and adjustable brightness.

Figure 8: The 7-color night light feature.
- Cambio de cores: Toca brevemente o COR button to cycle through the 7 available colors.
- Color Loop Mode: Manteña premido o COR button for 2 seconds to enter a continuous color-changing loop.
- Turning Off Night Light: Preme o SNOOZE / LUZ button to turn the night light off.
- Adjusting Night Light Brightness: The night light brightness can also be adjusted from 0-100% using the DIMMER DE PANTALLA slider, similar to the main display.
6. Axustar o volume da alarma
The alarm volume has 5 adjustable levels, ranging from 45dB to 85dB.
- While an alarm is sounding, or when setting an alarm, press the HOUR + botón para aumentar o volume.
- Preme o MIN - botón para baixar o volume.

Figure 9: Volume adjustment using HOUR + and MIN - buttons.
7. Porto de carga USB
The clock includes a 5V-1A USB charging port on its side, allowing you to charge small electronic devices like smartphones or tablets while the clock is plugged into power.
Mantemento
- Limpa o reloxo cun pano suave e seco. Non empregues produtos de limpeza abrasivos nin solventes.
- Keep the clock away from dust and moisture.
- If not in use for an extended period, remove the backup batteries to prevent leakage.
Resolución de problemas
| Problema | Causa posible | Solución |
|---|---|---|
| A pantalla do reloxo está apagada. | No power, or display dimmer set to 0%. | Check power connection. Adjust DISPLAY DIMMER slider. |
| Non soa a alarma. | Alarm not set, alarm volume too low, or alarm turned off. | Ensure alarm is set and activated (indicator visible). Increase alarm volume. |
| Perda de tempo/configuración despois dun apagadotage. | No backup batteries installed, or batteries are dead. | Install fresh 2 x AAA batteries for backup. |
| A carga por USB non funciona. | Clock not powered by AC, or device requires more than 1A. | Ensure clock is plugged into AC power. Check device's charging requirements. |
Especificacións
| Característica | Detalle |
|---|---|
| Modelo | KT279 |
| Tipo de visualización | LED |
| Fonte de enerxía | Eléctrico con cable (100-240 V CA) |
| Copia de seguridade da batería | 2 pilas AAA (non incluídas) |
| Porto de carga USB | 5V-1A |
| Cores de luz nocturna | 7 cores |
| Dimmer da pantalla | 0-100% axustable |
| Volume de alarma | 5 levels (45dB to 85dB) |
| Duración do adiamento | minutos 9 |
| Dimensións do produto | 5.91" de ancho x 3.15" de alto (aprox. 150 mm x 80 mm) |
| Peso do elemento | 11.7 onzas |
| Material | Plástico |
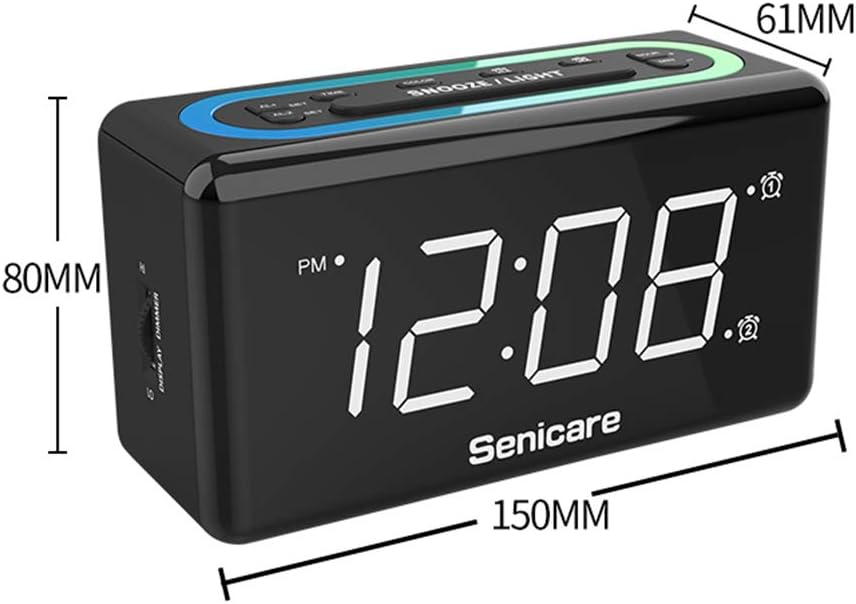
Figura 10: Dimensións do produto.
Garantía e Soporte
The Senicare Digital LED Alarm Clock comes with a garantía dun anoTamén ofrecemos unha Garantía de devolución de diñeiro de 30 días. For any questions or assistance, please contact our customer service team, available 24 horas a day. Your satisfaction is our priority.