Introdución
Thank you for choosing the HMF 65709-02 9U 19-inch Rack Cabinet. This manual provides detailed instructions for the safe and efficient assembly, installation, and operation of your new rack cabinet. Please read this manual thoroughly before beginning assembly and retain it for future reference.
Información de seguridade
Observe sempre as seguintes precaucións de seguridade para evitar lesións ou danos ao produto:
- Asegúrese de que todos os compoñentes estean presentes e sen danos antes da montaxe.
- Utilizar ferramentas adecuadas para a montaxe.
- Non exceda a capacidade de carga máxima de 60 kg.
- When mounting to a wall, ensure the wall structure can support the weight of the cabinet and its contents.
- Manteña os nenos e as mascotas lonxe da zona de reunión.
- Handle the glass door with care to avoid breakage.
Contido do paquete
Verifique que todos os seguintes compoñentes estean incluídos no seu paquete:
- Rack cabinet panels (top, bottom, sides, rear)
- 19-inch mounting rails
- Tempered glass door with cylinder lock
- 2 keys for the lock
- Ferraxes de montaxe (parafusos, porcas, arandelas)
- Manual de instrucións (este documento)
If any parts are missing or damaged, please contact HMF customer support.
Configuración e montaxe
The HMF 65709-02 rack cabinet is supplied unassembled for efficient shipping. Follow these steps carefully for proper assembly.
Pasos de montaxe
- Preparar compoñentes: Unpack all components and lay them out on a clean, flat surface. Identify the top, bottom, side panels, and mounting rails.
- Attach Mounting Rails: Secure the 19-inch mounting rails to the side panels using the provided screws. Ensure they are oriented correctly for equipment installation.
- Montar a estrutura do armario: Connect the side panels to the top and bottom panels. Use the provided hardware to firmly secure all connections.
- Instalar o panel traseiro: Attach the rear panel to the assembled frame.
- Mount Glass Door: Carefully attach the tempered glass door to the front of the cabinet using the hinges. Ensure the door swings freely.
- Install Lock: Insert the cylinder lock into the designated opening on the door and secure it. Test the lock with the provided keys.
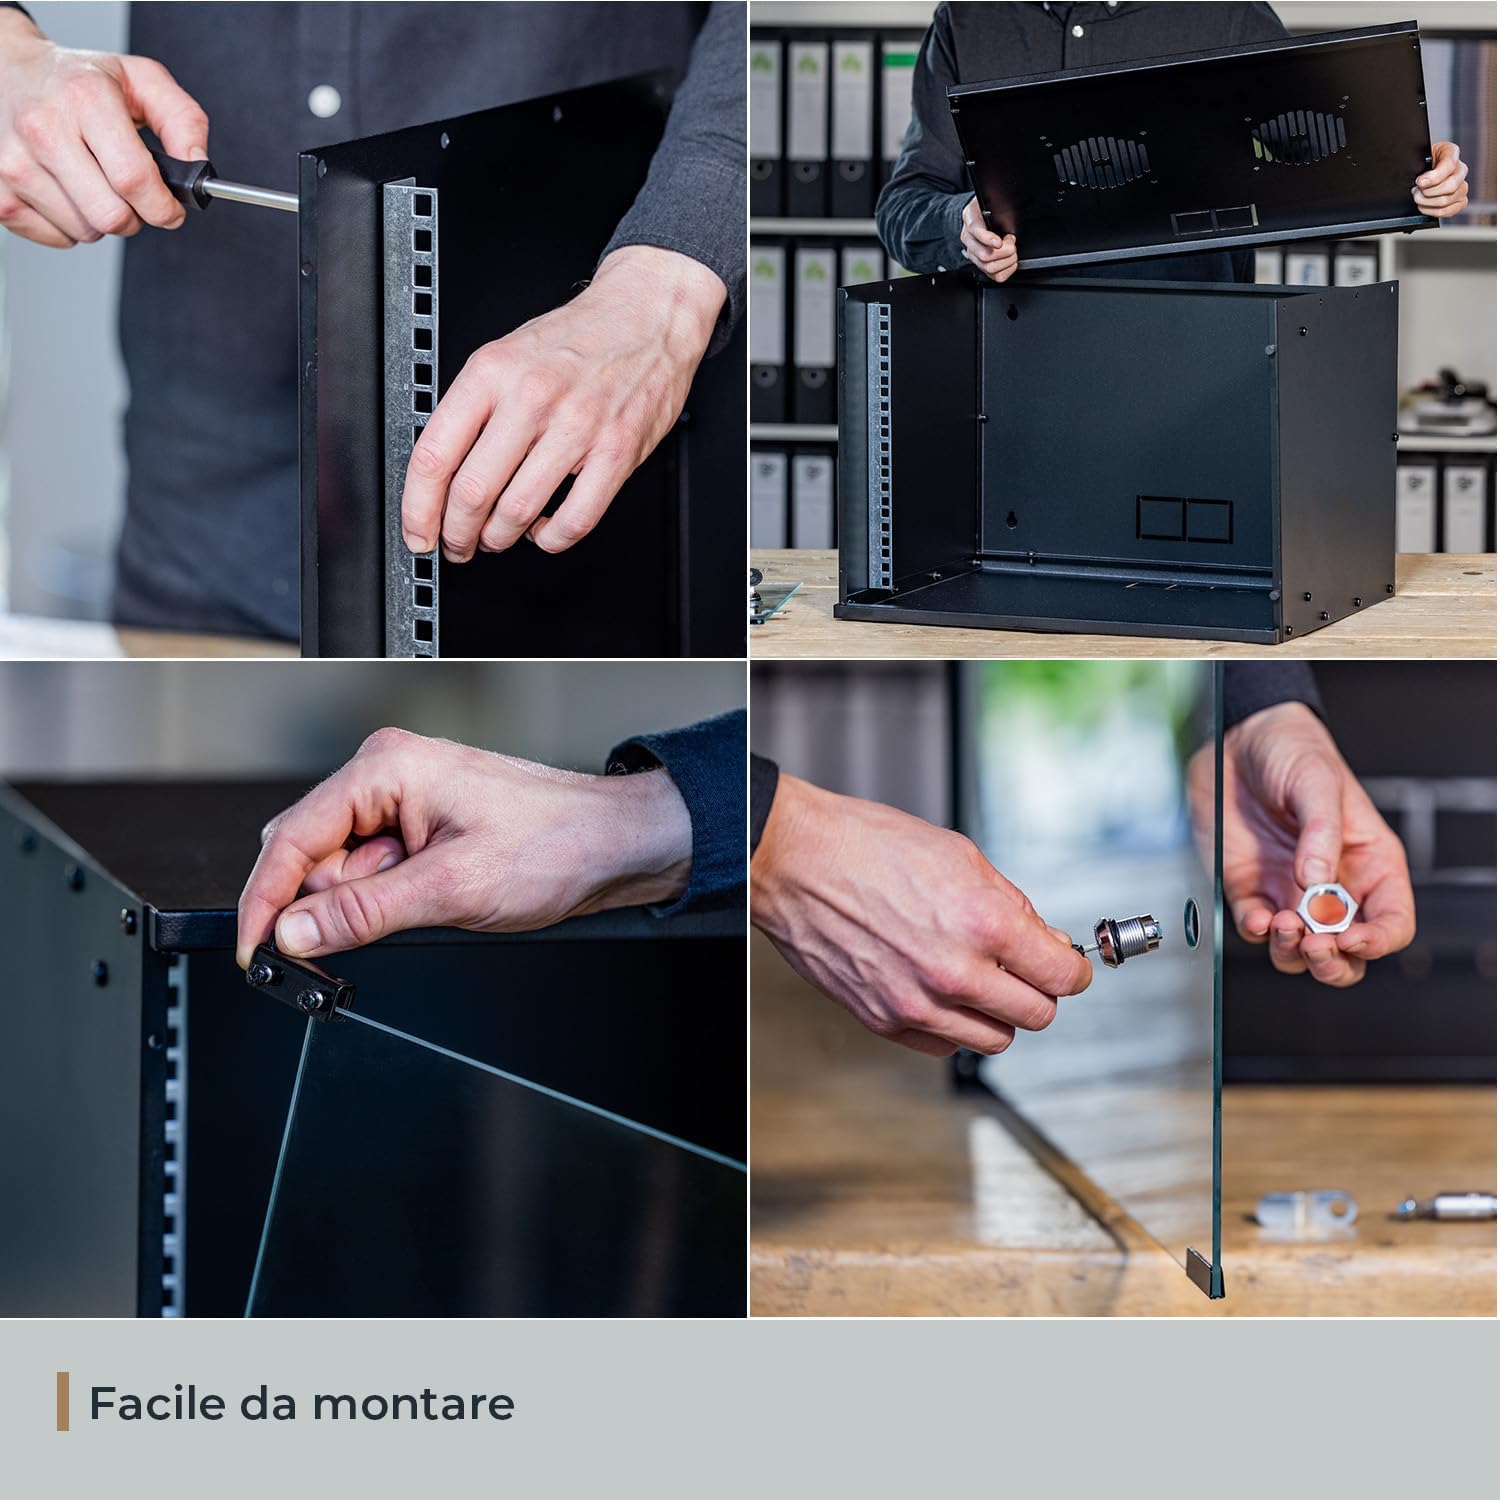
Image: Step-by-step visual guide for assembling the HMF 65709-02 rack cabinet, including securing mounting rails, connecting panels, and installing the glass door and lock mechanism.
Guía de vídeo de montaxe
Video: Official HMF assembly guide for the 19-inch rack cabinet, demonstrating the complete setup process from unpacking to final lock installation.
Montaxe na parede (opcional)
If wall mounting, ensure the wall material is suitable and use appropriate wall anchors (not included). Mark the drilling points using the cabinet's rear mounting holes as a template. Secure the cabinet firmly to the wall, ensuring it is level and stable before loading equipment.
Instrucións de funcionamento
Instalación de equipos
Install your 19-inch rack-mountable equipment into the cabinet using appropriate rack screws (not included). Ensure even weight distribution to maintain stability.
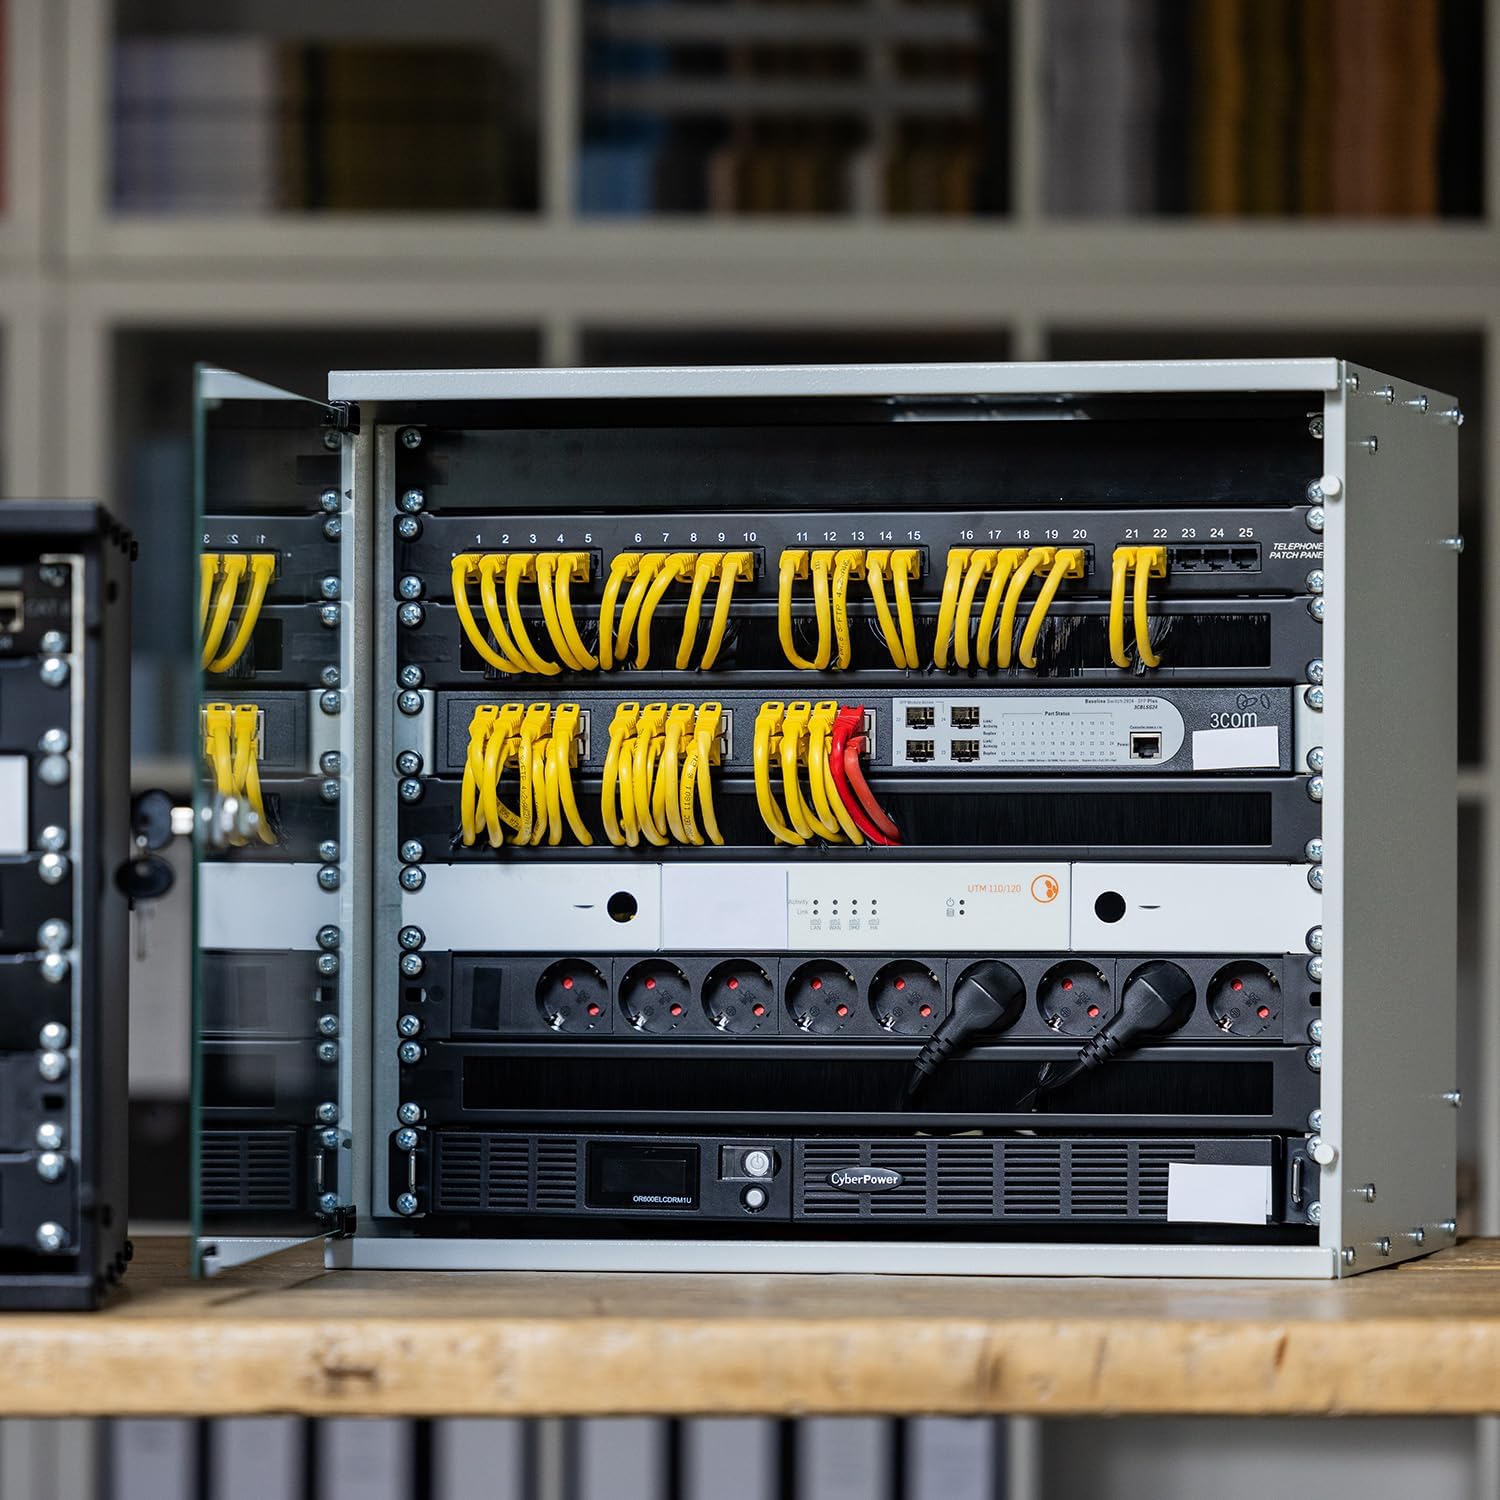
Image: An HMF rack cabinet with various network devices, patch panels, and power distribution units neatly installed, demonstrating proper equipment placement.
Xestión de cables
Utilize the three cable pass-throughs located on the rear panel for organized cable routing. This helps maintain airflow and prevents cable damage.

Imaxe: Detallada view of the cabinet's internal features, highlighting the ventilation slots on the top panel, the three cable pass-throughs at the rear, and the robust 19-inch mounting rails.
Ventilación
The cabinet features two ventilation slots on the top panel, designed for mounting 120mm fans (fans not included). Ensure adequate airflow to prevent overheating of installed equipment.
Mantemento
- Limpeza: Limpar as superficies exteriores cun pano suave eamp cloth. For the glass door, use a glass cleaner. Avoid abrasive cleaners.
- Inspección: Periodically check all screws and connections to ensure they remain tight. Inspect the door hinges and lock for smooth operation.
- Ventilación: Ensure ventilation slots are free from dust and obstructions to maintain proper airflow.
Resolución de problemas
| Problema | Causa posible | Solución |
|---|---|---|
| Cabinet feels unstable after assembly. | Parafusos soltos ou superficie irregular. | Tighten all assembly screws. Ensure the cabinet is placed on a level surface or securely wall-mounted. |
| A porta non pecha nin bloquea correctamente. | Hinges misaligned or lock mechanism obstructed. | Check hinge alignment and adjust if necessary. Ensure no cables or equipment obstruct the door's closing path. Inspect the lock for any debris. |
| Equipment overheating inside the cabinet. | Ventilación insuficiente. | Ensure ventilation slots are clear. Consider installing 120mm cooling fans in the designated slots. Optimize cable routing to improve airflow. |
Especificacións
| Característica | Detalle |
|---|---|
| Marca | HMF |
| Modelo | 65709-02 |
| Tamaño | 9 U (Rack Units) |
| Dimensións do produto (L x W x H) | 51 cm x 40 cm x 45 cm (aprox. 20.1 x 15.8 x 17.7 polgadas) |
| Profundidade máxima de instalación | 30.5 cm (aprox. 12 polgadas) |
| Material | Sheet steel (1 - 1.5 mm thickness) |
| Tipo de porta | Vidro de seguridade templado de 4 mm |
| Bloqueo | Cylinder lock with 2 keys |
| Cor | Negro |
| Peso | 10 kg (aprox. 22 lbs) |
| Capacidade de carga | 60 kg (aprox. 132 lbs) |
| Ventilación | 2 slots for 120mm fans (fans not included) |
| Xestión de cables | 3 cable pass-throughs |
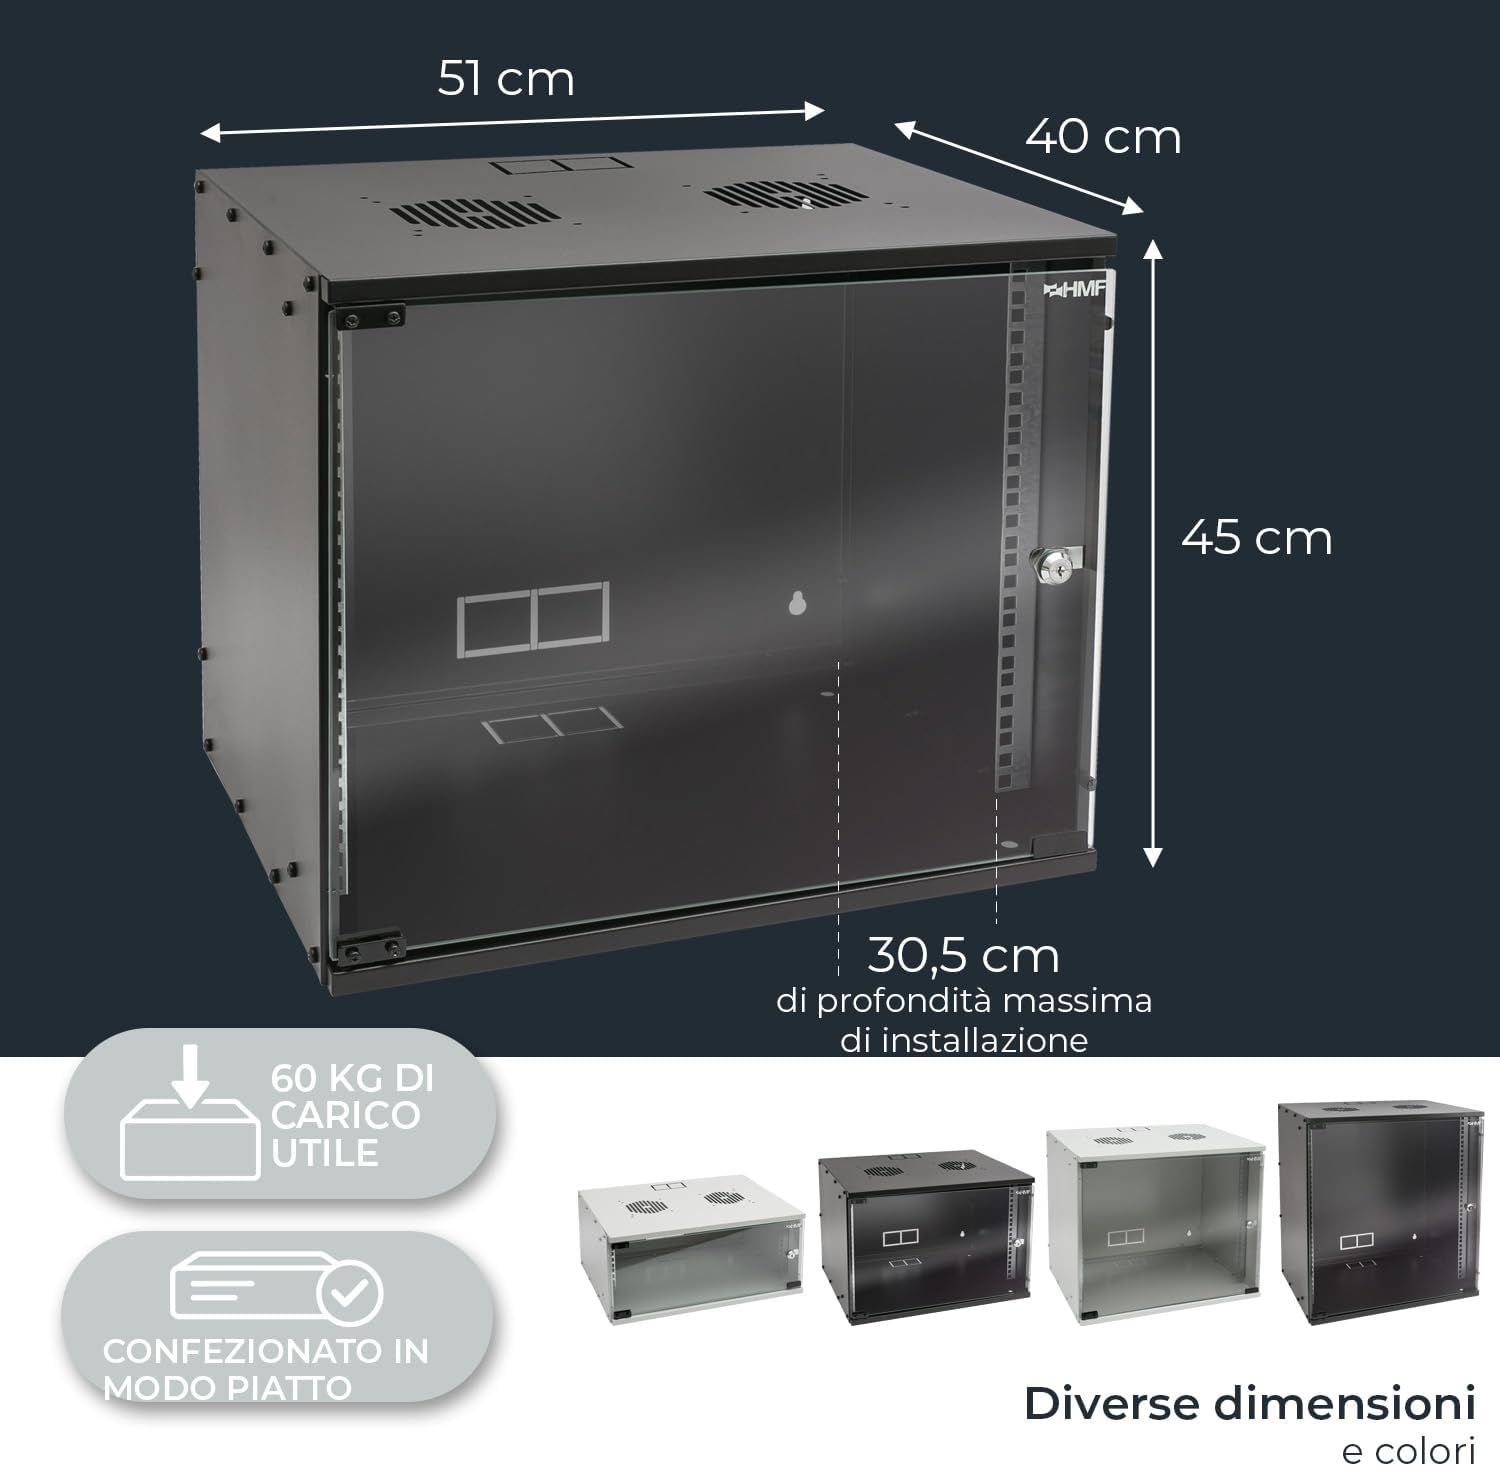
Imaxe: Dimensional ao finalview of the HMF 65709-02 rack cabinet, indicating its external measurements and the maximum internal depth available for equipment installation.
Garantía e Soporte
HMF products are manufactured to high-quality standards. For warranty information or technical support, please refer to the contact details provided with your purchase or visit the official HMF websitio.
Websitio: HMF Official Store


