1. Introdución
Grazas pola compraasing the IRRADIO VDP-4600HDW LCD/LED Projector. This manual provides essential information for the safe and efficient operation of your device. Please read it thoroughly before use and retain it for future reference.
2. Instrucións de seguridade
- Non bloquee as aberturas de ventilación. Asegúrese de que haxa un fluxo de aire axeitado arredor do proxector para evitar o sobrequecemento.
- Non mire directamente á lente do proxector cando estea aceso.amp está acendido, xa que a luz brillante pode causar danos nos ollos.
- Keep the projector away from water or other liquids. Do not operate in damp ou condicións húmidas.
- Empregue só o adaptador de corrente subministrado co proxector.
- Non intente reparar o proxector vostede mesmo. Encargue calquera mantemento a persoal cualificado.
- Coloque o proxector sobre unha superficie estable e nivelada para evitar que caia.
3. Contido do paquete
Comprobe que todos os artigos estean presentes no seu paquete:
- IRRADIO VDP-4600HDW Projector
- Control remoto
- Cable de alimentación
- Cable HDMI
- Cabo AV
- Manual de usuario
4. Produto rematadoview
4.1. Compoñentes do proxector

Figura 4.1: En xeral view of the IRRADIO VDP-4600HDW Projector. This image displays the projector from an angled perspective, highlighting its compact design and the lens on the front left side, with ventilation grilles and control buttons visible on the top and sides.

Figura 4.2: Fronte view of the projector. This image focuses on the large projection lens on the left, with the IRRADIO logo and ventilation grilles on the right side of the front panel.

Figura 4.3: Traseira view of the projector. This image shows the VGA port, focus adjustment knob, and keystone correction knob on the rear panel, along with additional ventilation.
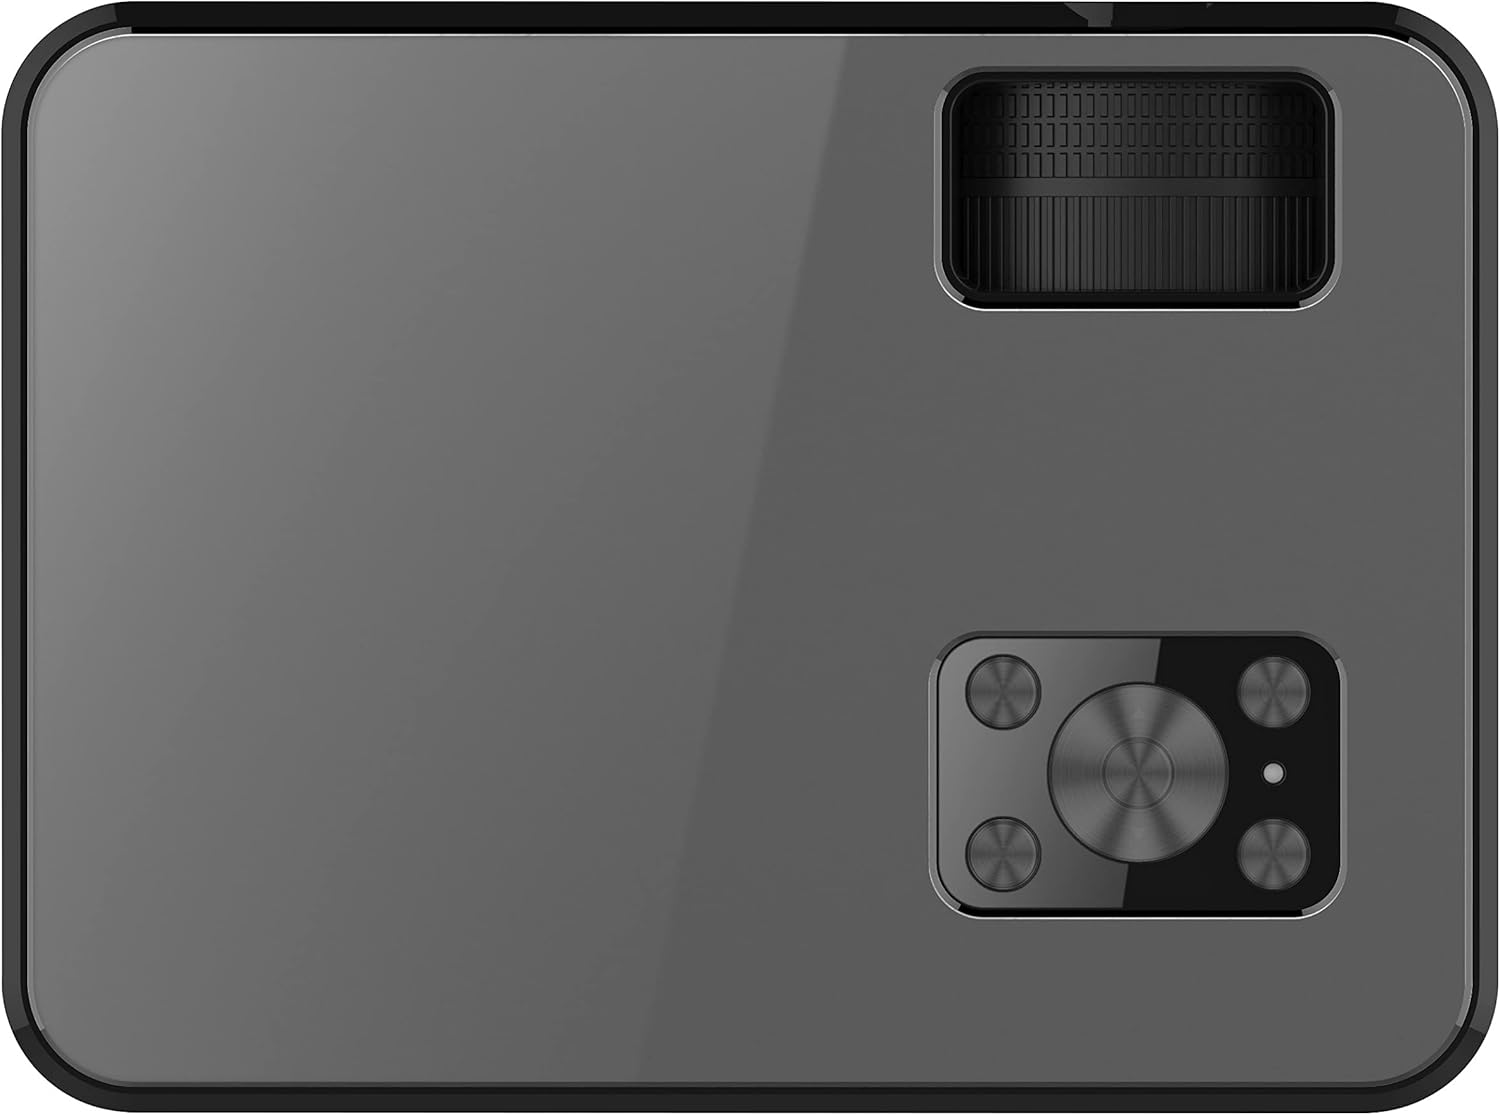
Figura 4.4: Arriba view of the projector. This image displays the control panel with navigation buttons (up, down, left, right, OK), source, menu, and exit buttons, along with the power button and volume controls.

Figura 4.5: Lado view of the projector showing input/output ports. This image highlights two HDMI ports, AV input, two USB ports, and a 3.5mm headphone jack (audio out).

Figura 4.6: Lado oposto view of the projector. This image shows the power input port and additional ventilation grilles.

Figura 4.7: Abaixo view of the projector. This image displays the mounting points for ceiling installation and rubber feet for stable placement on a flat surface.
4.2. Control remoto
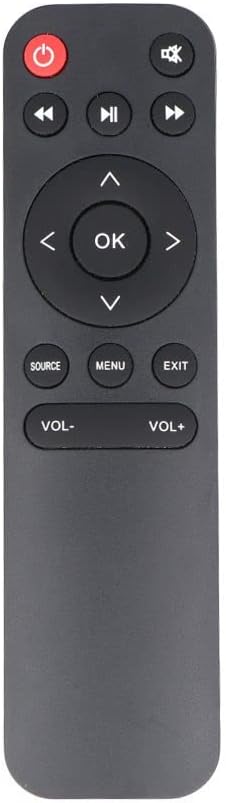
Figura 4.8: The remote control for the IRRADIO VDP-4600HDW Projector. It features buttons for power, mute, navigation (up, down, left, right, OK), source selection, menu, exit, and volume control.
4.3. Ports and Controls Overview
- Botón de encendido: Acende/apaga o proxector.
- Lente: Projects the image.
- Anel de enfoque: Axusta a claridade da imaxe.
- Corrección Keystone: Adjusts image distortion.
- Portos HDMI (x2): Connect to HDMI-enabled devices (laptops, gaming consoles, Blu-ray players).
- Portos USB (x2): Conecta unidades USB para reproducir contido multimedia.
- Porto VGA: Connect to computers with VGA output.
- Porto AV: Connect to older devices using composite video.
- Saída de audio de 3.5 mm: Conecta altofalantes ou auriculares externos.
- Receptor IR: Para sinais de control remoto.
5. Configuración
5.1 Colocación
Place the projector on a stable, flat surface or mount it to the ceiling. Ensure the projector is positioned directly in front of the projection screen or wall. The optimal projection distance ranges from 1.52 meters to 3.48 meters, yielding a screen size between 50 and 120 inches.
- Proxección frontal: Place the projector in front of the screen.
- Rear Projection: Coloca o proxector detrás dunha pantalla translúcida.
- Montaxe no teito: The projector can be inverted and mounted to the ceiling. Adjust settings in the OSD menu for inverted projection.
5.2. Conexión de alimentación
- Conecte o cable de alimentación ao porto de entrada de alimentación do proxector.
- Plug the other end of the power cable into a standard electrical outlet (220V AC, 50Hz).
- Prema o botón de acendido do proxector ou do mando a distancia para acendelo.
5.3. Axuste do enfoque e da distorsión trapezoidal
- Acende o proxector e mostra unha imaxe.
- Xire o Anel de enfoque (located near the lens) until the image appears sharp and clear.
- Axustar o Corrección Keystone knob (located on the rear panel) to correct any trapezoidal distortion, making the image rectangular.
6. En funcionamento
6.1. Acendido/apagado
Prema o botón de acendido do proxector ou do control remoto para acender ou apagar a unidade.
6.2. Selección da fonte de entrada
Despois de acender, prema o botón FONTE button on the remote control or the projector's control panel to cycle through available input sources (HDMI1, HDMI2, USB1, USB2, VGA, AV).
6.3. Conectando Dispositivos Externos
- HDMI: Connect an HDMI cable from your device (e.g., laptop, game console) to one of the projector's HDMI ports. Select the corresponding HDMI input.
- VGA: Connect a VGA cable from your computer to the projector's VGA port. Select the VGA input.
- DE: Use the provided AV cable to connect to devices with composite video output. Select the AV input.
- USB: Insert a USB flash drive into a USB port. The projector's media player interface will appear automatically or can be accessed via the source menu.
6.4. Reprodución multimedia (USB)
The integrated media player supports various formats:
- Formatos de imaxe: JPEG, BMP, PNG, MPO
- Formatos de vídeo: MPEG1, MPEG2, H.263, H.264, AVS, MJPEG, RV30, RV40, HEVC
- Formatos de audio: MPEG1, MPEG2, LPCM, MP3
Navega por files using the remote control's arrow keys and press OK para seleccionar.
6.5. Wireless Audio Connection
The projector features an integrated wireless audio function for connecting to external audio devices. Refer to the on-screen display (OSD) menu for specific pairing instructions. Typically, you will need to enable the wireless audio feature in the projector's settings and then pair it with your desired external speaker or headphone.
7. Mantemento
7.1. Limpeza das lentes
Use a soft, lint-free cloth and a specialized lens cleaning solution to gently wipe the lens. Avoid abrasive materials or excessive pressure.
7.2. Limpeza do filtro de po
Regularly check and clean the dust filters to ensure optimal airflow and prevent overheating. Use a soft brush or a vacuum cleaner with a brush attachment to remove dust from the ventilation grilles.
7.3. Almacenamento
When not in use for extended periods, store the projector in a cool, dry place, protected from dust and direct sunlight. Use the original packaging or a protective case.
8 Solución de problemas
- Sen enerxía: Asegúrate de que o cable de alimentación estea conectado correctamente e que a toma de corrente funcione.
- Sen imaxe: Check the input source selection. Ensure the connected device is powered on and sending a signal. Verify cable connections.
- Imaxe borrosa: Adjust the focus ring. Ensure the projection distance is within the optimal range.
- Image Distorted: Axuste a corrección trapezoidal.
- Sen son: Check the volume settings on both the projector and the connected device. If using external speakers, ensure they are properly connected or paired via wireless audio.
- O control remoto non funciona: Replace the batteries. Ensure there are no obstructions between the remote and the projector's IR receiver.
9. Especificacións
| Característica | Especificación |
|---|---|
| Sistema de proxección | LCD panel with LED light source |
| Resolución nativa | 1920 x 1080 (Full HD 1080p) |
| Relación de contraste dinámico | 2000:1 |
| Light Source Brightness | 3000 lúmenes |
| LED Lamp A vida | 50,000 horas |
| Lente | Enfoque manual |
| Wireless Audio Function | Integrado |
| Conectividade | 2x HDMI, 2x USB, VGA, AV Composite, 3.5mm Headphone Jack (output) |
| Relación de aspecto | 16:9 Native / 4:3 Compatible |
| Tamaño de proxección óptimo | 50" - 120" |
| Distancia de proxección óptima | 1.52 m a 3.48 m |
| Modos de proxección | Front, Rear, Ceiling (Front/Rear) |
| Audio | 1x 3W Hi-Fi Speaker |
| Sistema de refrixeración | Sistema de refrixeración dual |
| Linguaxe OSD | 23 idiomas |
| Fonte de alimentación | 220V AC 50Hz (single phase) |
| Peso | 1.4 kg |
| Dimensións (W x H x D) | 222 x 91 x 173 mm |
10. Garantía e soporte
Information regarding specific warranty terms and support contacts is not available in the provided product data. Please refer to the product packaging or the retailer's websitio para obter detalles da garantía e información de atención ao cliente.


