1. Produto rematadoview
The Sinotimer TM618N-2 is a versatile 7-day weekly digital programmable timer designed for automated control of electrical equipment. It allows users to set specific daily or weekly schedules for turning devices on and off, ensuring efficient energy management and convenience. This timer is suitable for a wide range of applications, including controlling lighting, heating, ventilation, and other electrical appliances.

Figura 1: Fronte view of the Sinotimer TM618N-2 Digital Timer, showing the display and control buttons.
2. Características clave
- Programable semanalmente: Allows up to 16 ON/OFF programs per day or week.
- Multifuncional: Includes Clock display, Timer, Countdown, Automatic weekly time deviation correction, and Sleep mode.
- Alta capacidade: Soportes 16 Amp / 220 Volt AC loads.
- Ancho Voltage Compatibilidade: Operates with 220V, 230V, 240V AC.
- Batería incorporada: Mantén a configuración durante a apagadatages (Lithium battery type).
- Aplicacións versátiles: Ideal for controlling dryers, defrosting equipment, swimming pool pumps, gates, lighting, and more.
3. Especificacións
| Característica | Detalle |
|---|---|
| Modelo | TM618N-2 |
| Marca | Sinotimer |
| Voltage | 220 V / 230 V / 240 V CA |
| Valoración actual | 16 Amp |
| Número de programas | 16 programas de acendido/apagado |
| Material | Plástico |
| Tipo de batería | Lithium (internal, non-replaceable by user) |
| Cor | Multi-color (typically white/grey) |
4. Instalación
Aviso de seguridade importante: Installation should only be performed by a qualified electrician. Ensure power is disconnected before attempting any wiring.
- Montaxe: The TM618N-2 is designed for DIN rail mounting or screw mounting. Secure the timer in a suitable electrical enclosure.
- Cableado: Refer to the wiring diagram on the back of the unit.
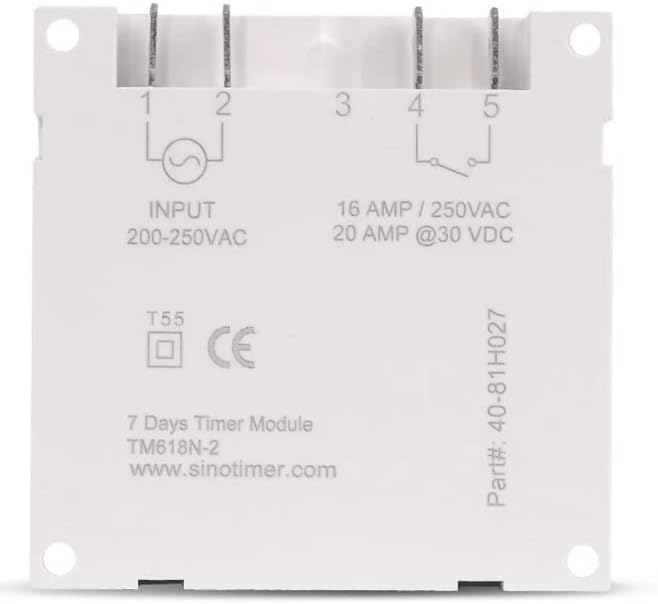
Figura 2: Atrás view of the Sinotimer TM618N-2, showing input/output terminals and wiring diagram.
- Input (Terminals 1 & 2): Connect your 200-250VAC power supply to these terminals.
- Output (Terminals 3, 4, & 5):
- Terminal 3: Common (COM)
- Terminal 4: Normally Open (NO) - Connect your load here for switched power.
- Terminal 5: Normally Closed (NC) - (Less commonly used for timer applications, but available).
- Encendido: Once wiring is complete and secure, restore power to the circuit. The timer display should illuminate.

Figure 3: Technical drawing showing the dimensions of the Sinotimer TM618N-2 timer.
5. Instrucións de funcionamento
5.1. Funcións dos botóns
- RELOXO: Úsase para axustar a hora e o día actuais.
- PROG: Enters/exits programming mode for ON/OFF schedules.
- SEMANA: Selects the day(s) of the week during time or program setting.
- HORARIO: Adjusts the hour during time or program setting.
- MIN: Adjusts the minute during time or program setting.
- RECORDA: Recalls or cancels a program setting.
- MANUAL: Manually overrides the timer's current state (ON/AUTO/OFF).
- R (Reiniciar): Small button (requires a pointed object) to reset the timer to factory defaults.
5.2. Axuste da hora e do día actuais
- Manteña premido o RELOXO botón.
- Mentres sostén RELOXO, prema SEMANA to set the current day (MO, TU, WE, TH, FR, SA, SU).
- Mentres sostén RELOXO, prema HORA para configurar a hora actual.
- Mentres sostén RELOXO, prema MIN para configurar o minuto actual.
- Soltar o RELOXO botón para gardar a configuración.
5.3. Programming ON/OFF Schedules
The timer supports up to 16 ON and 16 OFF programs. Each program can be set for a specific day or group of days.
- Preme o PROG unha vez. A pantalla mostrará "1 ON".
- Preme SEMANA repeatedly to select the desired day(s) for this program (e.g., MO, TU, WE, TH, FR, SA, SU; MO-FR; SA-SU; MO-SA; etc.).
- Preme HORA para axustar a hora de acendido desexada.
- Preme MIN para axustar o minuto de acendido desexado.
- Preme PROG de novo. A pantalla mostrará "1 OFF".
- Repita os pasos 2-4 para axustar a hora de apagado desexada para o primeiro programa.
- Preme PROG to move to the next program ("2 ON", "2 OFF", etc.) and repeat the process for up to 16 programs.
- To exit programming mode and save settings, press the RELOXO botón.
5.4. Anulación manual
Preme o MANUAL button to cycle through the output modes:
- ACTIVADO: Output is continuously ON, ignoring programs.
- AUTOMÁTICO: Output follows the programmed schedules.
- OFF: Output is continuously OFF, ignoring programs.
Asegúrate de que o temporizador estea activado AUTO mode for programmed operation.
5.5. Resetting the Timer
To clear all settings and return the timer to its factory default state, insert a pointed object (like a paperclip) into the small R (Reset) hole and press gently.
6. Mantemento
The Sinotimer TM618N-2 requires minimal maintenance.
- Manteña o dispositivo limpo e libre de po. Use un pano suave e seco para limpalo.
- Non use produtos de limpeza ou disolventes abrasivos.
- Ensure the timer is installed in a dry environment, away from direct moisture or extreme temperatures.
- The internal battery is designed for long life and is not user-replaceable. If the display goes blank or settings are not retained after a power outage, the battery may need professional service.
7 Solución de problemas
| Problema | Causa posible | Solución |
|---|---|---|
| A pantalla está en branco. | Sen fonte de alimentación; batería interna esgotada. | Check power connections. If power is present, the internal battery may need charging (leave connected to power for several hours) or replacement (professional service required). |
| O temporizador non se activa/desactiva segundo a programación. | Timer is not in AUTO mode; incorrect program settings; wiring issue. | Preme MANUAL until "AUTO" is displayed. Review and correct program settings. Verify wiring connections. |
| A configuración pérdese despois de apagar a enerxíatage. | Internal battery is depleted or faulty. | Leave the timer connected to power for at least 4 hours to charge the internal battery. If the problem persists, the battery may need replacement (professional service recommended). |
| Os botóns non responden. | Temporary software glitch; unit needs reset. | Realizar un reinicio completo usando o R button. If the issue continues, contact support. |
8. Garantía e soporte
Para obter información sobre a garantía e asistencia técnica, consulte a documentación incluída coa súa compra ou póñase en contacto co seu vendedor. Garde o comprobante de compra para reclamacións de garantía.
Manufacturer: Sinotimer


