1. Instrucións de seguridade importantes
Please read these instructions carefully before operating the appliance and keep them for future reference. Failure to follow these instructions may result in electric shock, fire, or serious injury.
- Non faga funcionar o forno se a porta ou as juntas da porta están danadas.
- Non quentar líquidos ou outros alimentos en recipientes pechados xa que poden explotar.
- Use só utensilios axeitados para o seu uso en fornos microondas.
- O forno debe limparse regularmente e eliminar os depósitos de alimentos.
- Non manter o forno en condicións de limpeza pode provocar un deterioro da superficie que pode afectar negativamente á vida útil do aparello e, posiblemente, provocar unha situación perigosa.
- Non use produtos de limpeza abrasivos ou raspadores metálicos afiados para limpar o vidro da porta do forno, xa que poden raiar a superficie, o que pode provocar que se rompa o vidro.
- Este aparello está pensado só para uso doméstico.
2. Produto rematadoview
The Severin MW 7773 is a versatile 3-in-1 appliance combining microwave, grill, and hot air convection functions. It features a digital display, multiple power levels, and automatic cooking programs for convenient food preparation.

Figura 2.1: Fronte view of the Severin MW 7773 3-in-1 Microwave Oven. The appliance features a black and silver finish with a large viewing window and a control panel on the right side.
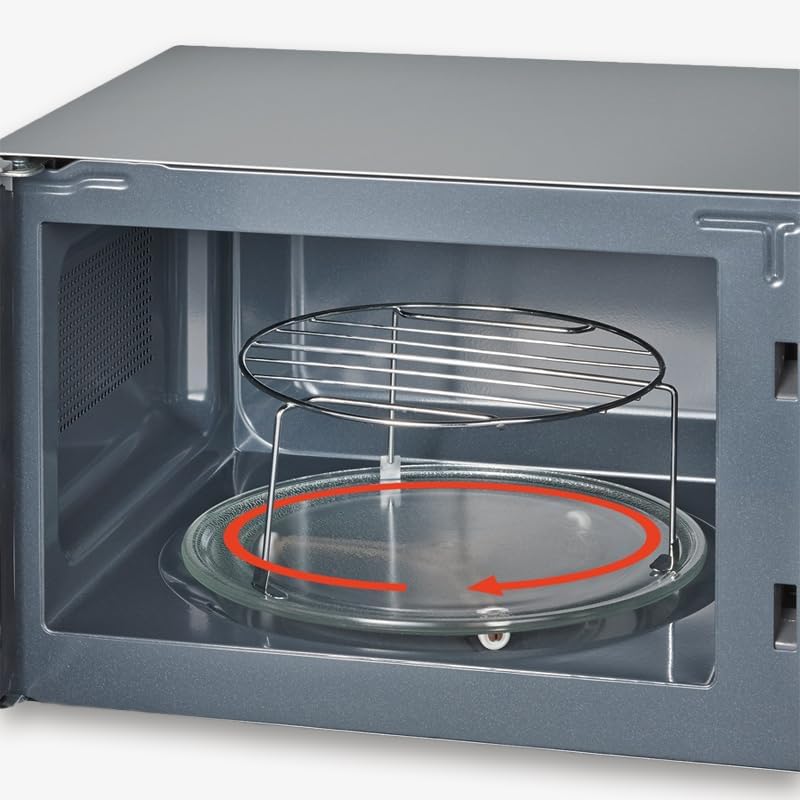
Figura 2.2: Interior view of the microwave oven, showing the glass turntable and the included metal grill grate. The turntable rotates to ensure even cooking.
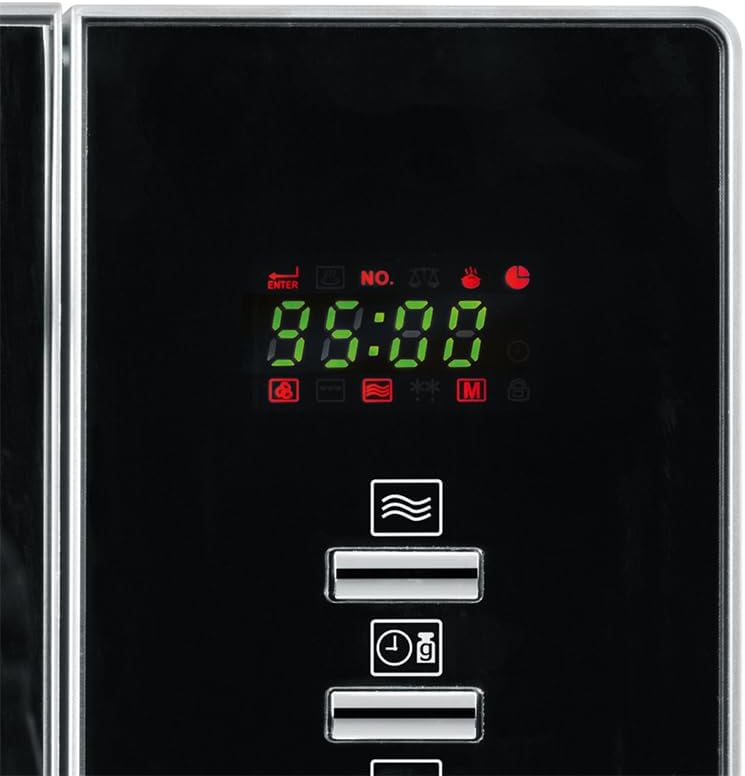
Figure 2.3: Close-up of the digital control panel, featuring an LCD display, various function buttons, and a rotary knob for setting time and power levels.
3. Configuración e instalación
3.1 Desembalaxe
Carefully remove the microwave oven from its packaging. Retain the packaging materials for future transport or storage if necessary. Check for any damage during transit. If the appliance appears damaged, do not operate it and contact customer support.
3.2 Colocación
- Place the oven on a flat, stable surface capable of supporting its weight (approximately 14.2 kg).
- Ensure adequate ventilation. Leave a minimum of 20 cm (7.9 inches) clearance above the oven, 10 cm (3.9 inches) at the rear, and 5 cm (2 inches) on both sides.
- Non bloquee ningunha das aberturas de ventilación do forno.
- Manteña o forno lonxe de fontes de calor, campos magnéticos fortes e zonas con alta humidade.
3.3 Turntable and Grill Grate Assembly
- Coloque o anel de rolos no centro da cavidade do forno.
- Position the glass turntable securely on top of the roller ring. Ensure it sits correctly in the center hub.
- For grilling or convection cooking, place the appropriate grill grate (small or large) on the turntable as required by your recipe.
3.4 Conexión eléctrica
Conecte o cable de alimentación a unha toma de corrente con conexión a terra. Asegúrese de que o volumetage of your power supply matches the rating label on the appliance (2.3E+2 Volts AC).
4. Instrucións de funcionamento
4.1 Funcións do panel de control
Refer to Figure 2.3 for a visual representation of the control panel.
- Pantalla LCD: Shows time, power level, cooking mode, and program indicators.
- Botóns de función: Select microwave, grill, hot air, or combination modes.
- Botón rotativo: Adjusts cooking time, power level, and selects automatic programs.
- Start/Quick Button: Initiates cooking or provides instant start at full power.
- Botón Parar/Cancelar: Detén a cocción ou borra a configuración.
- Bloqueo de seguridade infantil: Activates to prevent unintended operation.
4.2 Axustar o reloxo
Cando se conecta o forno por primeira vez, a pantalla mostrará "0:00".
- Press the "Clock" button (if available, otherwise consult specific model manual for clock setting).
- Turn the rotary knob to set the hour.
- Prema de novo o botón "Reloxo".
- Turn the rotary knob to set the minutes.
- Prema o botón "Reloxo" para confirmar.
4.3 Cocción ao microondas
- Coloque os alimentos nun recipiente apto para microondas no prato xiratorio.
- Pecha a porta do forno.
- Prema o botón "Microondas".
- Turn the rotary knob to select the desired power level (10 levels available).
- Turn the rotary knob again to set the cooking time.
- Prema o botón "Inicio" para comezar a cociñar.
4.4 Cociña á grella
Use the included grill grate for best results.
- Coloque a comida na grella.
- Pecha a porta do forno.
- Prema o botón "Grellar".
- Xire o botón rotatorio para axustar o tempo de cocción.
- Prema o botón "Inicio" para comezar a grellar.
4.5 Hot Air (Convection) Cooking
Preheating may be required for optimal results.
- Coloque a comida nun prato apto para forno.
- Pecha a porta do forno.
- Press the "Hot Air" button.
- Turn the rotary knob to select the desired temperature.
- Turn the rotary knob again to set the cooking time.
- Press the "Start" button to begin convection cooking.
4.6 Cociña combinada
The appliance offers various combination modes (e.g., Microwave + Grill, Microwave + Hot Air) for versatile cooking. Consult the specific combination program details in your appliance's full manual for precise instructions.
4.7 Programas automáticos
The oven features 9 automatic cooking programs, including a pizza function. To use:
- Prema o botón "Menú automático" ou "Programa".
- Turn the rotary knob to select the desired program number (P1-P9).
- Press "Start". The oven will automatically set the appropriate power and time.
4.8 Función de desconxelación
A función de desconxelación permite desconxelar os alimentos conxelados de forma rápida e eficiente.
- Coloque os alimentos conxelados no prato xiratorio.
- Prema o botón "Desconxelar".
- Turn the rotary knob to select defrost by weight or time.
- Prema "Inicio".
4.9 Bloqueo de seguridade infantil
To activate the child safety lock, press and hold the "Stop/Cancel" button for approximately 3 seconds until a lock indicator appears on the display. To deactivate, repeat the process.
5. Mantemento e Limpeza
Unha limpeza regular axuda a manter o rendemento e a lonxevidade do teu forno microondas.
5.1 Limpeza xeral
- Desconecte sempre o forno da toma de corrente antes de limpalo.
- Limpa a cavidade do forno, a porta e as xuntas da porta regularmente con adamp pano e deterxente suave.
- Non empregues produtos de limpeza abrasivos, la de aceiro nin produtos químicos agresivos, xa que poden danar as superficies.
- For stubborn food residues, place a bowl of water with lemon slices inside the oven and microwave on high for 5-10 minutes. The steam will loosen the residue, making it easier to wipe away.
5.2 Turntable and Grill Grate
The glass turntable and metal grill grates can be removed for cleaning. Wash them in warm, soapy water or in a dishwasher. Ensure they are completely dry before placing them back in the oven.
5.3 Limpeza exterior
Limpe as superficies exteriores cun suave, damp cloth. For stainless steel parts, use a specialized stainless steel cleaner if necessary, wiping in the direction of the grain.
6 Solución de problemas
| Problema | Causa posible | Solución |
|---|---|---|
| O forno non arranca. | Cable de alimentación non conectado; Porta non pechada correctamente; Fusible fundido ou disyuntor saltado. | Asegúrese de que o enchufe estea firmemente na toma de corrente; peche a porta con seguridade; comprobe o fusible/disxuntor doméstico. |
| A comida non se cociña de xeito uniforme. | Comida sen remexer nin dar a volta; prato xiratorio non xira. | Stir or turn food halfway through cooking; Ensure turntable and roller ring are correctly placed and clean. |
| Excessive steam inside oven. | Alto contido de humidade nos alimentos. | Isto é normal para algúns alimentos. Limpe o interior despois de usalo. |
| A luz do forno non funciona. | É preciso substituír a lámpada. | Póñase en contacto co persoal de servizo cualificado para substituír a lámpada. Non intente substituíla vostede mesmo. |
Se o problema persiste despois de intentar estas solucións, póñase en contacto co servizo de atención ao cliente de Severin.
7. Especificacións
| Marca: | Severin |
| Modelo: | MW 7773 |
| Tipo: | 3-in-1 Microwave Oven with Grill and Hot Air Function |
| Capacidade: | 20 litros |
| Potencia do microondas: | 800 W |
| Potencia grella: | 1350 W |
| Hot Air Power: | 1350 W |
| Niveis de potencia: | 10 |
| Programas automáticos: | 9 |
| Tipo de instalación: | Encimera |
| Cor: | Negro e prata |
| Material: | Aceiro inoxidable |
| Dimensións do produto (ancho x profundo x alto): | Approx. 17.99" x 15.75" x 10.35" (45.7 cm x 40 cm x 26.3 cm) |
| Peso do artigo: | Aprox. 14.2 kg (31 libras) |
| Compoñentes incluídos: | Glass Turntable, Roller Ring, 2 Grill Grates |
8. Garantía e soporte
Severin products are manufactured to high quality standards. For information regarding warranty terms and conditions, please refer to the warranty card included with your purchase or visit the official Severin websitio.
For technical support, spare parts, or service inquiries, please contact Severin customer service. Contact details can typically be found on the Severin websitio web ou na documentación da súa compra.