1. Introdución
The AeroCool Blade is an ATX semi-tower PC case designed for optimal airflow and aesthetic appeal. It features an RGB front panel with preset lighting modes, a full tempered glass side window, and ample space for component installation. This manual provides essential information for the proper setup, operation, and maintenance of your PC case.
Información de seguridade: Always disconnect power from your system before performing any installation or maintenance. Handle components with care to avoid damage. Refer to individual component manuals for specific installation instructions.
2. Contido do paquete
- AeroCool Blade ATX Semi-Tower PC Case
- 1 x 120mm RGB Rear Fan (pre-installed)
- 3 x 120mm Front Fans (pre-installed)
- Kit de accesorios (parafusos, separadores, bridas para cables)
3. Configuración e instalación
3.1 Preparación do caso
Carefully remove the case from its packaging. Place it on a stable, flat surface. Remove the tempered glass side panel by unscrewing the thumb screws at the rear of the case and gently pulling the panel away.

Figura 3.1: Interno view of the AeroCool Blade PC case, illustrating the layout for component installation.
3.2 Instalación da placa base
- Install the necessary motherboard standoffs into the motherboard tray according to your motherboard's form factor (ATX, Micro-ATX, Mini-ITX).
- Instale a protección de E/S na abertura traseira da caixa.
- Coloca con coidado a placa base sobre os separadores, aliñando os orificios dos parafusos.
- Fixe a placa base cos parafusos proporcionados.
3.3 Instalación da Unidade de Alimentación (PSU).
The AeroCool Blade supports bottom-mounted PSUs. Slide your PSU into the dedicated compartment at the bottom rear of the case. Secure it with screws from the rear of the case.
3.4 Instalación da unidade de almacenamento
- Discos duros de 3.5 polgadas: Install 3.5" hard drives into the drive cage located beneath the PSU shroud.
- 2.5" SSDs/HDDs: Install 2.5" drives onto the dedicated mounting points on the motherboard tray or behind it.

Figura 3.2: Parte interna traseira view, highlighting cable management routes and 2.5-inch drive mounting locations.
3.5 Expansion Card (GPU) Installation
Remove the necessary expansion slot covers from the rear of the case. Insert your graphics card or other expansion cards into the PCIe slots on your motherboard and secure them with screws.
3.6 Instalación do ventilador e da refrixeración
The case comes with one 120mm RGB fan pre-installed at the rear and three 120mm fans pre-installed at the front. Ensure all fan cables are connected to appropriate headers on your motherboard or fan controller.

Figure 3.3: A 120mm RGB fan, similar to those pre-installed in the AeroCool Blade case.
3.7 Conexións de E/S do panel frontal
Connect the front panel cables (USB 3.0, USB 2.0, HD Audio, Power Switch, Reset Switch, LED Switch, Power LED, HDD LED) to the corresponding headers on your motherboard. Refer to your motherboard manual for exact pin configurations.
4. Instrucións de funcionamento
4.1 Acendido
Once all components are installed and connected, replace the side panel. Connect your monitor, keyboard, mouse, and power cable to the PSU. Press the Power button located on the top panel of the case to turn on your system.

Figura 4.1: Parte superior frontal view of the case, indicating the location of the power button and front I/O ports.
4.2 Control de iluminación RGB
The AeroCool Blade features an RGB front panel. Use the dedicated LED button on the top panel to cycle through various preset lighting modes and effects. Pressing the button will change the lighting pattern or color.

Figura 4.2: Fronte view of the AeroCool Blade case with its distinctive RGB lighting.
4.3 Portos do panel frontal
The top panel provides convenient access to:
- 1 x porto USB 3.0
- 2 x portos USB 2.0
- HD Audio output
- Entrada de micrófono
Connect your USB devices, headphones, and microphone to these ports as needed.
5. Mantemento
5.1 Limpeza do filtro de po
Regularly check and clean the dust filters to maintain optimal airflow and prevent dust buildup inside the case. Dust filters are typically located at the top, front, and bottom (under the PSU). Gently remove them and clean with compressed air or rinse with water (ensure they are completely dry before re-installation).
5.2 Limpeza exterior
Limpe as superficies exteriores da carcasa cun pano suave eamp pano. Evite o uso de produtos químicos agresivos ou materiais abrasivos que poidan danar o acabado ou o vidro temperado.
6 Solución de problemas
- O sistema non se acende:
Ensure the PSU is switched on and properly connected to the wall outlet. Verify all power cables from the PSU are correctly connected to the motherboard and components. Check the front panel power switch connection to the motherboard. - A iluminación RGB non funciona:
Ensure the RGB controller (if applicable) and fan RGB cables are securely connected. Press the LED button on the top panel to cycle through modes. If connected to a motherboard header, check motherboard software settings. - Os ventiladores non xiran:
Verify that all fan power cables are securely connected to the motherboard fan headers or a fan controller. Check BIOS/UEFI settings for fan speed control. - O USB/audio do panel frontal non funciona:
Ensure the USB and HD Audio cables from the front panel are correctly connected to the corresponding headers on your motherboard.
7. Especificacións
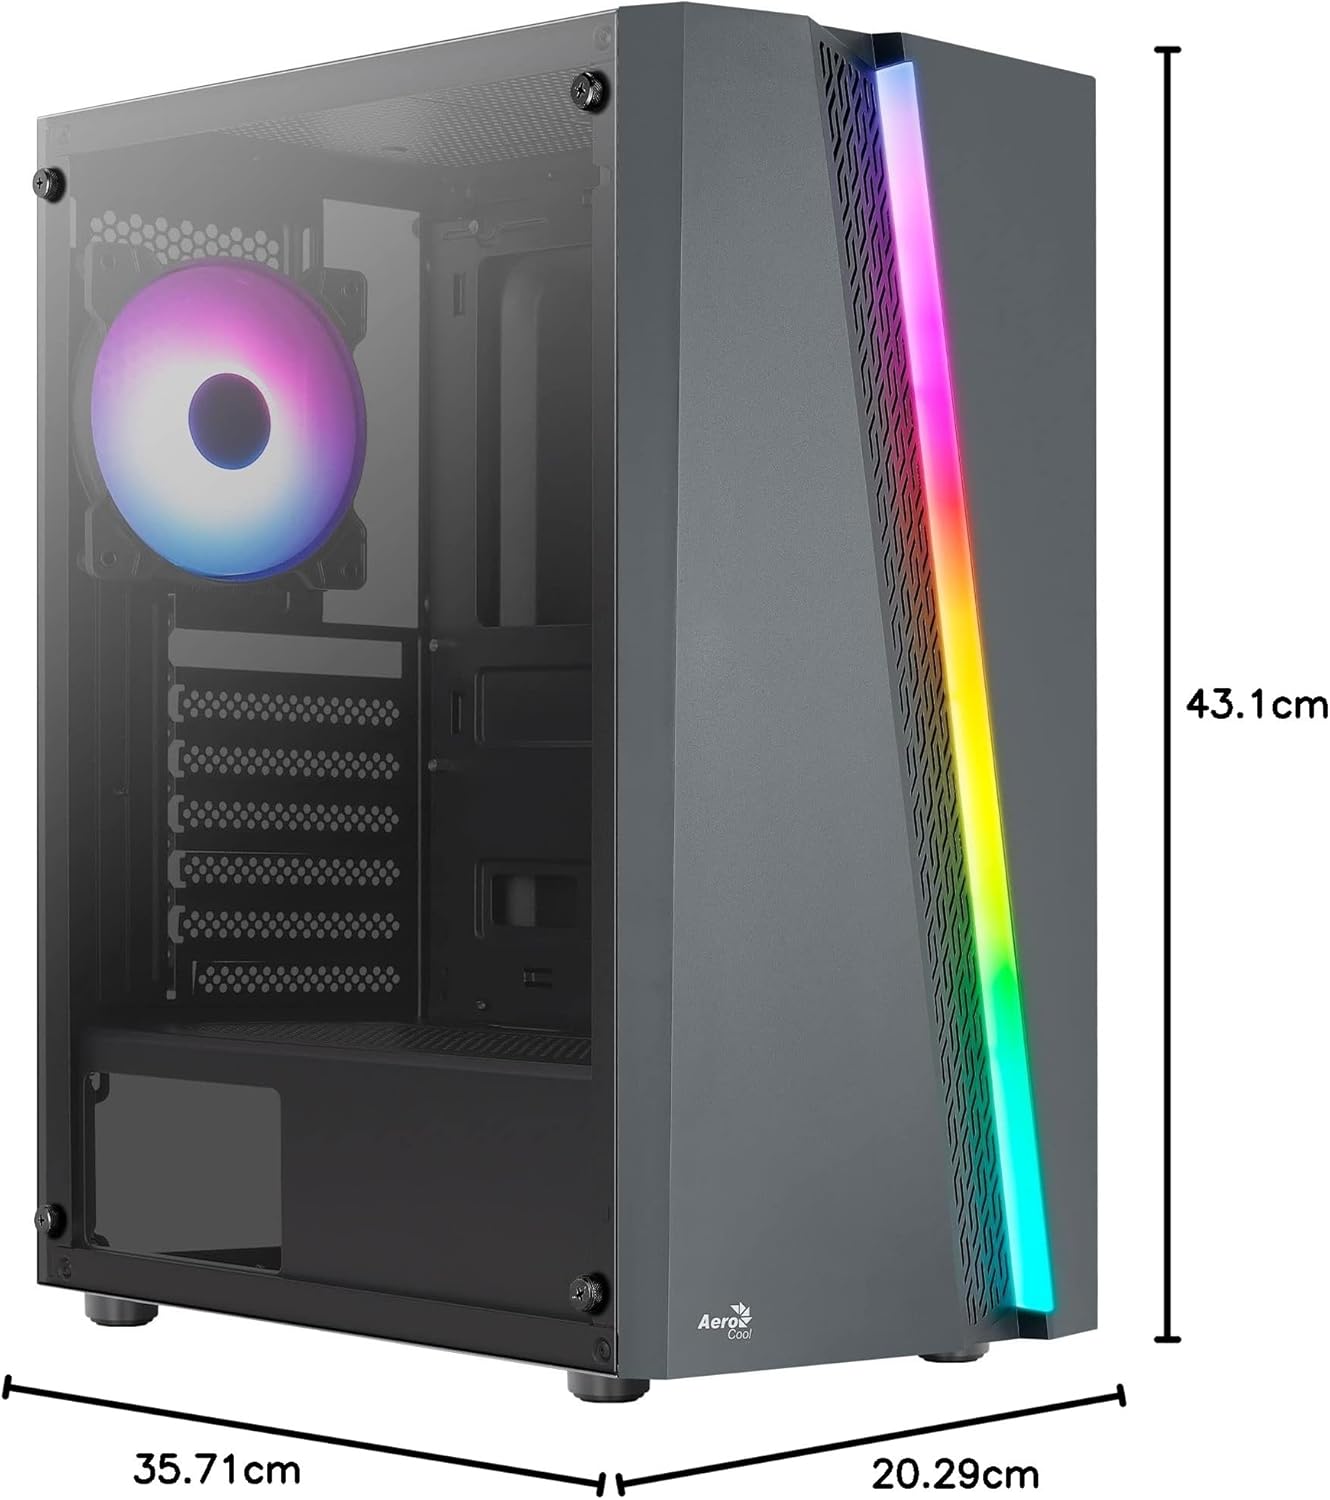
Figure 7.1: Dimensions of the AeroCool Blade PC Case.
| Característica | Especificación |
|---|---|
| Marca | AeroCool |
| Nome do modelo | BLADEBK |
| Tipo de caso | Semi-Tower |
| Compatibilidade da placa base | ATX, Micro ATX, Mini ITX |
| Material | Tempered Glass (Side Panel) |
| Dimensións do produto (L x W x H) | 43.1 x 20.3 x 35.7 cm |
| Peso do elemento | 4 kg |
| Unidade Bays | 2 x 3.5", 2 x 2.5" |
| Liquidación de GPU | Ata 307 mm |
| Altura do enfriador da CPU | Ata 155 mm |
| Portos de E / S dianteiros | 1 x USB 3.0, 2 x USB 2.0, HD Audio, Mic, LED Control, Power |
| Ventiladores preinstalados | 1 x 120mm RGB Rear, 3 x 120mm Front |
| Método de arrefriamento | Aire |
8. Garantía e soporte
For warranty information and technical support, please refer to the official AeroCool websitio web ou póñase en contacto co seu distribuidor local. Garde o comprobante de compra para reclamacións de garantía.
Información de contacto: Para obter máis asistencia, visite www.aerocool.io.


