1. Produto rematadoview
The QIACHIP WiFi Smart Relay Module is a versatile device designed for home automation. It allows users to remotely control connected appliances or devices via the eWeLink app. This module supports third-party voice control systems such as Amazon Alexa and Google Home, offering enhanced convenience for smart home integration. Key functionalities include timing on/off, scene linkage, power-on settings, inching (momentary) settings, and sharing control.

Image 1.1: QIACHIP WiFi Smart Relay Module with its packaging, highlighting compatibility with Google Home and Alexa.
2. Información de seguridade
- Fonte de alimentación: This device requires a stable USB 5V DC power input. Do not use power sources exceeding 5V to prevent damage.
- Cableado: Ensure all wiring is performed by a qualified individual if connecting to AC loads. Always disconnect power before wiring.
- Ambiente: Use the module in a dry environment. Avoid exposure to moisture, extreme temperatures, or corrosive substances.
- Capacidade de carga: Adhere to the maximum switching voltage e wattage specifications to prevent overloading the relay.
3. Contido do paquete
- QIACHIP WiFi Smart Relay Module (KR05-1CHKG-W-EW)
- Manual de usuario (este documento)
Note: A USB power adapter and cable are required for operation and are not included. Remote controls are also sold separately.
4. Características do produto
- Control remoto: Control devices from anywhere using the eWeLink app on your smartphone.
- Control de voz: Compatible con Amazon Alexa e Google Home para un funcionamento mans libres.
- Modos de traballo: Supports both self-locking (toggle) and inching (momentary) modes, configurable via the app.
- Programación e temporizadores: Set schedules, countdowns, and loop timers for automated control.
- Saída de contacto seco: Provides a passive output, suitable for controlling various devices like garage door openers, access control systems, and traditional switches.
- 2.4G Remote Control Support: Can be paired with a 2.4G smart remote control (sold separately) for local control, offering a range of up to 30 meters in open areas.
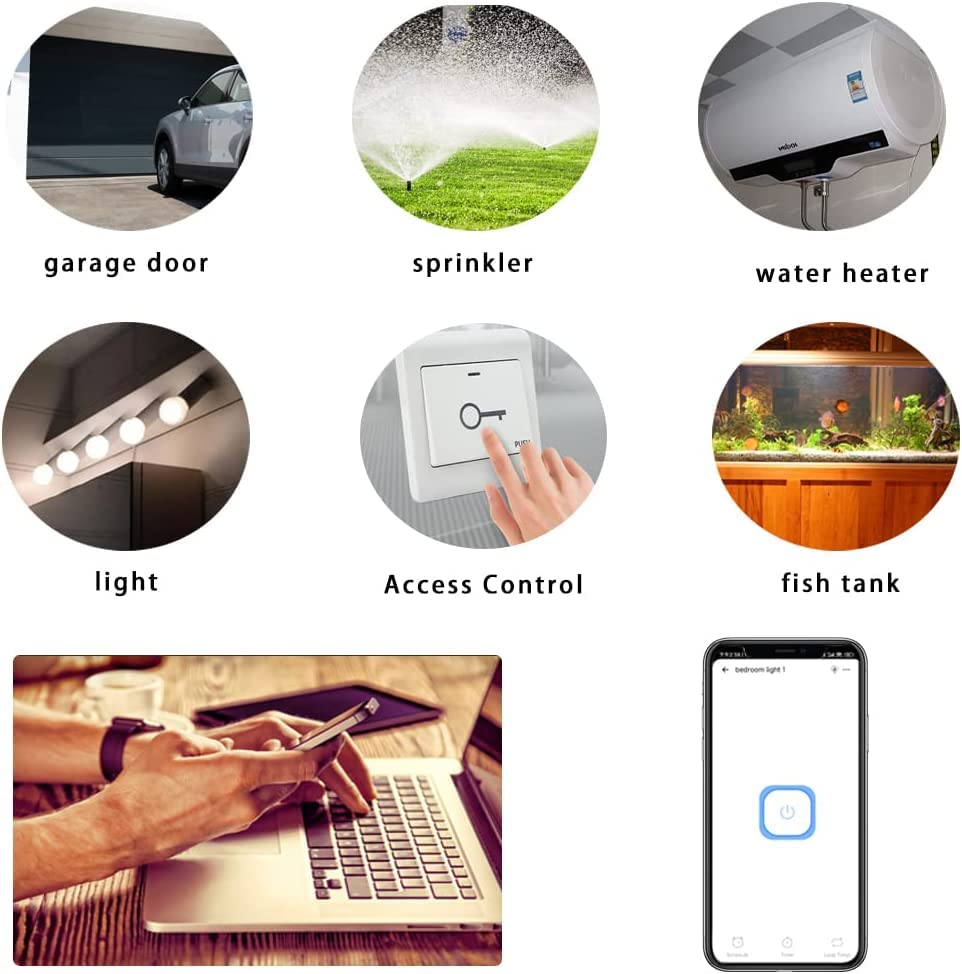
Imaxe 4.1: Ex.amples of devices and systems that can be controlled by the smart relay module.
5. Identificación de compoñentes

Imaxe 5.1: Detallada view of the KR05-1CH module with key components labeled.
- Input USB 5V: Porto micro USB para alimentación.
- On/Off Switch/Setting Button: Used for manual control and pairing.
- WiFi Network Indicator Light: Mostra o estado da conexión Wi-Fi.
- Relay Indicator Light: Indicates the relay's activation status.
- Terminais de entrada/saída: Screw terminals for connecting the device to be controlled (dry contact).
6. Guía de configuración
6.1. Alimentando o dispositivo
Connect a standard USB 5V power adapter (not included) to the Micro USB port on the module. The module will power on, and the Wi-Fi indicator light will begin to flash, indicating it is ready for pairing.
6.2. Wiring Diagram (Dry Contact)
The module provides a dry contact (passive output) relay. This means it acts as a switch, opening or closing a circuit without supplying power itself. You will need to connect the device you wish to control to the Input and Output terminals.
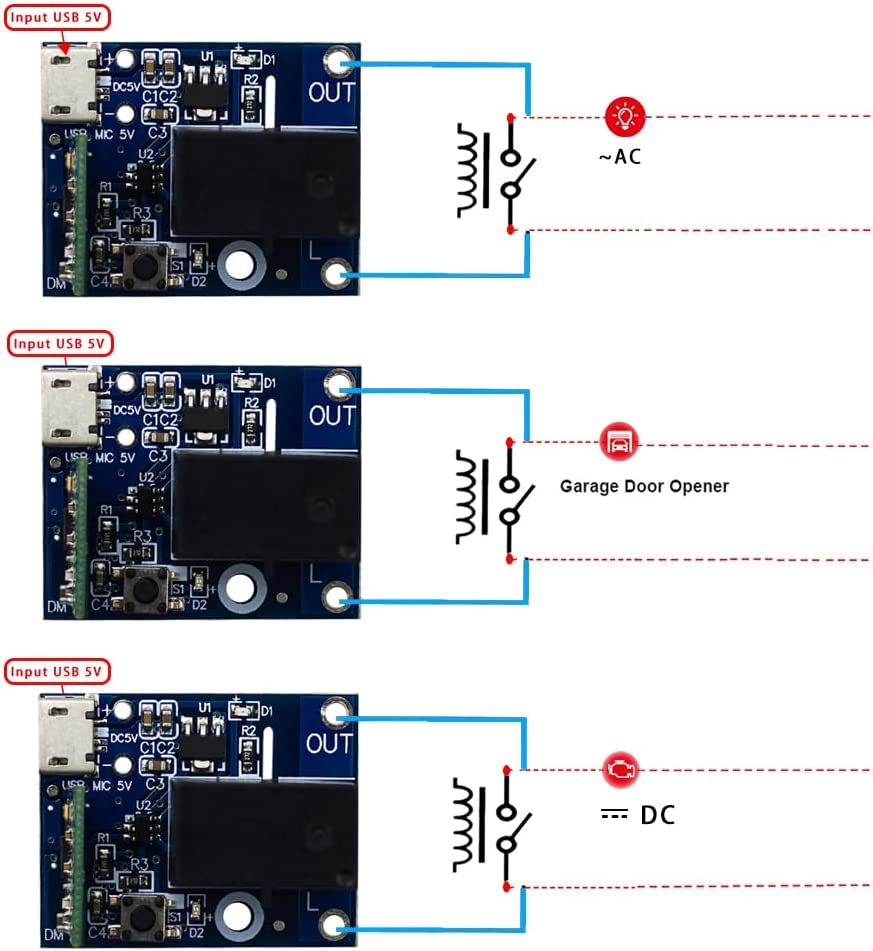
Imaxe 6.1: Ex.amples of dry contact wiring for various applications.
- For AC Loads: Connect the module's output terminals in series with one of the AC lines (e.g., Live wire) of your AC device. The module itself is powered by USB 5V, not the AC line.
- For DC Loads: Connect the module's output terminals in series with the positive or negative line of your DC device.
- For Garage Door/Access Control: Connect the module's output terminals to the control input terminals of your garage door opener or access control system, which typically require a momentary contact closure.
6.3. Instalación e emparellamento da aplicación
- Descarga a aplicación eWeLink: Busca "eWeLink" in your smartphone's app store (Google Play Store for Android or Apple App Store for iOS) and install it.
- Rexistrarse/Iniciar sesión: Abre a aplicación eWeLink e rexistra unha nova conta ou inicia sesión cunha xa existente.
- Entrar no modo de emparellamento: Power on the module. Press and hold the "on/off switch/setting button" on the module for approximately 5 seconds until the Wi-Fi network indicator light flashes rapidly.
- Engadir dispositivo: In the eWeLink app, tap the "+" icon (or "Add Device") and follow the on-screen instructions to add a new device. Select the appropriate pairing mode (e.g., Quick Pairing Mode).
- Conectar a wifi: Enter your 2.4GHz Wi-Fi network name and password. The module only supports 2.4GHz Wi-Fi networks, not 5GHz.
- Emparellamento completo: The app will search for and connect to the module. Once connected, you can rename the device and assign it to a room.
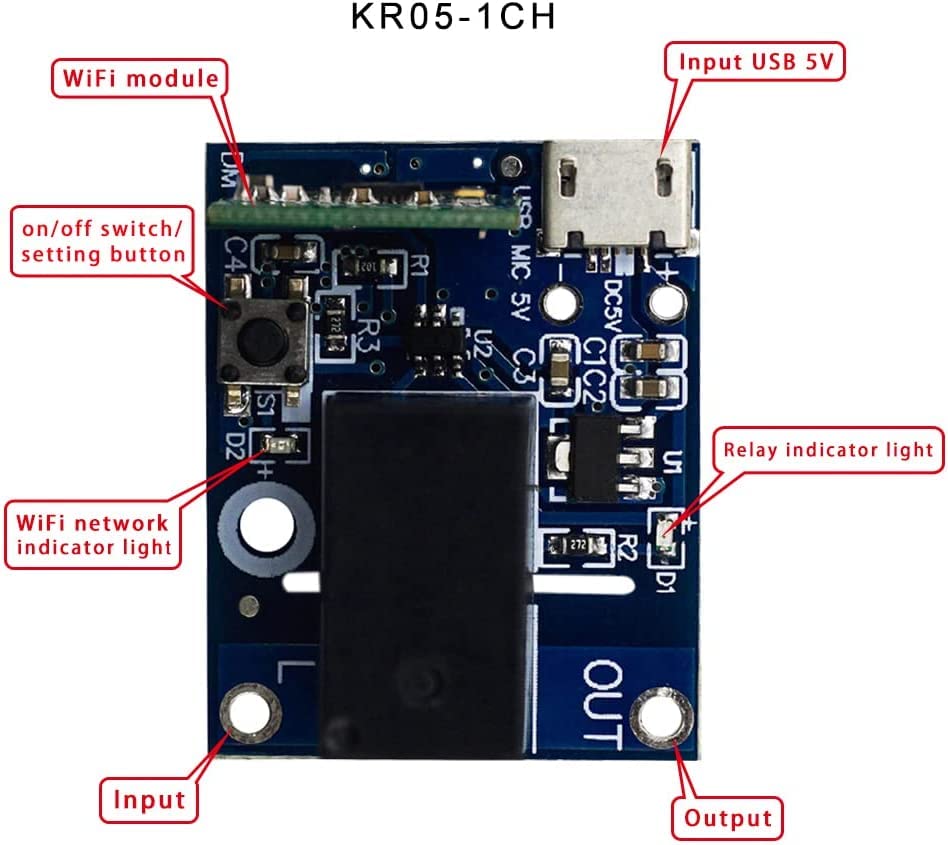
Image 6.2: eWeLink app interface for controlling the smart relay module.
7. Modos de funcionamento
7.1. Self-Locking Mode (Default)
In self-locking mode, the relay acts like a traditional toggle switch. When you turn it ON, it stays ON until you manually turn it OFF. Similarly, when you turn it OFF, it stays OFF until manually turned ON. This mode is suitable for controlling lights, fans, or other devices that require a continuous ON/OFF state.
7.2. Inching (Momentary) Mode
In inching mode, the relay will automatically turn OFF after a set duration once it has been turned ON. This mode is ideal for applications like garage door openers, electric strikes, or pulse-activated devices. The duration of the momentary pulse can be adjusted within the eWeLink app (e.g., 0.5 seconds to several minutes).
To switch between modes, access the device settings within the eWeLink app and select the desired working mode.
8. Integración do fogar intelixente
The QIACHIP WiFi Smart Relay Module is compatible with popular smart home platforms:
- Amazon Alexa: Link your eWeLink account in the Alexa app to control the module with voice commands (e.g., "Alexa, turn on the garage door").
- Google Home/Asistente: Link your eWeLink account in the Google Home app to control the module with voice commands (e.g., "Hey Google, open the gate").
- IFTTT: Create custom automations and applets by connecting your eWeLink account to IFTTT (If This Then That).
Ensure your eWeLink account is bound and devices are synchronized within the respective third-party smart home applications.

Image 8.1: Illustration of multiple modules in a home environment, indicating remote control capabilities.
9. Mantemento
- Limpeza: Gently wipe the module with a dry, soft cloth. Do not use liquid cleaners or solvents.
- Actualizacións de firmware: Consulta periodicamente a aplicación eWeLink para ver se hai actualizacións de firmware dispoñibles para garantir un rendemento e unha seguridade óptimos.
- Estabilidade de potencia: Ensure the USB 5V power supply is stable to prevent unexpected behavior.
10 Solución de problemas
- Q: Device not connecting to Wi-Fi?
- A: Ensure your Wi-Fi network is 2.4GHz. Check that the Wi-Fi password is correct. Move the module closer to your Wi-Fi router. Try resetting the module by holding the setting button for 5 seconds until the indicator flashes rapidly, then re-attempt pairing.
- Q: Relay not responding to app commands?
- A: Verify the module is powered on and connected to Wi-Fi (solid blue indicator light). Check your internet connection. Ensure the wiring to the controlled device is correct and secure. Test the manual button on the module.
- Q: Voice control not working?
- A: Confirm that your eWeLink account is correctly linked and synchronized with Amazon Alexa or Google Home. Check the device name in the eWeLink app and use that name in your voice commands. Ensure your smart speaker is connected to the internet.
- Q: Inching mode duration is incorrect?
- A: Adjust the inching duration setting within the device's settings in the eWeLink app.
11. Especificacións
| Parámetro | Valor |
|---|---|
| Número de modelo | KR05-1CHKG-W-EW (CK-BL602-4SW-HS(138)) |
| Vol. De entradatage | USB DC 5V |
| Tipo de saída | Dry Contact (Passive Output) |
| Vol. máximo de conmutacióntage | 5 Volts (for control signal, not power) |
| Wattage | 50 watts (Max load capacity) |
| Modo de operación | Automatic (App controlled) |
| Conectividade | Wi-Fi 2.4GHz (IEEE 802.11 b/g/n) |
| Tipo de conector | Micro USB |
| Material de contacto | Cobre |
| Tipo de contacto | Normalmente aberto |
| Tipo de montaxe | Montaxe en superficie |
| Dimensións do produto | 7 x 5 x 3 cm |
| Peso do produto | 20 g |
| UPC | 787996396422 |
12. Garantía e soporte
For warranty information, technical support, or further assistance, please refer to the contact details provided with your purchase or visit the official QIACHIP websitio. Garda o comprobante de compra para reclamacións de garantía.


