1. Introdución
This manual provides essential information for the safe and effective operation, setup, maintenance, and troubleshooting of your YESWELDER 205A MMA/Lift TIG Arc Welder. Please read this manual thoroughly before operating the machine to ensure proper use and to prevent injury or damage.

Imaxe 1.1: Fronte view of the YESWELDER 205A MMA/Lift TIG Arc Welder, showcasinpolo seu deseño compacto e o seu panel de control.
2. Información de seguridade
Welding operations involve significant risks. Always prioritize safety to prevent electric shock, burns, fire, and other hazards. Adhere to all local and national safety regulations.
Precaucións xerais de seguridade:
- Usar equipo de protección individual (EPI) axeitado, incluíndo un casco de soldador con sombra axeitada, roupa resistente ás lapas, luvas de soldador e calzado de seguridade.
- Ensure the welding area is well-ventilated to avoid inhaling fumes.
- Manter os materiais inflamables lonxe da zona de soldadura.
- Desconecte sempre a alimentación antes de realizar mantemento ou axustes.
- Non opere a soldadora en damp ou condicións húmidas.
Características de seguridade integradas:
The YESWELDER 205A is equipped with several safety mechanisms:
- Vol. Automáticotage Fluctuation Compensation: Helps maintain stable welding performance despite input power variations.
- Protección contra sobrecorriente: Apaga automaticamente a máquina se a corrente supera os límites de seguridade.
- Protección contra sobrecarga: Evita danos por carga excesiva.
- Control de temperatura: Monitors internal temperature and initiates automatic shutdown if overheating occurs.
- IP21 Protection Standard: Provides protection against solid objects over 12mm and vertically falling water drops.
- Electrostatic Coating: Unique coating designed to prevent shock transfer.

Imaxe 2.1: Acabadoview of the YESWELDER 205A's built-in safety features.
3. Produto rematadoview
The YESWELDER 205A is a versatile 2-in-1 welding machine offering both Stick (MMA) and Lift TIG welding capabilities. It features an advanced IGBT inverter technology for stable arc performance and a user-friendly interface.
Características principais:
- Dual Welding Modes: Supports Stick (MMA) and Lift TIG welding.
- Alta saída: Ata 205 amperes, suitable for various welding tasks.
- Funcións avanzadas: Includes Hot Start, Arc Force, and Anti-Stick for improved arc ignition and stability.
- Pantalla LED grande: Provides clear visibility of current, electrode size, and welding mode.
- Deseño portátil: Weighs approximately 3.8 kg (8.4 lbs) for easy transport.
- Construción duradeira: Inclúe unha c de plástico adicionalasing for enhanced protection.
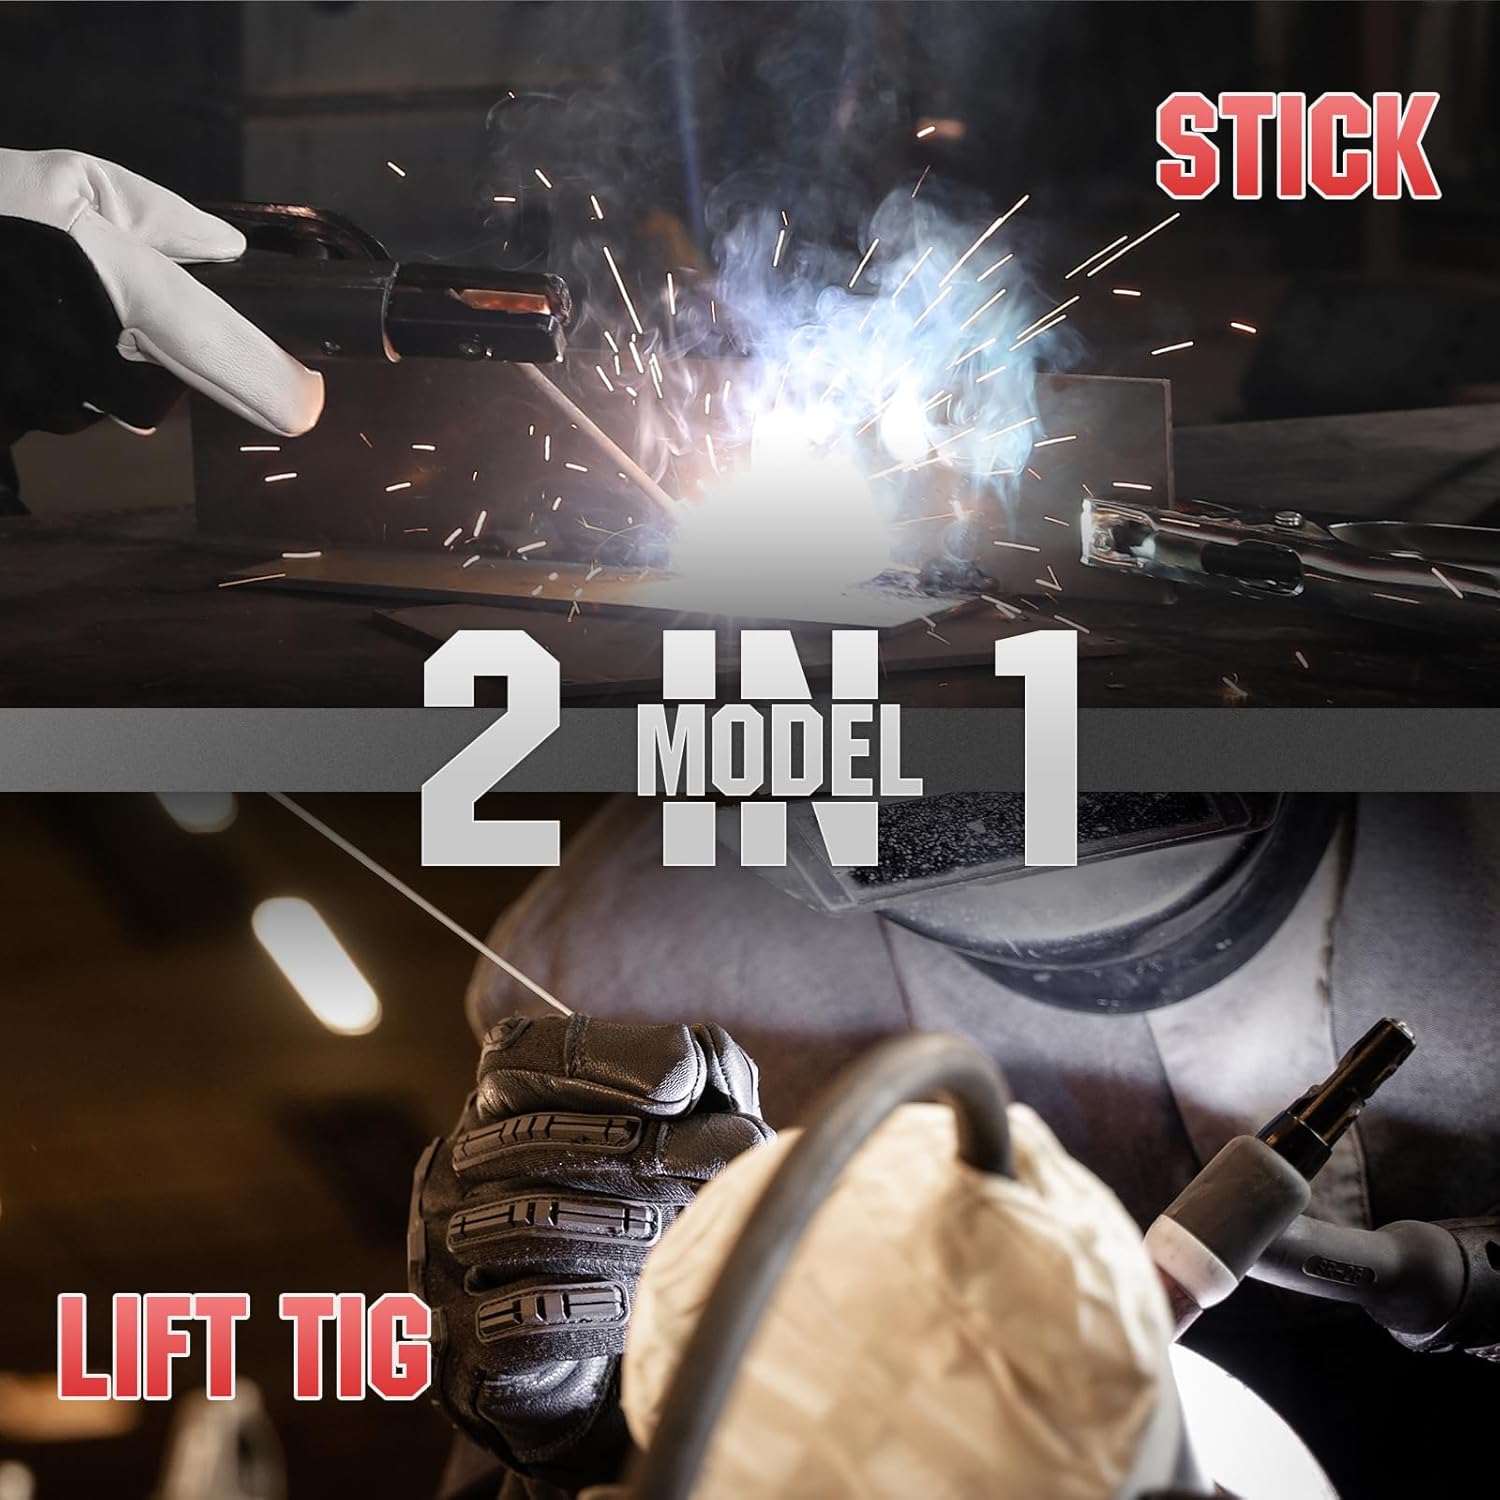
Image 3.1: The YESWELDER 205A supports both Stick (MMA) and Lift TIG welding modes.
Introdución ao panel de control:
Familiarize yourself with the control panel components for efficient operation.
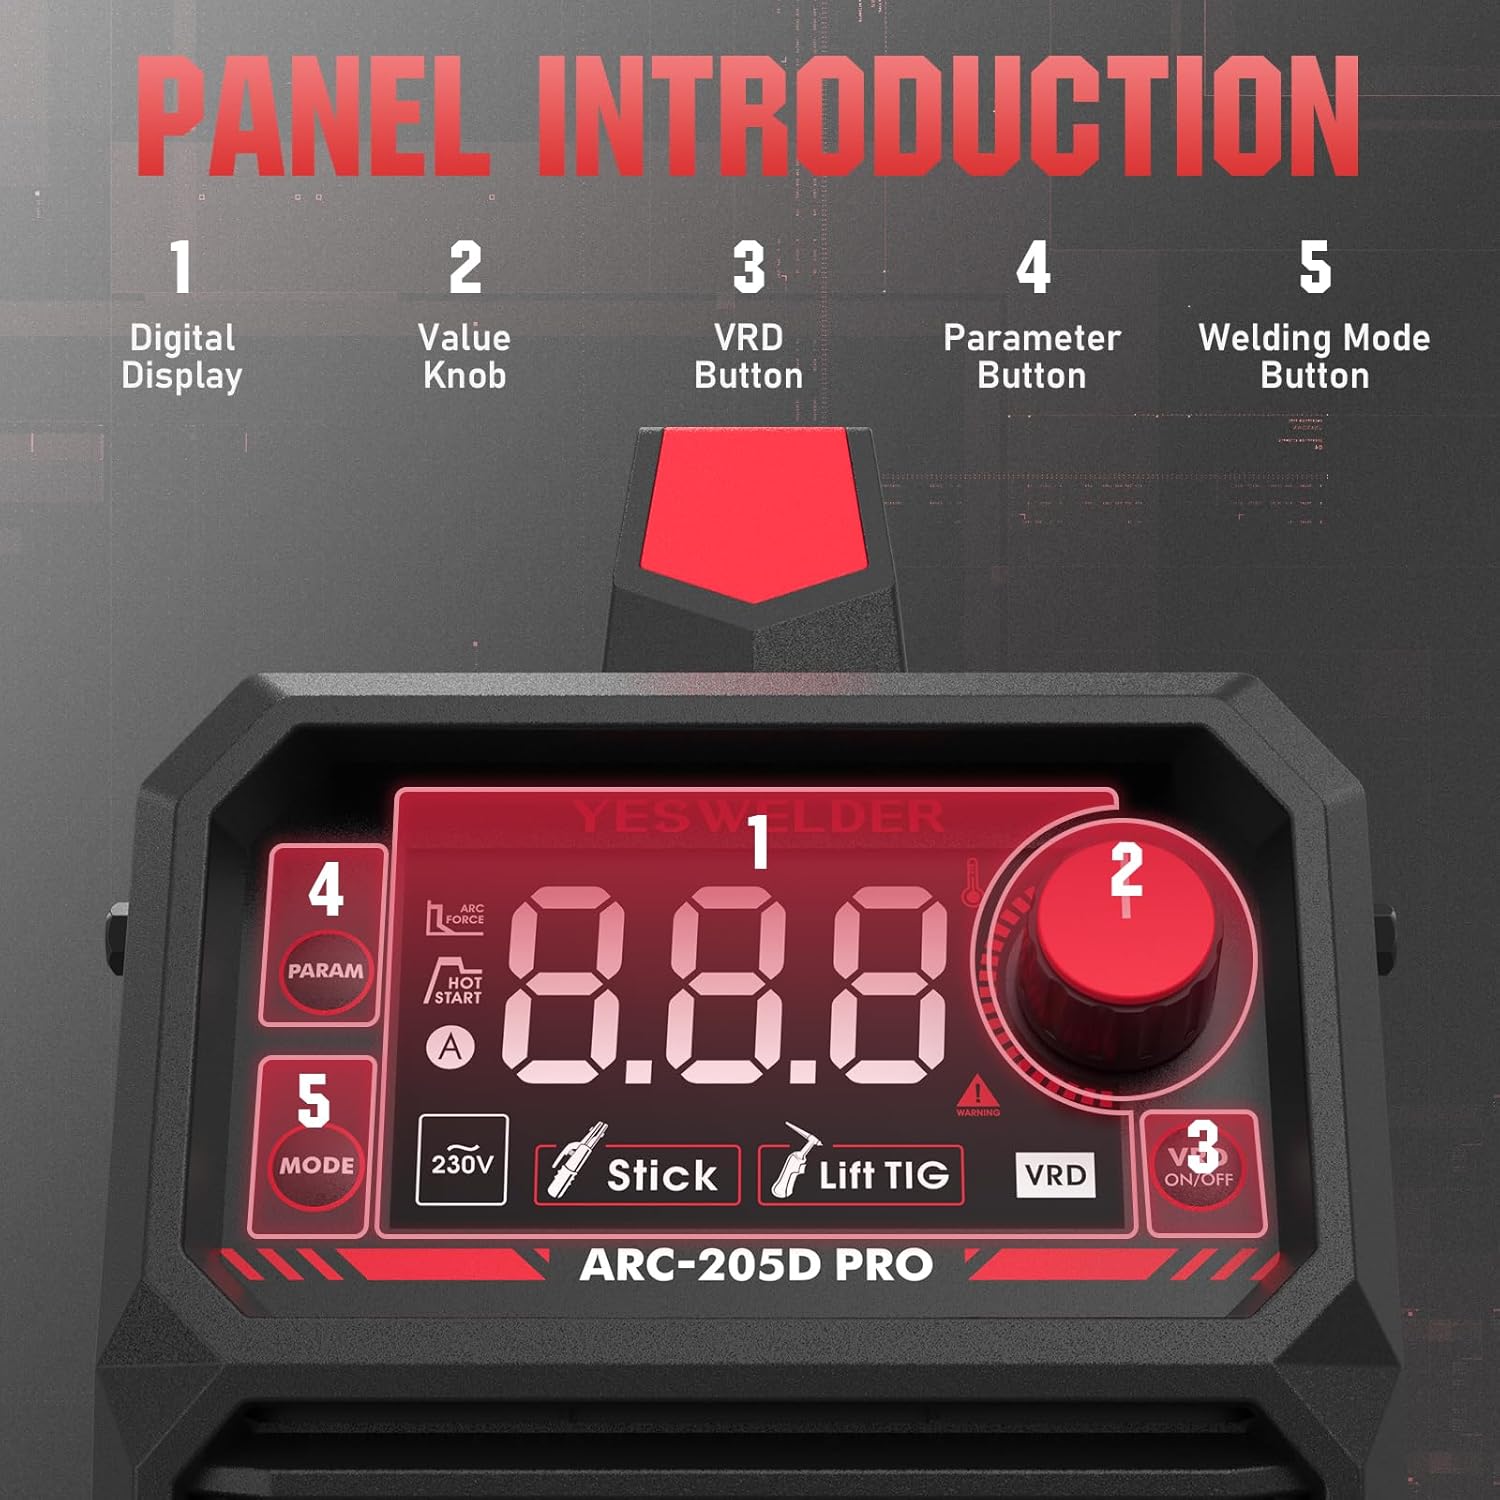
Imaxe 3.2: Detallada view of the control panel, indicating the digital display, value knob, VRD button, parameter button, and welding mode button.
- Pantalla dixital: Shows welding parameters such as current, electrode size, and selected mode.
- Botón de valor: Adjusts welding current and other parameters.
- VRD Button: Activates or deactivates Voltage Reduction Device for enhanced safety in certain environments.
- Parameter Button: Cycles through adjustable parameters (e.g., Hot Start, Arc Force).
- Botón do modo de soldadura: Selects between Stick (MMA) and Lift TIG welding modes.

Image 3.3: The upgraded large LED display provides clear and comprehensive information during operation.
4. Configuración
Unha configuración axeitada é fundamental para unha soldadura segura e eficaz. Siga estes pasos atentamente.
4.1 Desembalaxe e inspección:
- Remove the welder and all accessories from the packaging.
- Inspect for any shipping damage. Contact your supplier immediately if damage is found.
- Asegúrese de que estean presentes todos os compoñentes listados na lista de embalaxe.
4.2 Connecting Accessories:

Image 4.1: Electrode holder and ground clamp conexións.
- Cl Claseamp Conexión: Conecte a terra clamp cable ao terminal de saída negativo (-) da soldadora. Conecte firmemente o cable de terraamp á peza de traballo ou á mesa de soldadura, garantindo un bo contacto eléctrico.
- Electrode Holder Connection (for MMA/Stick): Connect the electrode holder cable to the positive (+) output terminal on the welder. Insert the welding electrode into the holder.
- TIG Torch Connection (for Lift TIG - torch sold separately): If performing Lift TIG welding, connect the TIG torch cable to the negative (-) output terminal. Connect the gas hose from the TIG torch to your argon gas regulator.
4.3 Conexión de alimentación:
- Asegúrese de que o interruptor de alimentación da soldadora estea na posición de apagado.
- Connect the power input cable to a suitable 230V power outlet. Verify that the power source meets the welder's requirements.
5. Instrucións de funcionamento
The YESWELDER 205A offers two primary welding modes: Stick (MMA) and Lift TIG.
5.1 Starting the Welder:
- After connecting all cables and ensuring safety, turn the power switch to the ON position.
- The LED display will illuminate, showing the default welding mode and current.
5.2 Soldadura con electrodo revestido (MMA):

Image 5.1: Visual representation of Stick welding (left) and Lift TIG welding (right).
- Seleccionar modo: Press the 'Welding Mode Button' until 'Stick' (MMA) is indicated on the display.
- Axustar a corrente: Use o botón de valor para axustar a corrente de soldadura (amperes) according to the electrode type and material thickness. The machine supports up to 205A.
- Adjust Parameters (Optional): Press the 'Parameter Button' to cycle through Hot Start and Arc Force settings. Adjust these using the 'Value Knob' as needed for optimal arc ignition and stability.
- Comezar a soldar: Strike the arc by lightly touching the electrode to the workpiece and quickly lifting it slightly. Maintain a consistent arc length and travel speed.
5.3 Soldadura TIG por elevación:
For Lift TIG welding, a TIG torch with a gas valve is required (not included).
- Seleccionar modo: Press the 'Welding Mode Button' until 'Lift TIG' is indicated on the display.
- Axustar a corrente: Use o botón de valor para axustar a corrente de soldadura (amperes) based on the material and tungsten electrode size.
- Fluxo de gas: Open the gas valve on the TIG torch to establish argon gas flow.
- Iniciar Arco: Gently touch the tungsten electrode to the workpiece and then lift it slightly (1-2mm) to initiate the arc. The arc will start at a low current and ramp up to the set current.
- Perform Weld: Maintain a short arc length and feed filler rod manually if required.
6. Mantemento
Un mantemento regular garante a lonxevidade e o rendemento óptimo da súa soldadora.
6.1 Mantemento diario:
- Clean the exterior of the machine with a dry, soft cloth.
- Inspect all cables and connections for damage or loose fittings.
- Check the electrode holder and ground clamp para o desgaste.
6.2 Periodic Maintenance (Monthly/Quarterly):
- Limpeza interna: Disconnect power. Open the machine casing and use compressed air to blow out dust and debris from the cooling fins and internal components. Ensure no moisture enters.
- Comprobación do ventilador: Verify that the cooling fan operates freely and is not obstructed.
- Inspección da terminal: Check all power terminals for corrosion or looseness. Tighten if necessary.
Caution: Only qualified personnel should perform internal maintenance. Always disconnect power before opening the machine.
7 Solución de problemas
Consulta a táboa seguinte para ver os problemas comúns e as súas posibles solucións.
| Problema | Causa posible | Solución |
|---|---|---|
| A soldadora non se acende | No power from outlet; Power switch off; Internal fuse blown | Check power supply; Turn power switch ON; Contact service for fuse replacement |
| Sen arco ou arco débil | Mala conexión á terra; Axuste de corrente incorrecto; Electrodos mollados ou vellos; Cables danados | Ensure good ground contact; Adjust current; Use dry electrodes; Inspect and replace cables |
| Indicador de sobrequecemento activado | Exceeded duty cycle; Insufficient ventilation; Fan malfunction | Allow machine to cool down; Ensure clear airflow; Check fan operation |
| Arco inestable | Corrente incorrecta/voltage; Contaminated workpiece; Improper electrode angle | Adjust settings; Clean workpiece; Correct electrode technique |
8. Especificacións
Technical specifications for the YESWELDER ARC-205D-EU model.

Image 8.1: Detailed technical specifications for the ARC-205D model.
| Especificación | Valor |
|---|---|
| Número de modelo | ARC-205D-EU |
| Vol. De entradatage (U1) | 230 V |
| Max Input Current (I1 max) | 29A |
| Effective Input Current (I1 eff) | 22.4A |
| Corrente de saída (I2) | 205A (MMA), 158A (TIG) |
| Vol. De saídatage (U2) | 18.2V (MMA), 16.3V (TIG) at 60% duty cycle |
| Vol. sen cargatage (U0) | 65 V |
| Duty Cycle (X) | 60% en 205A, 100% en 158A |
| Dimensións (L x W x H) | 31.5 x 12 x 20.8 cm |
| Peso | 3.8 kg (8.4 lb) |
| Método de arrefriamento | Refrixeración por ventilador |
| Grao de illamento | F |
| Clase de protección | IP21S |
9. Garantía e soporte
For warranty information, technical support, or service inquiries, please contact YESWELDER customer service. Keep your purchase receipt as proof of purchase.
For further assistance, visit the official YESWELDER websitio web ou póñase en contacto cos seus centros de servizo autorizados.


