1. Introdución
Thank you for choosing the Dimplex 36 Inch Slim Built-in Linear Electric Fireplace Heater. This manual provides essential information for the safe installation, operation, and maintenance of your new electric fireplace. Please read all instructions carefully before installation and use, and retain this manual for future reference.
This electric fireplace is designed to provide supplemental heat and aesthetic flame effects for indoor residential use. Its slim design allows for versatile installation options, including built-in or wall-mounted configurations.
2. Información importante de seguridade
AVISO: Para reducir o risco de incendio, descarga eléctrica ou lesións, observe o seguinte:
- Le todas as instrucións antes de usar este aquecedor.
- Este quentador quéntase cando está en uso. Para evitar queimaduras, non deixes que a pel espida toque superficies quentes. Mantén os materiais combustibles, como mobles, almofadas, roupa de cama, papeis, roupa e cortinas, a polo menos 0.9 m da parte dianteira do quentador e afastalos dos laterais e da parte traseira.
- É necesario ter extrema precaución cando calquera aquecedor é usado por nenos ou persoas inválidas ou preto de eles e sempre que o aquecedor se deixa en funcionamento e sen vixilancia.
- Non fagas funcionar ningún quentador cun cable ou enchufe danados ou despois de que o quentador funcione de forma avariada, se deixe caer ou se dane de calquera xeito. Desbota o quentador ou devólveo a un centro de servizo autorizado para a súa revisión e/ou reparación.
- Non use ao aire libre.
- Nunca coloque o aquecedor onde poida caer nunha bañeira ou outro recipiente de auga.
- Non pase o cable debaixo da alfombra. Non cubra o cable con alfombras, corredores ou revestimentos similares. Coloque o cable lonxe da zona de tráfico e onde non se tropece.
- Para desconectar o aquecedor, apague os controis e, a continuación, retire o enchufe da toma de corrente.
- Non insira nin permita que entren obxectos estraños en ningunha abertura de ventilación ou escape, xa que isto pode provocar unha descarga eléctrica ou incendio, ou danar o quentador.
- Para evitar un posible incendio, non bloquee de ningún xeito as entradas ou escapes de aire. Non o use en superficies brandas, como unha cama, onde se poidan bloquear as aberturas.
- Un aquecedor ten partes quentes e con arcos ou chispas no seu interior. Non o use en áreas onde se use ou almacene gasolina, pintura ou vapores ou líquidos inflamables.
- Use este aquecedor só como se describe neste manual. Calquera outro uso non recomendado polo fabricante pode provocar incendios, descargas eléctricas ou lesións ás persoas.
- Conecte sempre os quentadores directamente a unha toma/receptáculo de parede. Nunca use un cable de extensión ou unha toma de alimentación reubicable (toma de toma/multimetro).
3. Contido do paquete
Comprobe que todos os compoñentes estean presentes antes de comezar a instalación:
- Dimplex 36 Inch Slim Electric Fireplace Unit
- Control remoto
- Acrylic Crystals (Ember Bed Media)
- Mounting Bracket (for wall-mount installation)
- Manual de usuario (este documento)
4. Instalación
The Dimplex Slim Electric Fireplace offers flexible installation options: built-in (recessed) or wall-mounted. Its shallow 4-inch depth allows for flush installation into standard 2x4 framing.
Imaxe: An infographic demonstrating the versatility of the fireplace's installation, showing how it can be fully recessed into a wall, partially recessed, or surface wall-mounted.
4.1 Selección do sitio
- Ensure the chosen location is away from water sources and direct sunlight.
- Maintain proper clearances from combustible materials as specified in the safety information.
- Ensure a grounded 120V AC, 15 Amp dedicated circuit is available.
4.2 Built-in (Recessed) Installation
This fireplace is designed to fit flush into new or existing 2x4 framing.
- Construct a framed opening in the wall according to the product dimensions (refer to Section 7. Specifications and the dimensional diagram).
- Ensure the opening provides adequate support for the fireplace unit.
- Carefully slide the fireplace unit into the framed opening.
- Secure the unit to the framing using appropriate screws through the designated mounting holes.
- Conecte o cable de alimentación a unha toma de terra.

Imaxe: A technical diagram illustrating the precise dimensions of the Dimplex 36-inch electric fireplace, including its shallow depth of 3.75 inches (9.8 cm), width of 37.25 inches (94.6 cm), and height of 19.625 inches (49.8 cm).

Imaxe: Un lado view of the fireplace unit, emphasizing its shallow design which allows for flush installation into standard 2x4 framing.
4.3 Instalación na parede
For surface wall-mounting, use the included mounting bracket.
- Locate wall studs for secure mounting.
- Attach the mounting bracket to the wall using appropriate hardware, ensuring it is level and securely fastened to at least two studs.
- Carefully lift the fireplace unit and hang it onto the mounting bracket.
- Ensure the unit is securely seated on the bracket.
- Conecte o cable de alimentación a unha toma de terra.

Imaxe: The electric fireplace is shown integrated seamlessly into a wall, demonstrating its flush-mount installation in a contemporary room setting.
5. Funcionamento
Your Dimplex electric fireplace can be operated using the integrated control panel on the unit or the included remote control.

Imaxe: This image shows the Dimplex 36-inch electric fireplace in operation, featuring its dynamic multi-color flame effects and the illuminated acrylic crystal ember bed.
5.1 Panel de control
The control panel is located on the top right of the fireplace unit. It features a digital display and touch-sensitive buttons for various functions.

Imaxe: Un detallado view of the fireplace's on-unit control panel, showing the digital temperature display and touch-sensitive buttons for manual operation.
5.2 Control remoto
The included remote control provides convenient access to all fireplace functions from a distance.

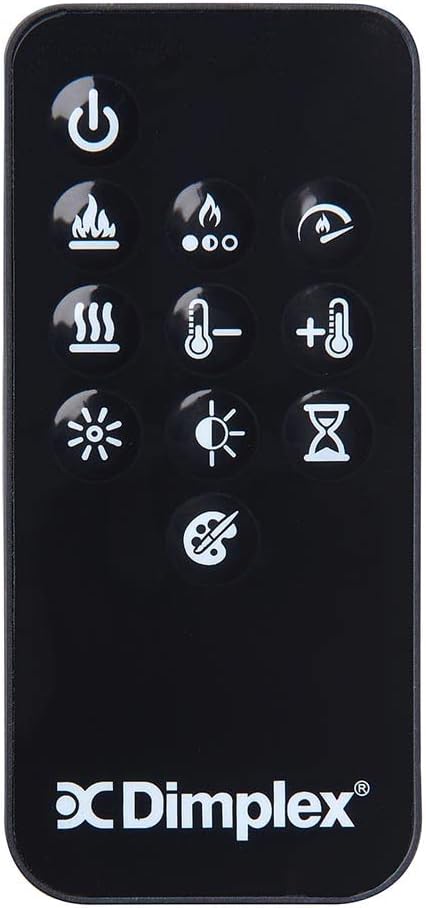
Imaxe: The included remote control unit, featuring clearly labeled buttons for adjusting power, flame color and speed, heater settings, and the built-in timer.
5.3 Funcións básicas
- Encendido/apagado: Preme o botón de acendido para acender ou apagar a unidade.
- Efectos de chama: Use the flame button to cycle through various flame colors (Yellow, Orange, Blue, Mixed) and adjust flame speed. The Multi-Fire SL Technology creates a multi-layered flame appearance.
- Leito de brasas: Adjust the color of the acrylic crystal ember bed to complement the flame effects.
- Función do calefactor: Activate the supplemental heater. Use the temperature up/down buttons to set your desired room temperature. The heater provides warmth for up to 400 sq ft.
- Velocidade do ventilador: Adjust the fan speed for the heater.
- Temporizador: Set the built-in timer for automatic shut-off, up to 8 hours.
6. Mantemento
Un mantemento regular garante un rendemento óptimo e unha maior duración da súa lareira eléctrica.
- Limpeza: Desconecte a corrente antes de limpar. Use un pano suave eamp pano para limpar as superficies exteriores. Non empregue produtos de limpeza abrasivos nin sprays.
- Panel de vidro: Limpar o panel de vidro cun pano suave e un limpador de cristais non abrasivo.
- Ventos de aire: Periodically check and clean the air intake and exhaust vents to ensure they are free from dust and debris. A vacuum cleaner with a brush attachment can be used.
- Almacenamento: If storing the fireplace for an extended period, ensure it is clean, dry, and stored in a safe, dry location.
7 Solución de problemas
Se tes problemas coa túa lareira, consulta os seguintes problemas e solucións comúns:
| Problema | Causa posible | Solución |
|---|---|---|
| A lareira non se acende. | Sen electricidade, disyuntor disparado, conexión solta. | Check power cord connection, ensure outlet is functional, reset circuit breaker. |
| Sen efecto de chama. | Flame function is off, LED issue. | Ensure flame function is activated via control panel or remote. If problem persists, contact customer support. |
| O quentador non produce calor. | Heater function off, thermostat setting too low, air vents blocked. | Activate heater, increase thermostat setting, ensure air vents are clear. |
| O control remoto non funciona. | Pilas descargadas, obstrución, mando a distancia fóra de alcance. | Replace batteries, remove obstructions, operate remote within range. |
| Ruído inusual durante o funcionamento. | Fan obstruction, loose components. | Turn off and unplug the unit. Check for any obstructions in the fan area. If noise persists, contact customer support. |
8. Especificacións
| Característica | Detalle |
|---|---|
| Marca | DIMPLEX |
| Nome do modelo | PLF3614-XS |
| Fonte de enerxía | Eléctrico |
| Dimensións do produto (P x A x A) | 3.75" de profundidade x 36" de ancho x 19.5" de alto (9.5 cm de profundidade x 91.4 cm de ancho x 49.5 cm de alto) |
| Material | Metal |
| Tipo de acabado | Negro |
| Tipo de instalación | Built-in, Wall Mount |
| Saída de calor | 40000 unidades térmicas británicas (BTU) |
| Cobertura de calefacción | Ata 400 pés cadrados |
| Características especiais | LED Multi-Color Flames, Slim Thin Design, Built-in Timer, Corded |
| Compoñentes incluídos | Acrylic Crystals, Mounting Bracket, Remote Control |
| Peso do elemento | 57.7 libras (26.17 kg) |
| UPC | 781052137318 |
9. Información da garantía
This Dimplex electric fireplace comes with a Garantía limitada. Please refer to the warranty card included with your product for specific terms, conditions, and duration of coverage. The warranty typically covers manufacturing defects and material flaws under normal use and service.
Garda o teu comprobante de compra (recibo) para reclamacións de garantía.
10. Atención ao cliente
For technical assistance, warranty claims, or to order replacement parts, please contact Dimplex Customer Support. Refer to the contact information provided on the product packaging or the official Dimplex websitio.
When contacting support, please have your model number (PLF3614-XS) and serial number (if applicable) ready.


