1. Introdución
This manual provides detailed instructions for the setup, operation, and maintenance of your VYSER F2 Projector. Please read this manual thoroughly before using the projector to ensure proper functionality and to maximize your viewing experience. The VYSER F2 Projector is a versatile device designed for various entertainment and presentation needs, offering high-definition projection with multiple connectivity options.
2. Que hai na caixa
Upon unboxing your VYSER F2 Projector, please verify that all the following items are included:
- VYSER F2 Projector
- Control remoto
- Manual de usuario (este documento)
- Cable HDMI
- Cable de alimentación
3. Produto rematadoview
Familiarize yourself with the components and ports of your VYSER F2 Projector.

Figure 3.1: VYSER F2 Projector with key features highlighted.
3.1 Fronte View
- Lente de enfoque: Adjusts the clarity of the projected image.
- Receptor IR: Recibe sinais do mando a distancia.
3.2 Lateral e traseiro Views (Portos e controis)
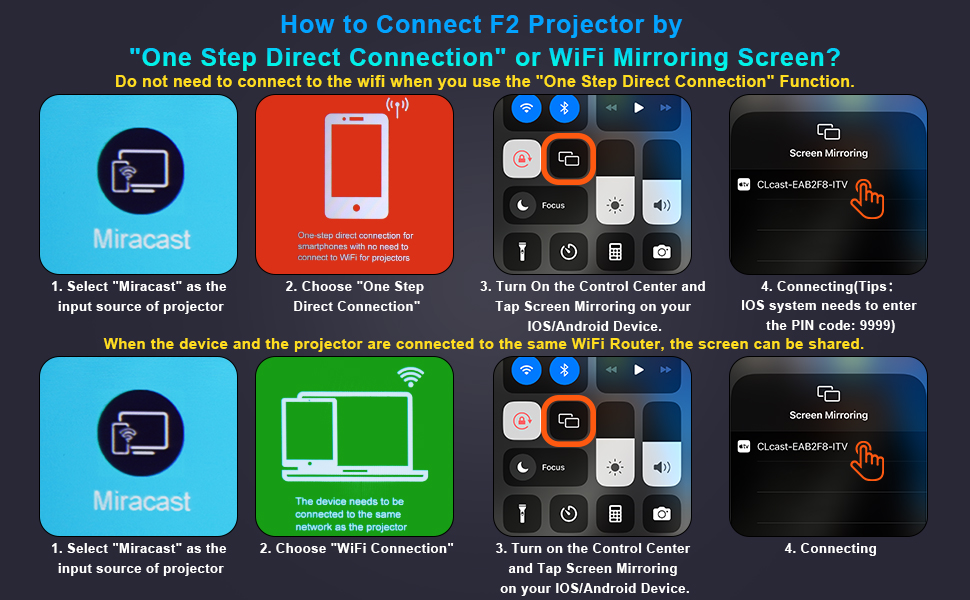
Figure 3.2: Multiple connection options on the VYSER F2 Projector.
- Portos HDMI (x2): Connect to devices like laptops, TV sticks, gaming consoles (e.g., PS5/Xbox).
- Portos USB (x2): Conecta unidades USB para reproducir contido multimedia.
- Porto AV: Connect to older devices using an AV cable.
- Saída de audio de 3.5 mm: Conecta altofalantes ou auriculares externos.
- Entrada de enerxía: Conecte o cable de alimentación.
- Cooling Windows: Garantir unha ventilación adecuada para a disipación da calor.
- Controis a bordo: Buttons for power, menu, input source, and navigation.
3.3 360 Degree View do proxector
Video 3.1: A comprehensive 360-degree view of the VYSER F2 Projector, showcasing its design and various ports from all angles.
4. Configuración
Follow these steps to set up your VYSER F2 Projector for the first time.
4.1 Colocación
Place the projector on a stable, flat surface. Ensure there is adequate ventilation around the projector to prevent overheating. The projection distance can range from 5-15 feet, allowing for an adjustable screen size of 50-300 inches.
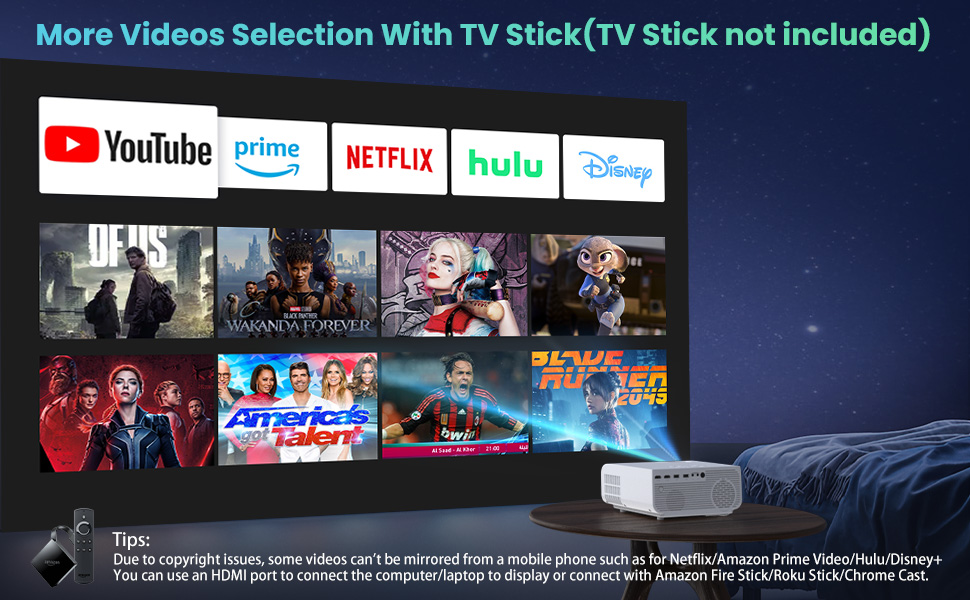
Figure 4.1: Adjustable display size from 50 to 300 inches.
The projector can be placed on a table, mounted on a tripod, or ceiling-mounted. Use the adjustable foot at the bottom of the projector to fine-tune the projection angle if needed.
4.2 Conexión de alimentación
- Connect the power cable to the Power Input port on the projector.
- Conecte o outro extremo do cable de alimentación a unha toma de corrente.
- Press the Power button on the projector or remote control to turn it on.
4.3 Corrección de enfoque e trapezoide
- Axuste do foco: Rotate the focus lens ring on the front of the projector until the image appears clear and sharp.
- Corrección Keystone: Use the keystone correction dial (usually on top or side) to adjust the image shape if it appears trapezoidal. The projector supports ±15° keystone correction.
5. Instrucións de funcionamento
Learn how to connect your devices and utilize the various features of your projector.
5.1 Conexión de dispositivos
The VYSER F2 Projector offers multiple ways to connect your devices:
- HDMI: For high-definition video and audio from laptops, gaming consoles, TV boxes, etc.
- USB: Para reproducir medios files directamente desde unha unidade flash USB.
- DE: For connecting older devices with AV output.
5.2 Wireless Connectivity (Screen Mirroring)
The projector supports 5G/2.4G WiFi for seamless screen mirroring from your smartphone or tablet.
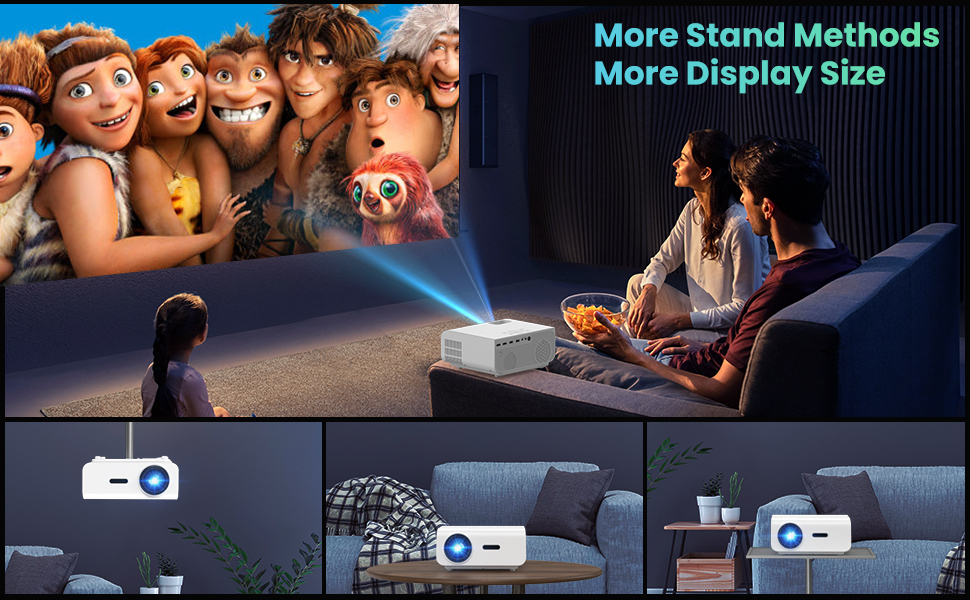
Figure 5.1: 5G/2.4G WiFi Screen Mirroring for various devices.
One-Step Direct Connection: This feature allows direct connection to your phone without needing a WiFi network. Ideal for outdoor use or when a router is unavailable.
Video 5.1: Demonstration of the F2 Projector's One-Step Direct Connection with WiFi and Bluetooth, showing quick setup for phone mirroring.
For detailed steps on screen mirroring, refer to the on-screen instructions by selecting "Miracast" from the input source menu.
Note: Due to copyright restrictions, some streaming services (e.g., Netflix, Amazon Prime Video, Hulu, Disney+) may block screen mirroring. For these services, it is recommended to use an HDMI connection with a compatible device like a Fire TV Stick, Roku Stick, or laptop.
5.3 Conexión Bluetooth
The projector features Bluetooth 5.1 for connecting to external Bluetooth speakers or headphones, enhancing your audio experience.

Figure 5.2: Bluetooth connection for external audio devices.
To connect: Navigate to the Bluetooth settings on the projector, enable Bluetooth, and select your desired audio device from the list of available devices. (Note: The projector connects to Bluetooth speakers, not directly to smartphones/tablets via Bluetooth for audio input).
5.4 Navegación por menús
Use the remote control or the on-board buttons to navigate the projector's menu. Options typically include input source selection, picture settings (brightness, contrast, color), sound settings, and system settings.
6. Mantemento
Un mantemento axeitado garante a lonxevidade e o rendemento óptimo do seu proxector.
- Limpeza de lentes: Use a soft, lint-free cloth specifically designed for optical lenses to gently clean the projector lens. Avoid abrasive materials or harsh chemicals.
- Eliminación de po: Regularly clean the cooling vents to prevent dust buildup, which can affect performance and lifespan. Use a soft brush or compressed air.
- Almacenamento: Cando non o use durante períodos prolongados, garde o proxector nun lugar fresco e seco, idealmente na súa embalaxe orixinal ou nunha funda protectora.
- Apagar correctamente: Apague sempre o proxector co botón de acendido e deixe que arrefríe antes de desconectalo ou movelo.
7 Solución de problemas
Se tes problemas co teu proxector, consulta os seguintes pasos habituais para a resolución de problemas:
| Problema | Posible causa/solución |
|---|---|
| Sen imaxe ou mensaxe "Sen sinal" |
|
| Imaxe borrosa |
|
| Trapezoidal image |
|
| Sen son nin baixo |
|
| Screen mirroring issues (e.g., Netflix not working) |
|
| Projector overheating or shutting down |
|
8. Especificacións
Key technical specifications for the VYSER F2 Projector:
| Característica | Detalle |
|---|---|
| Marca | VYSER |
| Modelo | Proxector F2 |
| Resolución nativa | 1920 x 1080 (1080P nativo) |
| Brillo | 12000 Lux (350 ANSI Lumens) |
| Relación de contraste | 10000:1 (implied from image comparison) |
| Tamaño de proxección | 50-300 polgadas |
| Distancia de proxección | 5-15 pés |
| Tecnoloxía de conectividade | Wireless (5G/2.4G WiFi), Bluetooth 5.1, HDMI (x2), USB (x2), AV, 3.5mm Audio Out |
| Corrección Keystone | ±15° Manual |
| Peso do elemento | 4.11 libras |
| Cor | White-White |
9. Garantía e soporte
VYSER is committed to providing excellent customer service and technical support for your projector.
- Atención ao cliente de por vida: Enjoy lifetime customer service and technical support for your VYSER F2 Projector.
- For any inquiries, technical assistance, or warranty claims, please contact VYSER customer support through the platform where you purchased the product or refer to the official VYSER websitio para información de contacto.


