1. Introdución
This manual provides detailed instructions for the assembly, installation, operation, and maintenance of your AMANSON H07 ATX Mid Tower PC Case. Please read this manual thoroughly before beginning installation to ensure proper setup and safe operation. Keep this manual for future reference.

Figure 1.1: AMANSON H07 ATX Mid Tower PC Case with illuminated internal components.
2. Información de seguridade
- Desconecte sempre a fonte de alimentación da toma de corrente antes de realizar calquera instalación ou mantemento dentro da carcasa do PC.
- Manexe todos os compoñentes con coidado para evitar danos.
- Use unha pulseira antiestática para evitar danos por descarga electrostática (ESD) en compoñentes electrónicos sensibles.
- Manteña as pezas pequenas e os materiais de embalaxe fóra do alcance dos nenos.
- Asegúrate de que haxa unha ventilación axeitada arredor da carcasa do PC para evitar o sobrequecemento.
3. Contido do paquete
Verifica que todos os elementos estean presentes no paquete:
- AMANSON H07 ATX Mid Tower PC Case
- Accessory Box (screws, standoffs, cable ties, etc.)
- Manual de usuario (este documento)
4. Compoñente rematadoview
The AMANSON H07 PC case features a panoramic design with tempered glass panels for full visibility of your internal components. It supports various motherboard sizes and extensive cooling configurations.

Figure 4.1: Top I/O Panel with power button, USB 3.0, USB 2.0, and audio ports.
The top I/O panel includes:
- Botón de encendido
- Botón de reinicio
- 2x portos USB 2.0
- 1x porto USB 3.0
- Audio In/Out Jacks
5. Configuración e instalación
5.1. Preparación do caso
The AMANSON H07 features tool-less hinged tempered glass side panels for easy access. Gently open the side panel by pulling it from the rear edge. The panels can also be removed by lifting them off their hinges for full access during installation.

Figura 5.1: Panel lateral de vidro temperado con bisagras para un acceso doado.
5.2. Instalación da placa base
The H07 supports E-ATX, ATX, Micro-ATX, and ITX motherboards. Install the necessary standoffs for your motherboard form factor. Carefully align your motherboard with the standoffs and I/O shield, then secure it with screws.
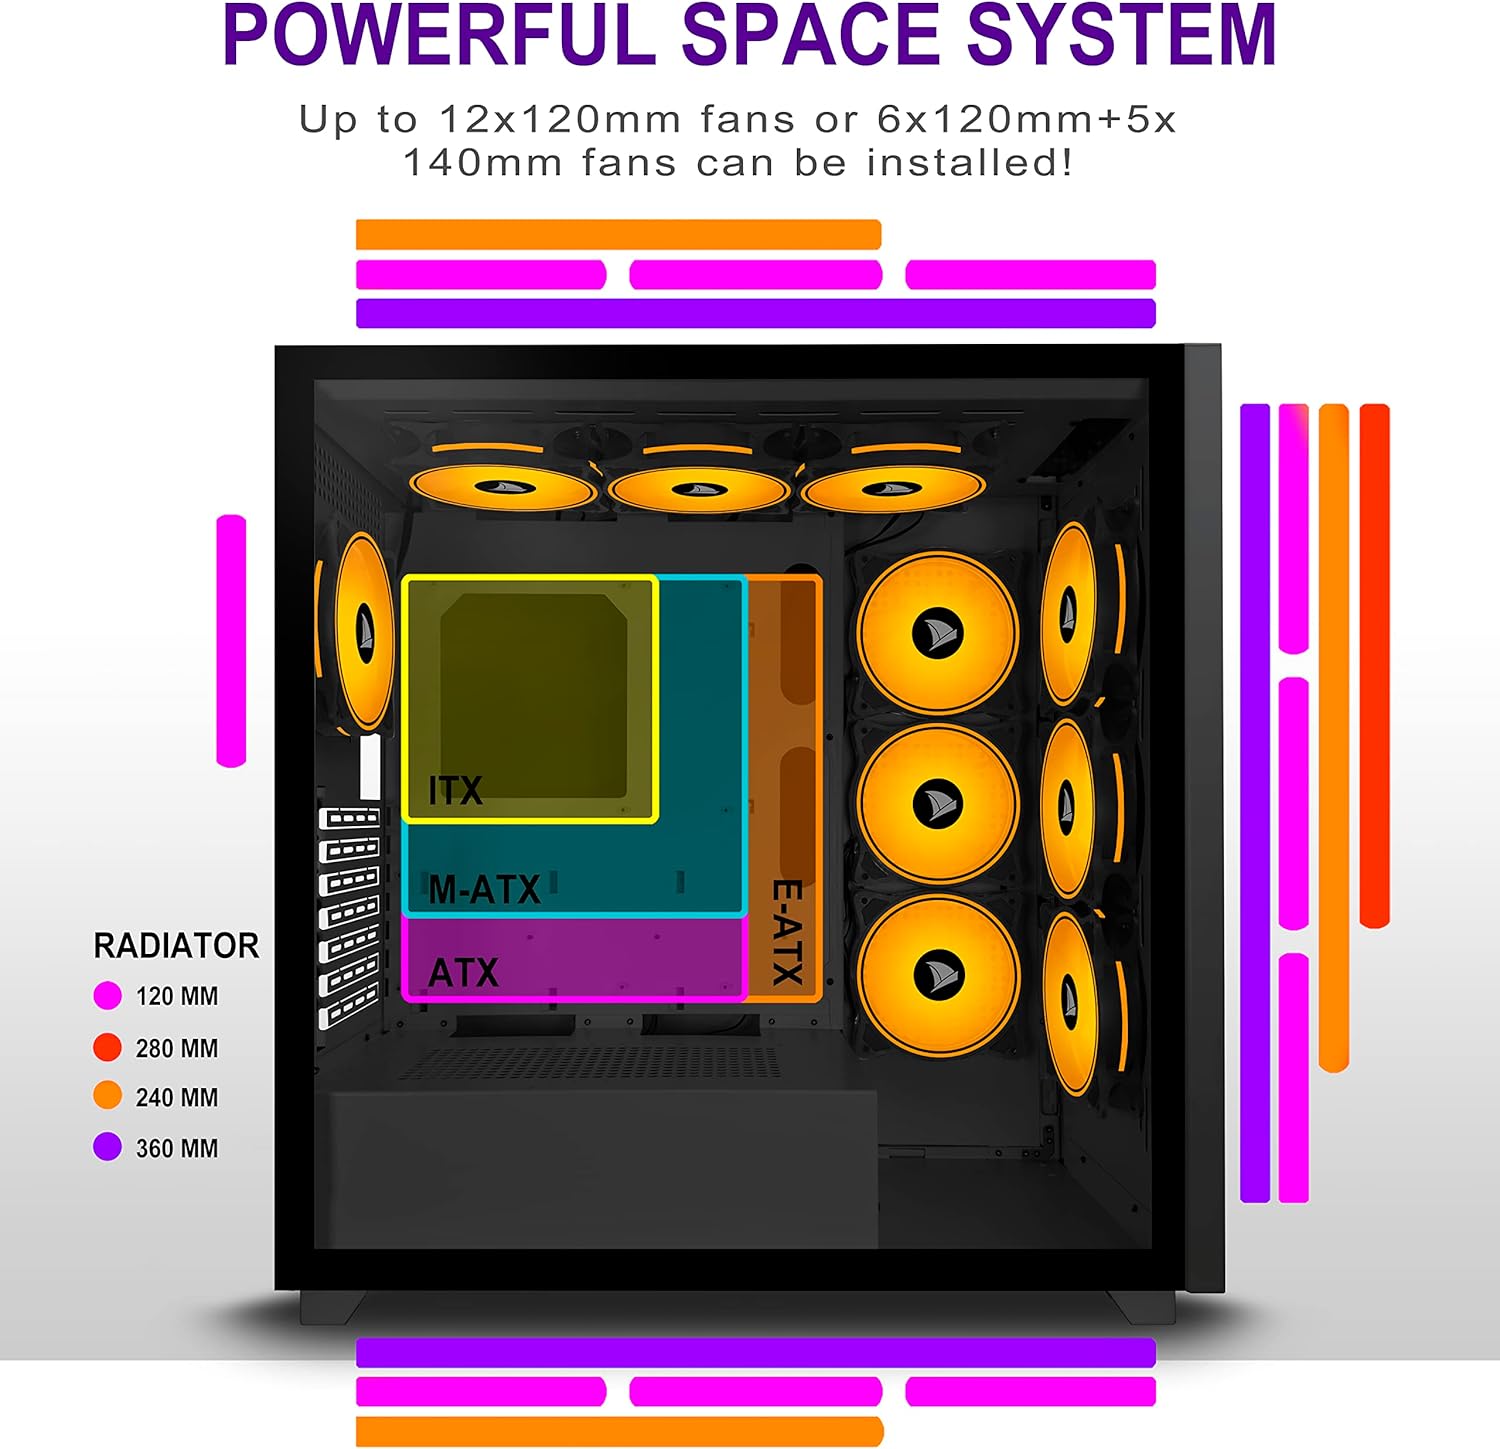
Figure 5.2: Motherboard and cooling component placement options.
5.3. Instalación da fonte de alimentación
Install your power supply unit (PSU) into the dedicated compartment at the bottom rear of the case. Secure it with screws from the rear of the case.
5.4. Instalación do dispositivo de almacenamento
The case provides multiple mounting points for storage devices. Install your 3.5" HDDs and 2.5" SSDs into the designated trays and mounting locations. Refer to the case diagram for specific locations.

Figure 5.3: Storage drive mounting options for HDDs and SSDs.
5.5. Expansion Card (GPU) Installation
Remove the necessary PCI-E slot covers from the rear of the case. Insert your graphics card or other expansion cards into the motherboard's PCI-E slots and secure them with screws.
5.6. Xestión de cables
Utilize the cable routing cutouts and tie-down points behind the motherboard tray to manage cables. This improves airflow and maintains a clean aesthetic.
6. Instrucións de funcionamento
6.1. Acendido/apagado
Press the power button located on the top I/O panel to turn on your PC. To shut down, use the operating system's shutdown function or press and hold the power button for several seconds.
6.2. Using Front I/O Ports
Connect USB devices to the USB 2.0 or USB 3.0 ports. Use the audio jacks for headphones, microphones, or speakers.
7. Mantemento
7.1. Limpeza
Limpa regularmente o exterior da carcasa cun pano suave eamp cloth. For internal cleaning, use compressed air to remove dust from fans and components. Ensure the PC is powered off and unplugged before cleaning.
7.2. Filtros de po
The AMANSON H07 may include removable dust filters. Clean these filters periodically to maintain optimal airflow and cooling performance.
8 Solución de problemas
- PC does not power on: Check all power connections, including the PSU to the wall, the PSU to the motherboard, and the front panel power switch cable to the motherboard.
- Overheating issues: Ensure all fans are properly installed and functioning. Verify that dust filters are clean and not obstructing airflow. Check thermal paste application on CPU cooler.
- Os portos USB non funcionan: Confirm that the front panel USB cables are correctly connected to the motherboard headers.
- Audio jacks not working: Verify that the front panel audio cable is correctly connected to the motherboard's audio header.
9. Especificacións
Below are the technical specifications for the AMANSON H07 PC Case:
| Característica | Detalle |
|---|---|
| Modelo | H07 |
| Tipo de caso | Torre media |
| Compatibilidade da placa base | E-ATX, ATX, Micro ATX, ITX |
| Material | Vidro Templado |
| Dimensións do produto (LxWxH) | 19.69 x 13.78 x 19.69 polgadas (500 x 350 x 500 mm) |
| Peso do elemento | 24.2 libras |
| Número de portos USB 2.0 | 2 |
| Número de portos USB 3.0 | 1 |
| Number of Expansion Slots | 8 |
| Método de arrefriamento | Aire |
| Tipo de montaxe da fonte de alimentación | Montaxe inferior |

Figure 9.1: AMANSON H07 PC Case dimensions (520mm height, 510mm length, 250mm width).
10. Información da garantía
Please refer to the product packaging or the official AMANSON websitio web para coñecer os termos e condicións específicos da garantía. Garda o comprobante de compra para reclamacións de garantía.
11. Apoio
For technical assistance or customer support, please visit the official AMANSON website or contact their customer service department. Contact details can typically be found on the product packaging or the brand's websitio.


