1. Introdución
This manual provides detailed instructions for the IINE Wireless Pro Controller, designed for use with Nintendo Switch, Switch OLED, and Switch Lite consoles. Please read this manual carefully before use to ensure proper operation and to maximize your gaming experience.

Image 1: The IINE Wireless Pro Controller, featuring a gold and green design with various buttons and joysticks.
2. Contido do paquete
Ao desembalar, comproba o contido do paquete para asegurarte de que estean presentes todos os elementos:
- 1 x IINE Wireless Pro Controller
- 1 x cable de carga USB-C
- 1 x Manual de instrucións (este documento)

Image 2: Visual representation of the controller and its packaging, indicating the included items.
3. Deseño do controlador
Familiarize yourself with the buttons and features of your IINE Wireless Pro Controller:
- Joystick analóxico esquerdo: Para o movemento e o control da cámara.
- Joystick analóxico dereito: For camera control and aiming.
- Pad direccional (D-Pad): For menu navigation and specific in-game actions.
- Botóns A/B/X/Y: Botóns de acción.
- Botóns E/D: Botóns de ombreiro.
- Botóns ZL/ZR: Botóns de disparo.
- Botón Menos (-): Select/Back button.
- Botón máis (+): Botón Inicio/Pausa.
- Botón de inicio: Returns to the Switch Home menu.
- Botón de captura de pantalla: Fai capturas de pantalla.
- Turbo (T) Button: Activa/desactiva a función Turbo.
- NFC Sensor: For Amiibo functionality (located near the center of the controller).
- Porto USB-C: Para carga e conexión por cable.
- Luces indicadoras: Mostrar o estado da conexión e o nivel da batería.
4. Configuración e conexión
4.1 Initial Pairing with Nintendo Switch
- Na túa consola Nintendo Switch, vai ao menú INICIO.
- Selecciona "Controis" > "Cambiar agarre/orde".
- Mentres esteas na pantalla "Cambiar agarre/orde", mantén premido o botón Botón de inicio on the IINE Pro Controller for 3-5 seconds until the indicator lights start flashing rapidly.
- Once the controller is successfully paired, the corresponding player indicator light(s) on the controller will remain solid.
4.2 Reconnecting to Nintendo Switch
If the controller has been previously paired, simply press the Botón de inicio to wake it up. It will automatically attempt to reconnect to the last paired Switch console.
4.3 conexión por cable
You can connect the controller to your Nintendo Switch dock using the provided USB-C cable. Ensure "Pro Controller Wired Communication" is enabled in the Switch System Settings (System > Controllers and Sensors > Pro Controller Wired Communication).
4.4 PC Steam Connection
The controller also supports PC Steam. Connect the controller to your PC via the USB-C cable. Your PC should recognize it as a gamepad. You may need to configure controller settings within Steam's Big Picture Mode or specific game settings.

Image 3: The controller shown alongside various Nintendo Switch models and a PC monitor, illustrating its broad compatibility.
5. Instrucións de funcionamento
5.1 Wake Up Function
When the Switch console is in sleep mode, press the Botón de inicio on the controller to wake up the console and automatically reconnect the controller.
5.2 Función Turbo
The Turbo function allows for rapid, automatic pressing of a button. It supports both auto-fire and manual fire dual modes.
- To set Manual Turbo: Manteña premido o botón T, then press any of the A/B/X/Y/L/R/ZL/ZR buttons once. The button will now activate Turbo when held down.
- To set Auto Turbo: Manteña premido o botón T, then press the desired A/B/X/Y/L/R/ZL/ZR button twice. The button will now continuously activate Turbo without needing to be held.
- To cancel Turbo for a specific button: Manteña premido o botón T, then press the desired A/B/X/Y/L/R/ZL/ZR button a third time.
- To cancel all Turbo functions: Manteña premido o botón T durante 5 segundos.
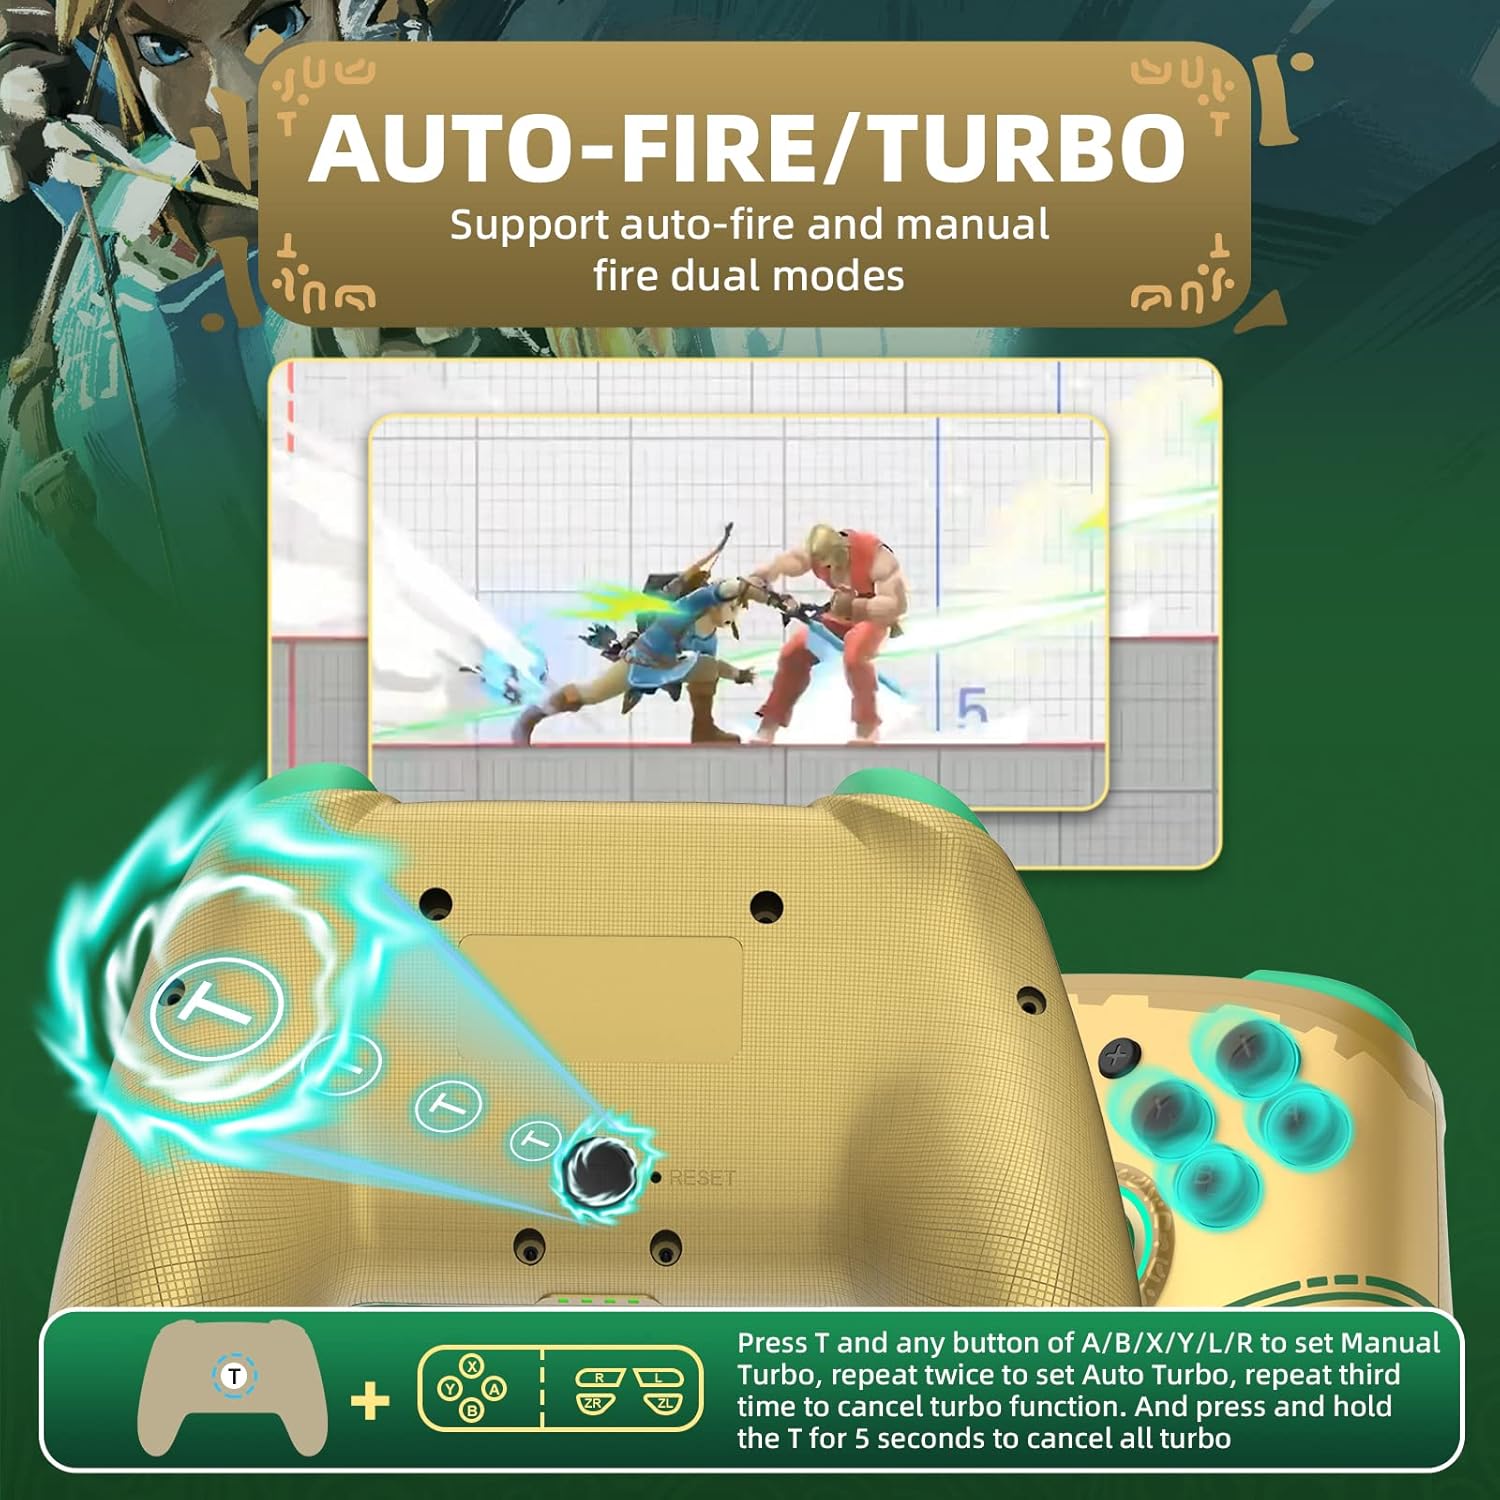
Image 4: Diagram illustrating the button combinations for setting and canceling the Turbo function on the controller.
5.3 Axuste da vibración
The controller features dual vibration feedback with 5 adjustable levels (0%, 30%, 50%, 70%, 100%).
- To adjust vibration intensity: Manteña premido o botón Te, a continuación, prema Directional Button Up to increase vibration or Directional Button Down to decrease vibration.
- O nivel de vibración predeterminado é do 50%.

Image 5: Graphic showing the T button and directional buttons used to adjust the vibration intensity, with a scale from 0% to 100%.
5.4 RGB Light Adjustment
The controller features RGB lighting around the analog sticks, which can be customized.
- To change monochromatic light color: Manteña premido o botón Te, a continuación, prema Stick analóxico esquerdo (L3) once. Repeat to cycle through colors.
- To activate colorful light mode: Manteña premido o botón T, then double-press the Stick analóxico esquerdo (L3).
- Para axustar o brillo: Manteña premido o botón Te, a continuación, prema Stick analóxico dereito (R3) para axustar os niveis de brillo.

Image 6: Instructions for changing the RGB light color and adjusting brightness using the T button and analog stick presses.
5.5 NFC/Amiibo Function
The controller supports NFC functionality for scanning Amiibo figures and cards.
- Ensure the NFC function is enabled in your game or Switch system settings.
- Place your Amiibo figure or card over the NFC sensor area, typically located near the center of the controller, between the analog sticks.
- The console will register the Amiibo data.

Image 7: Graphic highlighting the NFC area on the controller, indicating support for Amiibo scanning.
5.6 Motion Control (6-Axis Gyro)
The built-in 6-axis gyroscope provides precise motion control for compatible games, enhancing gameplay through features like visual angle adjustment, direction control, and aim shooting.

Image 8: Illustrations demonstrating the 6-axis gyro functionality for visual angle adjustment, direction control, and aim shooting in games.
6. Carga do controlador
The controller is equipped with a 600mAh high-capacity rechargeable battery.
- Connect the provided USB-C charging cable to the USB-C port on the controller.
- Connect the other end of the cable to a USB power source (e.g., Nintendo Switch dock, USB wall adapter, computer USB port).
- The indicator lights on the controller will show charging status. They will typically blink while charging and turn solid or off when fully charged.
- Unha carga completa adoita tardar aproximadamente de 2 a 3 horas.
7. Mantemento
- Manteña o controlador seco e lonxe da humidade.
- Evite expoñer o controlador a temperaturas extremas.
- Limpa o controlador cun pano suave e seco. Non empregues produtos químicos agresivos nin materiais abrasivos.
- Garde o controlador nun lugar seguro para evitar danos por caídas ou impactos.
8 Solución de problemas
- O controlador non se conecta:
- Asegúrese de que o controlador estea cargado.
- Repeat the initial pairing process (Section 4.1).
- Ensure the Switch console is updated to the latest firmware.
- Try connecting the controller via USB-C cable to the Switch dock.
- Reset the controller by inserting a thin object into the small reset hole (if present, usually on the back).
- Os botóns ou os joysticks non responden:
- Comprobe se o controlador está conectado correctamente.
- Test the controller in Switch's "Calibrate Control Sticks" or "Test Input Devices" settings.
- Ensure no debris is obstructing the buttons or sticks.
- Vibration is not working:
- Check the vibration adjustment settings (Section 5.3) to ensure it's not set to 0%.
- Verifica que o xogo ao que estás a xogar admite a retroalimentación por vibración.
- NFC/Amiibo not detected:
- Ensure the Amiibo is placed correctly over the NFC sensor.
- Verify that the game or Switch system settings have NFC enabled.
9. Especificacións
| Característica | Detalle |
|---|---|
| Número de modelo | Controlador |
| Compatibilidade | Nintendo Switch, Switch OLED, Switch Lite, PC (Steam) |
| Conectividade | Sen fíos (Bluetooth), con cable (USB-C) |
| Capacidade da batería | 600 mAh (recargable) |
| Porto de carga | USB-C |
| Características especiais | NFC, Turbo, Adjustable Vibration, RGB Lighting, Wake Up Function, 6-Axis Gyro Motion Control |
| Dimensións | 16.7 x 15.6 x 6.6 cm (aprox.) |
| Peso | 280 g (aprox.) |
10. Garantía e soporte
For warranty information or technical support, please refer to the official IINE websitio web ou póñase en contacto directamente co servizo de atención ao cliente. Garde o recibo da compra como proba de compra.
For further assistance, you may visit the IINE Store on Amazon: IINE Official Store


