1. Introdución
Thank you for choosing the FLYLINKTECH BD10 6000A 12V Car Jump Starter and Power Bank. This device is designed to provide emergency jump-starting for vehicles and serve as a portable power bank for various electronic devices. Please read this manual thoroughly before use to ensure safe and optimal operation.

Image 1.1: The FLYLINKTECH BD10 Jump Starter unit with its smart battery clamps.
2. Información de seguridade
Always observe the following safety precautions to prevent injury or damage to the device or vehicle:
- Non intente arrancar con axuda unha batería conxelada.
- Asegúrese de conectar a polaridade correcta (clavija vermella)amp a positivo, negro clamp to negative). Reverse polarity can cause damage.
- Non permitas que o cl intelixenteamps to touch each other when connected to the jump starter.
- Manteña o dispositivo lonxe dos nenos.
- Do not expose the device to extreme temperatures (above 60°C / 140°F or below -20°C / -4°F) or direct sunlight for extended periods.
- Non desmonte nin modifique o dispositivo.
- Usa só o clavilleiro intelixente fornecidoamps and charging cables.
- Se o dispositivo se quenta excesivamente durante o uso, desconécteo inmediatamente.

Image 2.1: The jump starter incorporates multiple safety features such as spark-proof, reverse polarity, overvoltage, short circuit, overload, and high-temperature protection.
3. Contido do paquete
Verifica que todos os elementos estean presentes no paquete:
- FLYLINKTECH BD10 Jump Starter Unit
- Batería intelixente Clamps
- Cable USB-C a USB-C
- Cable USB-A a USB-C
- 12V DC Car Charger Adapter
- Manual de usuario
- Estuche de almacenamento

Image 3.1: The complete package includes the jump starter, smart clamps, various cables, user manual, and a protective storage case.
4. Configuración e carga
4.1 Cargo inicial
Before first use, fully charge the jump starter. The device features a 26800mAh battery capacity.
- Connect the provided USB-C cable to the jump starter's USB-C input port.
- Connect the other end of the cable to a compatible USB wall charger (not included). For fastest charging, use a PD 45W charger.
- The LED screen will display the charging status and battery percentage.
4.2 Charging Times
| Clasificación do cargador | Tempo de carga aproximado |
|---|---|
| 5W | 18 horas |
| 18 W | 7 horas |
| 45 W | 2 horas |
Note: A 45W wall charger is not included in the package.

Image 4.1: The device supports PD 45W fast charging, significantly reducing recharge time when using a compatible charger.
5. Instrucións de funcionamento
5.1 Puesta en marcha dun vehículo
The FLYLINKTECH BD10 is capable of jump-starting all gas engines and diesel engines up to 12.0L.
- Ensure Sufficient Charge: Check the jump starter's LED screen to ensure it has at least 50% charge.
- Connect Smart Clamps: Insert the blue plug of the smart clamps into the jump starter's 12V output port. Ensure a firm connection.
- Conectar á batería do coche:
- Adxunta o vermello (+) clamp ao terminal positivo da batería do vehículo.
- Adxunta o negro (-) clamp ao terminal negativo da batería do vehículo.
- Indicador de verificación: O intelixente clamp indicator light should turn solid green, indicating a correct connection. If it flashes or shows red, check connections and battery status.
- Press BOOST (if needed): If the vehicle battery is extremely low or completely dead, press the 'BOOST' button on the jump starter. Wait for the indicator light on the smart clamps to turn solid green.
- Arrancar o vehículo: Attempt to start your vehicle. If it doesn't start on the first try, wait 30 seconds before trying again. Do not attempt more than 3 consecutive starts.
- Eliminar Clamps: Unha vez que o vehículo arranque, retire inmediatamente o cle intelixenteamps from the car battery, then disconnect them from the jump starter.

Image 5.1: The jump starter connected to a car battery, ready for operation. It supports 6000A peak current, 12V output, and is suitable for a wide range of engines.

Image 5.2: Visual guide illustrating the four steps to jump-start a vehicle: connect the plug, attach clamps, press boost, and start the engine.
5.2 Función de batería externa
The BD10 can charge multiple electronic devices via its USB-A and USB-C ports.
- Saída USB1: Up to 18W (max)
- Saída USB2: Up to 18W (max)
- Saída USB-C: Ata 45 W (potencia de descarga)
Connect your device using the appropriate USB cable to the desired output port. The LED screen will show 'OUT' and the wattage being drawn.

Image 5.3: The jump starter functioning as a power bank, simultaneously charging a smartphone and a tablet via its USB ports.
5.3 lanterna LED
The built-in LED flashlight offers three modes: constant light, SOS signal, and strobe light.
- Press and hold the flashlight button to turn on the constant light.
- Press the button again to cycle through SOS and strobe modes.
- Manteña premido de novo para desactivalo.

Image 5.4: The integrated LED flashlight provides illumination, an SOS signal, and a strobe function for emergency situations.
5.4 Informative LED Screen
The 6.0-inch LED screen provides real-time information about the device's status:
- Nivel de batería: Mostra o porcentaxe de batería restantetage.
- IN/OUT Indicator: Shows whether the device is charging (IN) or discharging (OUT).
- Wattage Pantalla: Indicates the power (W) being drawn or supplied.
- Avisos de erro: Displays specific error codes or symbols if an issue occurs.
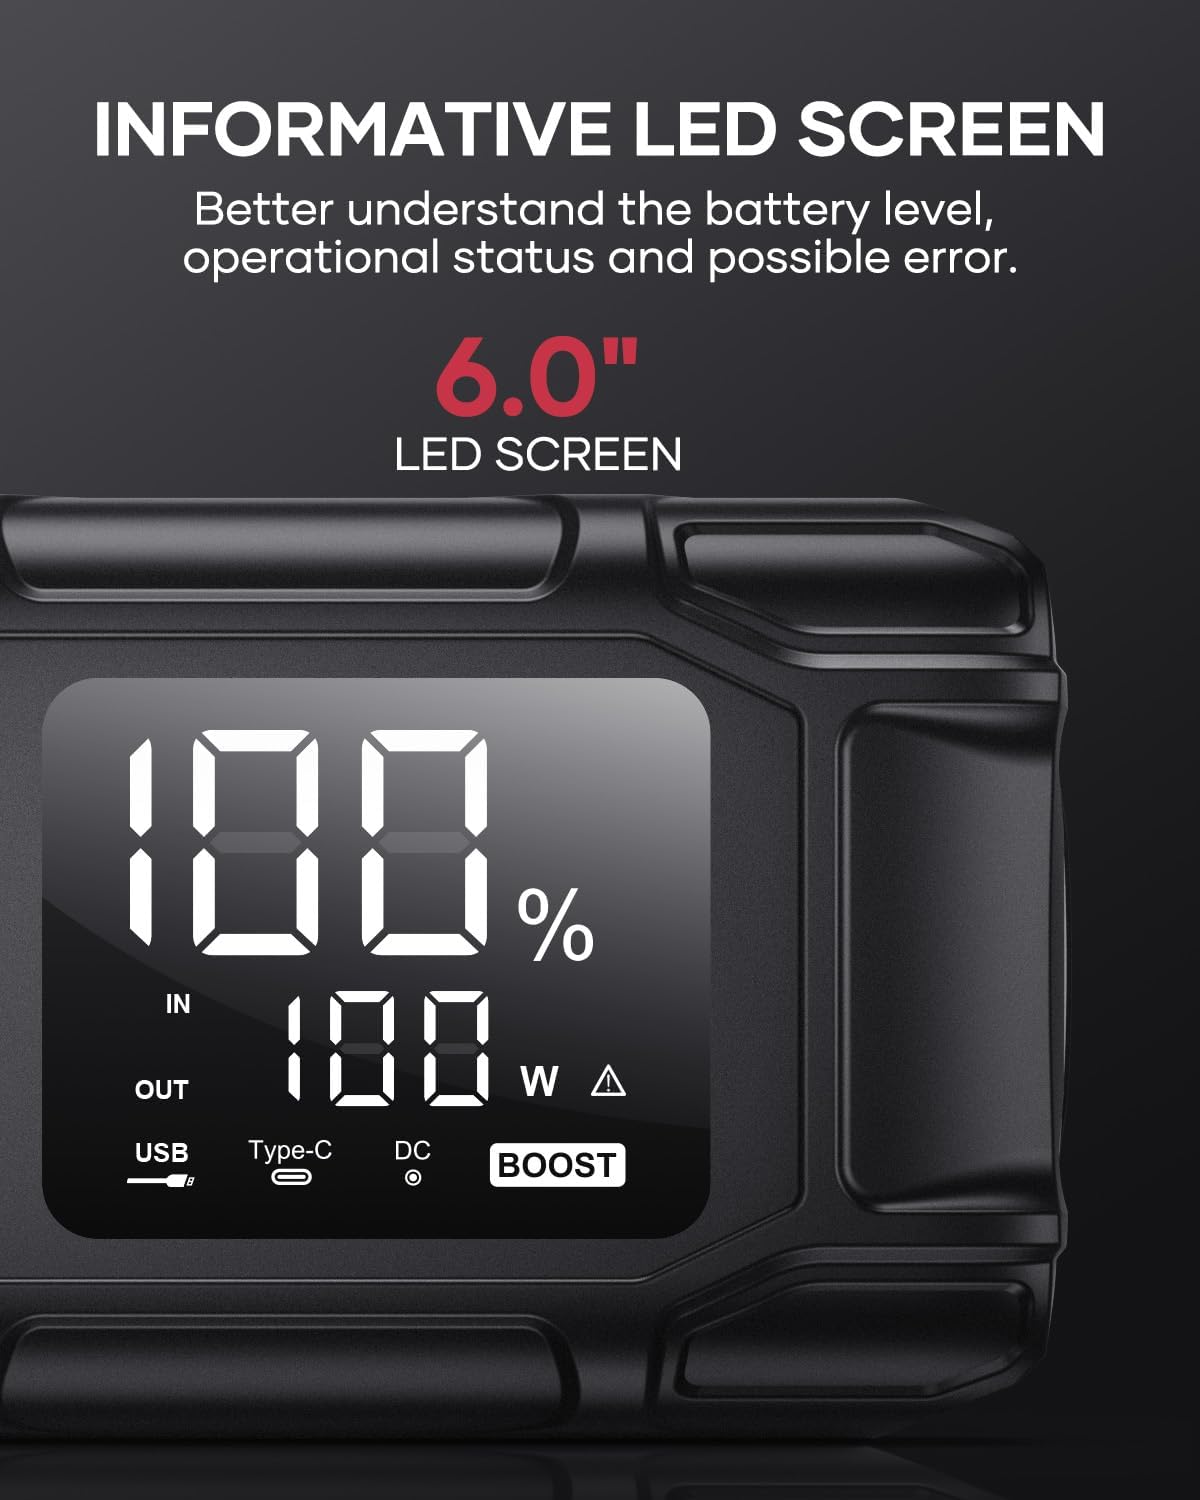
Image 5.5: The 6.0-inch LED screen provides clear information on battery percentage, input/output status, and power consumption.
6. Mantemento
- Recarga regularmente: Para prolongar a duración da batería, recargue o arrancador cada 3-6 meses, mesmo se non o está a usar.
- Almacenamento: Store the device in its protective case in a cool, dry place, away from direct sunlight and moisture.
- Limpeza: Limpe o dispositivo cun pano suave e seco. Non empregue produtos químicos agresivos nin materiais abrasivos.
- Clamp Coidados: Asegúrate de que o cl intelixenteampestean limpos e libres de corrosión antes e despois de cada uso.
7 Solución de problemas
The device features multiple alarm situations indicated by audible signals and screen displays:
- Baixo Voltage Protección: Audible signal "3". Recharge the device.
- Externo Voltage Exceeds Vehicle Voltage: Audible signal "4". Check vehicle battery voltage.
- Protección contra curtocircuítos: Audible signal "5". Check clamp connections for short circuits.
- Safety Mode Activated: Audible signal "6". Device has entered safety mode due to an issue.
- Protección contra sobrecorriente: Audible signal "7". Reduce load or check connections.
- Alarma de temperatura alta/baixa: Audible signal "8". Allow device to return to operating temperature range (-20°C to 60°C).
- Reverse Connection: Audible signal "9". Correct the clamp polaridade.

Imaxe 7.1: Acabadoview of the device's multi-alarm system, indicating various protection states with unique audible signals.
Se os problemas persisten despois de seguir estes pasos, póñase en contacto co servizo de atención ao cliente.
8. Especificacións
| Característica | Especificación |
|---|---|
| Marca | FLYLINKTECH |
| Modelo | BD10 |
| Pico de corrente de saída | 6000 Ampere |
| Capacidade da batería | 26800 mAh |
| Vol. De saídatage | 12 V |
| Entrada/Saída USB-C | PD 45 W |
| Saída USB-A | 18 W (máx.) |
| Applicable Engine Types | All Gas, up to 12.0L Diesel |
| Temperatura de funcionamento | -20 °C a 60 °C (-4 °F a 140 °F) |
| Dimensións do produto | 23.95 x 10 x 5.69 cm |
| Peso do elemento | 920 g |

Image 8.1: The device is designed to operate reliably in extreme climates, from -20°C (-4°F) to 60°C (140°F).
9. Garantía e soporte
FLYLINKTECH is committed to providing high-quality products. For any questions, technical assistance, or warranty claims, please refer to the contact information provided with your purchase or visit the official FLYLINKTECH websitio. Conserve o comprobante de compra para efectos de garantía.


