1. Introdución
This manual provides detailed instructions for the safe and effective operation of the GVDA GD166B True RMS Digital Clamp Meter. This high-performance smart digital clamp meter is designed to simplify and enhance your electrical measurement tasks. It integrates a wide range of functions, making it an essential tool for professionals and enthusiasts alike.
The GD166B is capable of measuring AC/DC voltage, AC/DC current, frequency, duty cycle, resistance, capacitance, temperature, diode, continuity, NCV (Non-Contact Voltage) detection, live wire detection, and more.
2. Información de seguridade
ADVERTENCIA: Para evitar descargas eléctricas ou lesións persoais, lea e comprenda toda a información de seguridade antes de usar este produto.
- Cumpre sempre os códigos de seguridade locais e nacionais.
- Do not use the meter if it appears damaged or if the insulation is compromised.
- Non aplique máis que o voltage, tal e como está marcado no contador, entre os bornes ou entre calquera terminal e terra.
- Teña coidado ao traballar con voltagpor riba de 30 V CA RMS, 42 V pico ou 60 V CC. Este volumetagsupoñen un perigo de descarga.
- Remove the test leads from the circuit before changing functions.
- Ensure the battery cover is closed and secured before operation.
- Do not operate the meter with the battery compartment open.
- Substitúe as baterías en canto apareza o indicador de batería baixa.
- Non use o medidor en ambientes explosivos de gas, vapor ou po.
- Use os terminais, a función e o rango adecuados para as súas medicións.
3. Produto rematadoview
The GVDA GD166B is a versatile digital clamp meter designed for accurate and reliable electrical measurements. Below are its key features and components.
3.1 Características principais
- Medición de verdadeiro valor RMS para lecturas precisas en formas de onda non sinusoidais.
- Medidas AC/DC Voltage, AC/DC Current, Resistance, Capacitance, Frequency, and Temperature.
- Diode Test and Continuity Test functions.
- Vol. Sen contactotage (NCV) detection and Live Wire detection for enhanced safety.
- AC Inrush Current measurement.
- Smart Measurement (Auto) mode for simplified operation.
- Data Hold, Backlight, and Flashlight functions.
- Large LCD display with 6000 counts.
- Compact and ergonomic design with a 36mm clamp apertura.
3.2 Compoñentes

Figura 3.2.1: Fronte View of the GD166B Clamp Medidor. This image shows the main unit of the GVDA GD166B digital clamp meter along with its red and black test leads. The large display, function buttons, and the clamp jaw are clearly visible.

Figure 3.2.2: GVDA GD166B with Brand Logo. Un máis preto view of the GD166B clamp meter, highlighting the GVDA brand logo and model number on the device's body.
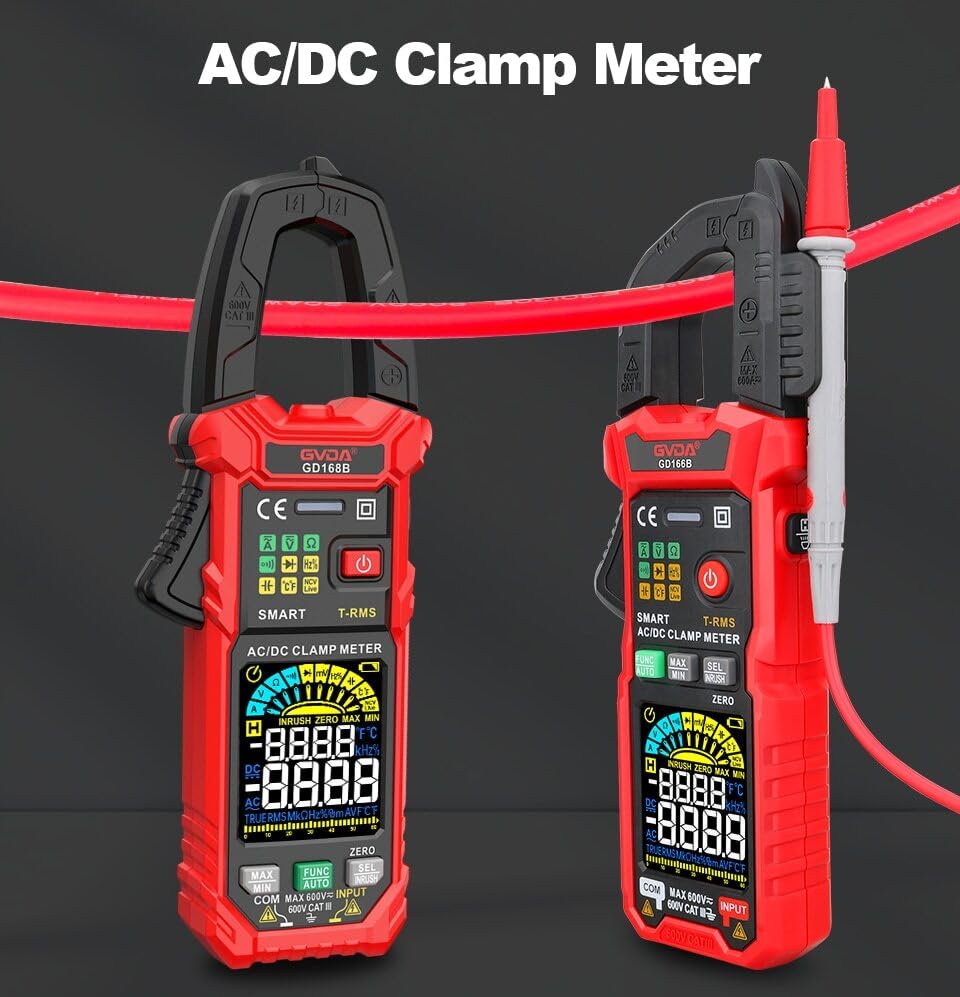
Figure 3.2.3: AC/DC Clamp Meter Comparison. This image displays two GVDA clamp meters, GD168B and GD166B, side-by-side, showcasing their similar design and functionality as AC/DC clamp metros.

Figura 3.2.4: Contido do paquete. This image shows the complete package contents, including the GD166B clamp meter, test leads, a thermocouple probe, a carrying case, and the user manual.
4. Configuración
4.1 Instalación da batería
The GD166B requires 3 x 1.5V AAA batteries (not included) for operation.
- Localice o compartimento das baterías na parte traseira do medidor.
- Use un desaparafusador para abrir a tapa do compartimento da batería.
- Insert three AAA batteries, ensuring correct polarity (+ and -).
- Coloque a tapa do compartimento da batería e fíxaa co parafuso.
4.2 Conexión dos cables de proba
For measurements requiring test leads (e.g., voltage, resistance, continuity, diode, capacitance, temperature), connect them as follows:
- Insira o cable de proba negro na toma de entrada "COM" (común).
- Insert the red test lead into the "INPUT" (positive) input jack.

Figure 4.2.1: Test Lead Connection. This image illustrates the correct way to connect the test leads to the meter's input jacks for various measurements.
5. Instrucións de funcionamento
5.1 Encendido/apagado
Preme o Botón de acendido (⑂) to turn the meter on or off.
5.2 Selección de funcións
The GD166B features a "Smart Measurement (Auto)" mode, which automatically identifies the measurement type (voltage, resistance, continuity) when test leads are connected. For other specific functions, use the FUNC button to cycle through modes or the rotary dial if present (though this model appears button-driven).
5.3 Common Measurements
5.3.1 AC/DC Voltage Medición
- Connect the red test lead to the "INPUT" jack and the black test lead to the "COM" jack.
- Seleccione o vol. Axeitadotage range (or use Smart Auto mode).
- Conecte os cables de proba en paralelo ao circuíto ou compoñente que se vai medir.
- Le o voltago valor da pantalla.
5.3.2 Medición de corrente CA/CC (Clamp)
For current measurements, use the clamp jaw. Ensure the circuit is de-energized before clamping.
- Select the AC or DC current function.
- Abre o clamp jaw and enclose only one conductor of the circuit.
- Pecha o clamp jaw completely.
- Lea o valor actual na pantalla.
5.3.3 Medición de resistencia
- Asegúrese de que o circuíto estea desenergizado antes de medir a resistencia.
- Connect the test leads to the "INPUT" and "COM" jacks.
- Select the resistance function.
- Conecte os cables de proba ao compoñente que se vai medir.
- Lea o valor de resistencia na pantalla.
5.3.4 Proba de continuidade
- Asegúrate de que o circuíto estea desenergizado.
- Connect the test leads to the "INPUT" and "COM" jacks.
- Select the continuity function.
- Connect the test leads across the circuit or component. A continuous beep indicates continuity (low resistance).
5.3.5 Vol. sen contactotagDetección e (NCV).
A función NCV permite a detección do volume de CAtage sen contacto directo.
- Select the NCV function.
- Place the top end of the meter near the conductor or outlet.
- O contador emitirá un pitido e o indicador NCV acenderase se o volume de CA étage é detectado.

Figure 5.3.5.1: NCV Measurement in Progress. This image demonstrates the GD166B clamp meter being used to perform a Non-Contact Voltage (NCV) measurement on an electrical outlet, indicating its ability to detect live voltage sen contacto físico.
5.3.6 AC Inrush Current Measurement
This function measures the initial surge of current when a device is turned on.
- Select the Inrush Current function.
- Abre o clamp jaw and enclose only one conductor of the circuit.
- Turn on the device to be measured. The meter will capture the peak inrush current.

Figure 5.3.6.1: Inrush Current Measurement. This image shows the GD166B clamp meter actively measuring inrush current on a set of electrical wires, demonstrating its capability to capture transient current peaks.
5.3.7 Outras funcións
- Retención de datos: Preme o ATENCIÓN botón para conxelar a lectura actual na pantalla. Prema de novo para soltala.
- MAX / MIN: Preme o MAX/MIN button to record the maximum and minimum readings.
- Retroiluminación/Lanterna: Preme o Botón de luz to turn on/off the display backlight or the integrated flashlight.
- DCA Zero: Used to zero out the DC current reading before measurement to ensure accuracy.
6. Mantemento
6.1 Limpeza
Limpar o caso co anuncioamp un pano e un deterxente suave. Non empregue abrasivos nin disolventes. Manteña os terminais de entrada libres de sucidade ou humidade.
6.2 Substitución da batería
When the low battery indicator (icona da batería) appears on the display, replace the batteries immediately to ensure accurate readings. Refer to Section 4.1 for battery installation instructions.
6.3 Almacenamento
If the meter is not to be used for an extended period, remove the batteries to prevent leakage and damage to the meter. Store the meter in a cool, dry place, away from direct sunlight and extreme temperatures.
7 Solución de problemas
| Problema | Causa posible | Solución |
|---|---|---|
| O medidor non se acende. | Baterías gastadas ou instaladas incorrectamente. | Comprobe a polaridade das baterías; substitúa as baterías. |
| Móstrase "OL". | Overload or out of range. | Select a higher range (if applicable) or ensure the measured value is within the meter's limits. |
| Lecturas inexactas. | Low battery; incorrect function/range; poor test lead connection. | Replace batteries; select correct function/range; ensure secure test lead connection. |
| Sen pitido de continuidade. | Circuit not continuous; high resistance; meter not in continuity mode. | Check circuit; ensure resistance is low; select continuity mode. |
8. Especificacións
| Parámetro | Rango/Valor |
|---|---|
| DC Voltage | 600mV, 6V, 60V, 600V |
| Vol. ACtage | 600mV, 6V, 60V, 600V |
| Corrente alterna | 60 A, 600 A |
| Corrente DC | 60 A, 600 A |
| Resistencia | 600Ω, 6kΩ, 60kΩ, 600kΩ, 6MΩ, 60MΩ |
| Corrente de entrada CA | 60 A, 600 A |
| Capacitancia | 6nF, 60nF, 600nF, 6µF, 60µF, 600µF, 6mF, 60mF |
| Frecuencia | 100Hz, 1000Hz, 10kHz, 100kHz, 1000kHz, 10MHz |
| Ciclo de traballo | 1-99 % |
| Temperatura | -40℃ ~ 1000℃, -40℉ ~ 1832℉ |
| Máx. Voltage entre os terminais e a Terra | 600 V |
| Mostrar | 6000 contas |
| Indicación de exceso de alcance | "OL" |
| Indicación de batería baixa | Si |
| Input Polarity Indication | Display "-" |
| Clamp Tamaño de apertura | 36 mm |
| Requisito de enerxía | 3 baterías AAA de 1.5 V |
| Tamaño do produto | 199*81*32 mm |
| Peso (paquete) | 440 g |
9. Garantía e soporte
This product is manufactured to high-quality standards. For information regarding warranty coverage, technical support, or service, please refer to the documentation provided with your purchase or contact your retailer.
Conserve o comprobante de compra para reclamacións de garantía.


