1. Produto rematadoview
This manual provides instructions for the assembly, operation, and maintenance of your Greesum 5' x 4' Resin Weather Resistant Outdoor Storage Shed. Designed for outdoor use, this shed offers a storage capacity of 99.6 cubic feet, suitable for gardening tools, brooms, ladders, and other outdoor items up to 76 inches in length. Its construction features PVC and aluminum for durability and weather resistance.

Image 1.1: The Greesum 5' x 4' Resin Outdoor Storage Shed in a backyard setting, demonstrating its storage capabilities.
2. Información de seguridade
- Dificultade de montaxe: This shed can be challenging to assemble. It is highly recommended to seek assistance from another person or consider professional installation to ensure proper and safe construction.
- Risco de incendio: The shed's material (PVC) requires it to be kept away from open flames and high heat sources to prevent damage or fire.
- Manipulación de materiais: While the PVC material reduces the risk of scratches during installation, always handle components with care to avoid injury.
- Estabilidade: Ensure the shed is installed on a level and stable surface. Secure the shed to the ground or a suitable base to prevent tipping, especially in windy conditions.
3. Lista de pezas
Before beginning assembly, verify that all parts are present and undamaged. Refer to the included packing list for a complete inventory. Each part is typically labeled for identification.
Note: A detailed parts diagram and list are usually provided in the physical packaging. Ensure you have this document before proceeding.
4. Configuración e montaxe
Assembly of the Greesum storage shed requires careful attention to detail and may be time-consuming. It is strongly recommended to have at least two people for assembly. Some users have found clamps helpful to align parts during construction.
4.1 Preparación do lugar
- Choose a level, firm surface for installation.
- Limpar a zona de calquera resto, rochas ou vexetación.
- Ensure adequate clearance around the shed for door operation and future maintenance.
4.2 Pasos de montaxe (orientación xeral)
- Montaxe base: Construct the base frame according to the instructions. Ensure it is square and level.
- Instalación do panel de parede: Attach the wall panels to the base. Pay close attention to the orientation of each panel. Due to the material, panels may require careful alignment and potentially temporary clamping before securing.
- Instalación do marco da porta e da porta: Assemble the door frame and attach the doors. Ensure smooth operation and proper alignment for the lockable mechanism.
- Montaxe do tellado: Install the pitched roof components. This step can be particularly challenging and may require extra assistance to align and secure.
- Fixación final: Secure all screws and fasteners. The shed does not come with pre-drilled screw holes for all connections, but a drill bit is provided for this purpose.

Image 4.1: Key features of the shed, including the lockable door, light-admitting windows, pitched roof design, and the durable resin material.

Image 4.2: The shed's interior, showcasing its capacity to store items like a bicycle and tools.
5. Funcionamento
The Greesum storage shed is designed for straightforward operation once assembled.
- Acceso á porta: The shed features sliding doors for easy access. Ensure the path in front of the doors is clear for smooth opening and closing.
- Mecanismo de bloqueo: Utilize the integrated lockable latch for security. A padlock (not included) can be added for enhanced protection of your stored items.
- Ventilación: The shed design may include features for air circulation. Ensure these are not obstructed to prevent moisture buildup.
6. Mantemento
Regular maintenance will help prolong the life and appearance of your Greesum storage shed.
- Limpeza: Clean the shed periodically with mild soap and water. Avoid abrasive cleaners or harsh chemicals that could damage the resin material.
- Resistencia á intemperie: The shed is designed to be weather-resistant, offering UV protection and waterproof properties. However, regular inspection for any signs of wear or damage, especially after severe weather, is recommended.
- Pitched Roof: The pitched roof helps with water runoff. Keep the roof clear of heavy snow or debris to maintain its integrity.
- Funcionalidade da porta: Lubricate door tracks or hinges if they become stiff to ensure smooth operation.

Image 6.1: Illustration of the shed's UV protection and waterproof design, contributing to its long service life.
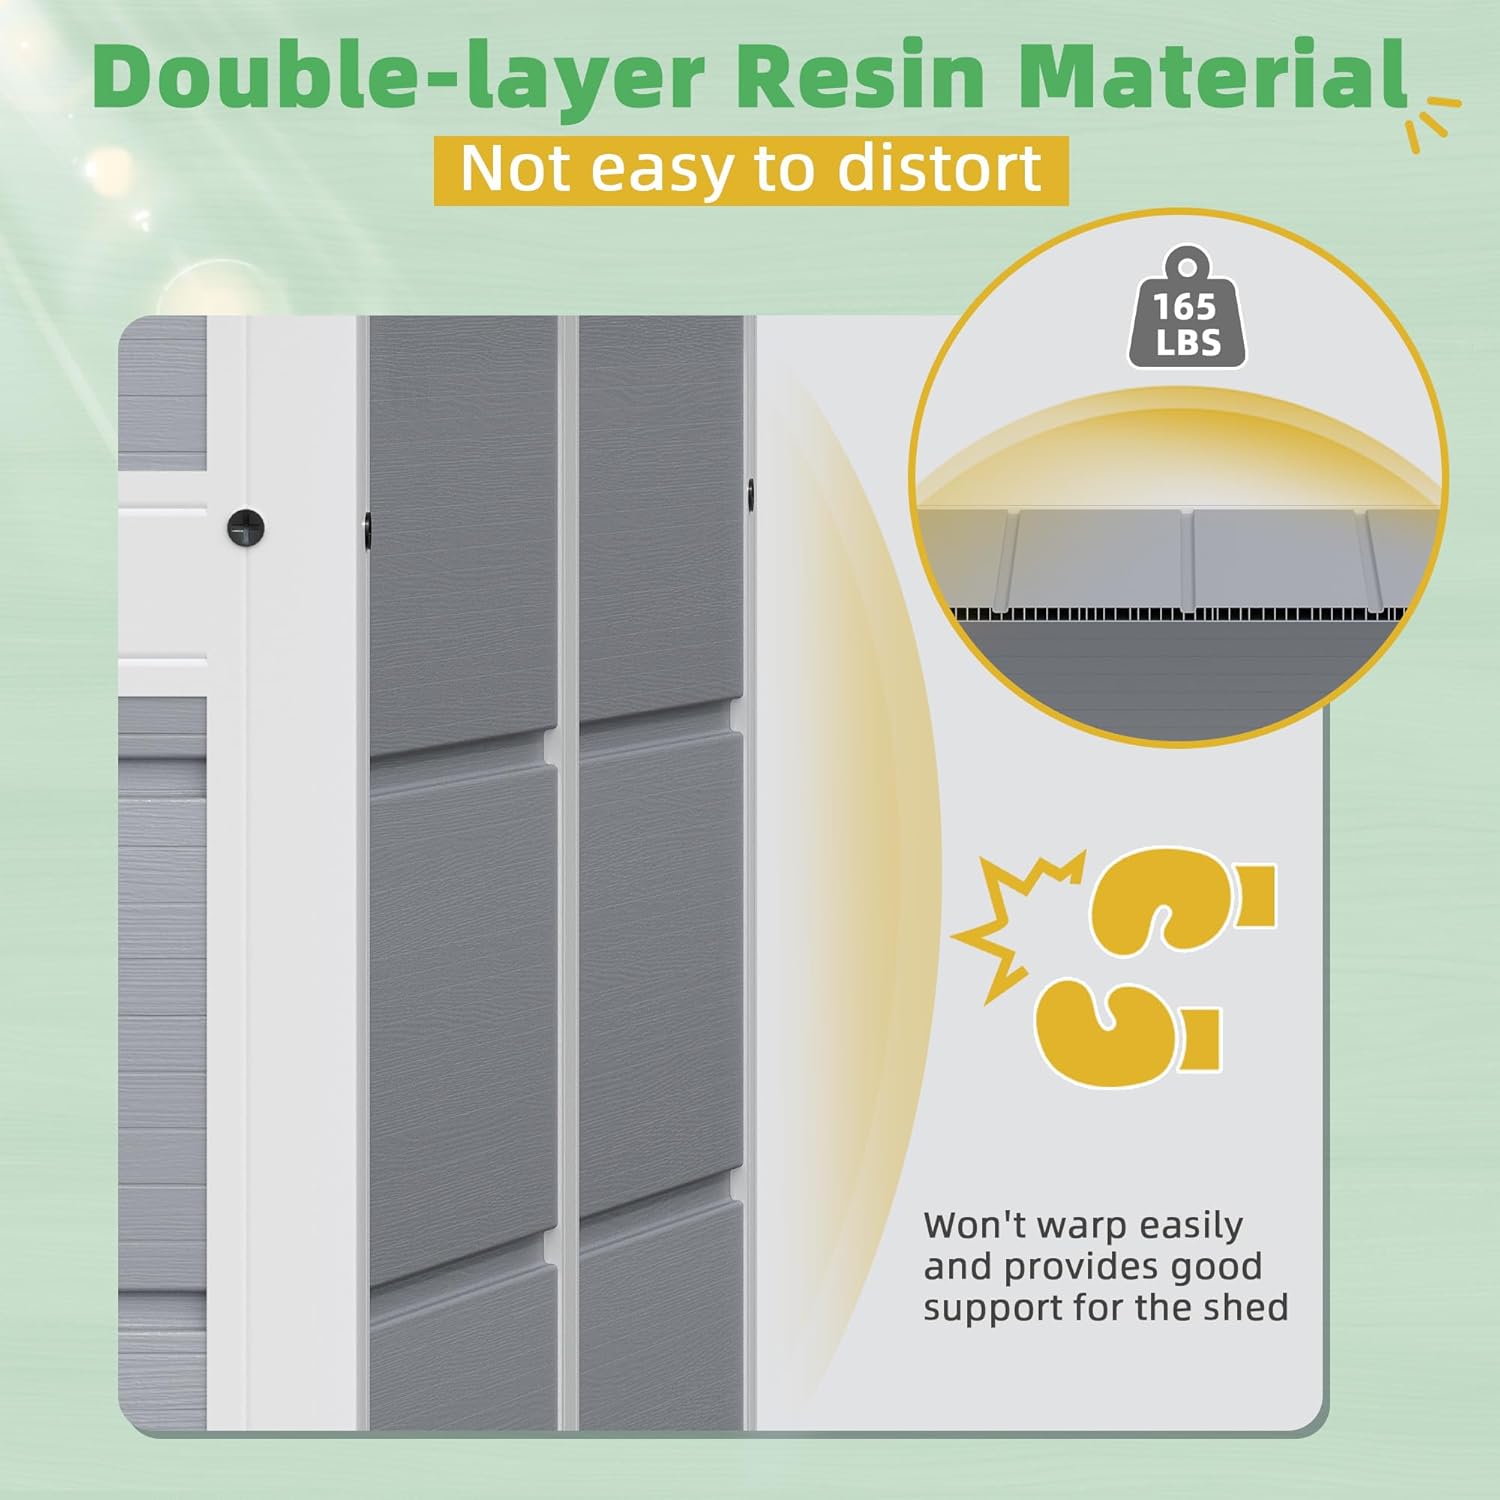
Image 6.2: Detail of the double-layer resin material, emphasizing its strength and ability to resist distortion, providing good structural support.
7 Solución de problemas
| Problema | Causa posible | Solución |
|---|---|---|
| As pezas non se aliñan durante a montaxe. | Incorrect orientation of panels; base not level; manufacturing tolerance. | Double-check panel orientation. Ensure the base is perfectly level. Use clamps to temporarily hold parts in place while securing fasteners. Seek assistance for alignment. |
| Water leakage into the shed. | Improper sealing during assembly; gaps at connecting areas; extreme weather conditions. | Inspect all seams and connections. Apply silicone sealant to any gaps if necessary. Ensure the roof is properly installed and sealed. |
| Doors are stiff or do not slide smoothly. | Restos nas vías; portas desalinhadas; falta de lubricación. | Clean door tracks thoroughly. Check door alignment and adjust if possible. Apply a silicone-based lubricant to the tracks. |
| O galpón parece fráxil ou inestable. | Incomplete fastening; improper base preparation; high winds. | Ensure all fasteners are tightened. Verify the shed is on a solid, level foundation. Consider anchoring the shed to the ground for added stability. |
8. Especificacións
| Característica | Detalle |
|---|---|
| Marca | Greesum |
| Número de modelo | GS-PS0179S4 |
| Dimensións do produto | 43.5" D x 54.3" W x 76.4" H |
| Capacidade de almacenamento | 99.6 cu.ft (for 5' x 4' model) |
| Cor | Gris claro |
| Material | PVC, PP, Aluminum |
| Material base | Resina |
| Tipo de material superior | Cloruro de polivinilo |
| Nivel de resistencia á auga | Resistente á auga |
| Material do marco | Aluminio |
| Estilo de porta | Portas Correderas |
| Requírese montaxe | Si |
| Peso do elemento | 73 libras |
| UPC | 760606703476 |

Image 8.1: Detailed product dimensions for the Greesum 5' x 4' storage shed.
9. Garantía e soporte
For warranty information or customer support, please refer to the documentation included with your product packaging or contact Greesum customer service directly. Contact details can often be found on the manufacturer's official websitio web ou a través do seu punto de venda.
Note: Specific warranty terms and conditions may vary. Keep your proof of purchase for any warranty claims.


