1. Introdución
The GVDA GD128PLUS Smart Rechargeable Digital Multimeter is an advanced, versatile tool designed for accurate and reliable electrical measurements. Featuring a 10000-count display, auto-ranging capabilities, and True RMS functionality, it is suitable for professionals and electronics enthusiasts alike. This manual provides essential information for safe and effective operation, setup, maintenance, and troubleshooting of your multimeter.
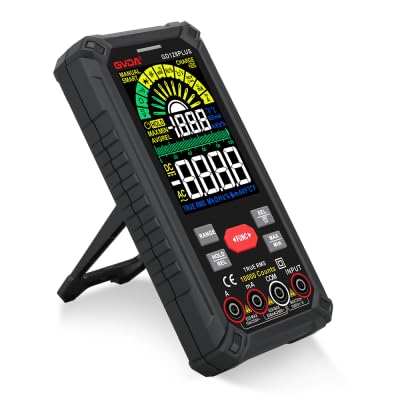
Figure 1.1: GVDA GD128PLUS Digital Multimeter with its integrated kickstand.
2. Información de seguridade
Siga sempre as seguintes precaucións de seguridade para evitar lesións persoais ou danos no multímetro:
- Non exceda os límites máximos de entrada para ningún rango de medición.
- Teña extrema precaución ao traballar co voltagpor riba de 30 V CA RMS, 42 V pico ou 60 V CC. Estes voltagsupoñen un perigo de descarga.
- Desconecte sempre a alimentación do circuíto e descargue todas as cargas de alto volumetagcondensadores antes de realizar probas de resistencia, continuidade ou díodos.
- Asegúrate de que os cables de proba estean en bo estado, sen ningún illamento danado.
- Non poñas en funcionamento o multímetro se parece estar danado ou se a carcasa está aberta.
- Use the correct function and range for each measurement.
- Manteña os dedos detrás dos protectores para dedos das sondas de proba durante as medicións.
- Do not use the multimeter in wet environments or in the presence of explosive gases or dust.
- O volume sen contactotage (NCV) function is for indication only; always verify voltagpresenza e con medición directa.
3. Contido do paquete
Upon unpacking, verify that all items listed below are present and in good condition:
- 1 x GVDA GD128PLUS Digital Multimeter
- 1 par de cables de proba (vermello e negro)
- 1 x cable de carga USB
- 1 x K-type Thermocouple Probe
- 1 x Cloth Carrying Bag
- 1 x Manual de usuario (este documento)
- 1 x Caixa de agasallo (embalaxe)
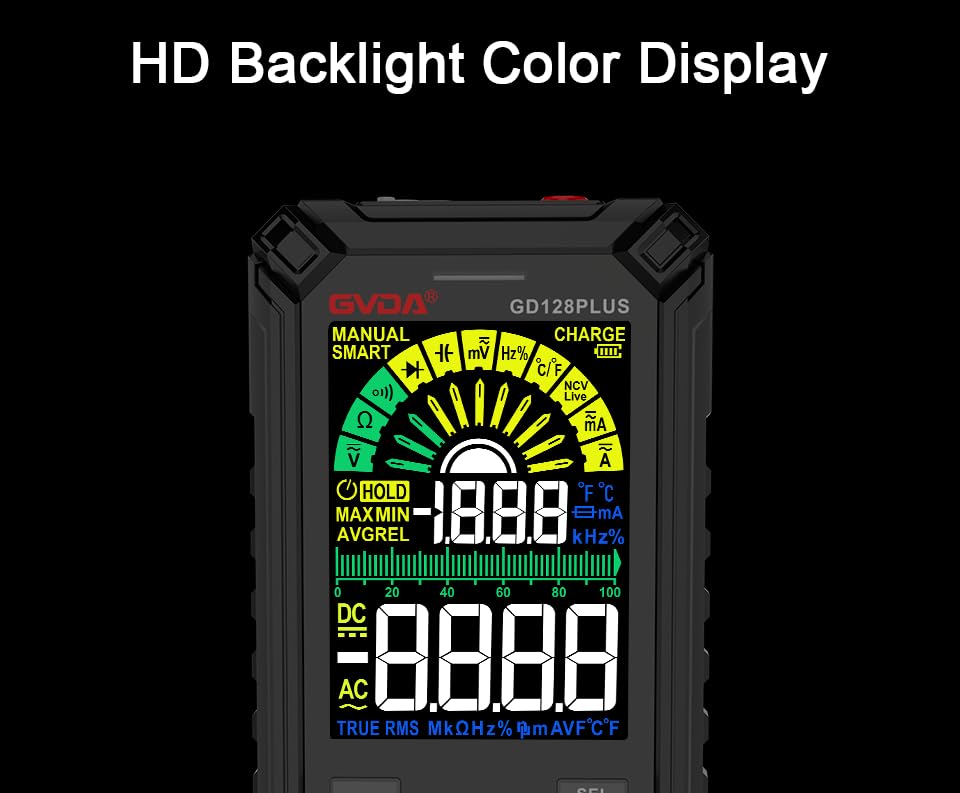
Figure 3.1: All components included in the GVDA GD128PLUS Multimeter package.
4. Características e compoñentes do produto
The GD128PLUS multimeter is equipped with a range of features for comprehensive electrical testing:
- Visualización de 10000 contas: Ofrece alta resolución para medicións precisas.
- Rango automático: Selecciona automaticamente o rango de medición axeitado, o que simplifica o funcionamento.
- RMS verdadeiro: Ensures accurate readings for non-sinusoidal AC waveforms.
- Batería de litio recargable: Built-in 3.7V battery for convenience and portability.
- HD Backlight Color Display: Clear and easy-to-read display in various lighting conditions.
- Vol. Sen contactotagDetección de e (NCV): Detecta con seguridade a presenza de CA voltage sen contacto directo.
- Linterna LED: Integrated light for illuminating dark work areas.
- Retención de datos (HOLD): Conxela a lectura actual na pantalla.
- Medición relativa (REL): Displays the difference between a stored reference value and the current reading.
- Medición MÁX/MÍN: Records the maximum and minimum values during a measurement session.
- Input Jack LED Indication: Guides correct test lead connection for selected function.
- Protección contra sobrecarga: Protects the device from damage due to excessive input.
4.1. Multimeter Layout

Figure 4.1: Key components and input jacks of the GVDA GD128PLUS Multimeter.
Consulte a Figura 4.1 para coñecer a localización dos seguintes compoñentes:
- Visualización: HD Backlight Color LCD for readings and indicators.
- Botóns de función: RANGE, HOLD/REL, FUNC, SEL, MAX/MIN.
- Tomas de entrada:
- Conector COM: Entrada común (negativa) para todas as medicións.
- VΩHzCap°C/°F Jack: Positive input for Voltage, Resistance, Frequency, Capacitance, and Temperature measurements.
- mAμA Jack: Entrada positiva para miliampere e microampmedicións de corrente aquí.
- Conector de 10 A: Entrada positiva para 10 Ampmedicións de corrente aquí.
- Botón de acendido / apagado: Located on the top edge.
- Jack de carga: Porto USB-C para recargar a batería interna.
- Flashlight Key: Button to activate the integrated LED flashlight.
- Indicador de aviso: LED light for safety alerts.
- Soporte: Integrated kickstand on the back for hands-free viewing.
5. Configuración
5.1. Carga inicial
Before first use, it is recommended to fully charge the multimeter's internal lithium battery. Connect the provided USB charging cable to the multimeter's charge jack and to a standard USB power adapter (not included) or a computer USB port. The display will indicate charging status. A full charge typically takes a few hours.

Figure 5.1: The multimeter's rechargeable lithium battery can be charged directly using a USB cable.
5.2. Attaching Test Leads
Para a maioría das medicións, conecte o cable de proba negro ao COM jack and the red test lead to the appropriate positive input jack (VΩHzCap°C/°F, mAμA, or 10A) depending on the desired measurement function. The input jack LED indicators will illuminate to guide correct connection.
6. Instrucións de funcionamento
6.1. Acendido/apagado
Manteña premido o Encendido/apagado button (located on the top edge) to turn the multimeter on or off. The device features an auto-power-off function to conserve battery life after a period of inactivity.
6.2. Modos de medición
The GD128PLUS offers various measurement modes, accessible via the rotary dial and function buttons:
6.2.1. VootagMedición (CA/CC)
- Xire o disco rotativo cara a V position. The multimeter will automatically detect AC or DC voltage.
- Conecte o cable de proba negro ao COM conector e o cable de proba vermello para o VΩHzCap°C/°F jack.
- Conecte as sondas de proba en paralelo ao circuíto ou compoñente que se está a probar.
- Le o voltago valor da pantalla.
6.2.2. Medición de corrente (CA/CC)
- Xire o disco rotativo cara a mA/μA or 10A position depending on the expected current.
- Conecte o cable de proba negro ao COM jack. Connect the red test lead to the mAμA jack for small currents or the 10A jack for larger currents.
- Conecta o multímetro en serie co circuíto. Asegúrate de que o circuíto estea desconectado antes de conectalo.
- Aplicar enerxía ao circuíto e ler o valor da corrente.
- Atención: Never connect the multimeter in parallel for current measurement, as this can damage the device and the circuit.
6.2.3. Medición da resistencia (Ω)
- Xire o disco rotativo cara a Ω posición.
- Conecte o cable de proba negro ao COM conector e o cable de proba vermello para o VΩHzCap°C/°F jack.
- Asegúrese de que o circuíto estea desenergizado e de que todos os condensadores estean descargados antes de medir a resistencia.
- Conecte as sondas de proba ao compoñente que se vai medir.
- Lea o valor da resistencia.
6.2.4. Medición de capacitancia (F)
- Xire o disco rotativo cara a Cap posición.
- Conecte o cable de proba negro ao COM conector e o cable de proba vermello para o VΩHzCap°C/°F jack.
- Asegúrese de que o condensador estea completamente descargado antes de conectar as sondas.
- Conecte as sondas de proba a través do capacitor.
- Lea o valor da capacitancia.
6.2.5. Medición de frecuencia (Hz)
- Xire o disco rotativo cara a Hz posición.
- Conecte o cable de proba negro ao COM conector e o cable de proba vermello para o VΩHzCap°C/°F jack.
- Connect the test probes in parallel to the signal source.
- Lea o valor da frecuencia.
6.2.6. Diode Test and Continuity Test
- Xire o disco rotativo cara a Díodo/Continuidade posición. Usa o SEL button to toggle between diode test and continuity test.
- Conecte o cable de proba negro ao COM conector e o cable de proba vermello para o VΩHzCap°C/°F jack.
- Proba de diodo: Conecta a sonda vermella ao ánodo e a sonda negra ao cátodo do díodo. Un voltaxe directotagMostrarase a pinga. Inverta as sondas; debería mostrarse un circuíto aberto (OL).
- Proba de continuidade: Connect the probes across the circuit or component. A continuous beep indicates a low resistance (continuity).
6.2.7. Vol. sen contactotagDetección e (NCV).
- Xire o disco rotativo cara a NCV posición.
- Move the top end of the multimeter near the conductor suspected of having AC voltage.
- The multimeter will emit an audible beep and the warning indicator will flash, with the display showing signal strength, if AC voltage é detectado.
- Nota: This function is for preliminary detection only. Always use direct contact measurement for precise voltage verificación.
6.2.8. Medición da temperatura (°C/°F)
- Xire o disco rotativo cara a ° C / ° F posición.
- Conecte a sonda do termopar tipo K ao COM e VΩHzCap°C/°F tomas, observando a polaridade.
- Coloque a punta do termopar sobre ou preto do obxecto cuxa temperatura se vai medir.
- Read the temperature on the display. Use the SEL botón para cambiar entre Celsius e Fahrenheit.
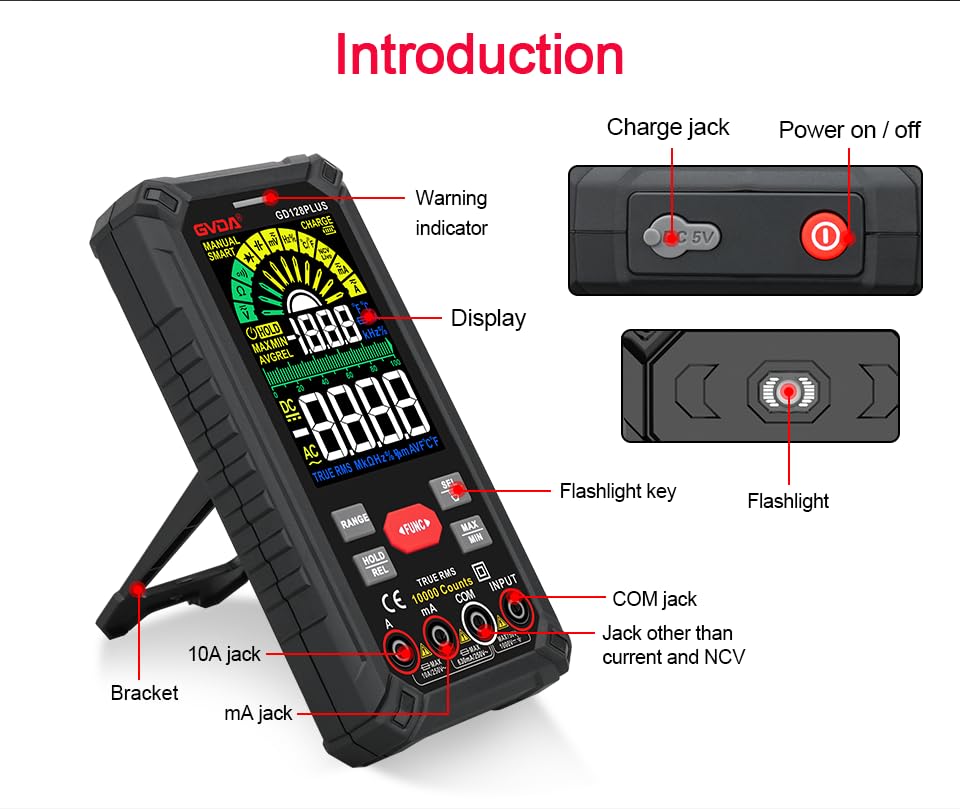
Figure 6.1: The multimeter can perform temperature tests using the included K-type thermocouple probe.
6.3. Funcións especiais
- Botón RANGE: In manual range mode, press to cycle through available ranges. In auto range mode, press to switch to manual range.
- HOLD/REL Button:
- Short press: Activates Data Hold, freezing the current reading. Press again to release.
- Long press: Activates Relative Measurement (REL). The current reading becomes the reference, and subsequent readings show the difference from this reference. Long press again to exit.
- Botón MAX/MIN: Press to enter MAX/MIN recording mode. The display will show the maximum, minimum, and average values detected since activation. Press again to cycle through MAX, MIN, AVG. Long press to exit.
- Botón FUNC: Used to switch between different functions within the same rotary dial position (e.g., AC/DC voltage, Díodo/Continuidade).
- Lanterna: Press the dedicated flashlight key on the side to turn the LED flashlight on or off.
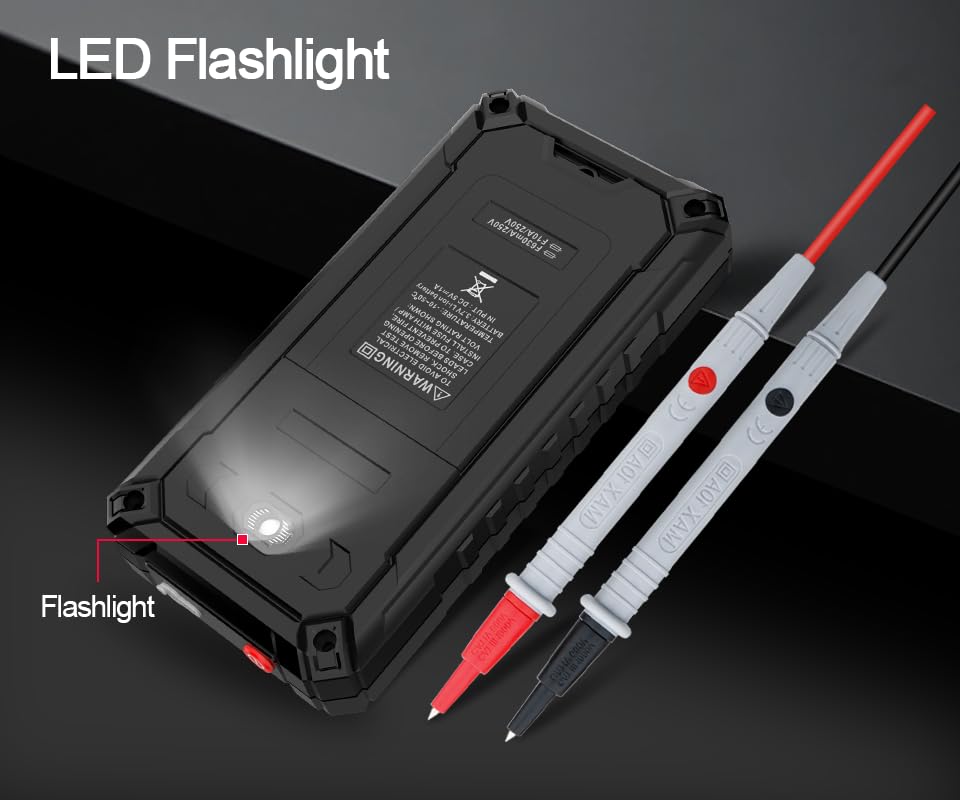
Figure 6.2: The multimeter features a convenient LED flashlight for illuminating work areas.
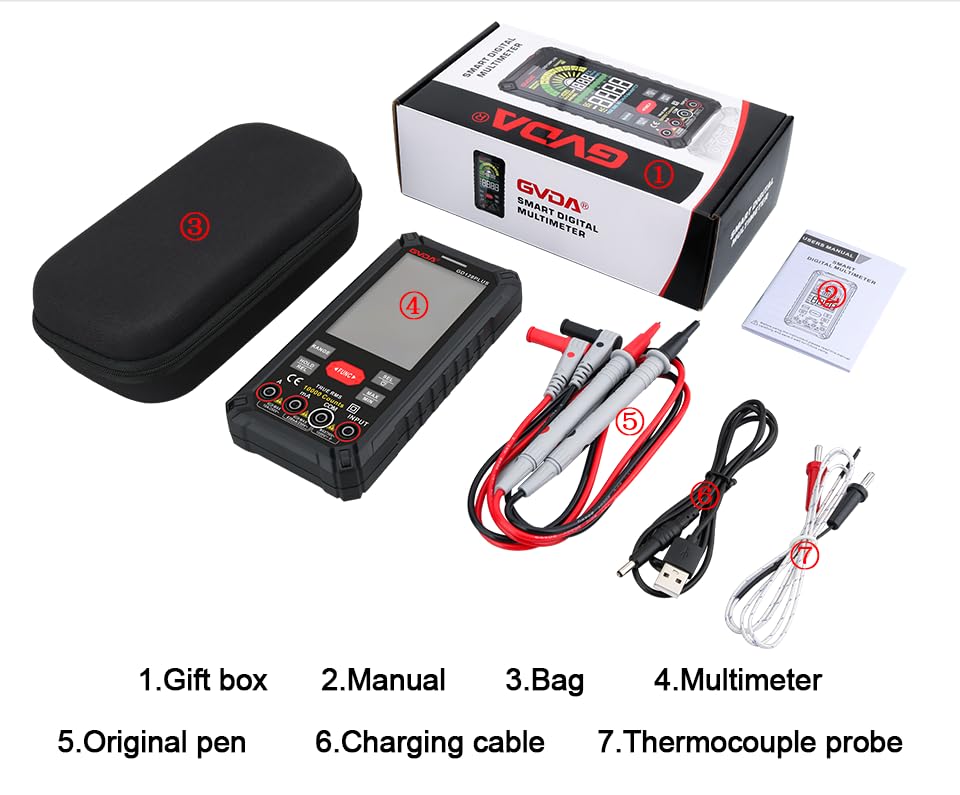
Figure 6.3: The HD Backlight Color Display provides clear and comprehensive measurement information.
7. Mantemento
7.1. Limpeza
Limpar o caso co anuncioamp cloth and mild detergent. Do not use abrasives or solvents. Ensure the multimeter is off and disconnected from any circuits before cleaning.
7.2. Carga da batería
The multimeter is equipped with a rechargeable lithium battery. When the low battery indicator appears on the display, connect the multimeter to a USB power source using the provided charging cable. Avoid fully discharging the battery frequently to prolong its lifespan.
7.3. Almacenamento
When not in use for extended periods, store the multimeter in a cool, dry place, away from direct sunlight and extreme temperatures. It is advisable to charge the battery periodically (e.g., every 3-6 months) to maintain its health.
8 Solución de problemas
| Problema | Causa posible | Solución |
|---|---|---|
| O multímetro non se acende. | Batería baixa ou esgotada. | Charge the multimeter using the USB cable. |
| Móstrase "OL" (sobrecarga). | A medición supera o rango seleccionado ou a capacidade máxima do medidor. | Switch to a higher range (if in manual range) or ensure the measurement is within the meter's specifications. |
| Lecturas inexactas. | Incorrect function/range selected; poor test lead connection; external interference. | Verify function and range; ensure test leads are securely connected; move away from strong electromagnetic fields. |
| Sen pitido de continuidade. | Circuit is open; multimeter not in continuity mode. | Check the circuit for breaks; ensure the multimeter is set to continuity mode (use SEL button if necessary). |
9. Especificacións
| Parámetro | Valor |
|---|---|
| Mostrar | 10000 Counts, HD Backlight Color LCD |
| Variando | Alcance automático / manual |
| RMS verdadeiro | Si |
| DC Voltage Alcance | Ata 1000V |
| Vol. ACtage Alcance | Ata 750V |
| Intervalo de corrente continua | Ata 10A |
| Rango de corrente alterna | Ata 10A |
| Rango de resistencia | Yes (Ohm) |
| Rango de capacitancias | Yes (Farad) |
| Rango de frecuencias | Yes (Hz) |
| Rango de temperatura | -40 °C a 1000 °C / -40 °F a 1832 °F |
| Proba de diodo | Si |
| Proba de continuidade | Si (con timbre) |
| NCV (Non-Contact Voltage) | Si |
| Fonte de alimentación | Batería de litio recargable de 3.7 V |
| Samptaxa de ling | Aprox. 3 veces por segundo |
| Dimensións | 166 mm x 83 mm x 29 mm (aprox. 6.5 x 3.3 x 1.1 polgadas) |
| Peso | Aprox. 1.26 libras (0.57 kg) |
| Entorno operativo | 0-40 °C, humidade relativa <80 % |
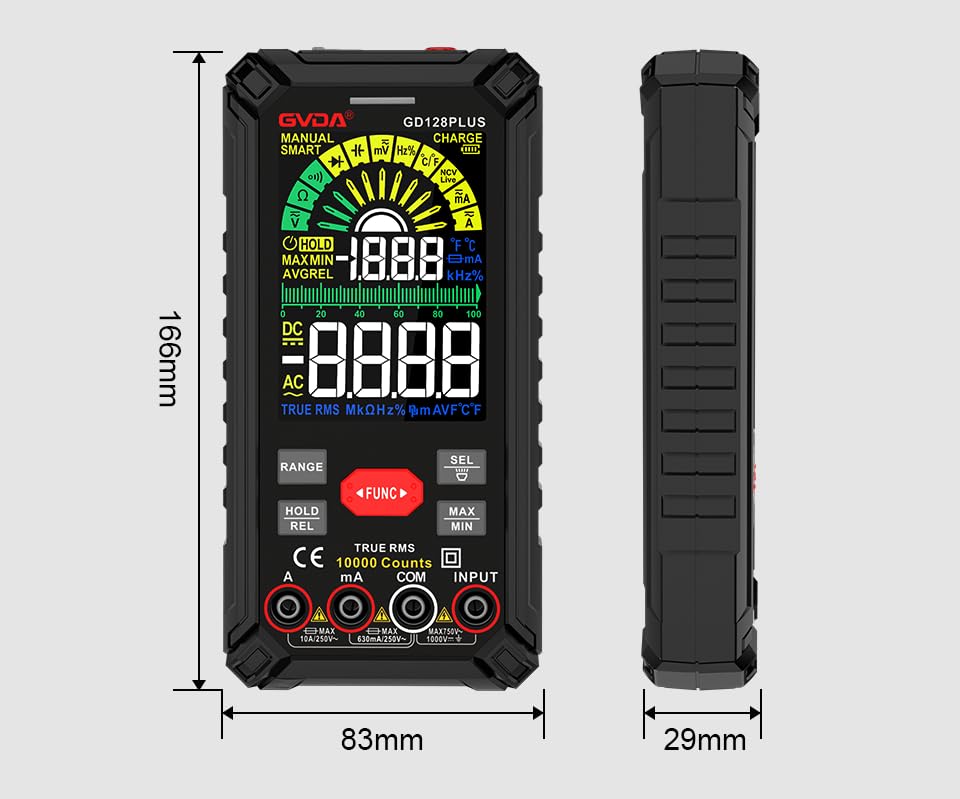
Figure 9.1: Physical dimensions of the GVDA GD128PLUS Multimeter.
10. Garantía e soporte
This GVDA GD128PLUS Digital Multimeter is designed for reliability and performance. For warranty information, technical support, or service inquiries, please refer to the contact details provided by your retailer or visit the official GVDA websitio. Garde o comprobante de compra para reclamacións de garantía.


