1. Introdución
This manual provides essential instructions for the safe operation, setup, maintenance, and troubleshooting of your CREATE THERA MATIC TOUCH automatic coffee machine. Please read this manual thoroughly before first use and retain it for future reference.
Información de seguridade
Always observe basic safety precautions when using electrical appliances to reduce the risk of fire, electric shock, and injury. Ensure the appliance is placed on a stable, level surface. Do not immerse the appliance, power cord, or plug in water or other liquids. Keep out of reach of children. Unplug the machine before cleaning or when not in use for extended periods.
2. Produto rematadoview
The CREATE THERA MATIC TOUCH is a fully automatic coffee machine designed to deliver fresh coffee from whole beans. It features a 20-bar pressure system, an integrated grinder, a 1.5-liter water tank, and a steam wand for milk frothing and hot water dispensing. The touch control panel allows for easy operation and customization of coffee intensity and volume.
Compoñentes principais
- Coffee Bean Hopper with integrated grinder
- Depósito de auga (capacidade de 1.5 L)
- Toca Panel de control
- Bote de café
- Varilla de vapor / Dispensador de auga quente
- Bandexa de goteo e recipiente de pos de café

Figura 2.1: Fronte view of the coffee machine, showing the coffee spout, drip tray, and touch control panel.

Figura 2.2: En ángulo view of the coffee machine, illustrating the removable water tank.

Figura 2.3: Máisview of the machine's removable parts for cleaning and maintenance.
3. Configuración
3.1 Desembalaxe e limpeza inicial
- Retire con coidado todos os materiais de embalaxe da máquina de café.
- Wash the water tank, drip tray, and coffee grounds container with warm soapy water, then rinse thoroughly and dry.
- Limpe o exterior da máquina cun anuncioamp pano.
3.2 Enchendo o depósito de auga
- Retire o depósito de auga do lateral da máquina.
- Encha o depósito con auga potable fresca e fría ata o indicador de nivel MÁX.
- Volva colocar o depósito de auga no seu lugar, asegurándose de que estea ben asentado.
3.3 Engadir grans de café
- Open the lid of the coffee bean hopper located on top of the machine.
- Pour whole coffee beans into the hopper. The hopper has a capacity of 180g.
- Peche ben a tapa para manter a frescura dos grans.

Figure 3.1: Adding coffee beans to the integrated hopper.
3.4 Primeiro uso / Imprimación
- Conecte a máquina a unha toma de corrente con conexión a terra.
- Press the power button on the touch control panel. The machine will perform an initial rinse cycle.
- Place a container under the coffee spout and steam wand to collect the water.
- Once the rinse cycle is complete, the machine is ready for use.
4. Instrucións de funcionamento
4.1 Toque Panel de control
The touch control panel provides access to all machine functions. Indicators will illuminate to show status or warnings such as 'no beans', 'no water', 'cleaning required', or 'drip tray full'.
4.2 Facer café
- Ensure the water tank is filled and the bean hopper contains enough coffee beans.
- Coloque unha cunca debaixo do pico do café.
- Select your desired coffee type (e.g., Espresso, Lungo) from the touch panel.
- You can adjust the coffee intensity and volume via the touch panel before brewing.
- Press the start button. The machine will grind the beans, brew, and dispense the coffee.
4.3 Using the Steam Wand
The steam wand can be adjusted between 0° and 42° for optimal milk frothing or hot water dispensing.
4.3.1 Espuma de leite
- Enche unha xerra de leite con leite frío.
- Coloque a lanza de vapor no leite, xusto debaixo da superficie.
- Select the steam function on the touch panel.
- Move the pitcher up and down to create foam.
- Once desired foam is achieved, turn off the steam function.
- Immediately clean the steam wand after use.
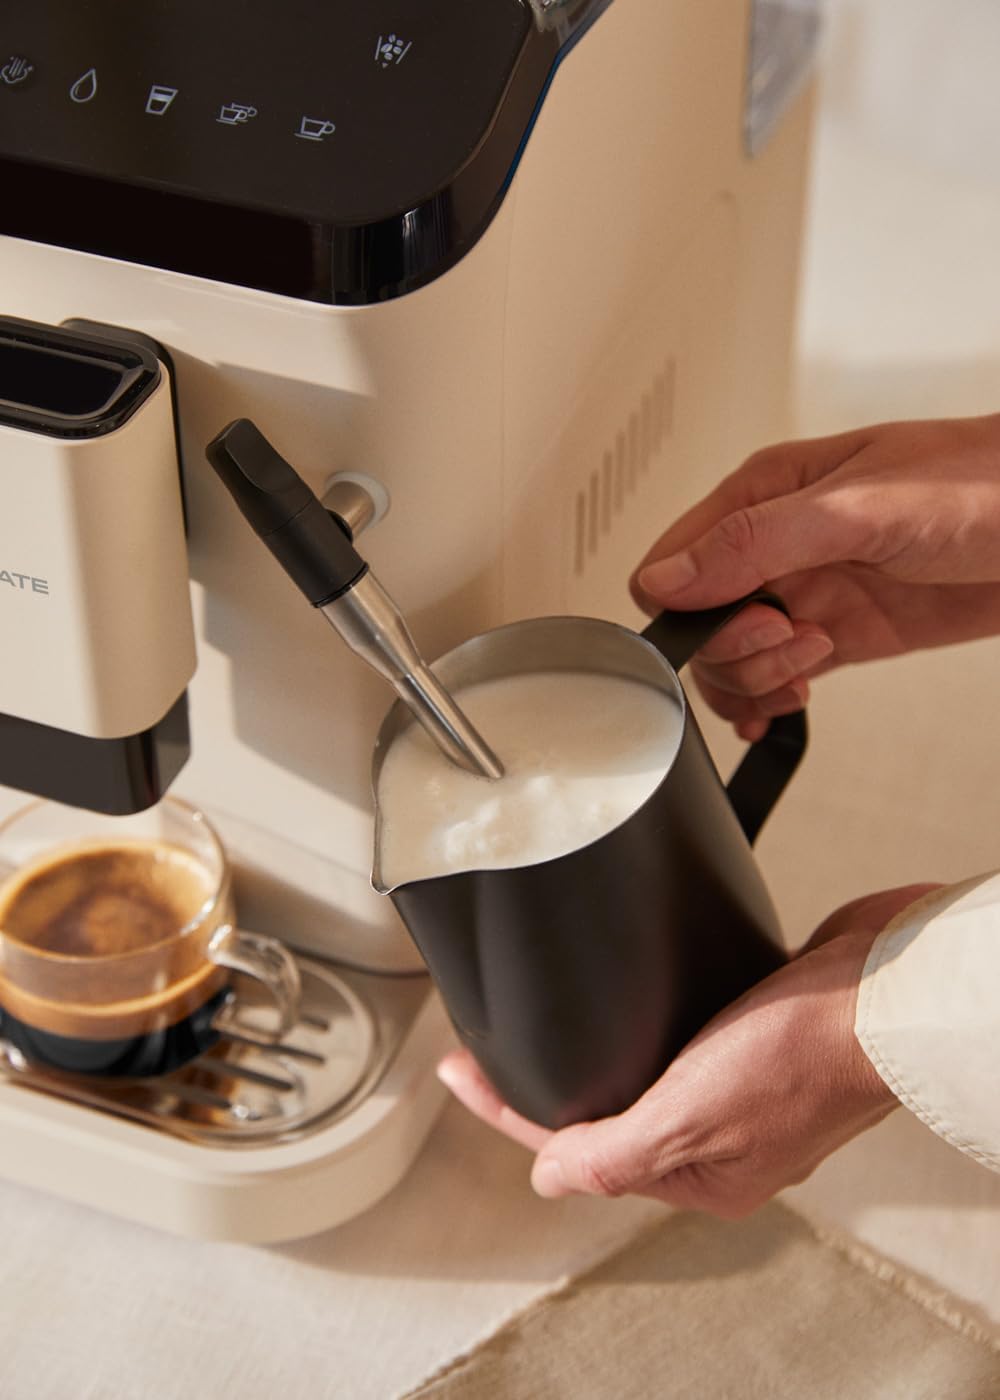
Figure 4.1: Frothing milk using the adjustable steam wand.
4.3.2 Distribución de auga quente
- Coloque unha cunca debaixo da varilla de vapor.
- Select the hot water function on the touch panel.
- The machine will dispense hot water for teas or other infusions.

Figure 4.2: Dispensing hot water for beverages.
5. Mantemento e Limpeza
Unha limpeza e un mantemento regulares garanten un rendemento óptimo e unha maior duración da súa máquina de café.
5.1 Función de autolimpeza
The machine is equipped with a self-cleaning function. Follow the prompts on the touch control panel when the cleaning indicator illuminates. This cycle helps maintain internal hygiene.
5.2 Bandexa de goteo e recipiente para posos de café
- When the 'drip tray full' indicator appears, carefully remove the drip tray.
- Empty the liquid from the drip tray and the used coffee grounds from the container.
- Wash both components with warm soapy water, rinse, and dry before reinserting.
5.3 Limpeza da lanza de vapor
Despois de cada uso, limpe a lanza de vapor cun adornoamp cloth to remove any milk residue. Periodically, remove the outer nozzle and rinse it under running water to prevent blockages.
5.4 Descalcificación
Over time, mineral deposits can build up in the machine. The machine will indicate when descaling is required. Use a suitable descaling solution designed for coffee machines and follow the instructions provided with the descaling product and the machine's display prompts.
6 Solución de problemas
Consulta esta sección para coñecer os problemas habituais e as súas solucións. Se o problema persiste, ponte en contacto co servizo de atención ao cliente.
| Problema | Causa posible | Solución |
|---|---|---|
| Non se dispensa café | Water tank empty / No coffee beans / Clogged coffee spout | Refill water tank / Add coffee beans / Clean coffee spout |
| Café débil | Insufficient coffee quantity / Coarse grind setting | Adjust coffee intensity setting / Adjust grinder to a finer setting |
| A máquina non se acende | Not plugged in / Power outage | Check power connection / Check circuit breaker |
| 'No water' indicator | Water tank empty or not properly inserted | Refill water tank and ensure it is correctly seated |
| 'No beans' indicator | Tolva de feixón baleira | Refill coffee bean hopper |
| 'Cleaning' indicator | Self-cleaning cycle required | Initiate the self-cleaning program as per display instructions |
| 'Drip tray full' indicator | Drip tray or coffee grounds container is full | Empty and clean the drip tray and coffee grounds container |
7. Especificacións
| Característica | Especificación |
|---|---|
| Marca | CREAR |
| Nome do modelo | THERA MATIC TOUCH |
| Número de modelo | 161966_361774 |
| Cor | Cream-white |
| Dimensións do produto (L x W x H) | 32.5 x 19 x 44 cm |
| Peso | 9.05 kg |
| Capacidade do depósito de auga | 1.5 litros |
| Capacidade da tolva de granos de café | 180 gramos |
| Presión | 20 bar |
| Potencia/Wattage | 1350 vatios |
| Voltage | 240 voltios |
| Material | AS + ABS |
| Características especiais | Removable tank, Milk frother, Integrated grinder, Self-cleaning function, Touch control panel |
8. Garantía e soporte
8.1 Información da garantía
Your CREATE THERA MATIC TOUCH coffee machine is covered by a manufacturer's warranty. Please refer to the warranty card included with your purchase for specific terms, conditions, and duration. Retain your proof of purchase for warranty claims.
8.2 Atención ao cliente
For technical assistance, spare parts, or any questions regarding your product, please contact CREATE customer support. Contact details can typically be found on the manufacturer's websitio web ou na embalaxe do produto.
Note: Specific contact information is not provided in this manual. Please refer to your product packaging or the official CREATE websitio para obter detalles de asistencia.


