1. Introdución
Thank you for choosing the Conentool 21V Cordless Impact Drill/Driver Kit. This tool is designed for various drilling and screwdriving tasks in wood, metal, plastics, and masonry. Please read this manual carefully before operating the tool to ensure safe and efficient use. Keep this manual for future reference.

Image 1.1: The Conentool 21V Cordless Impact Drill/Driver Kit, including the drill, two 2500mAh batteries, charger, and a variety of drill bits and accessories in a carrying case.
2. Instrucións xerais de seguridade
ADVERTENCIA: Lea todas as advertencias de seguridade, instrucións, ilustracións e especificacións proporcionadas con esta ferramenta eléctrica. O incumprimento de todas as instrucións que se indican a continuación pode producir descargas eléctricas, incendios e/ou lesións graves.
2.1 Seguridade da zona de traballo
- Manter a zona de traballo limpa e ben iluminada. As zonas desordenadas ou escuras invitan a accidentes.
- Non utilice ferramentas eléctricas en atmosferas explosivas, como en presenza de líquidos, gases ou po inflamables. As ferramentas eléctricas crean faíscas que poden acender o po ou os fumes.
- Manteña os nenos e os espectadores afastados mentres manexa unha ferramenta eléctrica. As distraccións poden facer que perdas o control.
2.2 Seguridade eléctrica
- Os enchufes das ferramentas eléctricas deben coincidir coa toma de corrente. Nunca modifique o enchufe de ningún xeito.
- Evite o contacto corporal con superficies conectadas a terra, como tubos, radiadores, cociñas e frigoríficos. Hai un maior risco de descarga eléctrica se o seu corpo está conectado a terra ou a terra.
- Non expoña as ferramentas eléctricas á choiva ou a condicións de humidade. A auga que entra nunha ferramenta eléctrica aumentará o risco de descarga eléctrica.
2.3 Seguridade persoal
- Usa sempre protección ocular. Usa lentes de seguridade, lentes protectoras ou unha pantalla facial.
- Use protección auditiva cando utilice a ferramenta durante períodos prolongados.
- Vístete correctamente. Non use roupa solta nin xoias. Manteña o cabelo e a roupa lonxe das partes móbiles.
- Mantéñase alerta, observa o que está a facer e use o sentido común ao manexar unha ferramenta eléctrica.
3. Contido do paquete
Verifique que todos os elementos que se indican a continuación estean incluídos no seu paquete. Se falta algún elemento ou está danado, póñase en contacto co servizo de atención ao cliente.
- 1 x Conentool 21V Cordless Impact Drill/Driver
- 2 baterías de ións de litio de 2500 mAh
- 1 x cargador de batería
- 1 x Extensión de eixe flexible
- Various Drill Bits (for wood, metal, masonry)
- Varias puntas de destornillador
- Adaptadores de enchufes
- Maletín de transporte
- Manual de usuario

Image 3.1: A complete overview of the kit contents, including the drill, two batteries, charger, flexible shaft, various drill bits, screwdriver bits, and socket adapters, all neatly arranged.
4. Produto rematadoview
Familiarize yourself with the main components of your drill/driver:
- chuck: Holds drill bits and screwdriver bits.
- Anel de axuste de torque: Selects the desired torque setting.
- Mode Selector Ring: Alterna entre os modos de atornillado, furado e furado de impacto.
- Interruptor selector de velocidade: Cambios entre marchas de alta e baixa velocidade.
- Interruptor de disparo: Activa a ferramenta e controla a velocidade (velocidade variable).
- Selector de avance/retroceso: Cambia o sentido de rotación.
- Luz de traballo LED: Ilumina a área de traballo.
- Batería: Proporciona enerxía á ferramenta.
- Botón de liberación da batería: Para quitar a batería.
- Manexar: Empuñadura ergonómica para un uso cómodo.

Imaxe 4.1: Un interno view highlighting the brushless motor, which provides increased power, efficiency, and a quieter operation with no sparks.
5. Configuración
5.1 Carga da batería
A batería non está completamente cargada no momento da compra. Recoméndase cargala completamente antes do primeiro uso.
- Conecta o cargador a unha toma de corrente estándar.
- Slide the battery pack onto the charger base. Ensure it clicks into place.
- The charger indicator light will show the charging status. A red light typically indicates charging, and a green light indicates a full charge.
- Unha vez cargado por completo, desconecte o cargador da toma de corrente e retire a batería.

Image 5.1: The battery charger connected to a wall outlet, with a battery pack inserted for charging. The red light indicates charging, and the green light indicates a completed charge.
5.2 Instalación e extracción da batería
- Para instalar: Align the battery pack with the base of the tool handle and slide it in until it clicks securely into place.
- Para eliminar: Press the battery release button (usually located at the front of the battery) and slide the battery pack out of the tool.

Imaxe 5.2: Un corte view of the 2500mAh battery pack, illustrating its internal lithium-ion cells and power management system, designed for up to 90 minutes of use per battery.
5.3 Instalación e extracción das puntas de furadeira/desaparafusador
- Para instalar: Rotate the chuck counter-clockwise to open the jaws. Insert the desired bit into the chuck as far as it will go. Rotate the chuck clockwise to tighten the jaws firmly around the bit.
- Para eliminar: Xire o mandril en sentido antihorario para afrouxar as mordazas e tirar da broca.
Ensure the bit is securely fastened to prevent it from slipping during operation.
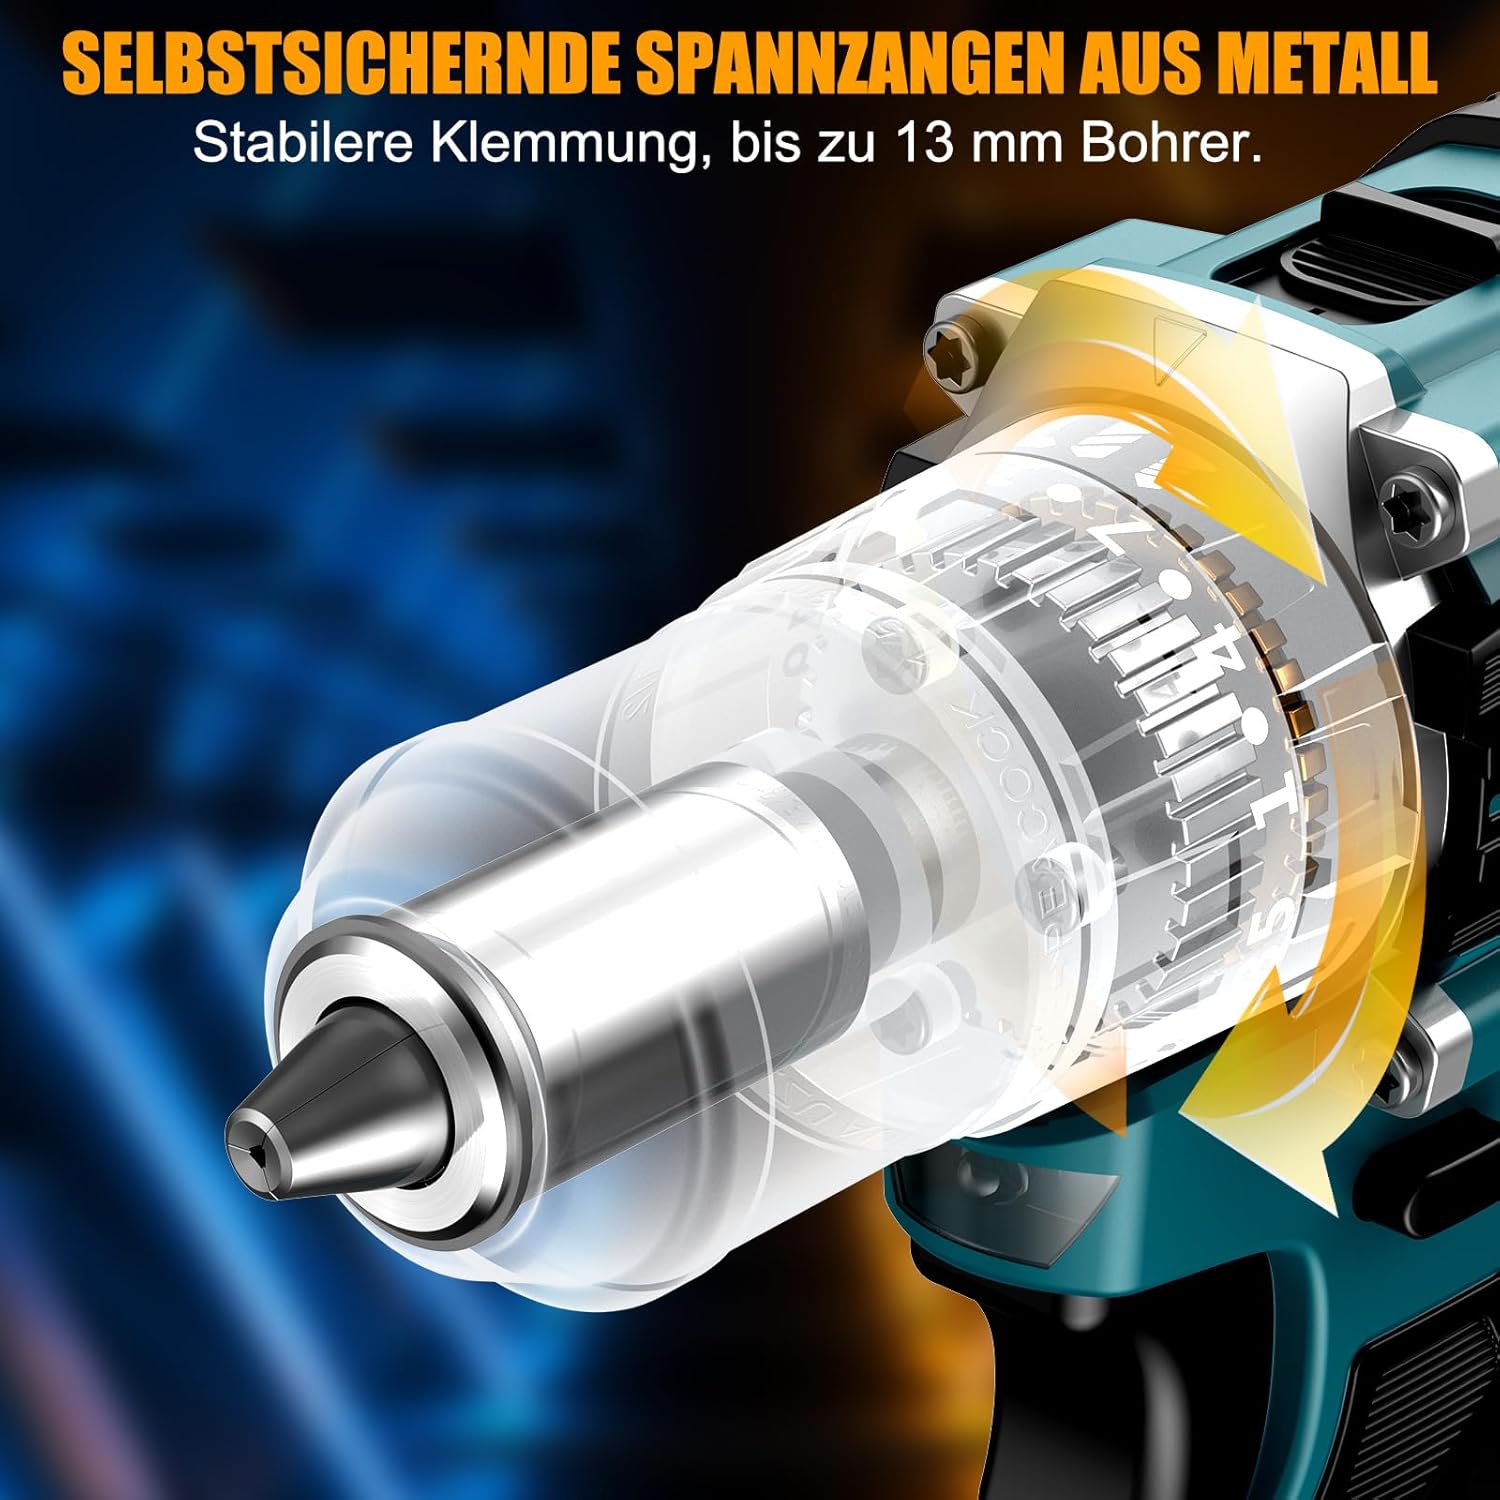
Imaxe 5.3: Detallada view of the self-locking metal chuck, demonstrating its stable clamping mechanism capable of holding drill bits up to 13mm securely.
6. Instrucións de funcionamento
6.1 Acendido/apagado e control de velocidade
- To turn the tool ON, press the trigger switch. The speed is variable; press the trigger further for higher speed.
- Para apagar a ferramenta, solte o interruptor de disparo.
- The integrated LED work light will illuminate when the trigger is pressed, providing visibility in dimly lit areas.
6.2 Rotación cara adiante/cara atrás
The forward/reverse selector switch is located above the trigger. Push it to the left for forward rotation (for screwdriving and drilling) and to the right for reverse rotation (for removing screws or freeing jammed bits). Ensure the tool is stopped before changing direction.
6.3 Speed Gear Selection
The drill features a 2-speed gear selector switch on top of the tool:
- Marcha 1 (baixa velocidade, 0-650 RPM): Ideal for high-torque applications like driving large screws or drilling large holes.
- Marcha 2 (alta velocidade, 0-1850 RPM): Suitable for fast drilling in softer materials and smaller diameter holes.
Always select the appropriate gear for the task. Change gears only when the tool is completely stopped.
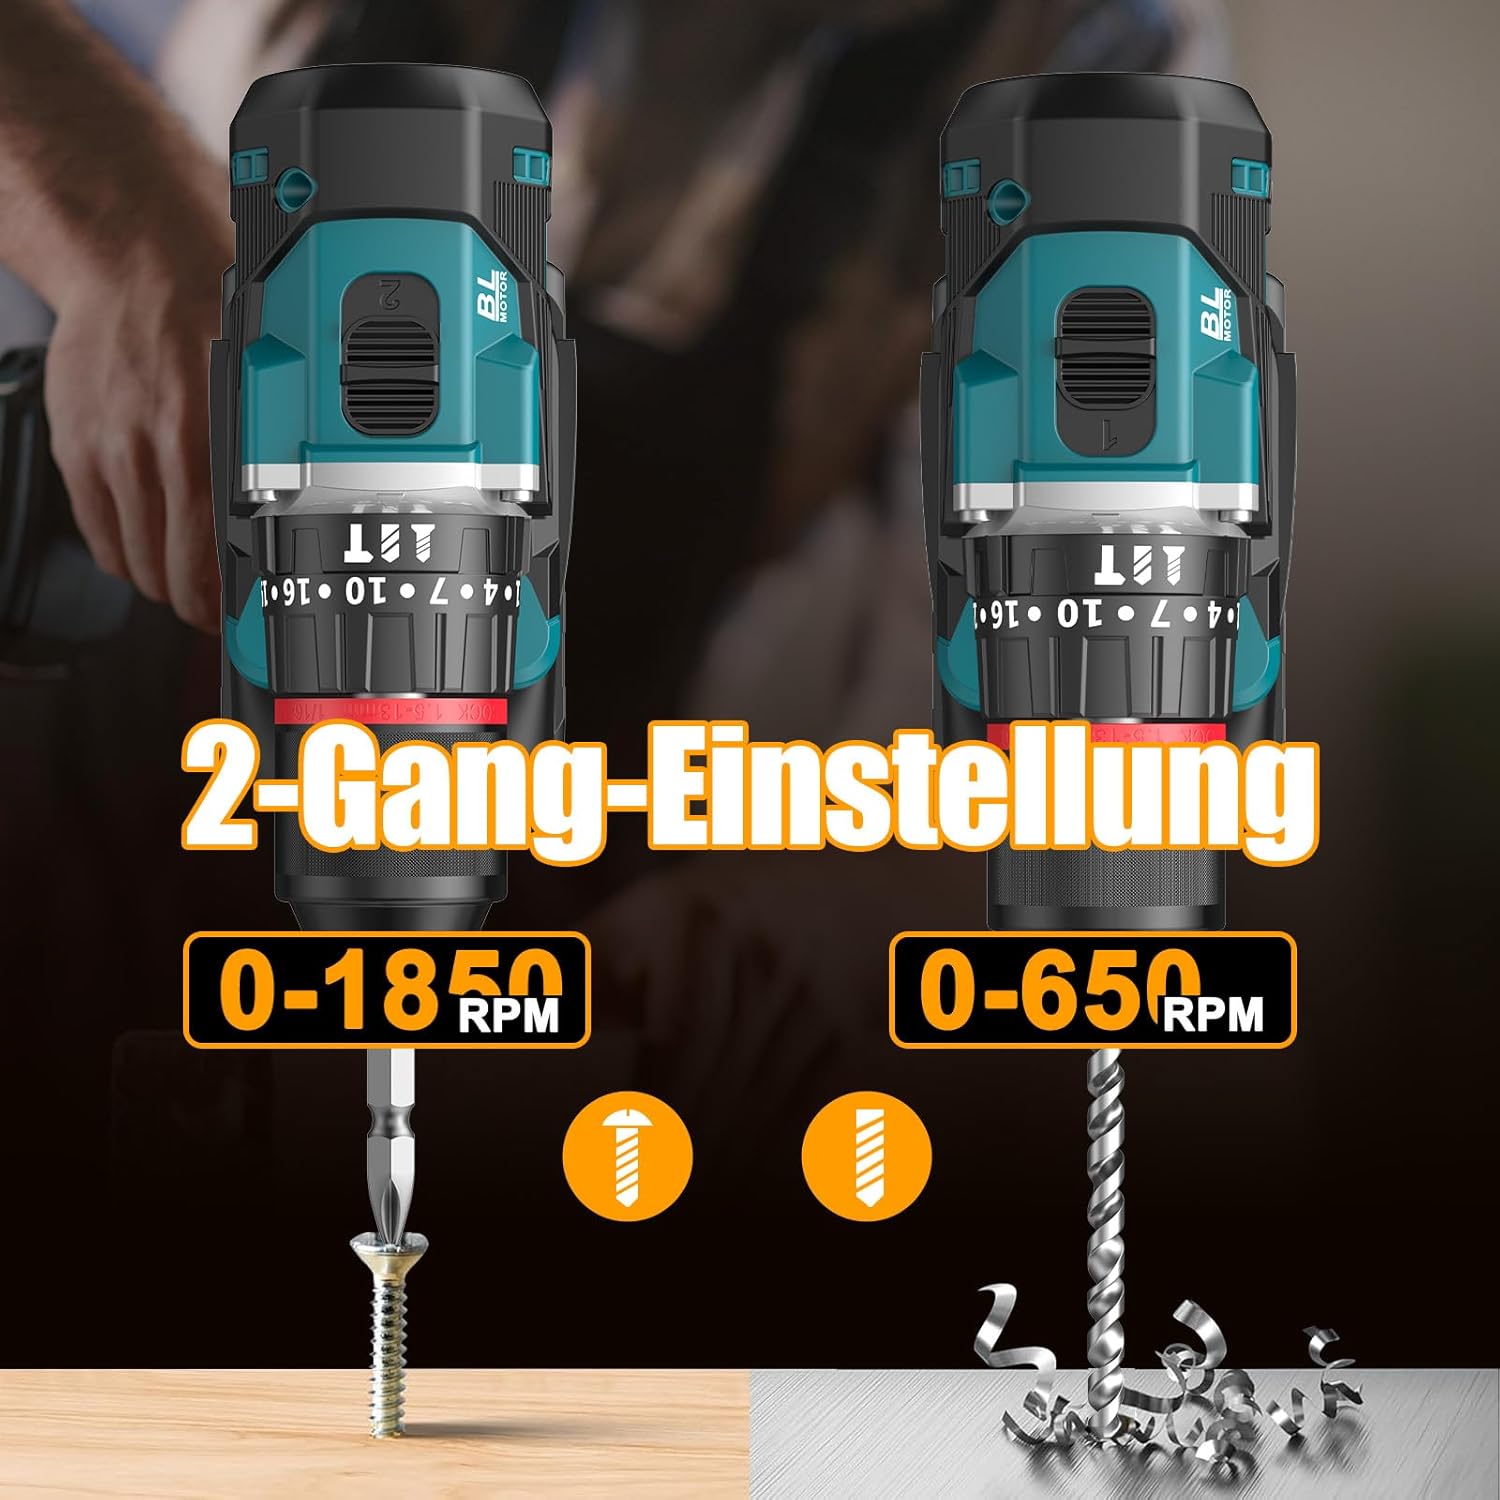
Image 6.1: An illustration demonstrating the two-speed gear settings: Gear 1 (0-650 RPM) for screwdriving and Gear 2 (0-1850 RPM) for drilling, allowing for optimal performance based on the application.
6.4 Torque Adjustment and Mode Selection
The torque adjustment ring allows you to set the desired torque for screwdriving applications, preventing overtightening or stripping screws. The mode selector ring allows you to switch between different operating modes.
- Screwdriving Mode (Torque Settings 1-35): Use these settings to match the torque to the screw size and material. Lower numbers for smaller screws/softer materials, higher numbers for larger screws/harder materials.
- Modo de perforación (Drill Bit Icon): For general drilling without impact. The clutch is disengaged, providing maximum torque.
- Impact Drilling Mode (Icona do martelo): For drilling into masonry or concrete, providing a hammering action in addition to rotation.
The drill offers 35+3 settings, including 35 torque settings for screwdriving and 3 modes (screwdriving, drilling, impact drilling).

Image 6.2: A visual representation of the 35+3 torque and mode settings, indicating precise power control and a maximum torque of 55 N.m, suitable for various materials like wood, brick, plastic, and metal.
7. Mantemento
7.1 Limpeza
- Desconecte sempre a batería antes de realizar calquera limpeza ou mantemento.
- Manteña limpas as aberturas de ventilación da ferramenta para evitar o sobrequecemento.
- Use un suave, damp pano para limpar a ferramenta casing. Non empregue produtos químicos agresivos nin produtos de limpeza abrasivos.
7.2 Almacenamento
- Garde a ferramenta e as baterías nun lugar fresco e seco, lonxe da luz solar directa e da humidade.
- Garde a ferramenta na súa funda de transporte para protexela do po e dos danos.
- Manter fóra do alcance dos nenos.

Image 7.1: A person carrying the Conentool drill kit in its durable black carrying case, designed for convenient storage and transport of the tool and its accessories.
7.3 Coidado coa batería
- Do not store batteries in a discharged state. Recharge them regularly, especially if not used for extended periods.
- Evite expoñer as baterías a temperaturas extremas.
- Non intente desmontar nin modificar a batería.
8 Solución de problemas
| Problema | Causa posible | Solución |
|---|---|---|
| A ferramenta non comeza | Batería non cargada ou instalada incorrectamente. | Asegúrate de que a batería estea completamente cargada e inserida correctamente. |
| Potencia ou velocidade reducidas | A carga da batería é baixa. | Recarga a batería. |
| A broca escorrega no mandril | Mandril non axustado o suficiente. | Tighten the chuck firmly around the bit. Ensure the bit shank is clean. |
| Sobrequecemento | Ranuras de ventilación bloqueadas; uso intenso continuo. | Limpar as ranuras de ventilación. Deixar que a ferramenta arrefríe durante un uso prolongado. |
9. Especificacións
| Característica | Especificación |
|---|---|
| Número de modelo | ebvc-sd-de |
| Voltage | 21 voltios |
| Tipo de batería | Ion de litio |
| Capacidade da batería | 2500 mAh (cada un) |
| Par máximo | 55 Nm |
| Configuración de par | 35 + 3 Modes (Screwdriving, Drilling, Impact Drilling) |
| Velocidade sen carga (marcha 1) | 0-650 RPM |
| Velocidade sen carga (marcha 2) | 0-1850 RPM |
| Tamaño de Chuck | 13 mm (3/8 inch) Keyless |
| Dimensións do produto | 35 x 31 x 10 cm |
| Peso (con batería) | 1.5 quilogramos |
10. Garantía e soporte
Conentool products are manufactured to high-quality standards. In the unlikely event of a defect due to material or manufacturing fault, please contact your retailer or Conentool customer service. Please retain your proof of purchase for warranty claims.
For further assistance, technical support, or to inquire about spare parts, please refer to the contact information provided with your purchase or visit the official Conentool websitio.


