1. Introdución
Thank you for choosing the OREiN 4500LM/30W Hardwired Motion Sensor LED Flood Light. This manual provides essential information for the safe installation, operation, and maintenance of your new flood light. Please read these instructions thoroughly before installation and retain them for future reference.
2. Información de seguridade
AVISO: Risco de descarga eléctrica. Desconecte a alimentación no fusible ou no disyuntor antes da instalación ou do mantemento.
- Installation must be performed by a qualified electrician or person familiar with the construction and operation of the product and the hazards involved.
- Asegurar a subministración voltage é correcto (120 V CA).
- Non instale preto de materiais combustibles.
- Use lentes e luvas de seguridade durante a instalación.
- This fixture is designed for outdoor use and is IP65 waterproof rated.
3. Contido do paquete
Comprobe que todos os compoñentes estean presentes antes de comezar a instalación:
- Iluminación (1)
- Soporte de montaxe (1)
- Parafusos (varios tamaños)
- Porcas (3)
- Manual de instrucións (1)
4. Produto rematadoview
The OREiN Flood Light features three adjustable LED heads and a motion sensor for comprehensive outdoor illumination and security.
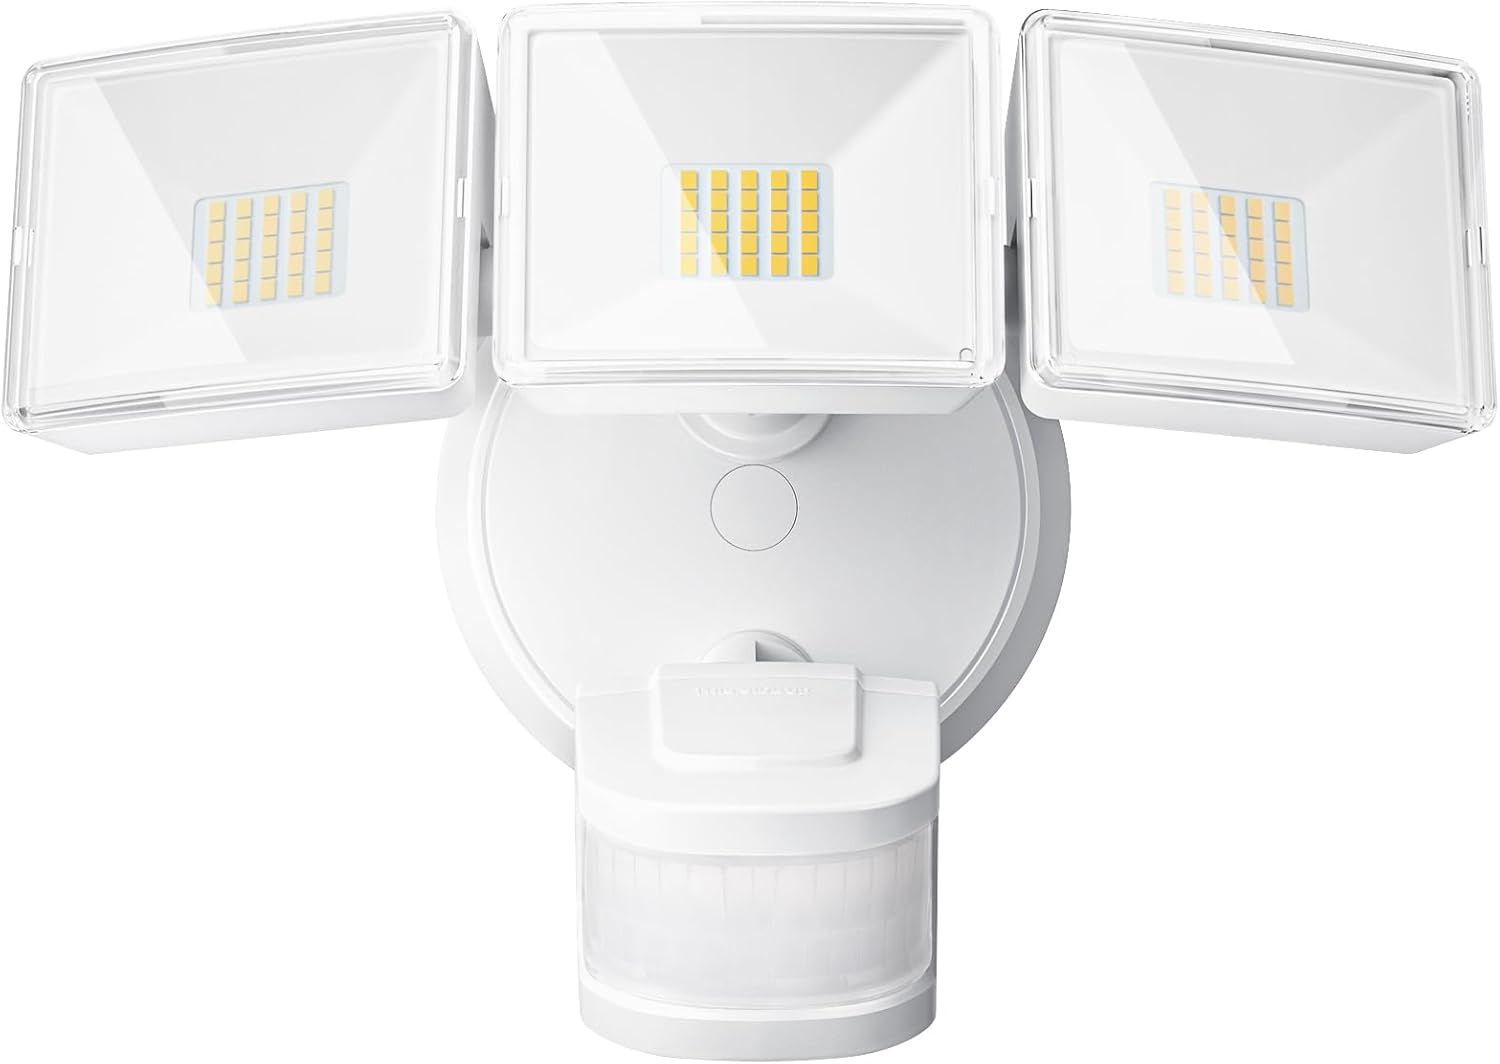
Figura 1: Fronte view of the OREiN 4500LM/30W Hardwired Motion Sensor LED Flood Light, showing the three adjustable light heads and the motion sensor below.

Figure 2: Diagram illustrating the flexible adjustment angles of the three light heads (340°) and the motion sensor (270° horizontally, 120° vertically).
5. Instalación
This flood light is designed for hardwired installation on a standard junction box (2.75” / 3.5”). It supports both wall and eave mounting.
Pasos de instalación:
- Apagar a enerxía: Disconnect power at the circuit breaker before starting.
- Soporte de montaxe seguro: Attach the metal mounting bracket to your existing junction box using the provided screws.
- Conecte cables: Connect the household wiring to the fixture wires using the provided wire nuts. Typically, black to black (live), white to white (neutral). This light belongs to secondary luminaires, so no extra ground wire connection is needed.
- Asegure a luminaria: Align the light fixture with the mounting bracket and secure it with the appropriate screws.
- Insert Waterproof Plug: Ensure the waterproof plug is properly inserted to prevent moisture ingress.
- Axustar os cabezales das luces e o sensor: Position the three light heads and the motion sensor to cover the desired areas.
- Restaurar enerxía: Volve a conectar o interruptor.
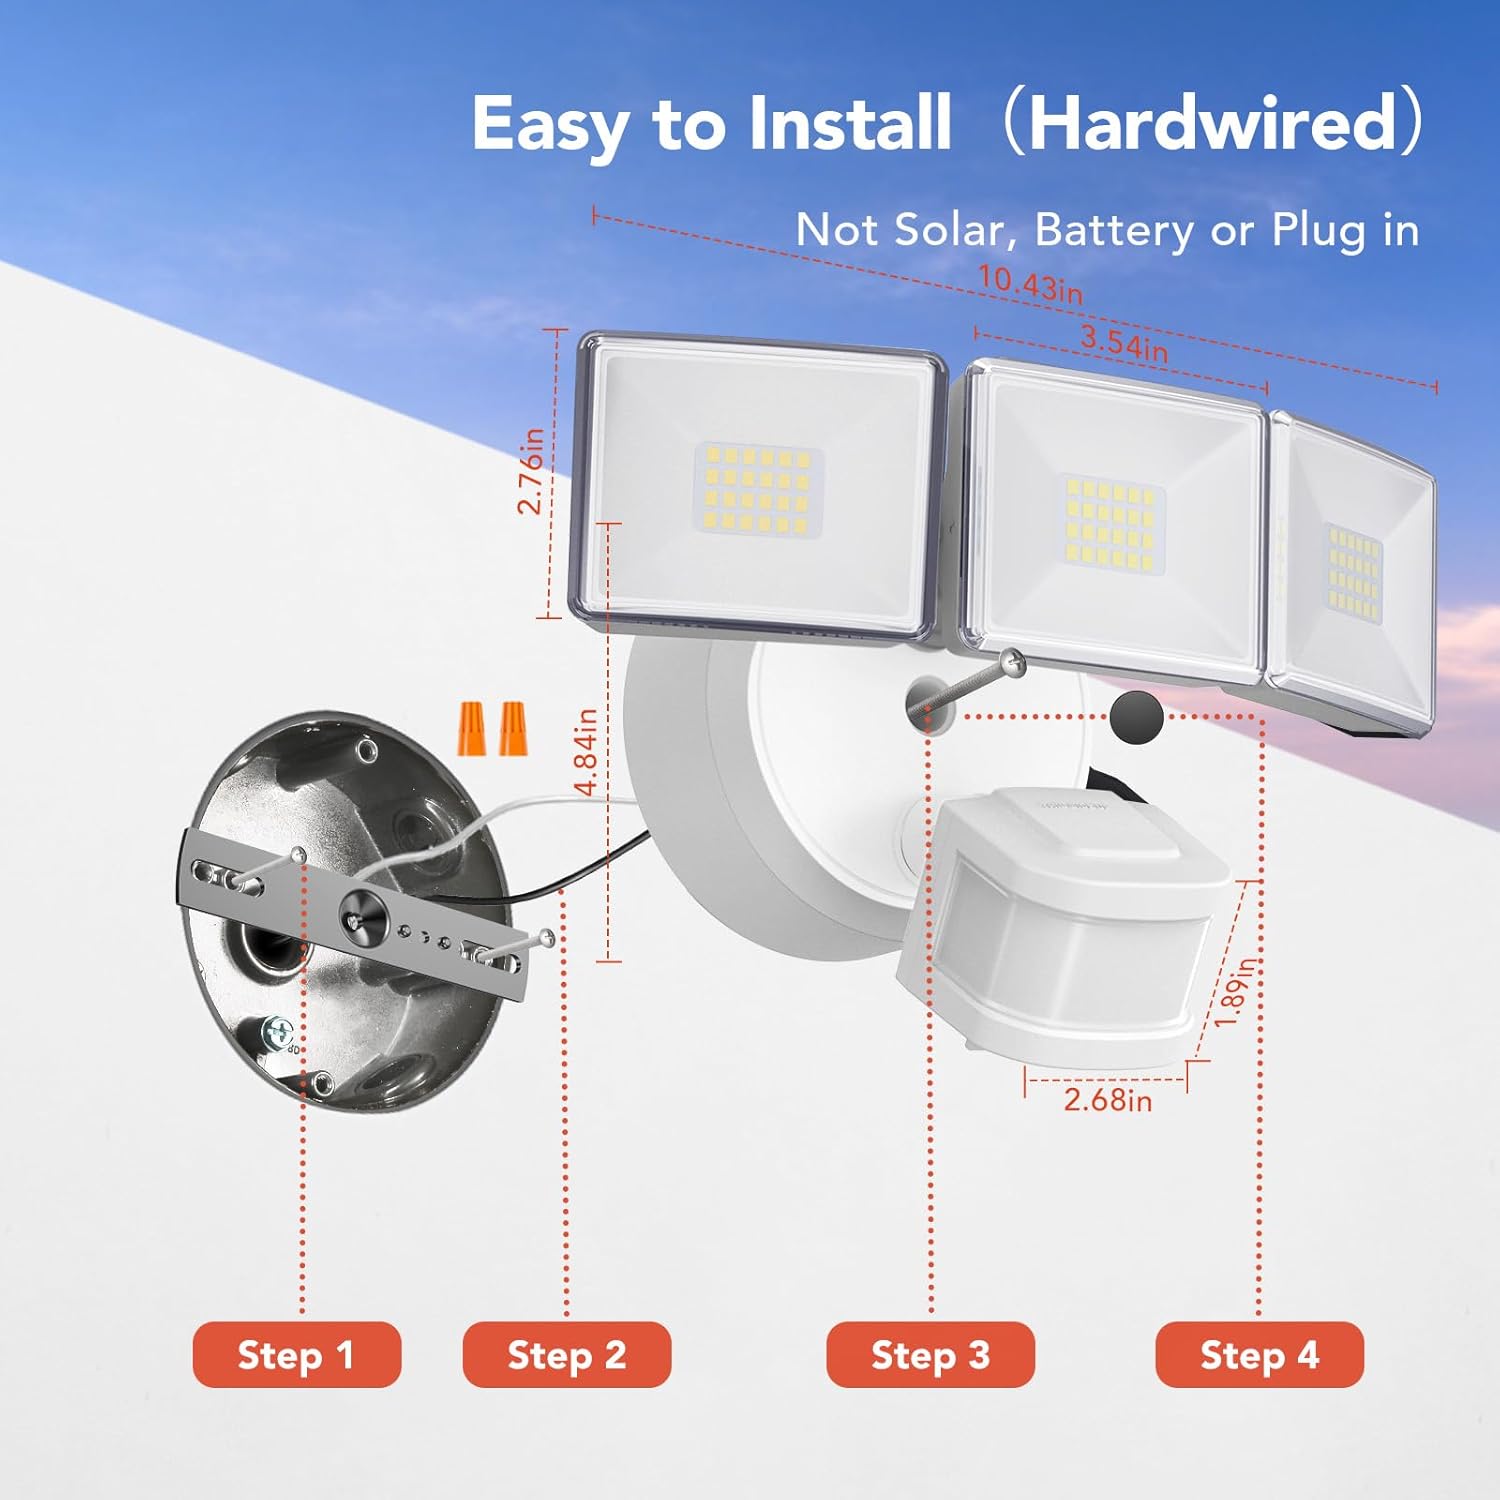
Figure 3: Step-by-step diagram for hardwired installation, showing mounting bracket, wire connections, and securing the fixture.

Figura 4: Examples of wall-mounted and soffit-mounted installations for the flood light.
6. Modos de funcionamento
The OREiN Flood Light offers three operational modes, selectable via a switch on the motion sensor unit:
- Modo de proba: The light turns on for 5 seconds when motion is detected, regardless of ambient light. Useful for testing sensor coverage during installation.
- Modo Do amencer ao anoitecer (D2D): The light automatically turns on at night and off during the day. In this mode, the motion sensing function is inactive.
- Modo automático: The light turns on only at night when motion is detected. The duration the light stays on (1, 5, or 10 minutes) can be adjusted.
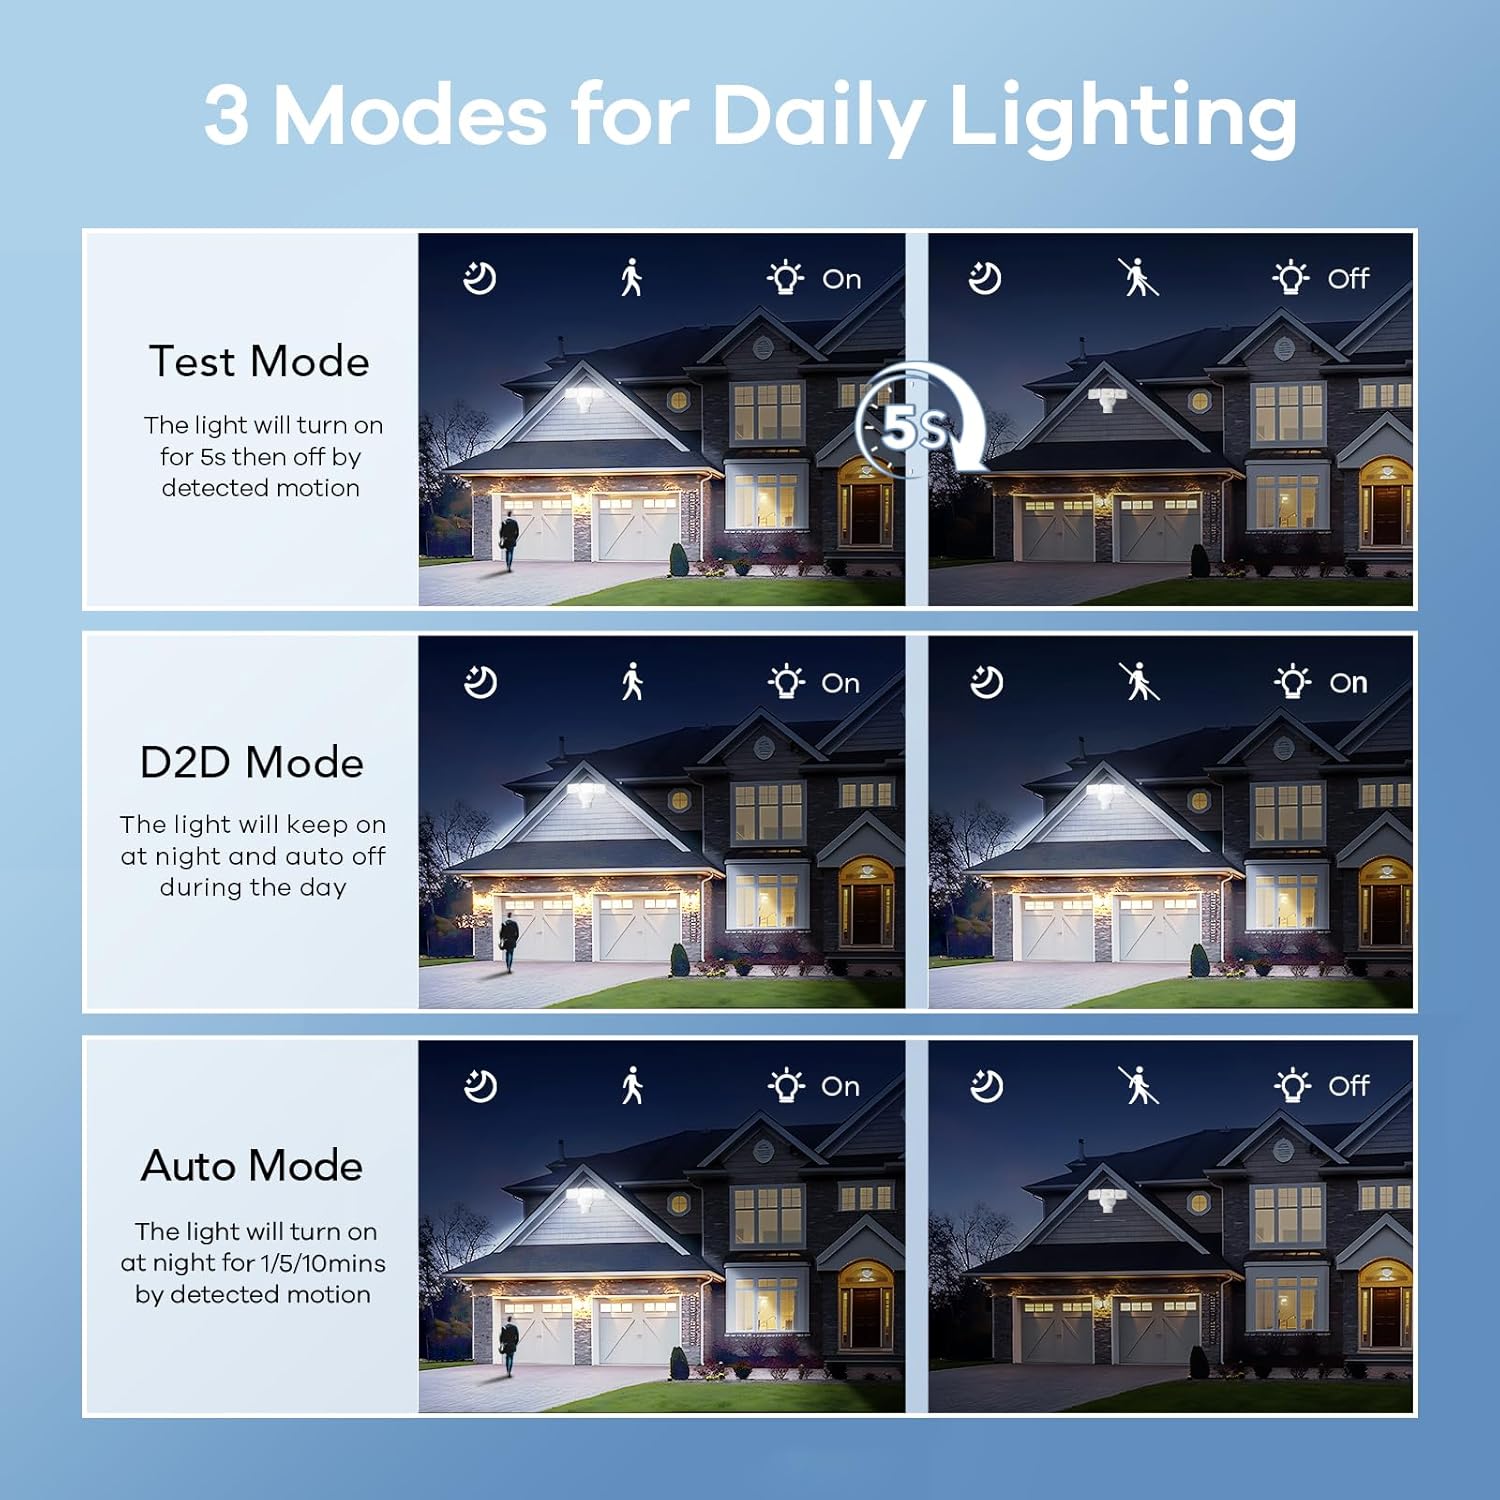
Figure 5: Visual representation of Test, Dusk to Dawn, and Auto modes in operation.

Figure 6: Illustration of the Dusk to Dawn mode, showing the light automatically activating when surroundings are dark and deactivating when bright.
7. Axustar a configuración
The motion sensor unit includes dials for adjusting the light's duration and sensitivity:
- Time Adjustment (Timer Minutes): Set the duration the light stays on after motion detection in Auto Mode (1, 5, or 10 minutes).
- Sensitivity Adjustment (Sensitivity): Adjust the motion detection range (10ft, 20ft, 30ft, 40ft). Max setting provides up to 40ft detection.

Figure 7: Close-up of the motion sensor with dials for adjusting mode, timer minutes, and sensitivity.
Video 1: Official OREiN video demonstrating the motion sensor outdoor lights, including features like wide detection, adjustable sensing distance, heat dissipation, adjustable time/sensitivity, flexible adjustment, and easy installation.
8. Mantemento
- Limpeza: Limpar o dispositivo cun suave, damp pano. Non use produtos de limpeza ou disolventes abrasivos.
- Inspección: Periodically check for any damage to the wiring or housing.
- Substitución da lámpada: The LED bulbs are integrated and not user-replaceable. The fixture has a lifespan of up to 50,000 hours.

Figure 8: Illustration demonstrating the IP65 waterproof rating, showing the light functioning reliably under rain.

Figure 9: Diagram showing the heat dissipation design of the light heads, contributing to the product's longevity.
9 Solución de problemas
| Problema | Causa posible | Solución |
|---|---|---|
| A luz non acende. | No power; incorrect wiring; sensor settings. | Check circuit breaker. Verify wiring connections. Adjust sensor mode/sensitivity. |
| A luz permanece acesa continuamente. | Sensor in D2D mode; continuous motion detected; sensitivity too high. | Switch to Auto mode. Check for constant heat sources or movement in detection zone. Reduce sensitivity. |
| A luz acende durante o día. | Sensor in Test mode; ambient light sensor blocked. | Switch to Auto or D2D mode. Ensure the ambient light sensor is not obstructed. |
| Motion detection range is too short/long. | Sensitivity setting incorrect. | Adjust the sensitivity dial on the motion sensor. |
10. Especificacións
| Característica | Detalle |
|---|---|
| Nome do modelo | OL3600354 |
| Marca | OREiN |
| Brillo | 4500 lúmenes |
| Wattage | 30 vatios |
| Temperatura da cor | 5000 Kelvin (luz do día) |
| Voltage | 120 voltios |
| Material | Acrilonitrilo Butadieno Estireno (ABS) |
| Nivel de resistencia á auga | Impermeable IP65 |
| Ángulo de detección de movemento | 240° |
| Distancia de detección de movemento | Ata 40 pés |
| Axuste da cabeza da luz | Cobertura 340° |
| Vida útil estimada | 50,000 horas |
| Tipo de instalación | Hardwired (Wall Mount, Eave Mount) |
| Dimensións do produto | 7.6 cm de longo x 6 cm de ancho x 8 cm de alto |
| Peso do elemento | 1.87 libras |
11. Garantía e soporte
OREiN offers an extended warranty for this product. For specific warranty details, please refer to the product packaging or contact OREiN customer support.
Atención ao cliente:
- For assistance, contact OREiN directly through Amazon or search for the brand name online.
- If you encounter any issues, it is recommended to contact customer support before initiating a return.

Figure 10: Image representing OREiN customer support, available for assistance.