1. Introdución
Thank you for choosing the Auxmir Rechargeable Wall Mounted Makeup Mirror. This manual provides detailed instructions for the safe and efficient use of your new mirror. This 8-inch double-sided mirror features 1X and 10X magnification, 3 color lighting modes, touch dimming, and a 360-degree swivel extendable arm for optimal viewndo e comodidade.

Image 1: Auxmir Rechargeable Wall Mounted Makeup Mirror, showcasing its design and illuminated surface.
2. Información de seguridade
- Keep the mirror fully charged to ensure consistent performance and avoid unexpected power interruptions.
- When utilizing the 10X magnifying side, position your face within 4 inches (10 cm) of the mirror to achieve the clearest image and prevent dizziness.
- The wall structure chosen for installation must be suitable and free of weak points. The entire mounting area must be flat, without projecting joints or tiles.
- The included screws and dowels are specifically designed for concrete walls. For other wall types, consult a professional or use appropriate mounting hardware.
- For any product inquiries or assistance, please contact Auxmir customer service.
3. Contido do paquete
Verifica que todos os elementos estean presentes no paquete:
- Auxmir Wall Mounted Makeup Mirror
- Cable de carga USB tipo C
- Modelo de perforación
- Mounting Hardware (Screws and Dowels)
4. Configuración e instalación
Follow these steps to securely mount your mirror:
- Escolla localización: Select a desired location on a suitable wall. Use the provided drilling template to mark two holes.
- Perforación: Drill two holes at the marked positions on the wall.
- Inserir tarugos: Insert the white expansion screws (dowels) into the drilled holes.
- Fixar a placa base: Position the base plate over the dowels and fix it securely with screws.
- Estrutura do espello de montaxe: Mount the mirror structure onto the fixed base plate and install the screw caps.
- Verificar a seguridade: Ensure the mirror is firmly attached to the wall before use.
Important Notes for Installation:
- The wall must be structurally sound and capable of supporting the mirror's weight.
- The mounting surface must be flat; avoid uneven areas or protruding elements.
- The included mounting hardware is intended for concrete walls. For other wall materials (e.g., drywall, wood studs), appropriate anchors and screws must be sourced separately.
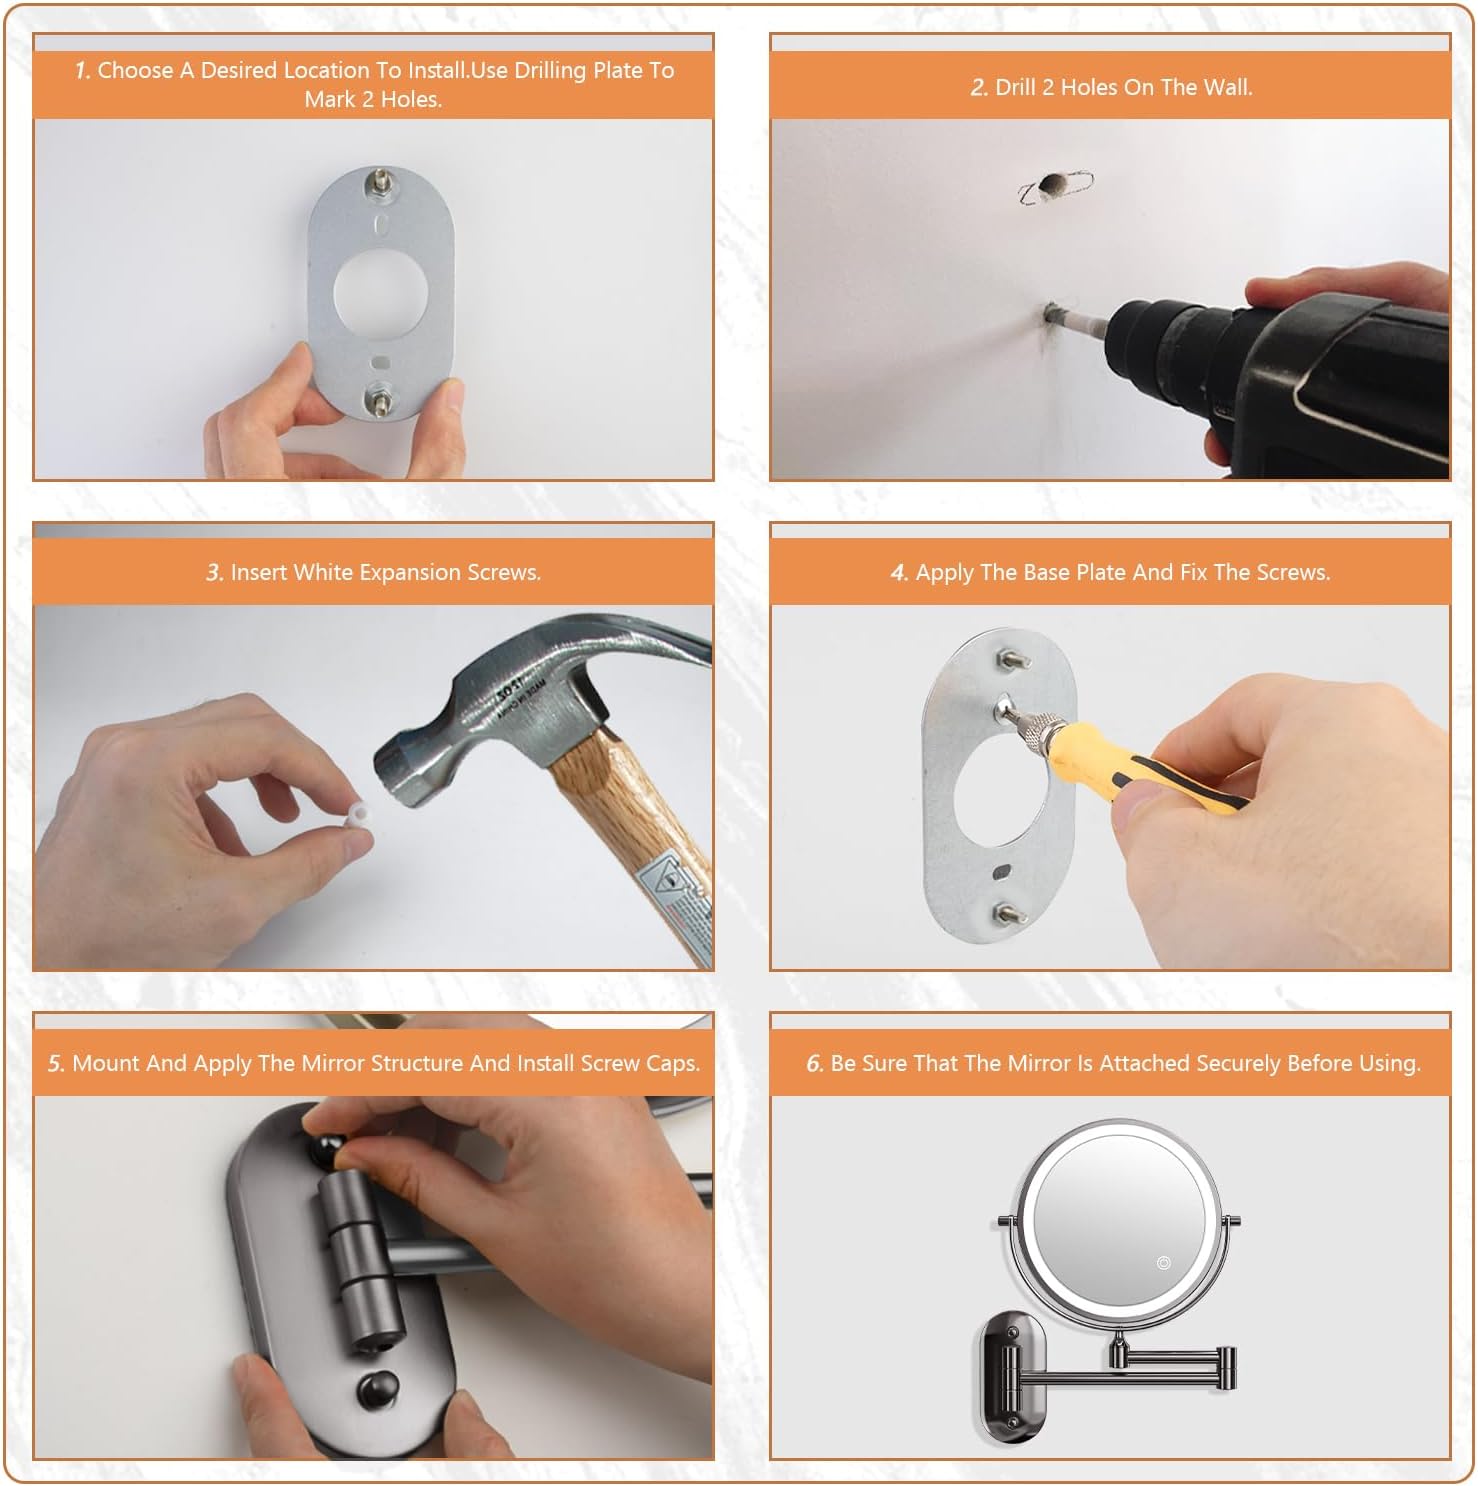
Image 2: Visual guide illustrating the six steps for mounting the mirror to a wall.
5. Instrucións de funcionamento
5.1 Power and Lighting Control
The mirror is equipped with 54 LED lights and features intelligent touch control for lighting functions.
- Encendido/apagado: Toca o botón do sensor táctil na superficie do espello para acender ou apagar as luces.
- Cambiar a cor da luz: Short press the touch sensor button to cycle through the 3 available light colors: Cool Light, Natural Light, and Warm Light.
- Axustar o brillo: Long press the touch sensor button to steplessly adjust the brightness from 300 lux to 1100 lux. Release the button when the desired brightness is reached.
- Función de apagado automático: The mirror lights will automatically turn off after 30 minutes of inactivity to conserve energy.

Image 3: Depiction of the three distinct color lighting modes: Cool Light, Natural Light, and Warm Light.

Image 4: Illustration of the stepless dimming feature, allowing brightness adjustment from 300 to 1100 lux.
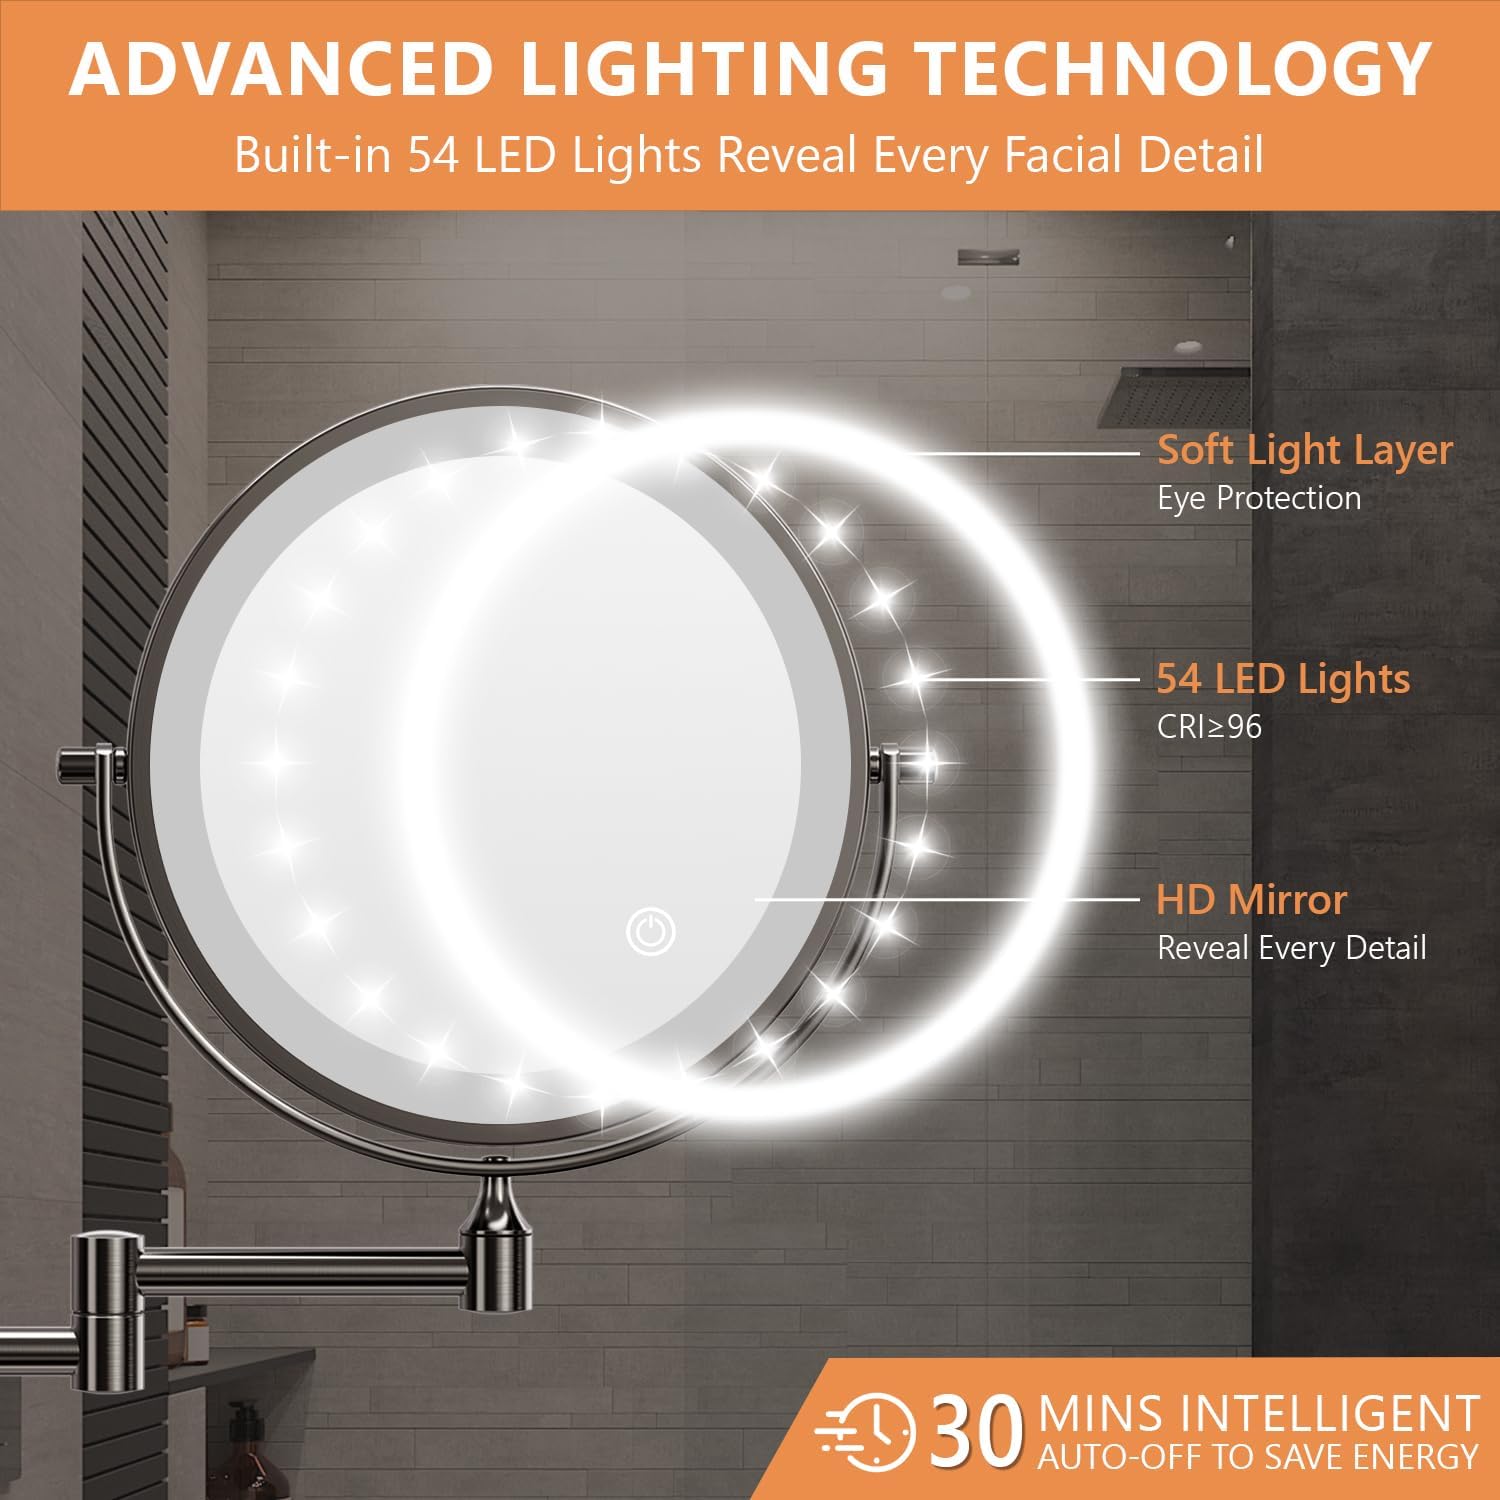
Imaxe 5: Detallada view of the mirror's advanced lighting technology, including 54 LED lights and the 30-minute auto-off function.
5.2 Ampliación
The mirror features a double-sided design with two magnification options:
- 1X Side: Ideal for general skincare routines and daily makeup application.
- 10X Side: Provides high magnification for precise tasks such as applying eyeliner, grooming eyebrows, or detailed skincare.
Tip for 10X Magnification:
For the clearest and most comfortable viewing experience on the 10X side, position your face within 4 inches (10 cm) of the mirror. Moving further away may result in a distorted or blurry image.

Image 6: Demonstration of the 1X and 10X magnification sides, emphasizing the recommended 4-inch distance for the 10X view.
5.3 Recarga da batería
Your mirror is equipped with a built-in 3200mAh rechargeable lithium battery.
- Porto de carga: Locate the Type-C charging port on the side of the mirror.
- Conectar o cargador: Connect the provided USB Type-C cable to the mirror and a suitable USB power adapter (not included).
- Indicador de carga: A red light indicates the mirror is charging. The light will turn green when fully charged.
- Tempo de carga: Unha carga completa adoita tardar aproximadamente de 3 a 4 horas.
- Primeiro uso: It is recommended to fully charge the mirror before its initial use for optimal battery performance.

Image 7: Visual representation of the mirror's USB Type-C charging capability, 3200mAh battery, and the red (charging) and green (fully charged) indicator lights.
5.4 Adjusting the Mirror
The mirror is designed for flexible positioning:
- Xiratorio 360°: The mirror head can rotate 360 degrees, allowing you to easily switch between the 1X and 10X sides and adjust the viewángulo de ing.
- Brazo extensible: The extendable arm allows you to pull the mirror closer for use and push it back against the wall when not needed, saving space.

Image 8: Illustration of the mirror's extendable, foldable arm and its 360-degree rotation capability for flexible positioning and space-saving.
6. Mantemento
To ensure the longevity and optimal performance of your mirror, follow these maintenance guidelines:
- Limpeza: Clean the mirror surface and frame with a soft, damp cloth. Avoid using abrasive cleaners, solvents, or harsh chemicals, as these can damage the finish or mirror coating.
- Desempolvado: Regularly dust the mirror and arm with a dry, soft cloth to prevent buildup.
- Almacenamento: When not in use, especially for extended periods, ensure the mirror is fully charged and stored in a dry environment.
7 Solución de problemas
If you encounter any issues with your Auxmir mirror, refer to the following common solutions:
| Problema | Causa posible | Solución |
|---|---|---|
| As luces non se acenden. | A batería está esgotada. | Connect the mirror to a power source using the USB Type-C cable and allow it to fully charge. |
| As luces son tenues ou parpadean. | Batería baixa ou axuste de brillo incorrecto. | Recharge the battery. Long press the touch sensor to increase brightness. |
| Image is blurry or distorted on 10X side. | A cara está demasiado lonxe do espello. | Ensure your face is within 4 inches (10 cm) of the 10X magnifying surface. |
| Mirror arm is stiff or difficult to move. | Dust or debris in joints. | Gently clean the joints with a soft cloth. Avoid forcing movement. |
If the problem persists after attempting these solutions, please contact Auxmir customer service for further assistance.
8. Especificacións
| Característica | Detalle |
|---|---|
| Marca | Auxmir |
| Número de modelo | X-8CB |
| Cor | Negro |
| Diámetro do espello | 8 polgadas |
| Ampliación | 1X/10X Dobre cara |
| Capacidade da batería | Recargable de litio de 3200 mAh |
| Tipo de carga | USB tipo C |
| Luces LED | 54 LEDs |
| Modos de luz | 3 (Cool, Natural, Warm) |
| Rango de brillo | 300 - 1100 lux (Stepless Dimmable) |
| Características especiais | 360 Degree Swivel, Extendable Arm, Touch Sensor, Auto-Off (30 mins), Rustproof |
| Material | Vidro, aceiro inoxidable |
| Dimensións do produto | 31L x 24W Centímetros |
| Peso do elemento | 1.04 g |
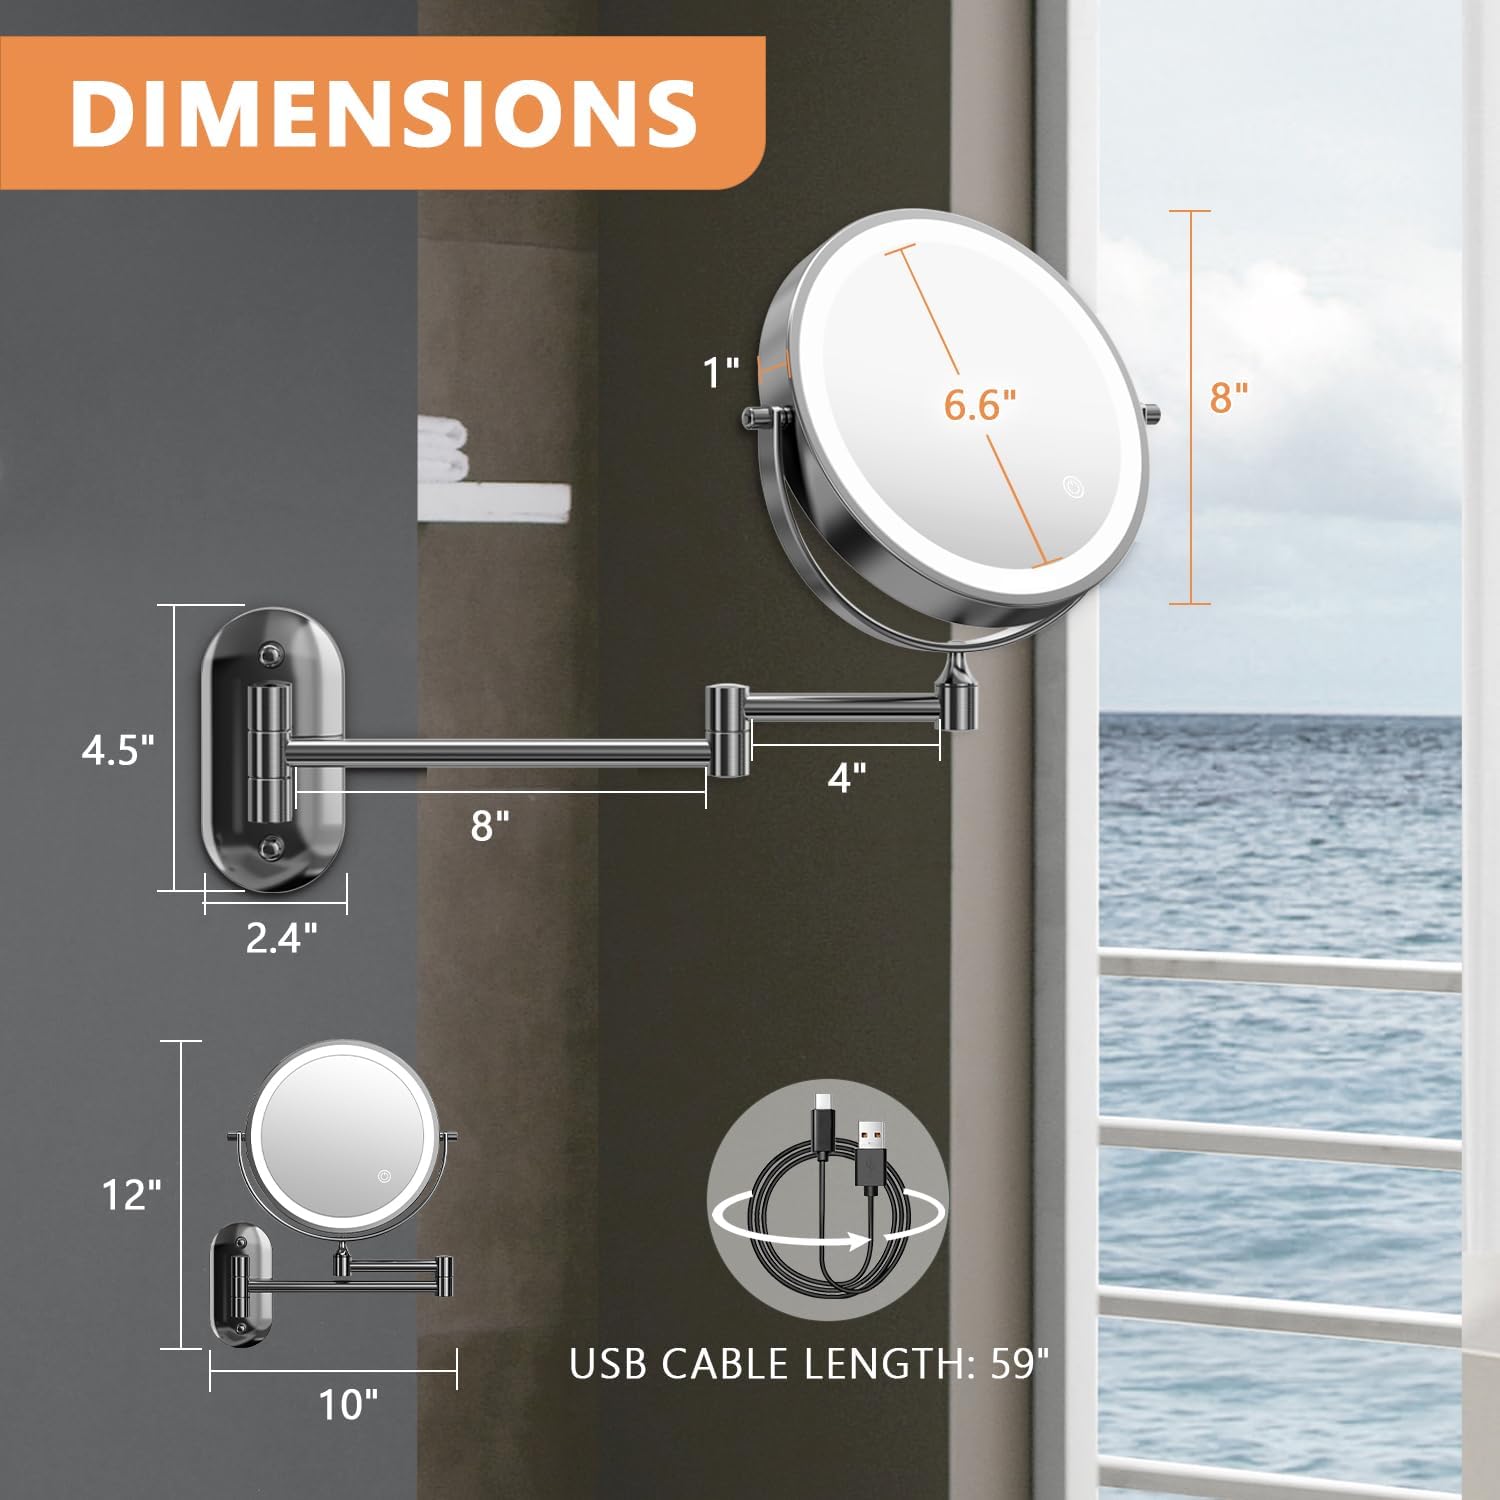
Image 9: Detailed diagram illustrating the physical dimensions of the mirror and its extendable arm.
9. Garantía e soporte
Auxmir ofrece unha 3 ano de garantía for this product, ensuring quality and reliability. Our professional customer service team is available to assist you with any questions or concerns you may have regarding your mirror.
For support, please visit the official Auxmir store or contact us directly through the retailer where you purchased the product.
Auxmir Store: Visit Auxmir Store


