Introdución
Thank you for choosing the RESTMO Sprinkler Timer with Brass Inlet. This programmable water timer is designed to simplify your garden watering tasks, providing automatic control for garden hoses, outdoor faucets, drip irrigation systems, and lawn watering. Please read this manual carefully before use to ensure proper installation, operation, and maintenance.
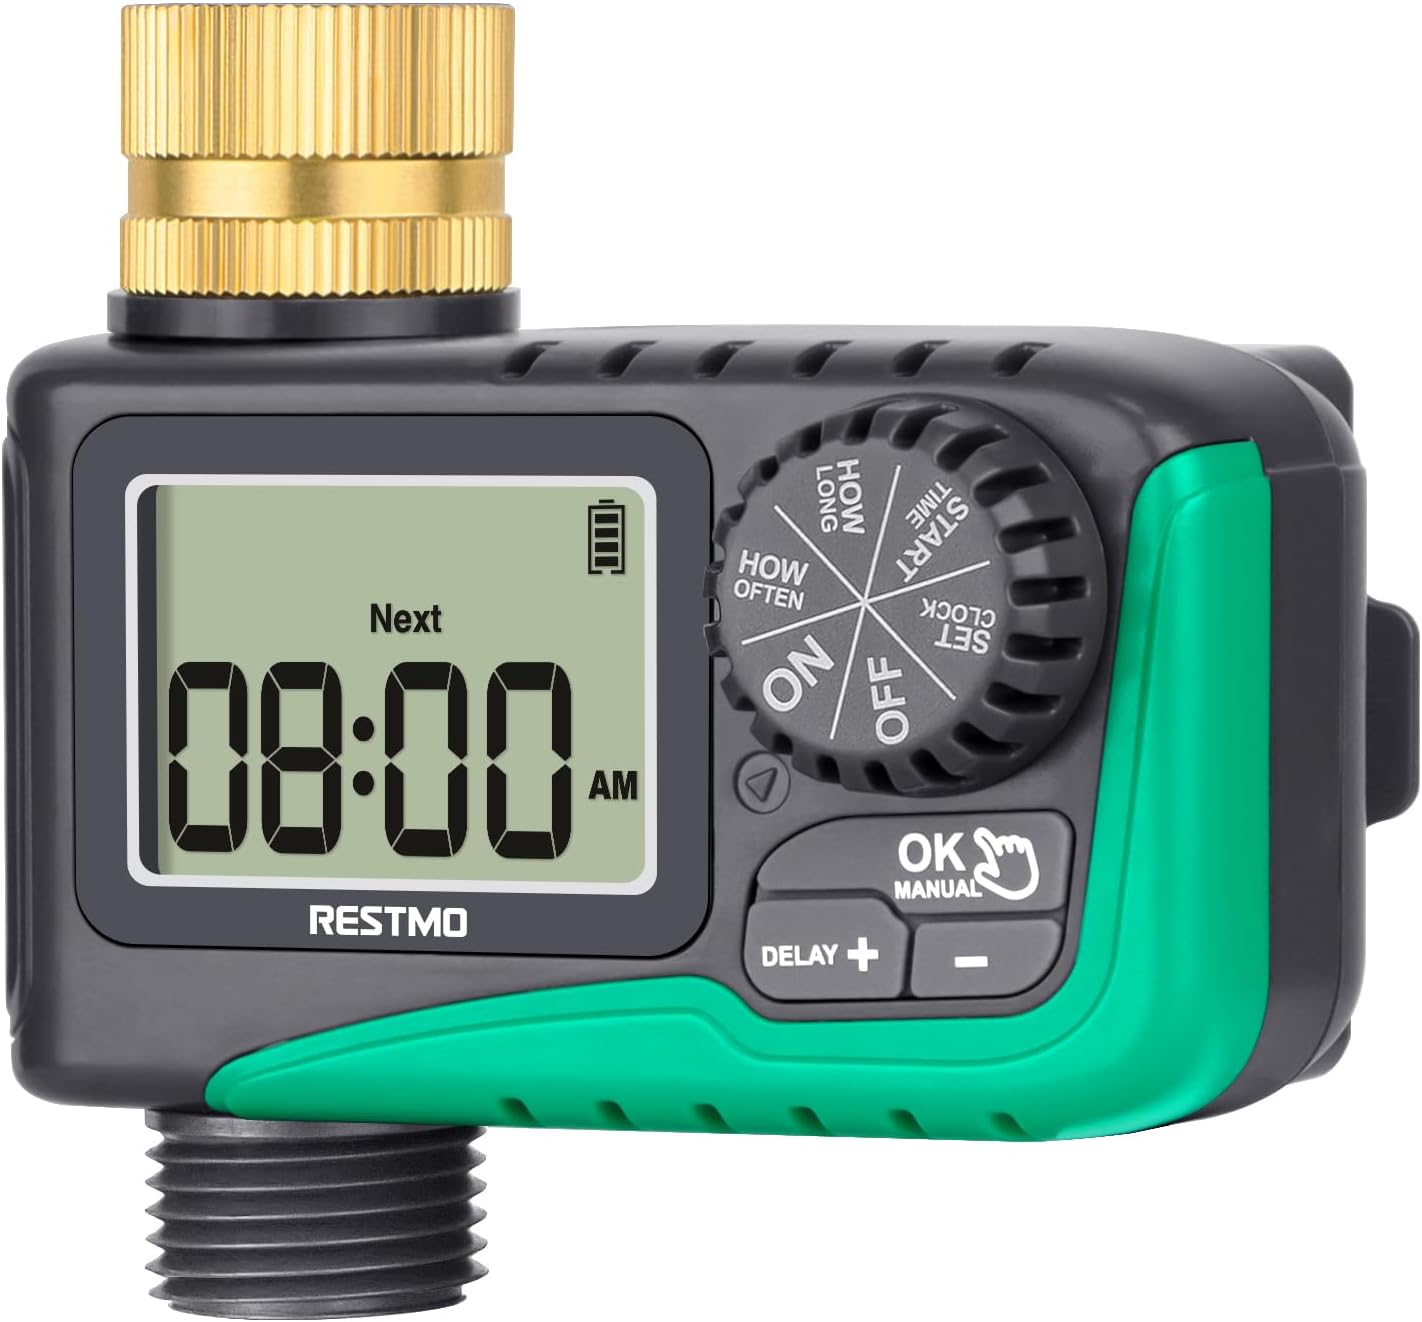
Imaxe: Fronte view of the RESTMO Sprinkler Timer, showing the digital display and control dial.
Información de seguridade
- Do not immerse the timer in water. It is IP54 waterproof, meaning it is protected against dust and splashing water, but not full immersion.
- Use only 2 x AAA 1.5V alkaline batteries (not included). Do not mix old and new batteries or different types of batteries.
- Retire as pilas se non vai usar o temporizador durante un período prolongado para evitar fugas.
- Protect the timer from freezing temperatures. Disconnect and store indoors during winter.
- Ensure all connections are tight to prevent leaks. Teflon tape is recommended for a secure seal.
Produto rematadoview
The RESTMO Sprinkler Timer features a user-friendly design with a large LCD screen and intuitive controls.
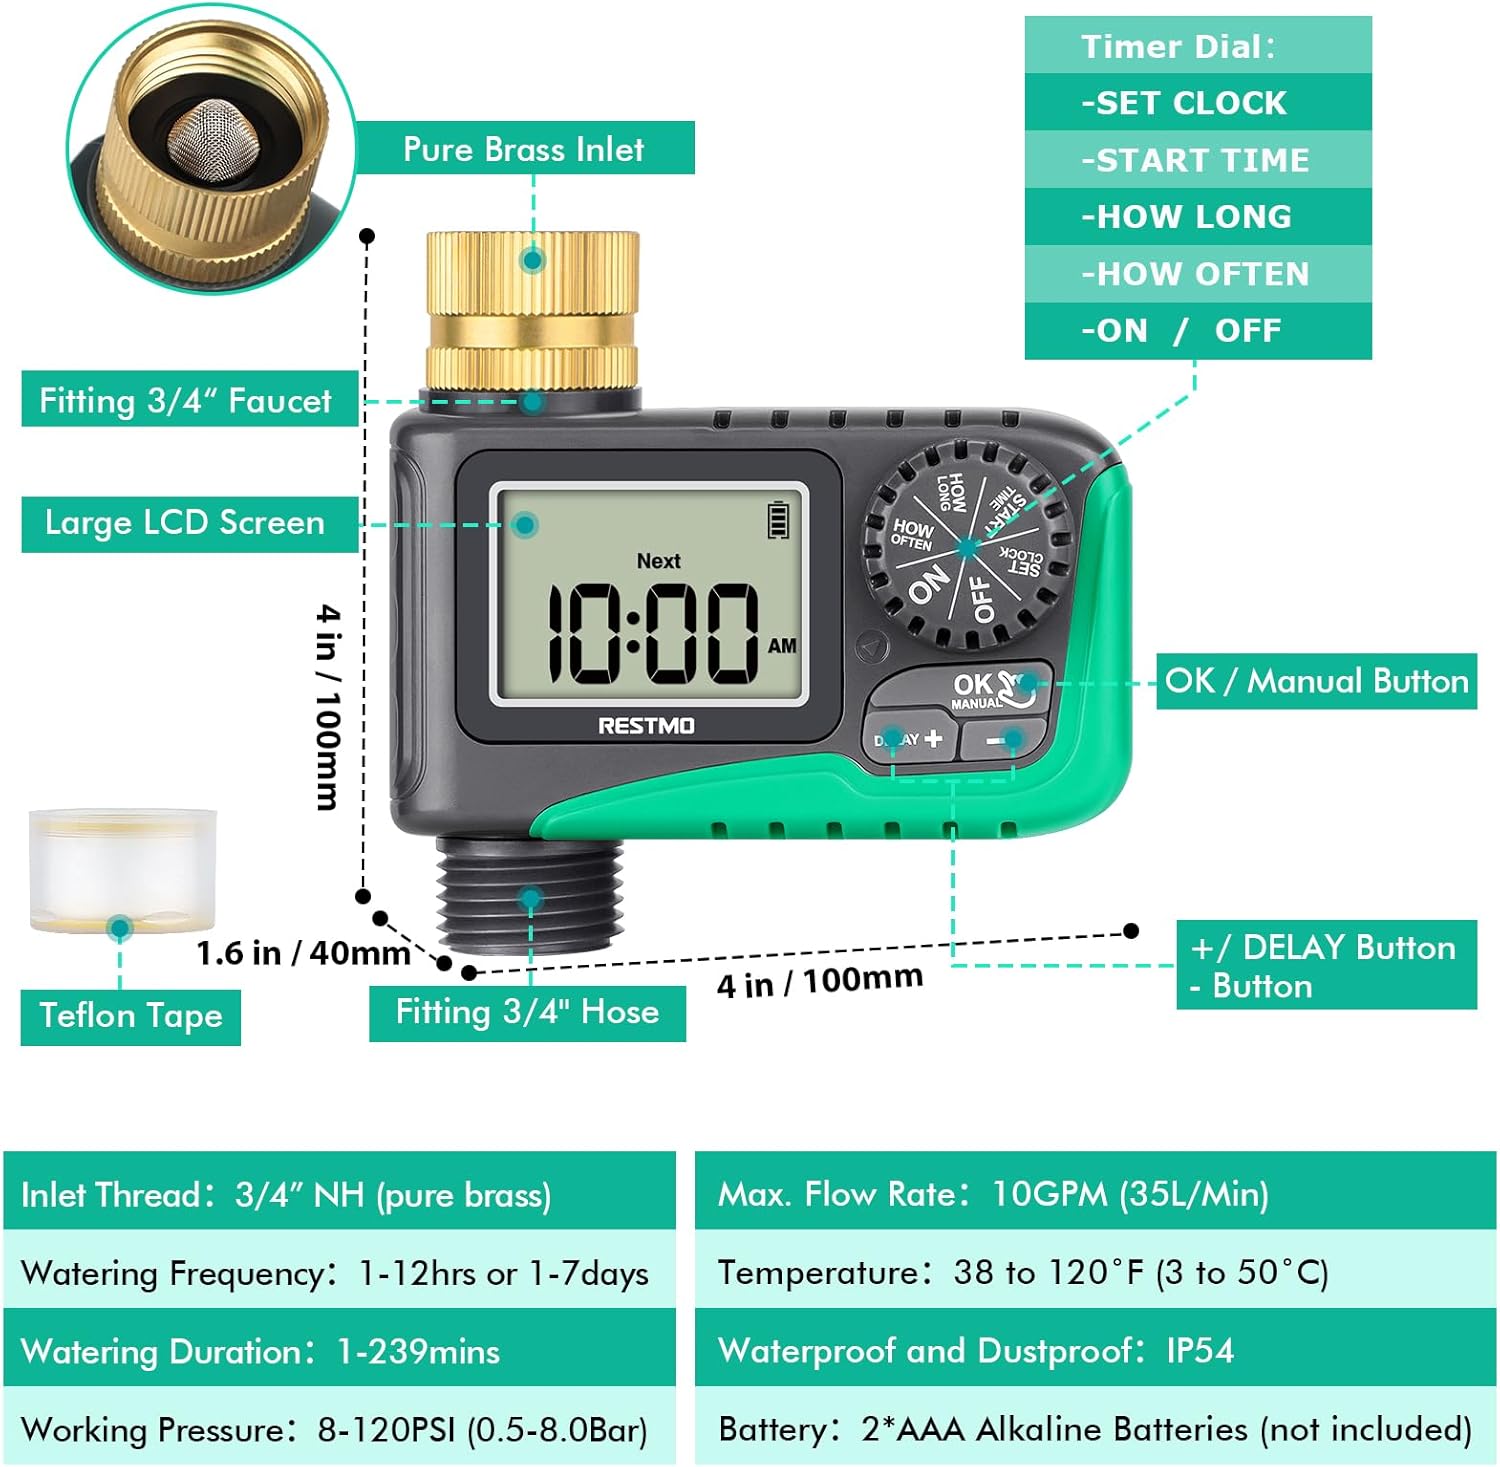
Image: Diagram illustrating the various components of the sprinkler timer, including the brass inlet, LCD screen, control dial, and buttons.
Compoñentes clave:
- Pure Brass Inlet Thread: 360-degree rotatable for easy installation, with a built-in metal filter washer to prevent debris.
- Pantalla LCD grande: Displays current time, next watering time, and battery status.
- Marcador do temporizador: Used to select different settings (SET CLOCK, START TIME, HOW LONG, HOW OFTEN, ON, OFF).
- Botón OK/Manual: Confirms settings and activates manual watering.
- Botóns +/-: Adjust values and activate rain delay.
- Compartimento de batería impermeable: Alberga 2 pilas AAA.

Imaxe: Primeiro plano view of the 360-degree swivel pure brass inlet, highlighting its design and durability.
Configuración e instalación
Follow these steps to install your RESTMO Sprinkler Timer:
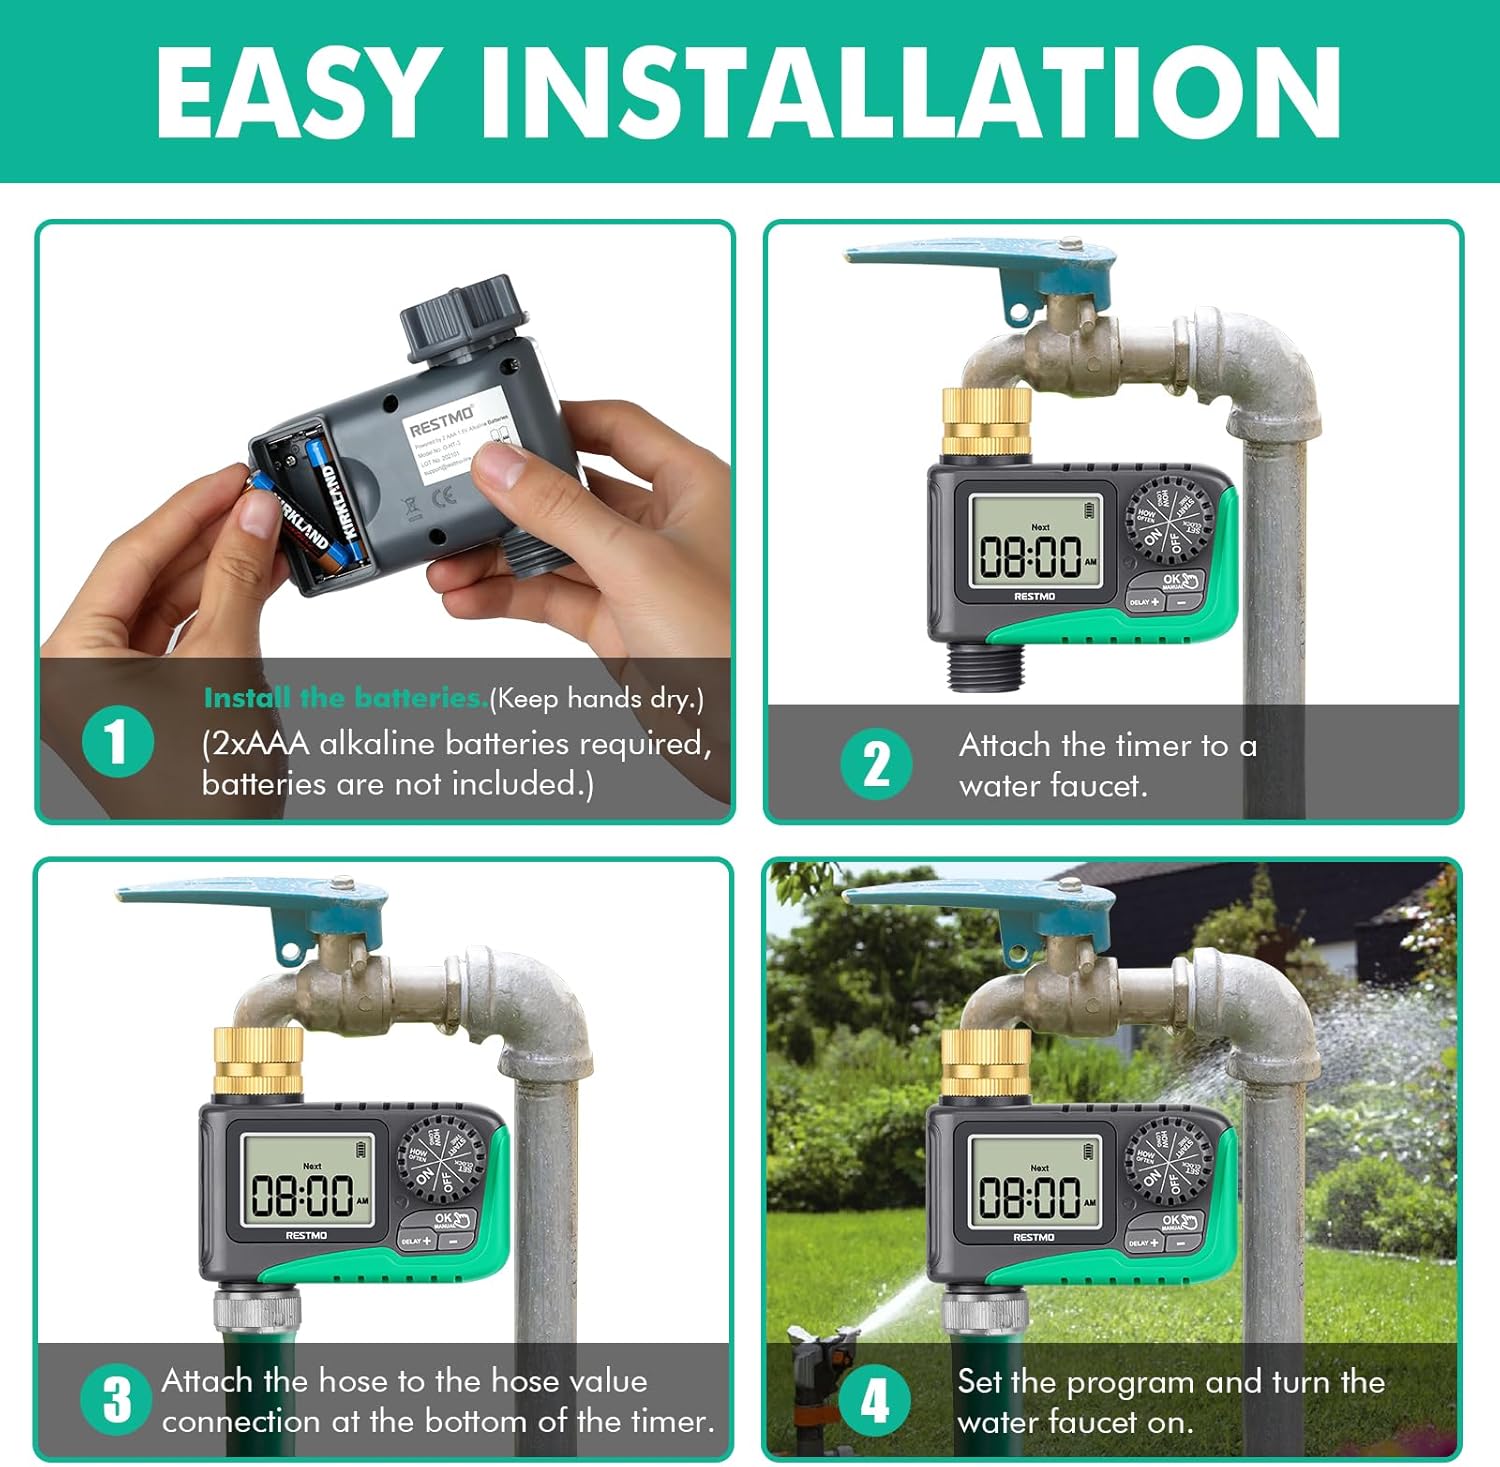
Image: Four-panel diagram showing the installation process: installing batteries, attaching to faucet, attaching hose, and setting the program.
- Instalar baterías: Open the waterproof battery compartment. Insert 2 x AAA 1.5V alkaline batteries (not included), ensuring correct polarity. Close the compartment securely. Keep your hands dry during this process.
- Conectar á billa: Screw the timer's brass inlet onto your 3/4" outdoor faucet. Hand-tighten firmly. For a leak-proof connection, wrap Teflon tape around the faucet threads before attaching the timer.
- Conecte a mangueira: Connect your garden hose to the 3/4" hose connection at the bottom of the timer. Ensure it is tightly secured.
- Abrir a billa: Open your faucet fully. The timer is designed to operate under water pressure.
Instrucións de funcionamento
1. Establecer o reloxo
This step sets the current time on the timer.
- Xire o disco para Axustar o reloxo.
- Preme o +/- botóns para axustar a hora e os minutos actuais.
- Preme o OK button to switch between hour and minute setup.
- Xire o dial a calquera outra posición para gardar os cambios.
2. Set Start Time
This sets when your automatic watering program will begin.
- Xire o disco para HORA DE INICIO.
- Preme o +/- botóns para axustar a hora de inicio desexada.
- Preme o OK button to switch between hour and minute setup.
- Xire o dial a calquera outra posición para gardar os cambios.
3. Set Watering Duration (How Long)
This sets how long the watering will last for each cycle.
- Xire o disco para CANTO TEMPO.
- Preme o +/- buttons to set the watering duration from 1 minute to 239 minutes.
- Preme o OK button to switch between hour and minute setup.
- Xire o dial a calquera outra posición para gardar os cambios.
4. Set Watering Frequency (How Often)
This sets how often the watering cycles will repeat.
- Xire o disco para Cantas veces.
- Preme o +/- buttons to set the watering frequency: from 1 hour to 12 hours, or from 1 day to 7 days.
- Preme o OK button to switch between hour and day/hour setup.
- Xire o dial a calquera outra posición para gardar os cambios.
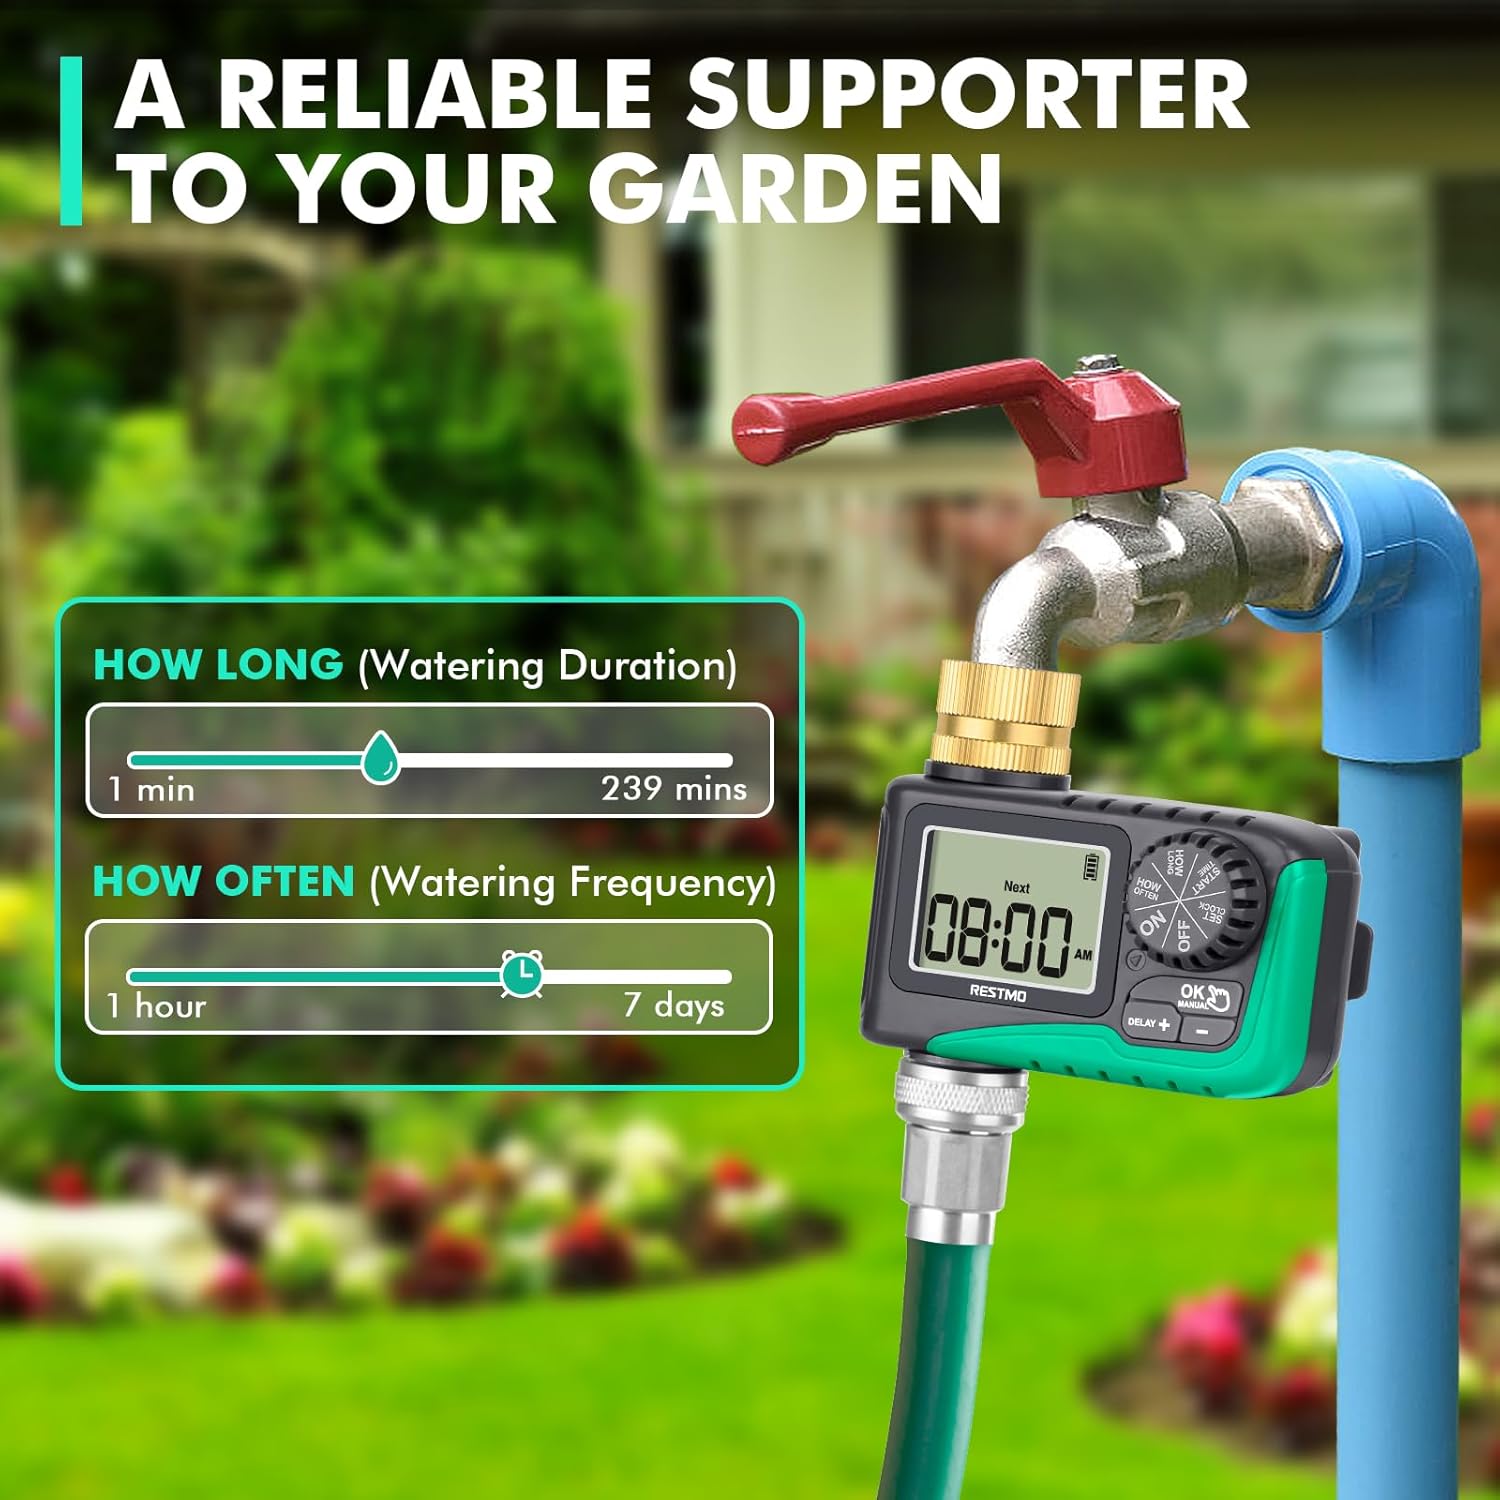
Image: Visual guide showing the range for 'How Long' (1-239 mins) and 'How Often' (1hr-7 days) settings.
5. Rego automático
Once programmed, turn the dial to ON to activate the automatic watering schedule. The LCD screen will display the remaining time of the current watering program when watering is active. When watering is off, the screen will flash between the next watering start time and the current time.

Image: Depicts the timer set to 'ON' for automatic watering, with a visual representation of the watering duration and frequency settings.
6. Rego manual
Para regar manualmente sen afectar o horario programado:
- With the dial at ON, prema e manteña o botón OK/MANUAL botón durante 3 segundos.
- Preme o +/- buttons to select the desired manual watering duration (1 to 239 minutes).
- Preme OK to switch between hour and minute. The setup flashes 3 times and manual watering will automatically start.
- Para cancelar o rego manual, xire o dial ata DESACTIVADO e despois de volta a ON.

Image: Shows how to activate manual watering and adjust its duration, with a visual of water flowing from the hose.
7. Atraso por choiva
Para deter temporalmente o programa de rego debido á choiva ou outros motivos:
- With the dial at ON, prema e manteña o botón DELAY + botón durante 3 segundos.
- Preme o +/- buttons to select a delay of 12, 24, 48, or 72 hours.
- Preme OK or wait for 3 seconds to start the rain delay.
- Para cancelar o retardo por choiva, xire o dial ata DESACTIVADO e despois de volta a ON.

Image: Illustrates the rain delay function with options for 12, 24, 48, and 72-hour delays.
8. Stop Watering
To completely stop all watering programs:
- Xire o disco para DESACTIVADO. The timer will keep off until the dial is turned to ON de novo.

Image: Shows the timer dial set to 'OFF', indicating that watering has stopped.
Mantemento
- Limpeza: Periodically check the brass inlet filter washer for debris and clean it to ensure optimal water flow.
- Substitución da batería: When the battery indicator on the LCD screen shows low power, replace the batteries promptly to avoid interruption of watering schedules.
- Invernización: Before the first frost, disconnect the timer from the faucet and hose. Remove the batteries and store the timer indoors in a dry, protected area to prevent damage from freezing.
Resolución de problemas
Aquí tes algúns problemas comúns e as súas solucións:
| Problema | Causa posible | Solución |
|---|---|---|
| O temporizador non se acende/LCD en branco | Baterías gastadas ou instaladas incorrectamente. | Replace batteries with new 2 x AAA alkaline batteries, ensuring correct polarity. |
| Water not flowing/Timer not watering | Faucet is off; low water pressure; clogged filter; incorrect program settings; valve stuck. | Ensure faucet is fully open. Check water pressure (10-120 psi required). Clean the inlet filter. Verify program settings (start time, duration, frequency). Reset the valves (see video below). |
| Fugas de auga polas conexións | Loose connections; missing/damaged washer; insufficient Teflon tape. | Tighten all connections. Check for and replace any missing or damaged rubber washers. Apply more Teflon tape to faucet threads. |
| Timer not following schedule | Incorrect clock setting; program not activated (dial not on ON); rain delay active. | Re-set the current time. Ensure the dial is set to ON. Check if rain delay is active and cancel if necessary. |
How to Reset the Valves:
If the timer's internal valves are not functioning correctly, you may need to reset them. This process involves cycling water through the timer manually to clear any obstructions or reset the mechanism.
Video: A step-by-step guide on how to reset the internal valves of the RESTMO Sprinkler Timer to ensure proper water flow.
Especificacións
- Modelo: O-HT
- Material: Latón, Metal
- Rosca de entrada: 3/4" NH (Pure Brass)
- Hose Fitting: 3/4"
- Duración do rego: 1-239 minutos
- Frecuencia de rego: 1-12 horas ou 1-7 días
- Rain Delay Options: 12/24/48/72 horas
- Max. Fluxo: 10 galóns por minuto (35 l/min)
- Presión de traballo: 10-120 PSI (0.5-8.0 bar)
- Rango de temperatura: De 38 a 120 °C (3 a 50 °F)
- Clasificación impermeable: IP54
- Fonte de enerxía: 2 pilas alcalinas AAA (non incluídas)
- Dimensións do produto: 3.94" D x 3.94" W x 1.57" H
- Peso do artigo: 5 onzas
Garantía e Soporte
RESTMO products are designed for durability and performance. For warranty information or technical support, please refer to the contact details provided with your product packaging or visit the official Restmo websitio. O noso equipo de atención ao cliente está dispoñible para axudarche con calquera pregunta ou preocupación.


