1. Produto rematadoview
The AUTOOL DM303 is a versatile automotive diagnostic multimeter and oscilloscope kit designed for comprehensive electrical testing in vehicles. It combines the functions of a digital multimeter with an oscilloscope, offering a wide range of measurement capabilities for both general electrical work and specialized automotive diagnostics.

Figure 1.1: AUTOOL DM303 Multimeter Oscilloscope and its accessories, including various test leads and a carrying case.
Características principais:
- Multimeter Capabilities: Accurately measures AC/DC voltage (0-1000V DC, 0-700V AC), resistance (0-1MΩ), continuity, AC/DC current (0-20A, 0-200mA), capacitance, frequency (1-1MHz), diodes, and duty cycle.
- Oscilloscope Function: Features a 500KHz waveform test bandwidth for measuring slowly changing signals, ideal for automotive circuits such as motor drive signals, ignition signals, camshaft/crankshaft signals, wheel speed sensor signals, and oxygen sensor signals.
- Auto Range & True RMS: Automatically selects appropriate measurement ranges and provides accurate readings for non-sinusoidal waveforms.
- Specialized Wiring Functions: Includes 8 types of wiring lines for diverse applications, such as battery voltage testing, fuel injector/relay testing, K-wire and CAN bus signal testing, and ECU diagnostics.
- Starting Test & Analog Signal Output: Evaluates battery starter systems and outputs 5V square wave and 5Vpp sine wave signals (1Hz-10KHz, 10%-90% duty cycle).
- Pantalla fácil de usar: Equipped with a 2.8-inch colorful screen with backlight, adjustable brightness, button sound, and sleep time for enhanced readability and convenience in various working environments.
Vídeo 1.2: Xeral rematadoview of the AUTOOL DM303 digital oscilloscope multimeter for automotive diagnostics, showcasing its various functions and applications.
2. Configuración e compoñentes
2.1 Contido do paquete
The AUTOOL DM303 kit includes the main multimeter unit, various test leads, and a carrying case. Refer to the diagram below for a detailed view of the included wiring lines and their functions.

Figura 2.1: Máisview of the 8 specialized wiring lines and their applications.
2.2 Device Layout and Connections
Familiarize yourself with the main components and connection points of the DM303 unit.
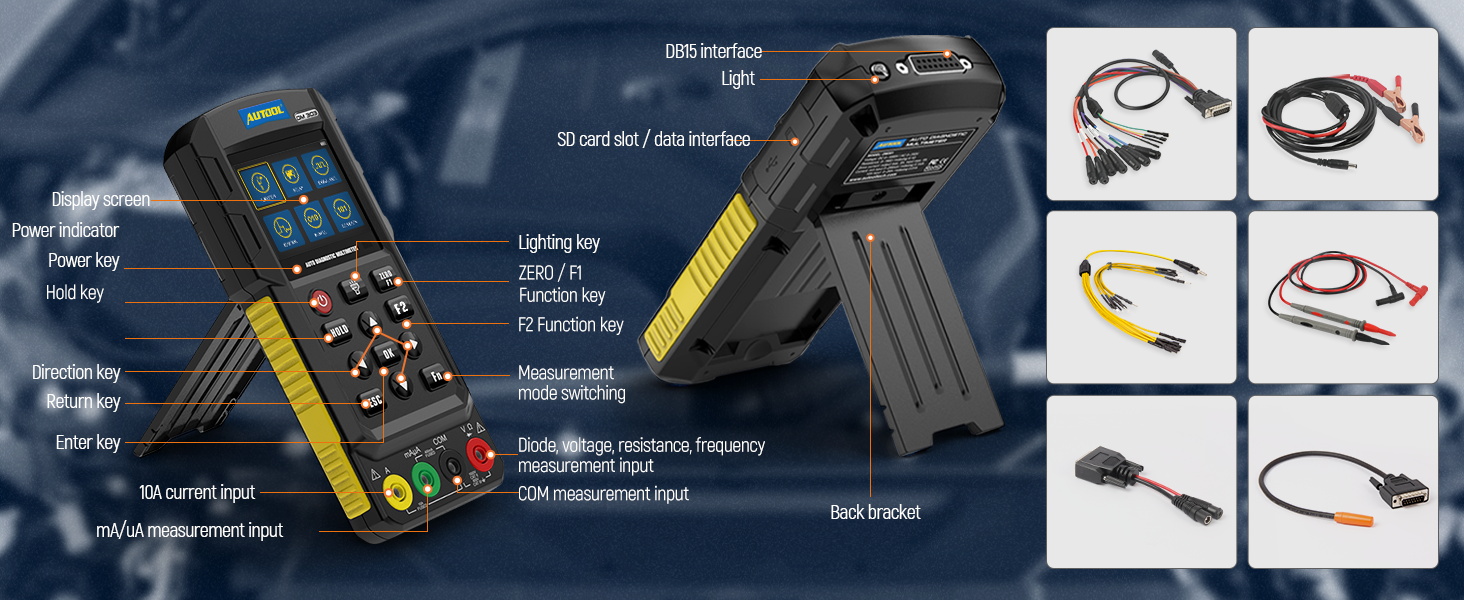
Figura 2.2: Parte dianteira e traseira view of the DM303 with key components labeled.
2.3 Configuración inicial
To begin using the DM303, ensure the device is powered on and test probes are correctly connected.
- Encendido: Press the power button to turn on the device. The screen will display the AUTOOL logo during startup.
- Connect Test Probes: Insert the red test probe into the VΩA jack (red) and the black test probe into the COM jack (black). For current measurements, connect the red probe to the mA/µA jack (green) for small currents or the 10A jack (yellow) for larger currents, and the black probe to the COM jack.
- Instalación da batería: The device uses AAA cells but has a socket for Li-Ion rechargeable batteries. Ensure batteries are correctly installed if not using the internal rechargeable option.
Video 2.3: Demonstrates powering on the device and connecting test probes for voltage measurement, including connecting to a car battery. This video shows the initial setup and basic voltage probas.
3. Instrucións de funcionamento
The AUTOOL DM303 offers various measurement modes accessible via the main menu. Use the directional keys and OK button to navigate and select functions.
3.1 Funcións do multímetro
The DM303 functions as a comprehensive digital multimeter with auto-ranging capabilities.

Figura 3.1: Exampos do voltage, current, and resistance measurements on the DM303 display.
3.1.1 voltagMedición (CA/CC)
Para medir voltage, select the "Voltmeter" (V) function from the main menu. The device will automatically detect AC or DC voltage. For AC voltage, press the Fn key to switch to AC measurement mode.
Video 3.1: Demonstrates how to measure alternating current (AC) voltage using the multimeter function, including connecting probes to an AC power source.
3.1.2 Medición de corrente (CA/CC)
Select the "Ammeter" (A) function. For small currents (mA/µA), connect the red probe to the green jack. For larger currents (up to 20A), connect the red probe to the yellow jack. Press F2 to switch between mA and 20A measurement modes.
Video 3.2: Illustrates the ammeter function for fuel pump inspection, showing how to measure current by inserting probes into the fuse box after removing the fuel pump fuse.
3.1.3 Medición de resistencia
Select the "Ohmmeter" (Ω) function to measure resistance. The device supports continuity circuit tests and diode tests.
Video 3.3: Demonstrates resistance measurement for remote key fob leakage detection, showing how to connect the probes to the key fob battery terminals and observe the standby current reading.
3.2 Función do osciloscopio
The oscilloscope function allows for waveform analysis of various automotive signals.

Figure 3.2: Oscilloscope display showing a waveform.
3.2.1 OBD Interface Testing
Use the oscilloscope function to test the OBD interface. Connect the test probes to the corresponding ports and observe the waveform while interacting with the vehicle (e.g., pressing the accelerator pedal) to identify abnormalities.
Video 3.4: Demonstrates using the oscilloscope function to test the OBD interface, showing waveform changes when the accelerator pedal is pressed.
3.2.2 Camshaft Detection
The oscilloscope can be used to detect camshaft signals. Start the engine and insert the red test probe into the power circuit, touching the contact parts to be tested. Use the up/down keys to adjust voltage display per grid and left/right keys to switch frequency for detailed waveform analysis.
Video 3.5: Illustrates camshaft detection using the oscilloscope, showing how to connect probes and adjust display settings to analyze the camshaft signal waveform.
3.3 Automotive Specific Tests
3.3.1 Proba de arranque
Perform a cranking test to evaluate the battery's starter system. Connect the device to the battery terminals and initiate the engine start sequence. The DM303 will display current, minimum voltage, and starting voltage to assess battery health and starting power.

Figure 3.3: Cranking test in progress, showing the device connected to the car battery.
3.3.2 Injector Test
The injector test function allows you to simulate engine speed to test fuel injectors. Connect the appropriate test lines to the injector and the DM303, then set the desired RPM to observe injector operation.

Figure 3.4: Injector test setup, simulating engine speed for diagnostic purposes.
3.3.3 Relay Test
Test automotive relays by connecting them to the DM303 using the appropriate wiring. The device can check the contact status and resistance of the relay.

Figure 3.5: Relay test in progress, part of a composite image demonstrating multiple automotive diagnostic functions.
3.3.4 Ignition Pulse Signal Test
Measure ignition pulse signals to diagnose ignition system issues. Connect the ignition pulse signal test line and observe the waveform on the oscilloscope display.
3.3.5 K-line & CAN Bus Signal Test
The DM303 can test K-line and CAN bus signals, providing data for network communication diagnostics in vehicles.
3.3.6 Automotive Lamp Circuit Simulation Testing
Simulate and test automotive lamp circuits to check for functionality and identify damaged components. Use the red test probe to touch the car lights circuit and output voltage to drive the electrical component.
Video 3.6: Demonstrates automotive lamp circuit simulation testing, showing how to connect the device and activate car lights to check for proper operation.
3.3.7 Analog Signal Output
The multimeter can output 5V square wave and 5Vpp sine wave signals with adjustable frequency (1Hz-10KHz) and duty cycle (10%-90%). This function is useful for testing various sensors and components that require a specific input signal.
Figure 3.6: Analog signal test in progress, part of a composite image demonstrating multiple automotive diagnostic functions.
4. Mantemento
- Limpeza: Limpe o dispositivo cun pano suave e seco. Non empregue produtos de limpeza abrasivos nin disolventes.
- Almacenamento: Store the DM303 in its carrying case in a cool, dry place away from direct sunlight and extreme temperatures.
- Coidado da batería: If the device uses removable batteries, remove them if the unit will not be used for an extended period to prevent leakage. For the internal rechargeable battery, ensure it is charged periodically to maintain its health.
- Coidados da sonda: Inspect test leads and probes regularly for any signs of wear, damage, or frayed insulation. Replace damaged components immediately to ensure accurate and safe operation.
- Actualizacións de software: Consulte o do fabricante websitio para ver se hai actualizacións de firmware dispoñibles para garantir un rendemento óptimo e o acceso a novas funcións.
5 Solución de problemas
If you encounter issues with your AUTOOL DM303, refer to the following common troubleshooting steps:
- O dispositivo non se acende:
- Ensure the battery is charged or correctly installed.
- Comprobe que o botón de acendido estea premido firmemente.
- Lecturas inexactas:
- Check that test probes are securely connected to the correct input jacks for the selected measurement type.
- Ensure the probes are making good contact with the circuit or component being tested.
- Verify the correct measurement mode is selected (e.g., AC vs. DC voltage, mA vs. 20A current).
- Clean the probe tips if they appear dirty or corroded.
- Sen visualización ou pantalla atenuada:
- Adjust the screen brightness setting in the device menu.
- Asegúrese de que a batería teña carga suficiente.
- Function Not Responding:
- Reinicie o dispositivo.
- Ensure the correct accessory cable (e.g., C04 Multi-functional Test Cable) is properly connected for specialized tests.
If troubleshooting steps do not resolve the issue, please contact AUTOOL customer support for further assistance.
6. Especificacións
| Especificación | Valor |
|---|---|
| Voltage Rango de medición | DC 0-1000V, AC 0-700V |
| Rango de medición actual | 0-20A, 0-200mA |
| Rango de medición de resistencia | 0-1 MΩ |
| Rango de medición de frecuencia | 1Hz-1MHz |
| Automotive Circuit Drive Current | 0-5A |
| Injector Drive Signal Output | 500-6000 RPM |
| Temperatura de traballo | 0°C-40°C (32°F-104°F) |
| Dimensións do produto | 10.23 x 7.87 x 4.33 polgadas |
| Peso do elemento | 3.7 libras |
| Fonte de enerxía | Alimentado por batería |

Figura 6.1: Representación visual das dimensións do produto e as especificacións clave.
7. Garantía e soporte
AUTOOL provides a Tres anos de garantía for the DM303 against any quality problems. If the product has any defect, AUTOOL will provide a new replacement or solutions without delay. Lifetime technical support is also provided.
For any needs or technical assistance, you are welcome to contact AUTOOL customer support. They aim to respond within 24 hours.