1. Información importante de seguridade
Please read and understand all instructions before installing or operating this fixture. Failure to follow these instructions may result in electric shock, fire, or other hazards that could cause personal injury or property damage.
- AVISO: Risco de descarga eléctrica. Desconecte a alimentación no fusible ou no disyuntor antes da instalación ou do mantemento.
- AVISO: Risk of fire. Keep combustible materials away from the lamp.
- This fixture is intended for indoor use only. Do not use in wet locations or where directly exposed to water.
- Asegurar a subministración voltage is compatible with the fixture's requirements (120V-277V).
- Todas as conexións de cableado deben facerse de acordo coas normas eléctricas locais e nacionais. Se non ten dúbidas sobre o cableado, consulte cun electricista cualificado.
- Non intente modificar nin desmontar o aparello. Non hai pezas no seu interior que o usuario poida reparar.
2. Que hai na caixa
Comprobe que todos os compoñentes estean presentes antes de comezar a instalación:
- Lámpada(s) LED para tendas
- Ferraxes de montaxe (parafusos, ancoraxes)
- Linking Cables (1.5" and 8" for daisy-chaining)
- Nuts de arame
3. Especificacións
| Característica | Especificación |
|---|---|
| Marca | Iluminación Sunco |
| Nome do modelo | LED Shop Light, 4ft Wraparound, Prismatic Lens, 8.5 Inch |
| Dimensións (L x W x H) | 48 cm de longo x 2.56 cm de ancho x 8.58 cm de alto |
| Wattage | 60 vatios |
| Brillo | 7200 lúmenes |
| Eficiencia | 120 LM/W |
| Temperatura de cor (CCT) | Seleccionable: 4000K, 5000K, 6000K |
| Voltage | 120 V-277 V |
| Regulable | Non (non regulable) |
| Material | Alloy Steel, Polycarbonate |
| Tipo de montaxe | Ceiling Mount (Flush Mount) |
| Características especiais | Linkable, Wide Beam Angle (110°) |
| Certificacións | ETL, FCC, RoHS |
| Vida Media | 50,000 horas |
The fixture features a durable build with an impact-resistant prismatic lens for wide and consistent light dispersion.

This image illustrates key features including impact resistance, the prismatic lens design, non-dimmable functionality, and the wide voltage compatibility of 120-277V.
4. Configuración e instalación
Follow these steps for proper installation. Ensure power is disconnected before starting.
4.1. Prepárese para a instalación
- Apague a enerxía: Locate the circuit breaker controlling the installation area and turn off the power.
- Eliminar o difusor: Gently remove the prismatic diffuser from the lamp base to access the internal components.
- Seleccionar a temperatura da cor (CCT): Before mounting, locate the CCT switch inside the fixture. Select your desired color temperature (4000K, 5000K, or 6000K). This setting cannot be changed easily after installation.

This image shows the internal CCT switch, allowing selection between 4000K, 5000K, and 6000K before installation.
4.2. Montaxe do aparello
The fixture is designed for flush mounting to a ceiling or surface. It includes keyhole slots for easy installation.
- Marcar puntos de montaxe: Hold the fixture in the desired mounting location and mark the positions for the mounting screws. Ensure these align with a junction box or suitable support structure.
- Instalar o hardware de montaxe: Drill pilot holes if necessary and install the provided mounting screws, leaving a small gap for the fixture to slide onto.
- Preparar o cableado: If connecting to a junction box, knock out the appropriate punch hole on the fixture's housing.

This diagram illustrates the three main steps for installation: securing the housing, connecting electrical wires, and attaching the light fixture.
4.3. Conexión eléctrica
- Conecte cables: Using the provided wire nuts, connect the fixture's wires to the supply wires: Live (black) to Live, Neutral (white) to Neutral, and Ground (yellow/green) to Ground. Ensure all connections are secure.
- Fíos de enganche: Carefully tuck all wires and wire nuts into the junction box or fixture housing.
4.4. Linking Multiple Fixtures (Daisy Chain)
This fixture supports daisy-chaining to extend lighting coverage. Use the provided linking cables.
- Connect Linking Cable: Insert one end of a linking cable into the designated port on the first fixture and the other end into the port on the next fixture.
- Conexións seguras: Ensure linking cables are securely connected and properly routed.
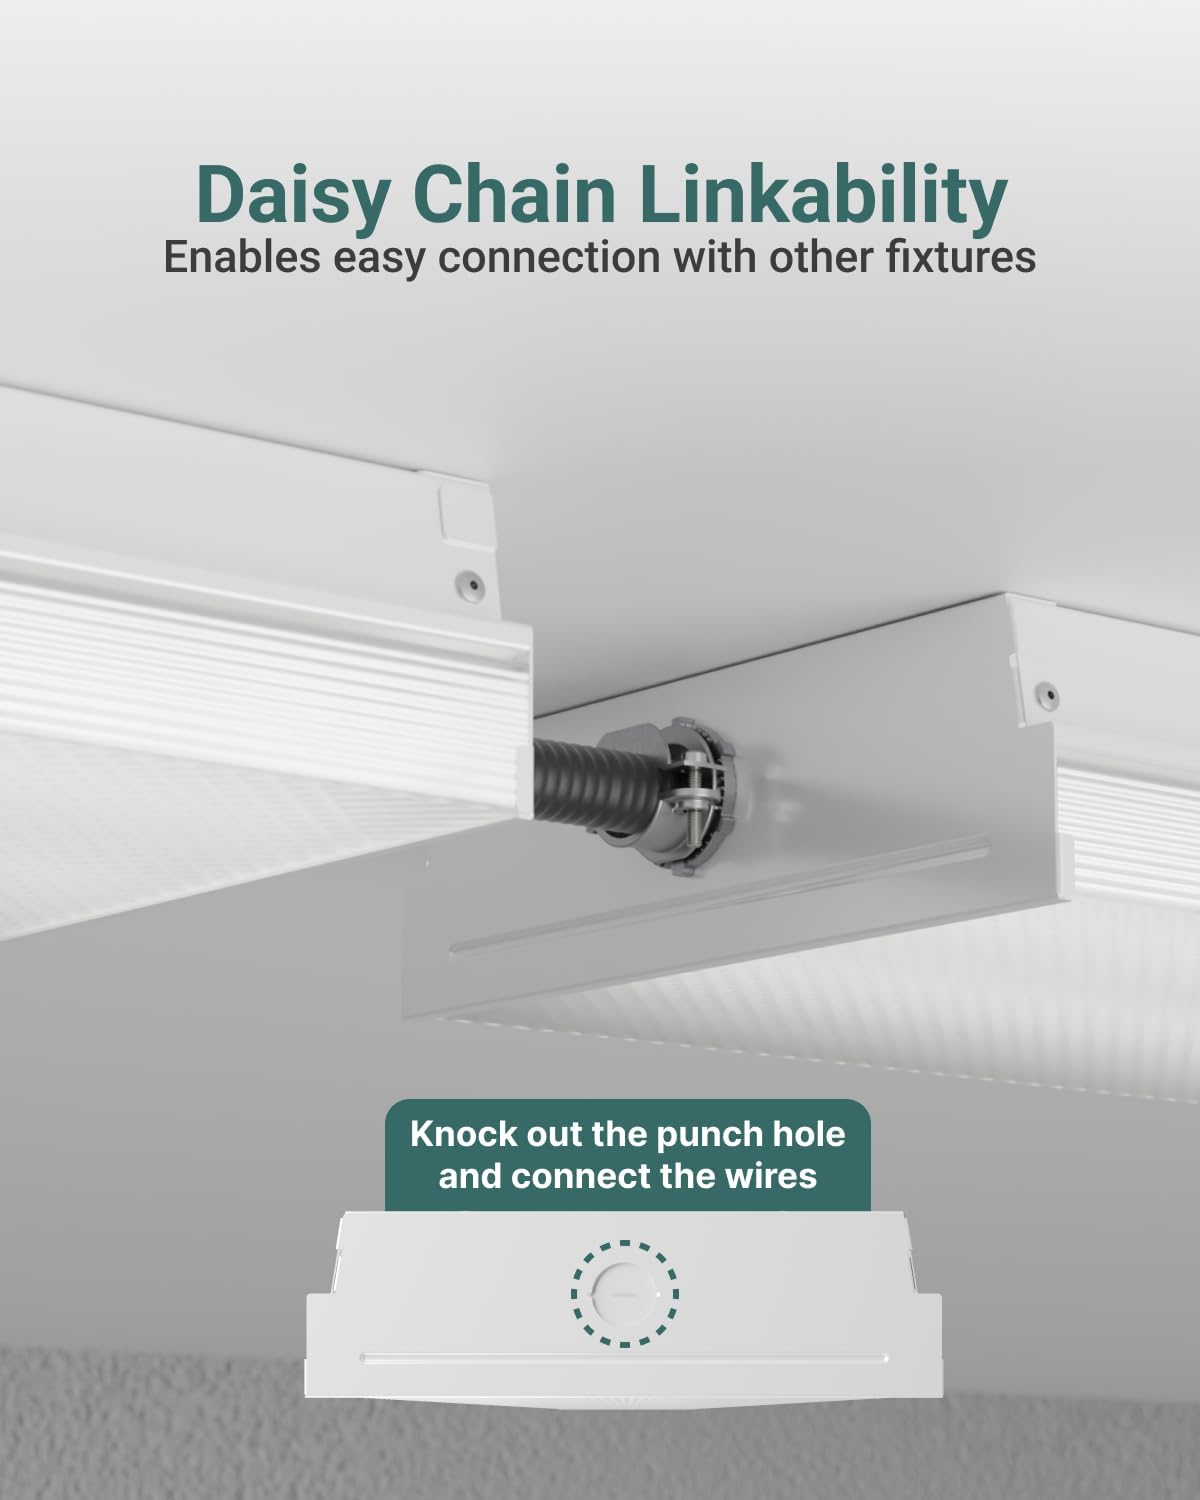
This image demonstrates how to daisy-chain multiple fixtures using the linking cables and highlights the knockout punch hole for electrical connections.
4.5. Pasos finais
- Reattach Diffuser: Align one end of the diffuser with the aluminum base and push it into place until it snaps securely.
- Restaurar enerxía: Turn the circuit breaker back on to restore power to the fixture.
5. Instrucións de funcionamento
The Sunco Lighting LED Shop Light is designed for straightforward operation once installed.
5.1. Selección da temperatura de cor (CCT)
This fixture features a selectable color temperature (CCT) switch, allowing you to choose between 4000K (Cool White), 5000K (Daylight), and 6000K (Bright White) to suit your preference or application. The CCT switch is located inside the fixture and must be set during installation before the diffuser is reattached.
- 4000K: Provides a neutral white light, suitable for offices or general workspaces.
- 5000K: Offers a bright, crisp daylight-like illumination, ideal for tasks requiring high visibility.
- 6000K: Delivers a very bright, cool white light, often preferred for industrial settings or areas needing maximum brightness.

This image displays the internal components and wiring, emphasizing the high efficiency of the LED fixture operating within a 120-277V range.
5.2. Acendido/apagado
The fixture is non-dimmable and operates via a standard wall switch connected to its power supply. Simply toggle the wall switch to turn the light on or off.
6. Mantemento
The Sunco Lighting LED Shop Light requires minimal maintenance. Always ensure power is disconnected before performing any maintenance.
- Limpeza: Limpe o exterior do aparello cun pano suave, seco ou lixeiramente húmidoamp cloth. Do not use harsh chemicals or abrasive cleaners, as these can damage the finish or lens.
- Inspección: Periodically inspect the fixture for any signs of damage, loose wiring, or wear. If any issues are found, disconnect power and consult a qualified electrician.
- Sen substitución de lámpadas: This fixture uses integrated LEDs, meaning there are no bulbs to replace. The LEDs are designed for a long lifespan of 50,000 hours.
7 Solución de problemas
If you experience issues with your LED Shop Light, refer to the following common troubleshooting steps:
- A luz non se acende:
- Comprobe o interruptor automático para asegurarse de que a alimentación está acendida.
- Verifique que todas as conexións dos cables estean seguras e sexan correctas.
- Asegúrese de que o interruptor de parede estea na posición de acendido.
- Parpadeos de luz:
- Confirm the fixture is not connected to a dimmer switch, as it is non-dimmable.
- Comprobe as conexións de cableado soltas.
- Asegurar a subministración voltage é estable e está dentro do rango especificado.
- Incorrect color temperature:
- The CCT switch must be set before installation. If the diffuser is already installed, carefully remove it to access and adjust the switch.
If these steps do not resolve the issue, contact Sunco Lighting customer support for assistance.
8. Garantía e soporte
Sunco Lighting avala a calidade dos seus produtos.
- Garantía: This product is backed by a 3-Year Warranty. Please refer to the official Sunco Lighting website or your purchase documentation for full warranty details and terms.
- Atención ao cliente: For technical assistance, troubleshooting, or warranty claims, please contact Sunco Lighting customer support.


