1. Introdución
This manual provides detailed instructions for the installation, operation, and maintenance of your Stinger Audio MT-1000.1M 1-Channel Monoblock Marine Audio Subwoofer Amplifier. Please read this manual thoroughly before attempting installation or operation to ensure proper use and to prevent damage to the unit or your audio system. Keep this manual for future reference.
2. Produto rematadoview
The Stinger Audio MT-1000.1M is a high-efficiency Class-D monoblock amplifier designed for marine environments. It delivers 1000 Watts RMS of power, optimized for subwoofer applications. Its robust, water-resistant design ensures reliable performance in challenging conditions.
Características principais:
- Monobloque dixital de clase D Ampmáis vivo: High efficiency and compact form factor.
- Deseño compacto e resistente: Built for lasting reliability.
- Fontes de alimentación robustas non reguladas: Designed for superior performance and efficiency.
- MOSFET de potencia HEXFET avanzado: Features reduced on-resistance, faster switching speeds, and enhanced reliability.
- Terminais de alimentación e altofalantes de inserción directa: Resistencia reducida para unha maior transferencia de potencia e eficiencia.
- Deseño resistente á auga: Protexe o amplifier against weather elements for uninterrupted performance.
- Potenciador de graves Q: Adjustable bass boost from 0dB to 12dB at a selected frequency.
- Remote Bass Knob Included: Flush-mount design for effortless bass level adjustment.

3. Información de seguridade
Observe sempre as seguintes precaucións de seguridade:
- Desconecte o terminal negativo da batería do vehículo antes de calquera instalación.
- Asegúrese de que haxa unha conexión a terra axeitada ao chasis do vehículo.
- Emprega un cableado do calibre axeitado para as conexións de alimentación, terra e altofalantes.
- Instala o amplifier in a well-ventilated area, away from direct heat sources.
- Evite montar o amplifier in locations where it may be submerged in water, despite its water-resistant rating.
- Consulta cun instalador profesional se tes algunha dúbida sobre algunha parte do proceso de instalación.
4. Que hai na caixa
Comprobe que todos os elementos estean presentes antes de comezar a instalación:
- Monobloque de 1000 vatios Amplifier (MT-1000.1M)
- Remote Level Control (Bass Knob)
- Hardware de montaxe
- Manual de instrucións
5. Identificación de compoñentes
Familiarizarse co amplifier's controls and connections.

5.1 Control Panel (Input Side)

- POWER/PRT/CLIP Indicators: LEDs indicating power status, protection mode, and signal clipping.
- REMOTE Port: RJ11 connection for the included remote bass level control.
- ENTRADA (RCA): Audio input from your head unit or source.
- BRIDGE IN/OUT (RCA): For linking multiple amplevantadores.
- Control GAIN: Adjusts the input sensitivity to match the output of your source unit.
- LPF (Low-Pass Filter) Control: Adjusts the upper frequency limit for the subwoofer. Range: 40Hz - 180Hz.
- Filtro SUBSONICO: Removes ultra-low frequencies below the audible range to protect the subwoofer. Range: OFF - 50Hz.
- FREQ (Bass Boost Frequency) Control: Selects the center frequency for the bass boost. Range: 30Hz - 80Hz.
- BOOST (Bass Boost Level) Control: Adjusts the level of bass boost. Range: 0dB - 12dB.
5.2 Terminal Panel (Output Side)

- GND (Ground) Terminal: Connects to the vehicle's chassis ground.
- REM (Remote) Terminal: Connects to the remote turn-on lead from your source unit.
- +12V (Power) Terminal: Connects to the positive terminal of the vehicle's battery via an inline fuse.
- MONO OUTPUT (Speaker Terminals): Connects to your subwoofer(s). Minimum impedance 1 Ohm.
6. Instalación
Proper installation is crucial for optimal performance and safety. Ensure all connections are secure and correctly polarized.
6.1 Localización de montaxe
Choose a mounting location that is secure, provides adequate ventilation, and is protected from excessive moisture. While the amplifier is water-resistant, direct exposure to heavy water spray or submersion should be avoided.

6.2 Conexións de cableado
- Potencia (B+): Connect a 4-gauge power cable from the +12V terminal of the amplifier directly to the positive terminal of the vehicle's battery. Install an appropriate inline fuse (100A recommended) within 18 inches of the battery.
- Terra (GND): Connect a 4-gauge ground cable from the GND terminal of the amplifier to a clean, bare metal point on the vehicle's chassis. Ensure a solid, low-resistance connection.
- Remoto (REM): Connect a 18-gauge remote turn-on wire from the REM terminal of the amplifier to the remote output of your head unit.
- Entrada RCA: Connect RCA cables from the subwoofer output of your head unit to the INPUT RCA jacks on the ampmáis vivo.
- Saída do altofalante: Connect your subwoofer(s) to the MONO OUTPUT terminals. Ensure the total impedance is not below 1 Ohm. Observe correct polarity (+ to + and - to -).
- Control remoto de graves: Conecte o botón de graves remoto á porta REMOTE do amplificador usando o cable fornecido.
7. Funcionamento
After installation, follow these steps to configure and operate your ampmáis vivo.
7.1 Initial Setup and Gain Adjustment
- Active o control de GANANCIA no amplifier to its minimum (counter-clockwise) position.
- Set your head unit's volume to about 75% of its maximum level.
- Play a dynamic piece of music with strong bass content.
- Aumente lentamente o control de GANANCIA no amplifier until you hear distortion, then back it off slightly until the sound is clear. The CLIP indicator should not illuminate continuously.
7.2 Configuración do filtro e do crossover
- LPF (filtro de paso baixo): Adjust the LPF control to set the upper frequency limit for your subwoofer. A common starting point is 80Hz-100Hz, but this may vary depending on your subwoofer and other speakers in your system.
- Filtro SUBSONICO: Set the SUBSONIC filter to protect your subwoofer from playing frequencies below its resonant frequency. A common setting is 25Hz-30Hz, or slightly below your subwoofer's tuning frequency if it's in a ported enclosure. If you have a sealed enclosure, you may set it to OFF or a very low frequency.
7.3 Reforzo de graves
- FREQ (Frecuencia de aumento de graves): Select the frequency at which you want the bass boost to be centered. This is typically between 30Hz and 80Hz, depending on the desired effect.
- BOOST (Nivel de aumento de graves): Adjust the level of boost from 0dB to 12dB. Use this sparingly to avoid distortion and potential damage to your subwoofer.
7.4 Botón de baixo remoto
The remote bass knob allows for convenient adjustment of the subwoofer output level from your listening position. It acts as a master volume for the subwoofer channel, allowing you to increase or decrease the bass intensity without affecting other ampconfiguración do lifier.
8. Mantemento
Un mantemento regular axuda a garantir a lonxevidade e o rendemento do seu ampmáis vivo.
- Limpeza: Limpar periodicamente o ampo exterior do lifador cun pano suave e seco. Evite o uso de produtos químicos agresivos ou produtos de limpeza abrasivos.
- Comprobación de conexión: Annually inspect all power, ground, remote, and speaker connections for corrosion or looseness. Tighten as necessary.
- Ventilación: Asegúrese de que o ampAs aletas de refrixeración do purificador están libres de obstrucións para permitir unha axeitada disipación da calor.
9 Solución de problemas
Se tes problemas co teu amplifier, refer to the following common problems and solutions.
| Problema | Causa posible | Solución |
|---|---|---|
| Sen alimentación / LED de alimentación apagado | Fusible fundido, cable de alimentación/terra/control remoto solto, sen sinal do control remoto. | Check inline fuse, verify all power connections, ensure head unit remote output is active. |
| LED de protección aceso | Speaker short circuit, impedance too low, overheating, DC offset. | Check speaker wiring for shorts, verify speaker impedance, ensure adequate ventilation, disconnect speakers and test. |
| Sen saída de audio | No input signal, incorrect gain setting, speaker wires disconnected. | Check RCA connections, adjust gain, verify speaker connections. |
| Son distorsionado | Ganancia demasiado alta, axustes de crossover incorrectos, mala conexión a terra. | Reduce gain, adjust LPF/Subsonic filters, check ground wire for secure connection. |
10. Especificacións
Detailed technical specifications for the Stinger Audio MT-1000.1M ampmáis vivo.
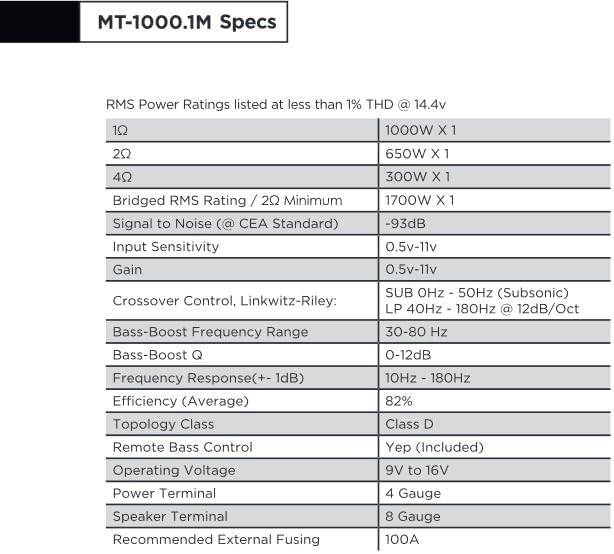
| Característica | Especificación |
|---|---|
| Potencia RMS (1Ω) | 1000W x 1 |
| Potencia RMS (2Ω) | 650W x 1 |
| Potencia RMS (4Ω) | 300W x 1 |
| Bridged RMS Rating (2Ω Minimum) | 1700W x 1 |
| Signal to Noise (CEA Standard) | -93 dB |
| Sensibilidade de entrada | 0.5V - 11V |
| Ganancia | 0.5V - 11V |
| Crossover Control (Linkwitz-Riley) | SUB 0Hz - 50Hz (Subsonic), LP 40Hz - 180Hz @ 12dB/Oct |
| Rango de frecuencia de refuerzo de graves | 30 Hz - 80 Hz |
| Bass-Boost Q | 0 - 12 dB |
| Resposta en frecuencia (+/- 1 dB) | 10 Hz - 180 Hz |
| Eficiencia (media) | 82 % |
| Clase de topoloxía | Clase D |
| Control remoto de graves | Si (incluído) |
| Vol. Operativotage | 9V a 16V |
| Terminal de alimentación | Contador 4 |
| Terminal de altofalantes | Contador 8 |
| Fusión externa recomendada | 100A |
| Peso do elemento | 6.14 libras |
| Dimensións do paquete | 14.5 x 7.8 x 3.2 polgadas |
| Data de primeira dispoñibilidade | 13 de marzo de 2024 |
| Fabricante | aguillón |
11. Garantía e soporte
11.1 Información da garantía
The Stinger Audio MT-1000.1M ampo lifier vén con a 1 ano de garantía from the date of purchase. Please retain your proof of purchase for warranty claims. The warranty covers manufacturing defects and workmanship under normal use. It does not cover damage caused by improper installation, accident, misuse, abuse, neglect, or unauthorized modification.
11.2 Atención ao cliente
For technical assistance, troubleshooting, or warranty inquiries, please contact Stinger Audio customer support. You can find more information and contact details by visiting the official STINGER brand store:


