1. Introdución
Thank you for choosing the Spacekey QIG-D01 Dehumidifier. This manual provides essential information for the safe and efficient operation of your new appliance. Please read it thoroughly before use and retain it for future reference. This dehumidifier is designed to reduce excess moisture in areas up to 850 square feet, such as basements, bedrooms, bathrooms, RVs, and closets, improving air quality and comfort.

Figura 1: Fronte view of the Spacekey QIG-D01 Dehumidifier, showing its white and black design with a digital display and visible water tank.

Figure 2: Visual representation of the dehumidifier's effectiveness in reducing room humidity.

Figure 3: Common issues resolved by maintaining optimal humidity levels with the dehumidifier.
2. Instrucións de seguridade importantes
Para reducir o risco de incendio, descarga eléctrica ou lesións, siga sempre estas precaucións básicas:
- Le todas as instrucións antes de usar o aparello.
- Non faga funcionar o deshumidificador cun cable ou unha ficha danados.
- Asegúrate de que a toma de corrente estea debidamente conectada á terra.
- Non bloquee as entradas ou saídas de aire.
- Manteña o aparello lonxe da auga e outros líquidos.
- Desconecte o deshumidificador antes de limpalo ou realizar calquera mantemento.
- Non permita que os nenos fagan funcionar o aparello sen supervisión.
- This appliance is equipped with a 45° tip-over protection feature. If the unit is tilted beyond 45 degrees, it will automatically shut off to prevent damage or spills.

Figure 4: Illustration of the dehumidifier's 45° tip-over protection, demonstrating automatic shutdown for safety.
3. Produto rematadoview
3.1 Components and Design Features
- Unidade principal con panel de control
- Water Tank (3.0L / 106 oz capacity)
- Filtro de aire lavable
- Cable de alimentación
- Integrated Handles for portability
- Visual Water Tank for easy monitoring
- 45° Tip-over Protection
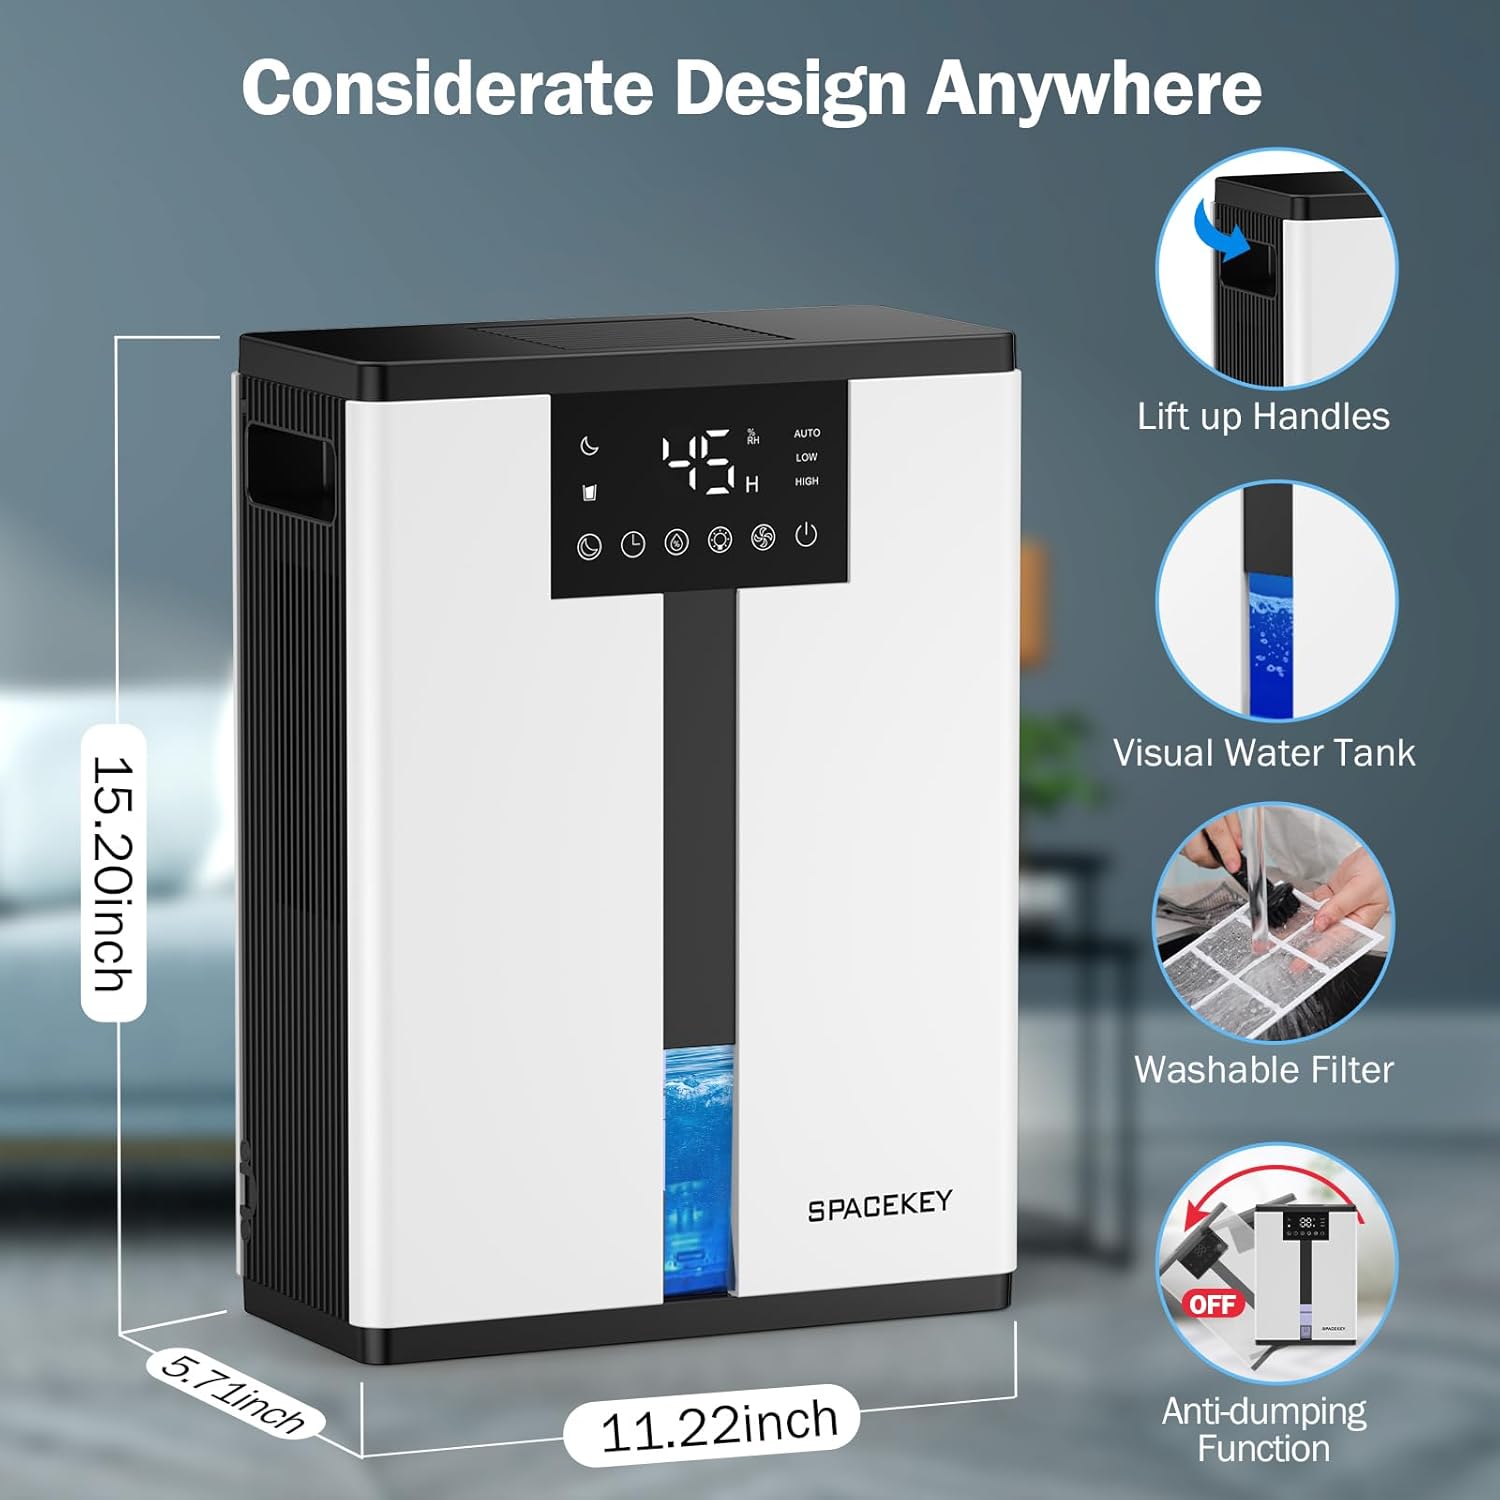
Figure 5: Key design elements and dimensions of the Spacekey QIG-D01 Dehumidifier.
3.2 Advanced Dehumidification Technology
The Spacekey QIG-D01 utilizes semiconductor condensation technology with dual fans and dual semiconductor condensers for enhanced efficiency in moisture removal.
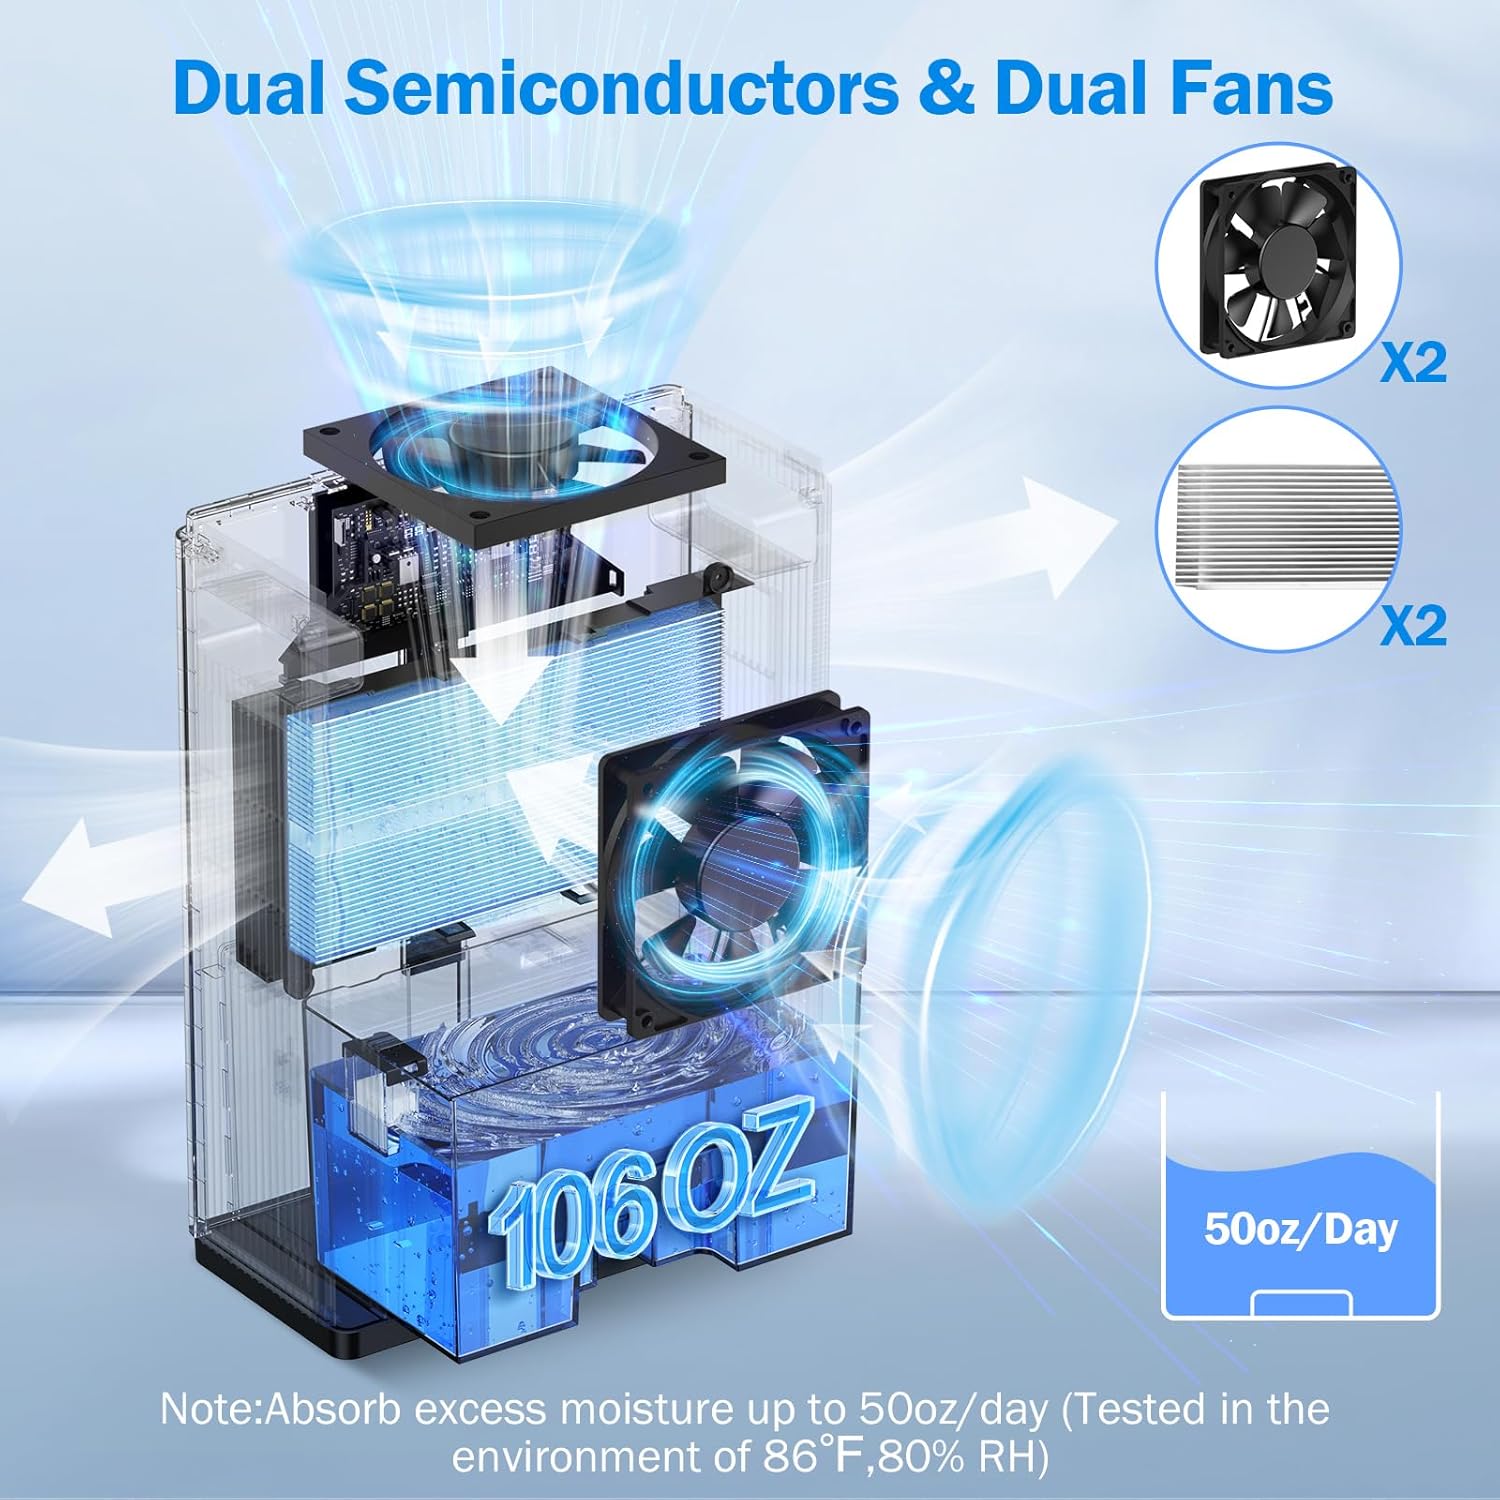
Figura 6: Interno view of the dual semiconductor and dual fan system for efficient dehumidification.
3.3 Panel de control
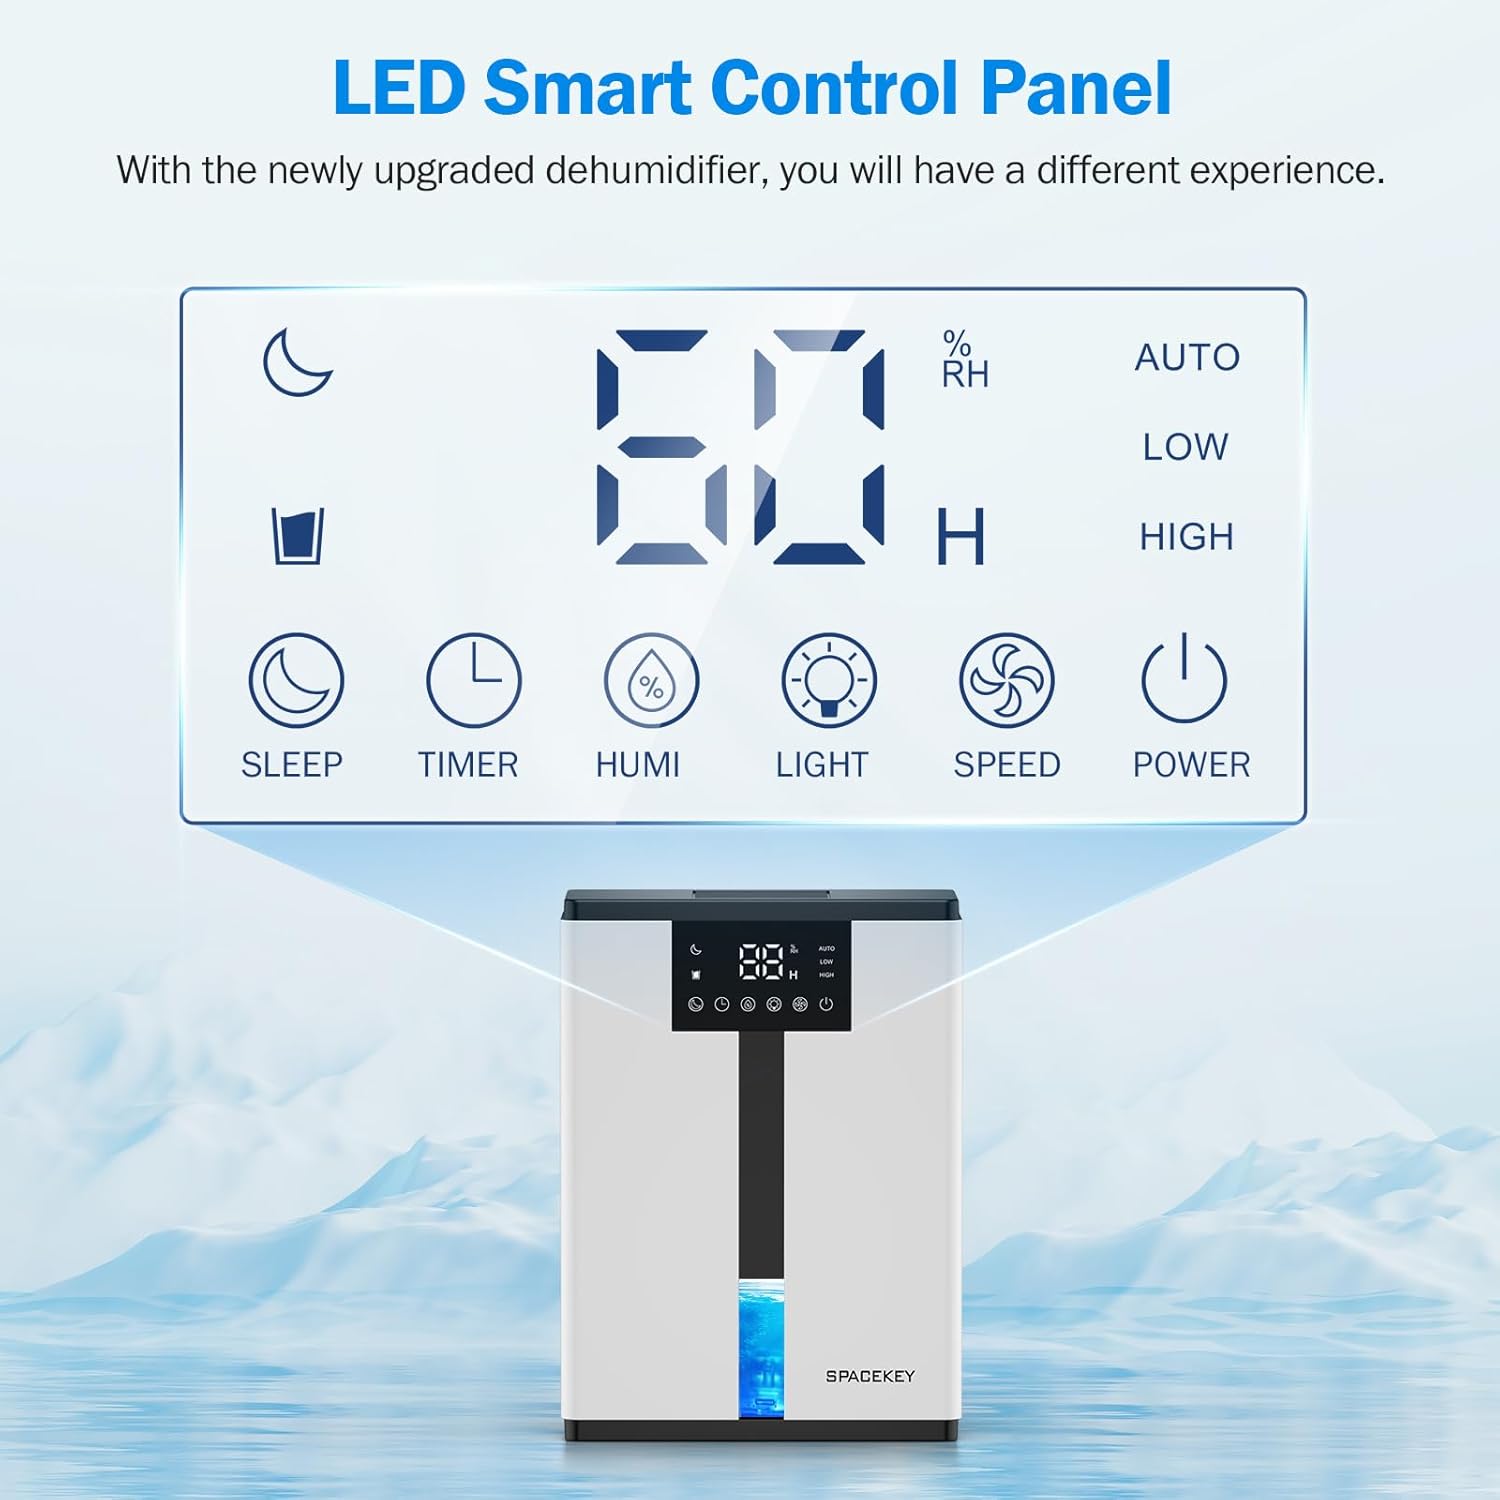
Figure 7: The LED Smart Control Panel, displaying current humidity and various function buttons.
The intuitive LED display shows real-time humidity. Buttons include:
- Modo de suspensión: Activates quiet operation and can be used with colorful lights.
- Temporizador: Sets operating duration (2H, 4H, 6H, 8H, 12H).
- HUMIDADE: Adjusts target humidity (45%, 55%, 65%, or continuous '00').
- LUZ: Controls the 7-color ambient light.
- VELOCIDADE: Selects fan speed (Auto, Low, High).
- POTENCIA: Acende / apaga a unidade.
4. Instrucións de configuración
- Desempaquetar: Retire con coidado o deshumidificador da súa embalaxe.
- Colocación: Place the unit on a flat, stable surface in the desired location. Ensure there is at least 8 inches (20 cm) of space around the air inlets and outlets for proper airflow.
- Conexión de alimentación: Enchufe o cable de alimentación a unha toma eléctrica conectada a terra.
- Verificación inicial: Ensure the water tank is correctly inserted and empty before starting operation.

Figure 8: Recommended placement areas for the dehumidifier, highlighting its suitability for various indoor environments.
5. Instrucións de funcionamento
5.1 Encendido/apagado
Preme o POTENCIA botón para acender ou apagar o deshumidificador.
5.2 Axuste do nivel de humidade
Preme o HUMI button to cycle through desired humidity levels: 45%, 55%, 65%. The unit will operate until the set humidity is reached, then pause. If set to '00', the unit will operate continuously.

Figure 9: Setting the target humidity level using the HUMI button.
5.3 Axuste da velocidade do ventilador
Preme o VELOCIDADE button to select between Auto, Low, and High fan speeds. Auto mode adjusts fan speed based on current humidity.
5.4 Función de temporizador
Preme o TEMPORIZADOR button to set an operating duration of 2, 4, 6, 8, or 12 hours. The unit will automatically turn off after the set time.

Figure 10: Using the Timer function to set the operating duration.
5.5 Sleep Mode & Colorful Lights
Preme o DURMIR button to activate sleep mode for ultra-quiet operation (approx. 30dB). Press the LUZ button to cycle through 7 colorful ambient lights or select a static color. This feature can be used independently or in conjunction with sleep mode.
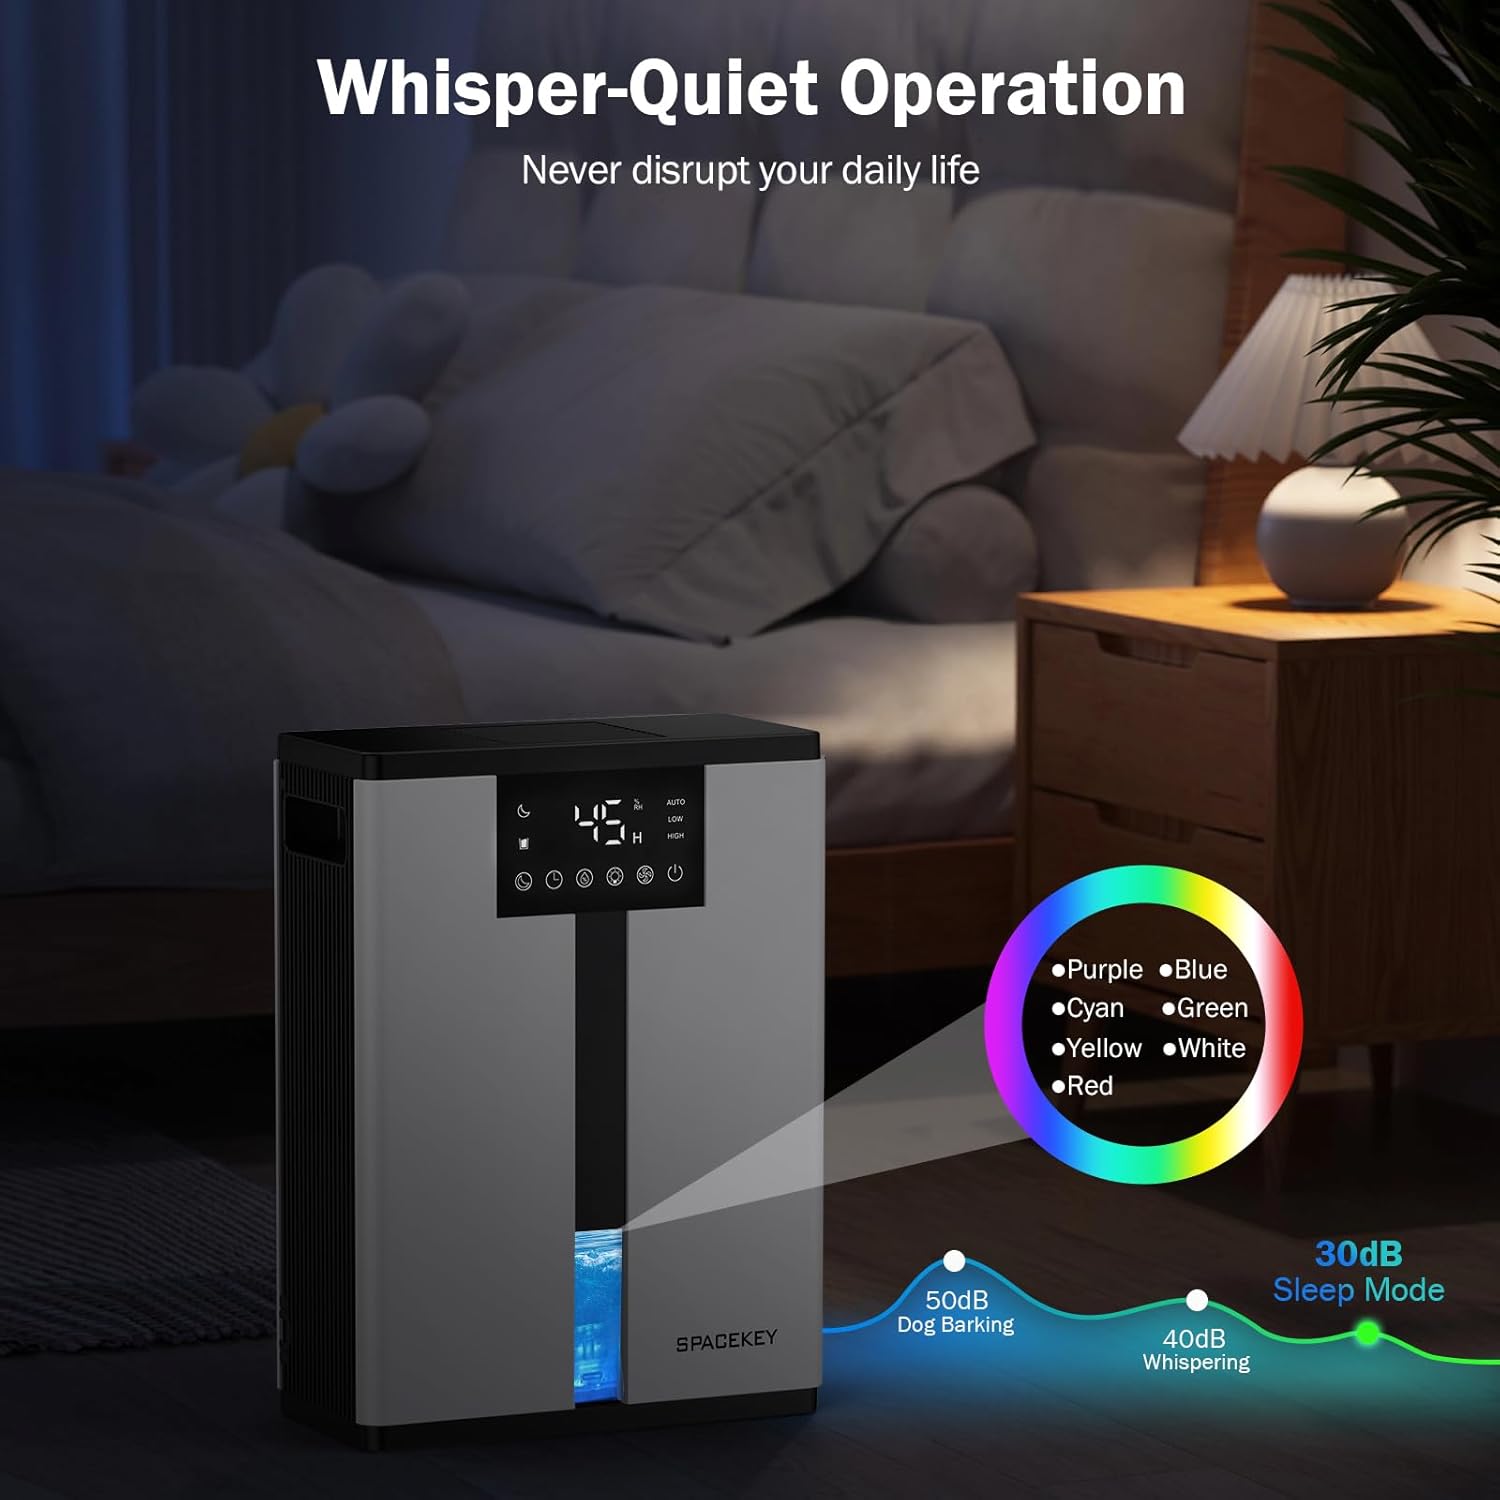
Figure 11: Dehumidifier in Sleep Mode with ambient lighting for a peaceful environment.
5.6 Apagado automático
The dehumidifier will automatically shut off and flash a red light with an audible beep when the water tank is full. Empty the water tank to resume operation.
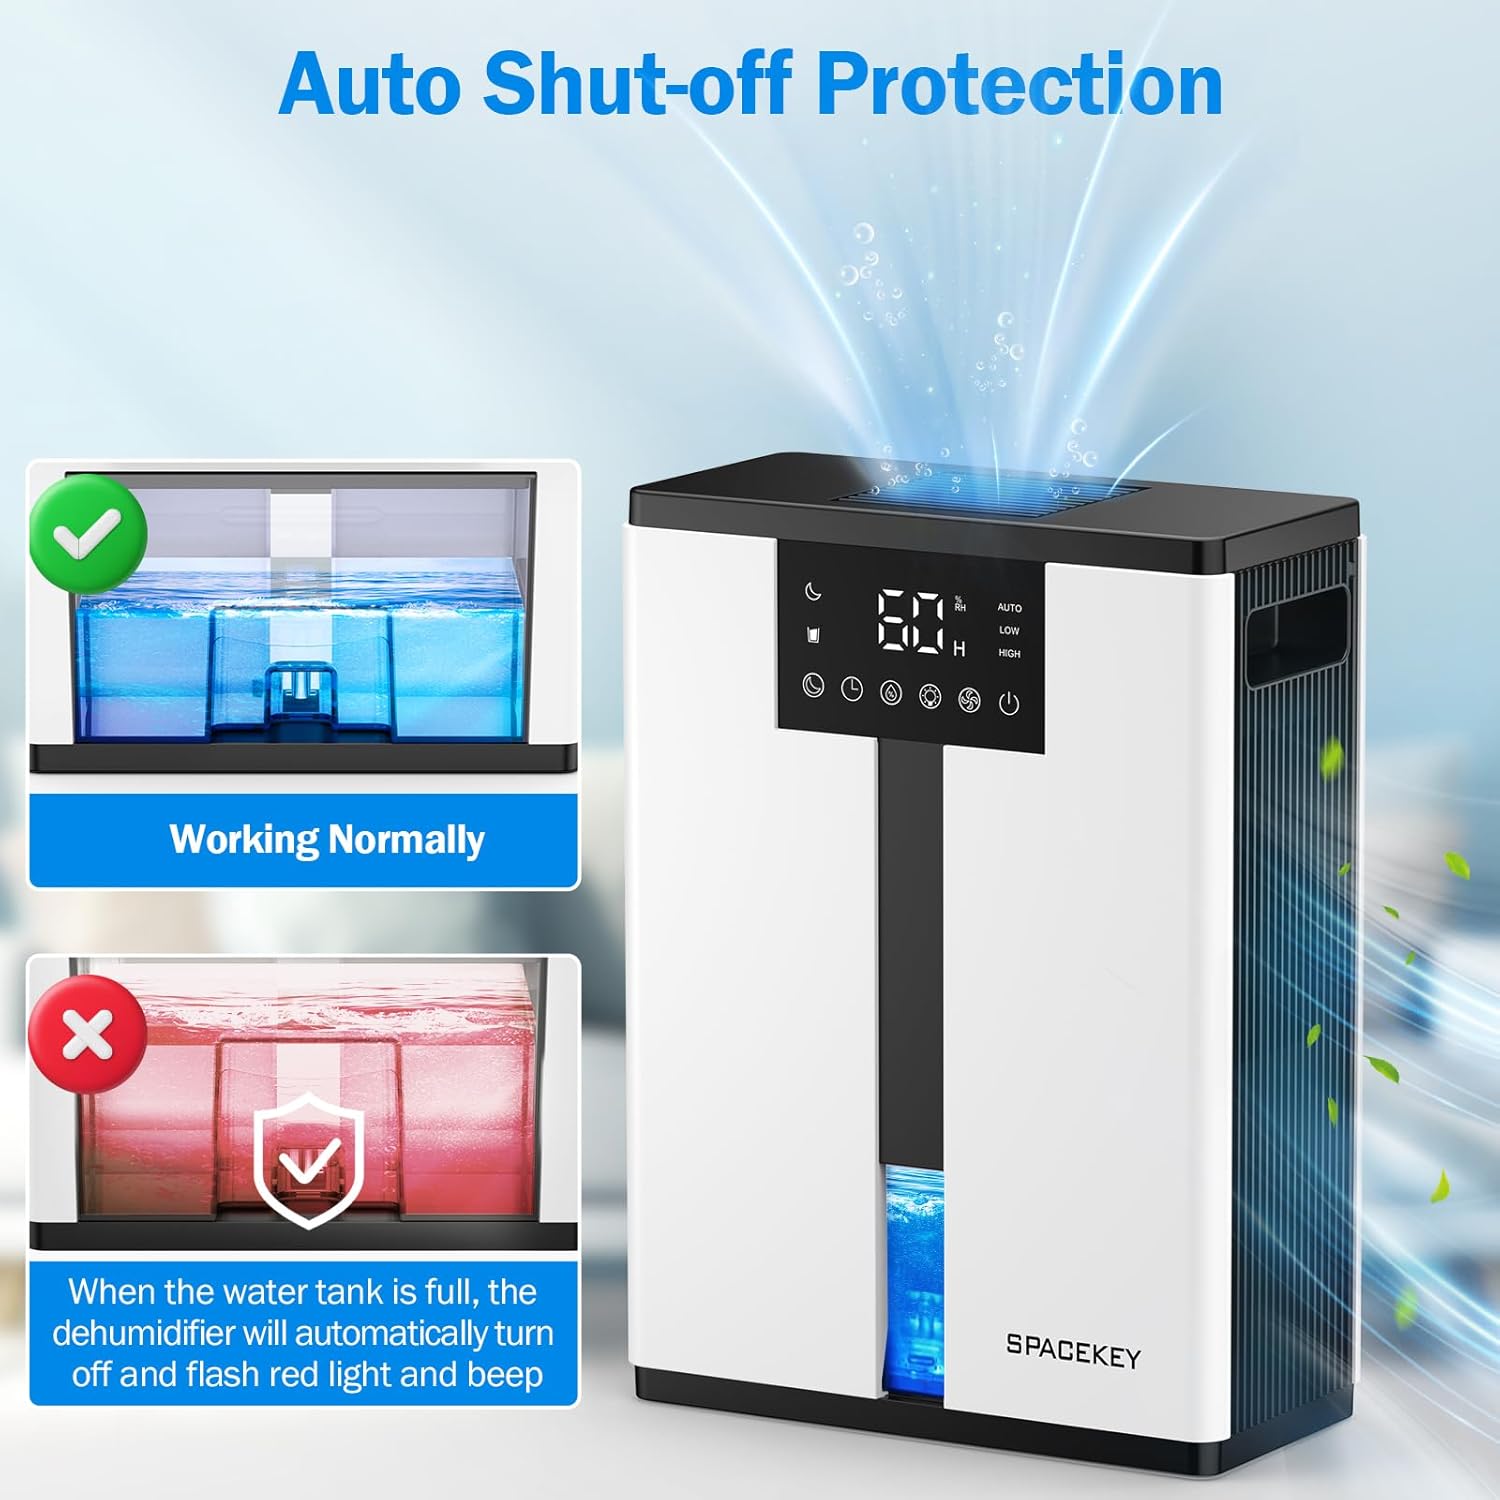
Figure 12: Automatic shut-off mechanism when the water tank is full.
6. Mantemento
6.1 Baleirado do depósito de auga
- Tire con coidado do depósito de auga pola parte dianteira da unidade.
- Retire a tapa do tanque.
- Despeje a auga recollida.
- Replace the lid and reinsert the water tank firmly into the dehumidifier.

Figure 13: Step-by-step guide to emptying the water tank.
6.2 Limpeza do filtro de aire
The washable filter should be cleaned regularly (every 2-4 weeks, depending on usage) to maintain optimal performance.
- Desenchufe o deshumidificador.
- Retire o filtro da parte traseira da unidade.
- Enxágüe o filtro baixo auga corrente para eliminar o po e os restos.
- Deixe que o filtro seque completamente ao aire antes de volvelo colocar.
- Non fagas funcionar o deshumidificador sen o filtro.

Figure 14: Instructions for removing and washing the air filter.
6.3 Limpeza do exterior
Limpe o exterior do deshumidificador cun suave, damp pano. Non use produtos de limpeza ou disolventes abrasivos.
7 Solución de problemas
| Problema | Causa posible | Solución |
|---|---|---|
| O deshumidificador non se acende. | No power; power cord not plugged in; water tank full or incorrectly inserted. | Check power connection; empty and reinsert water tank correctly. |
| Sen recollida de auga ou baixa deshumidificación. | Room humidity is already low; air filter is clogged; ambient temperature is too low; unit size is too small for the space. | Ensure humidity is above target; clean air filter; operate in recommended temperature range; consider unit placement or additional units for larger spaces. |
| A unidade é ruidosa. | Fan speed is set to High; unit is not on a flat surface. | Switch to Low or Sleep mode; ensure unit is on a stable, flat surface. |
| Red light flashing and beeping. | O depósito de auga está cheo. | Baleirar o depósito de auga e volver a colocalo. |
8. Especificacións
| Característica | Detalle |
|---|---|
| Nome do modelo | QIG-D01 |
| Marca | Tecla de espazo |
| Capacidade de deshumidificación | Up to 50 oz (approx. 3 pints) per 24 hours (at 86°F, 80% RH) |
| Capacidade do depósito de auga | 3.0 Liters (106 Fluid Ounces) |
| Área de cobertura | Ata 850 pés cadrados |
| Consumo de enerxía | 70 Watts (not more than 1.68 kWh/Day) |
| Nivel de ruído | Approx. 30dB (in Sleep Mode) |
| Dimensións (D x W x H) | 5.71" D x 11.22" W x 15.2" H |
| Peso do elemento | 8.91 libras |
| Características especiais | Automatic Shutoff, Intelligent Humidity Control, 4 Fan Speeds, Timer, 7 Colorful Lights, 45° Tip-over Protection, Washable Filter |
9. Garantía e atención ao cliente
Spacekey offers the following support for your dehumidifier:
- Reembolso de 30 días: For any dissatisfaction.
- Substitución de 2 anos: For product defects or malfunctions.
- Atención ao cliente de por vida: Dedicated support for any questions or issues.
If you have any questions or require assistance, please do not hesitate to contact Spacekey customer support. We aim to reply within 24 hours.


Figura 15: Máisview of Spacekey's customer support and warranty policies.


