1. Introdución
This manual provides detailed instructions for the safe and effective use of your KKnoon Digital Multimeter, specifically focusing on the FY128 model. This compact and intelligent electrical tester is designed for accurate measurements of various electrical parameters, making it suitable for professionals, educational institutions, and home users. It adheres to the safety requirements of the International Electrotechnical Safety Standard (IEC-61010) for electronic measuring instruments.
The multimeter features a 5999-count backlit LCD for clear readings, along with functions for AC/DC voltage, resistance, frequency, continuity, live wire checking, and Non-Contact VoltagDetección de e (NCV).

Figura 1: Fronte view of the KKnoon Digital Multimeter (Model FY128) showing the display and control buttons.
2. Información de seguridade
To ensure safe operation and prevent damage to the meter, please read and follow all safety instructions carefully. Improper use can result in electric shock or damage to the instrument.
- Always verify the meter's functionality before use by testing a known voltage ou fonte actual.
- Non exceda os valores de entrada máximos especificados para cada rango de medición.
- Ensure test leads are in good condition, free from cracks or damaged insulation, before connecting them to any circuit.
- Never use the meter if it appears damaged or if the casing está aberto.
- Teña extrema precaución ao traballar co voltagpor riba de 30 V CA RMS, 42 V pico ou 60 V CC. Estes voltagsupoñen un perigo de descarga.
- Retire os cables de proba do circuíto antes de cambiar as funcións ou os rangos.
- Substitúa as pilas inmediatamente cando apareza o indicador de pila baixa para garantir lecturas precisas.
- Non opere o medidor en ambientes con gases explosivos, vapores ou po.
3. Características do produto
The KKnoon Digital Multimeter offers a range of features designed for convenience and accuracy:
- Multifuncionalidade: Medidas AC/DC Voltage, Resistance, Frequency, Continuity, Live Wire Checking, and NCV (Non-Contact Voltage).
- Two Measurement Modes:
- Auto Identification: Automatically detects and measures AC/DC voltage, frequency, resistance, and continuity.
- Cambio manual: Allows selection of specific functions including AC/DC voltage, frequency, resistance, continuity, diode, capacitance (FY129C only), and LIVE NCV.
- Retención de datos: Lock the current measurement reading on the display with a single button press.
- Pantalla LCD grande: Provides clear and easy-to-read values with a 5999-count resolution.
- Flashlight & Screen Backlight: Mellora a visibilidade en condicións de pouca luz.
- Compact Design with Bracket: Portable and includes a built-in support bracket for hands-free operation.
- Conformidade de seguridade: Designed and produced according to IEC-61010 safety standards.

Figure 2: The multimeter's large LCD display clearly shows various measurement functions.

Figure 3: The integrated support bracket allows for convenient hands-free use.
4. Contido do paquete
Upon opening your package, please verify that all items listed below are present and in good condition:
- 1 x KKnoon Digital Multimeter (Model FY128)
- 1 par de cables de proba (vermello e negro)
- 1 Manual de usuario (inglés)
5. Configuración
5.1 Instalación da batería
The multimeter requires 2 x 1.5V AAA batteries (not included). To install or replace batteries:
- Asegúrese de que o multímetro estea apagado e que os cables de proba estean desconectados.
- Localiza a tapa do compartimento da batería na parte traseira do dispositivo.
- Use un desaparafusador para abrir o compartimento da batería.
- Introduza dúas pilas AAA de 1.5 V, respectando a polaridade correcta (+/-) tal como se indica no interior do compartimento.
- Coloque a tapa do compartimento da batería e fíxaa co parafuso.
5.2 Conexión dos cables de proba
The multimeter comes with a pair of test leads (red and black). Connect them as follows:
- Insira o cable de proba negro na toma de entrada "COM" (común).
- Insert the red test lead into the 'INPUT' jack for most measurements (Voltage, Resistance, Frequency, Continuity, Diode, Capacitance).

Figure 4: Labeled diagram of the multimeter's functions and input jacks.
6. Instrucións de funcionamento
6.1 Encendido/apagado
Prema o botón vermello de acendido (Botón de acendido) to turn the multimeter on or off. The device features an auto-shutdown function to conserve battery life after a period of inactivity.
6.2 Modos de medición
The multimeter offers two primary measurement modes:

Figure 5: The multimeter supports both auto identification and manual switching modes.
- Auto Identification Mode: When powered on, the meter defaults to auto identification. In this mode, it automatically detects and measures AC/DC voltage, frequency, resistance, and continuity. Simply connect the test leads to the circuit, and the meter will display the relevant measurement.
- Modo de conmutación manual: To access specific functions not covered by auto identification or to manually select a range, press the 'NCV/LIVE' button (or other function buttons if available on your specific model, e.g., FY129C for Diode/Capacitance). This allows you to cycle through AC/DC voltage, frequency, resistance, continuity, LIVE, and NCV.
6.3 Medición AC/DC Voltage
- Connect the black test lead to the 'COM' jack and the red test lead to the 'INPUT' jack.
- If in auto identification mode, the meter will automatically detect voltage. If in manual mode, select the appropriate AC or DC voltage función.
- Conecte os cables de proba en paralelo a través do compoñente ou circuíto que se vai medir.
- Le o voltago valor da pantalla LCD.
6.4 Medición da resistencia
- Asegúrese de que o circuíto estea desenergizado antes de medir a resistencia.
- Connect the black test lead to 'COM' and the red test lead to 'INPUT'.
- If in auto identification mode, the meter will automatically detect resistance. If in manual mode, select the resistance function (Ω).
- Conecte os cables de proba ao compoñente cuxa resistencia desexe medir.
- Lea o valor da resistencia na pantalla LCD.
6.5 Frecuencia de medición
- Connect the black test lead to 'COM' and the red test lead to 'INPUT'.
- If in auto identification mode, the meter will automatically detect frequency. If in manual mode, select the frequency function (Hz).
- Conecte os cables de proba ao circuíto onde se vai medir a frecuencia.
- Lea o valor da frecuencia na pantalla LCD.
6.6 Proba de continuidade
- Asegúrate de que o circuíto estea desenergizado.
- Connect the black test lead to 'COM' and the red test lead to 'INPUT'.
- If in auto identification mode, the meter will automatically detect continuity. If in manual mode, select the continuity function (★)).
- Toque os cables de proba nos dous puntos do circuíto ou compoñente que quere probar.
- A continuous beep indicates a low resistance path (continuity). The display will show the resistance value.
6.7 Live Wire Checking
This function helps identify live AC wires.
- Connect the black test lead to 'COM' and the red test lead to 'INPUT'.
- Press the 'NCV/LIVE' button until 'LIVE' is indicated on the display.
- Insert the red test lead into the socket or touch it to the wire you suspect is live.
- The meter will beep and the display will indicate 'LIVE' if a live wire is detected.
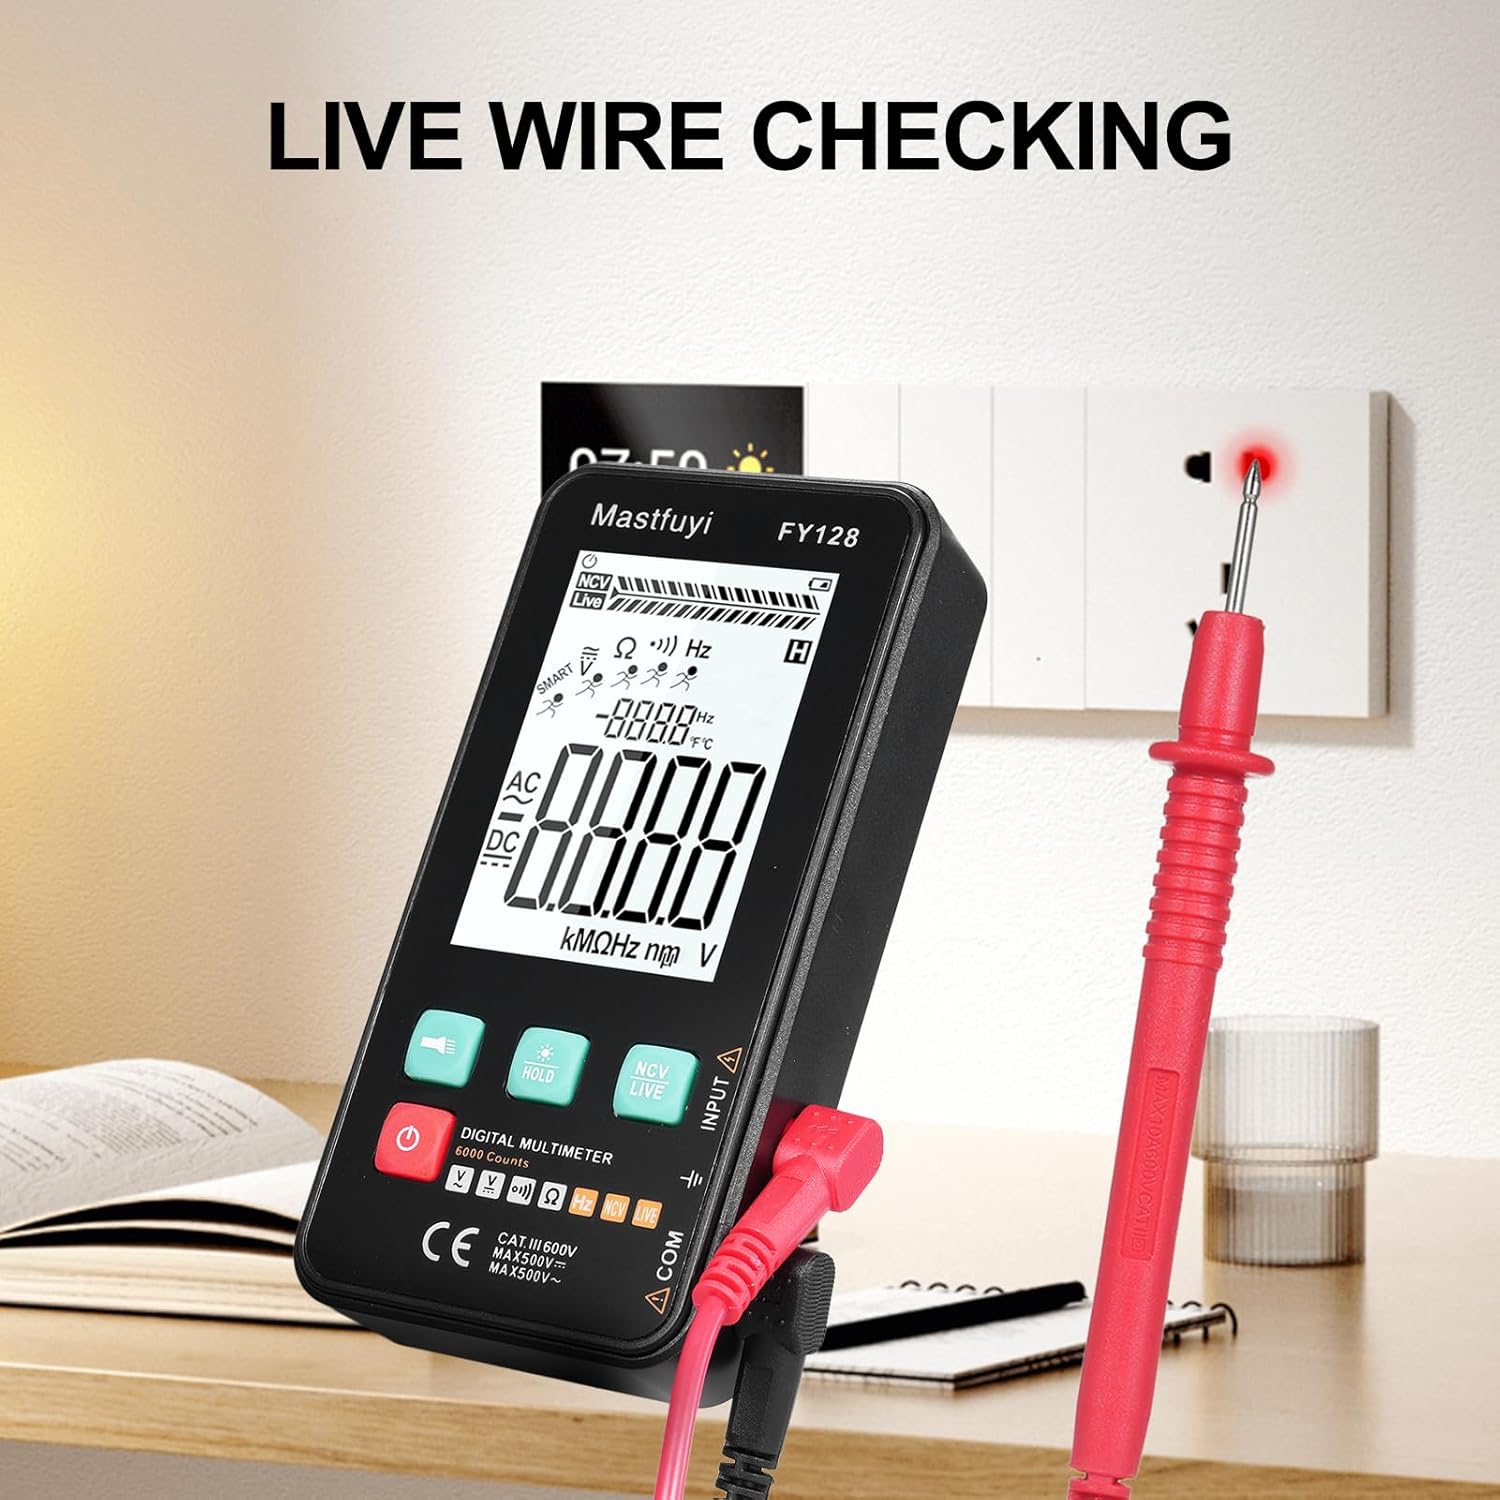
Figure 6: Using the multimeter for live wire detection.
6.8 NCV (Volumen sen contacto)tage) Proba
A función NCV permite a detección do volume de CAtage sen contacto directo.
- Press the 'NCV/LIVE' button until 'NCV' is indicated on the display.
- Bring the top front part of the multimeter close to the wire or electrical outlet.
- The meter will beep and the NCV indicator on the display will illuminate or increase in intensity as it detects AC voltage.

Figura 7: Vol. sen contactotage (NCV) detection in progress.
6.9 Función de retención de datos
To freeze the current reading on the display, press the 'HOLD' button. Press it again to release the hold and resume live measurements.
6.10 Flashlight & Backlight
Press the flashlight button (🔦) to turn on the built-in flashlight. Long press the 'HOLD' button to activate the screen backlight for improved visibility in dark environments.
7. Mantemento
7.1 Substitución da batería
Cando apareza o indicador de batería baixa na pantalla, substitúa as baterías segundo o descrito na Sección 5.1. Empregue sempre baterías AAA novas de 1.5 V.
7.2 Limpeza
Para limpar o multímetro, limpe a carcasa con sprayamp un pano e un deterxente suave. Non empregue abrasivos nin disolventes. Asegúrese de que o dispositivo estea completamente seco antes de usalo.
7.3 Almacenamento
If the multimeter is not used for an extended period, remove the batteries to prevent leakage and corrosion. Store the device in a cool, dry place, away from direct sunlight and extreme temperatures.
8 Solución de problemas
Se tes problemas co teu multímetro, consulta os seguintes problemas e solucións comúns:
| Problema | Causa posible | Solución |
|---|---|---|
| Sen pantalla ou pantalla escura | Baterías baixas ou gastadas; instalación incorrecta da batería | Substituír as baterías; comprobar a polaridade das baterías |
| Lecturas inexactas | Low batteries; Damaged test leads; Incorrect function selected | Replace batteries; Inspect/replace test leads; Select correct measurement function |
| Continuity test does not beep | Open circuit; High resistance; Incorrect function | Ensure circuit is closed; Check for breaks; Select continuity function |
| O contador non responde | Frozen display (Data Hold); Internal fault | Press 'HOLD' button to release; Contact customer support if issue persists |
9. Especificacións
The following specifications apply to the KKnoon Digital Multimeter Model FY128 (and FY128C, unless specified for FY129C):
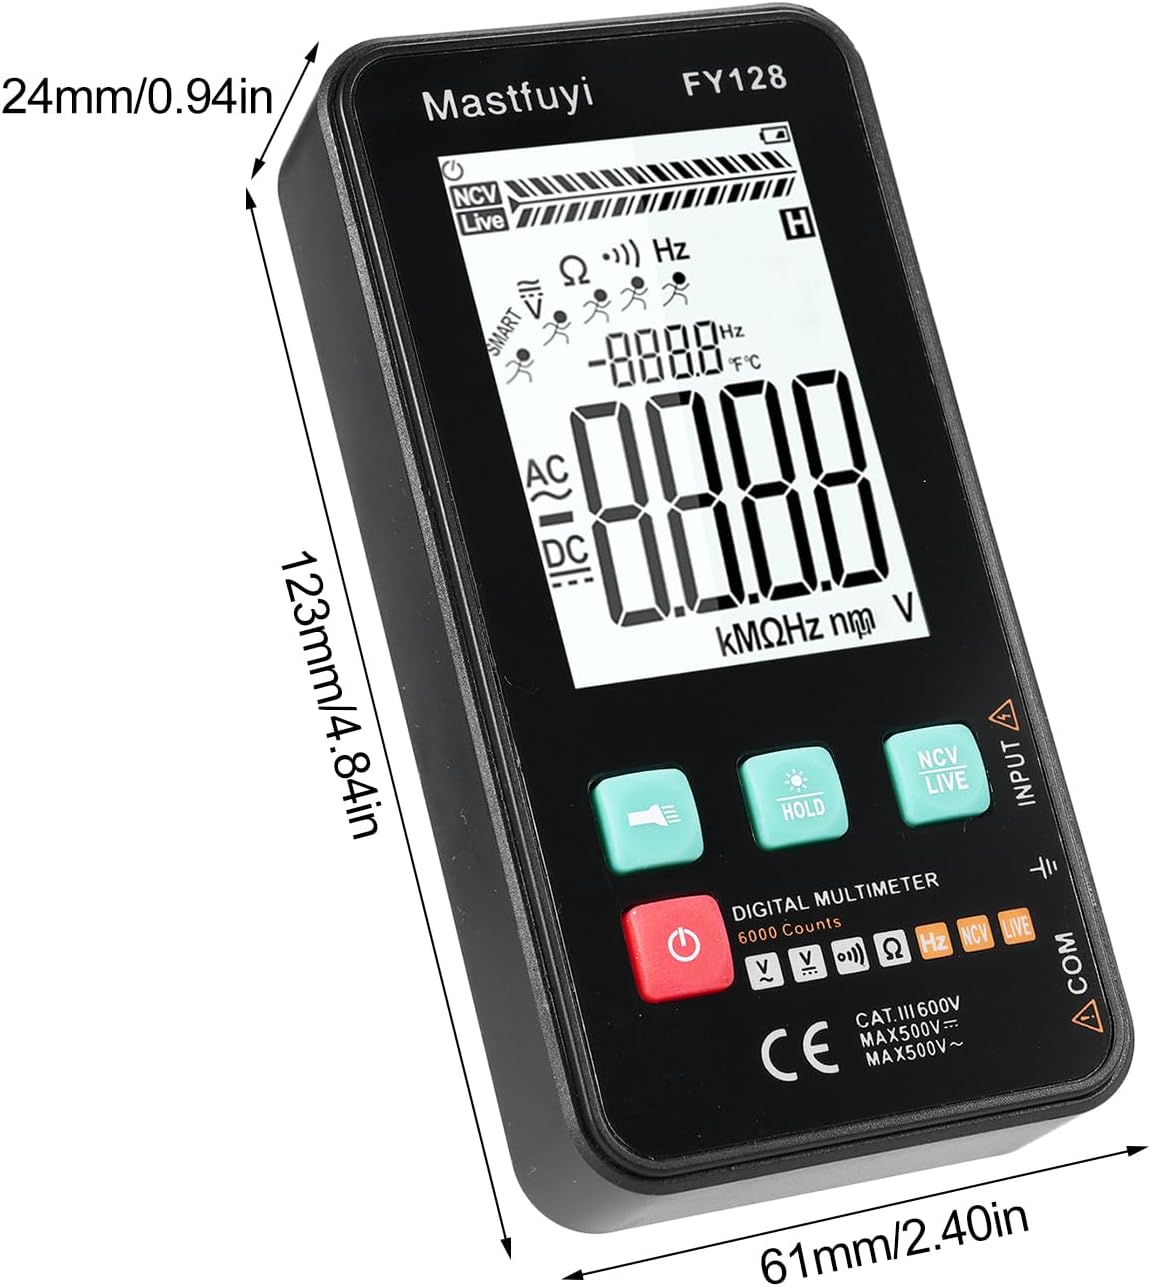
Figure 8: Physical dimensions of the KKnoon Digital Multimeter.
| Parámetro | Specification (FY128/FY128C) | Specification (FY129C - if different) |
|---|---|---|
| Vol. ACtage | 1V~500V, ±(1.5%+3) | 0.8V~500V, ±(1.5%+5) |
| DC Voltage | 0.5V~500V, ±(1.2%+5) | 0.8V~500V, ±(1.2%+5) |
| Resistencia | 30Ω~10000KΩ, ±(2%+5) | 30Ω~60000KΩ, ±(2%+5) |
| Frecuencia | 40Hz~1000Hz, ±(2.5%+5) | 10Hz~6000Hz, ±(2.5%+5) |
| Capacitancia | N/A | 6nf~60000µf, ±(2.5%+5) |
| Temperatura | N/A | -20℃~1000℃, ±(5%+4) |
| Temperatura ambiente | N/A | 0 ℃ ~ 70 ℃ |
| Diodo | Non | Si |
| Continuidade | Si | Si |
| NCV | Si | Si |
| Live Wire Checking | Si | Si |
| Apagado automático | Si | Si |
| Fonte de alimentación | 2 * 1.5V AAA batteries (Not included) | 2 * 1.5V AAA batteries (Not included) |
| Tamaño do elemento | 123 * 61 * 24 mm / 4.84 * 2.40 * 0.94 polgadas | 123 * 61 * 24 mm / 4.84 * 2.40 * 0.94 polgadas |
| Peso do elemento | 113 g / 3.98 oz | 113 g / 3.98 oz |
10. Garantía e soporte
For warranty information or technical support, please refer to the product packaging or contact your retailer. Keep your purchase receipt as proof of purchase. For general inquiries, you may visit the KKnoon brand page on Amazon.
