Introdución
Thank you for choosing the GOCHIFIX Laser Level with Tripod. This precision tool is designed to assist with various indoor projects, providing accurate horizontal and vertical lines for tasks such as picture hanging, tile installation, and construction. This manual provides essential information for safe operation, setup, maintenance, and troubleshooting to ensure optimal performance and longevity of your device.
Contido do paquete
Verifique que todos os elementos que se indican a continuación estean incluídos no seu paquete:
- Green Cross Laser Level
- Trípode extensible
- Bolsa de almacenamento portátil
- 2 pilas AA
- Manual de usuario

Image: Contents of the GOCHIFIX Laser Level package.
Características do produto
- Green Laser Technology: Features a sharp 520 laser from Japan, offering twice the brightness of traditional red lasers. Working range up to 100ft with an accuracy of ±1/9 inch at 32.8 feet. Laser brightness is adjustable to two levels.
- Bonus Laser Level Tripod: The included tripod is adjustable in height from 8.34 inches to 23.6 inches, suitable for various needs. It features a stable pan head for tilt and multi-angle rotation, and a standard 1/4'' quick-release plate for easy setup.
- Self-Levelling Cross Line Laser Level: Automatically levels within ±4°. An alarm sounds if the tilt exceeds 4°.
- Modo manual: Allows for multi-angle lock line projection when self-leveling is not required.
- Tempo de operación ampliado: Powered by 2 AA batteries for seamless and continuous use, with easy battery replacement.
- Deseño de protección de seguridade: IP54 protection level ensures the device is waterproof, dustproof, and drop-proof. Features 80% large-area vinyl wrapping for enhanced durability.

Image: Demonstrating the sharp green laser diode and its working range.

Image: Illustrating the IP54 protection level of the laser level.
Configuración
Instalación de baterías
- Locate the battery compartment on the rear of the laser level.
- Open the battery cover by sliding it or pressing the latch.
- Insira 2 pilas AA, asegurándose de manter a polaridade correcta (+/-) como se indica no interior do compartimento.
- Pecha a tapa da batería de forma segura.

Image: Battery compartment and battery insertion.
Montaxe de trípode
- Desprega as patas do trípode e esténdeas á altura desexada. Asegura os peches das patas.
- Ensure the tripod head is level using the integrated bubble level indicator.
- Attach the laser level to the tripod's 1/4'' quick-release plate by screwing it into the threaded mount on the bottom of the laser level.
- Secure the quick-release plate to the tripod head.

Image: Tripod features and height adjustment.
Modos de funcionamento
Modo de autonivelación
This mode is ideal for applications requiring perfectly level or plumb lines. The device will automatically adjust itself within a ±4° range.
- Slide the ON/OFF switch to the "unlocked" position (usually indicated by an open padlock icon or a specific symbol).
- The laser will emit lines and self-level. If the device is tilted beyond ±4°, the laser lines will flash and an alarm may sound, indicating it is out of level. Adjust the device's position until the lines become stable and the alarm stops.
- Press the power button briefly to cycle through horizontal line, vertical line, or both.
Modo manual
Use this mode when you need to project lines at a specific angle, such as for staircase railings or decorative patterns.
- Slide the ON/OFF switch to the "locked" position (usually indicated by a closed padlock icon or a specific symbol).
- Press and hold the power button for approximately 3 seconds to activate the laser.
- The laser lines will be locked, allowing you to tilt the device to any desired angle without triggering the out-of-level alarm.
- Press the power button briefly to cycle through horizontal line, vertical line, or both.
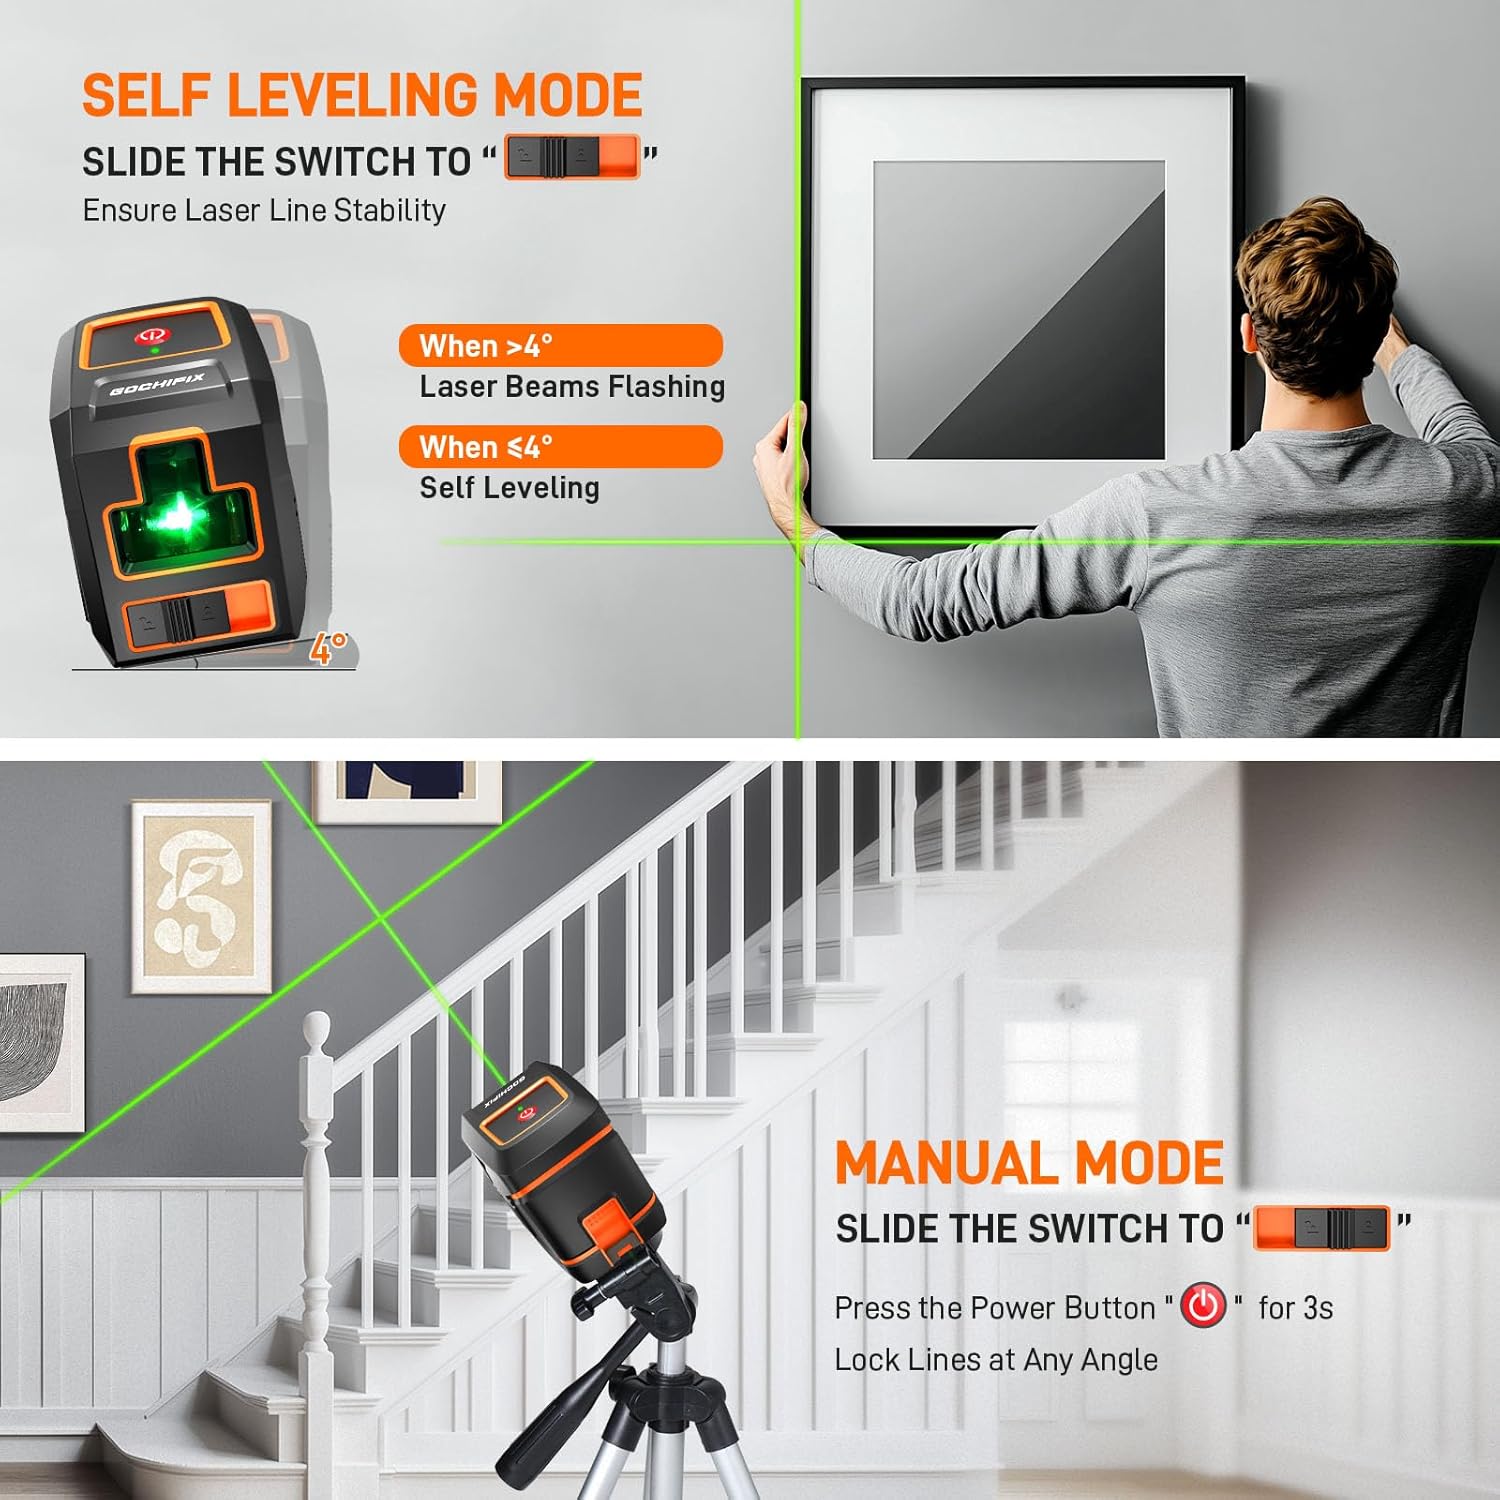
Image: Visual guide for Self-Leveling and Manual Modes.
Mantemento
Un mantemento axeitado garante a lonxevidade e a precisión do seu nivel láser.
- Limpeza: Limpe o dispositivo cun suave, damp cloth. Do not use abrasive cleaners or solvents. Keep the laser emission windows clean for optimal visibility.
- Almacenamento: When not in use, store the laser level in its portable storage bag in a dry, cool place, away from direct sunlight and extreme temperatures. Always ensure the pendulum is locked (switch in "locked" position) before storage or transport to prevent damage.
- Coidado da batería: Retire as pilas se non vai usar o dispositivo durante un período prolongado para evitar fugas e danos.
- Verificación de calibración: Periodically check the calibration of your laser level by projecting lines against a known plumb or level surface. If significant deviation is observed, contact customer support.
Resolución de problemas
If you encounter issues with your GOCHIFIX Laser Level, refer to the table below for common problems and solutions.
| Problema | Causa posible | Solución |
|---|---|---|
| Laser lines are flashing/alarm sounds in Self-Leveling Mode. | Device is tilted beyond ±4° self-leveling range. | Place the device on a more level surface or adjust the tripod until the lines stabilize. |
| No laser lines emitted. | Batteries are dead or incorrectly installed. / Device is OFF. | Check battery polarity and replace if necessary. Ensure ON/OFF switch is in the correct position. |
| Laser lines are dim. | Low battery power. / Dirty laser emission window. | Replace batteries. Clean the laser emission window with a soft cloth. |
| As liñas láser non son rectas nin precisas. | Device is not self-leveling correctly (if in self-leveling mode). / Internal component issue. | Ensure the device is within its ±4° self-leveling range. If the problem persists, contact customer support. |
Especificacións
| Especificación | Detalle |
|---|---|
| Marca | GOCHIFIX |
| Material | ABS + TPU |
| Cor | Negro + Laranxa |
| Estilo | Láser cruzado |
| Modo de operación | Self-Leveling Mode, Manual Mode |
| Peso do elemento | 1.92 libras |
| Dimensións do paquete | 16 x 4.5 x 3.78 polgadas |
| Número de modelo do artigo | GOCHIFIX |
| Baterías | 2 pilas AA necesarias (incluídas) |
| Fonte de enerxía | Alimentado por batería |
| Compoñentes incluídos | Baterías |
| Tipo de pila de batería | Alcalino |
| Data de primeira dispoñibilidade | 17 de xullo de 2024 |
Garantía e Soporte
GOCHIFIX stands behind the quality of its products. For warranty information, technical support, or any inquiries regarding your laser level, please refer to the contact information provided on the product packaging or visit the official GOCHIFIX websitio. Garde o comprobante de compra para reclamacións de garantía.
