1. Introdución
This manual provides detailed instructions for the installation, operation, and maintenance of your EMPIRE GAMING CL-242 ARGB PC Gaming Case. Please read this manual thoroughly before beginning installation to ensure proper setup and safe use of your new PC case. Retain this manual for future reference.
2. Información de seguridade
Observe as seguintes precaucións de seguridade durante a instalación e o funcionamento:
- Desconecte sempre a fonte de alimentación da toma de corrente antes de instalar ou retirar calquera compoñente.
- Use unha pulseira antiestática para evitar danos por descarga electrostática (ESD) nos compoñentes.
- Manexa os compoñentes con coidado para evitar danos físicos.
- Ensure all cables are properly routed and secured to prevent interference with fans or other moving parts.
- Do not block ventilation openings on the case.
- Keep the case away from liquids and excessive humidity.
3. Contido do paquete
Verifica que todos os elementos estean presentes no teu paquete:
- EMPIRE GAMING CL-242 PC Gaming Case (White)
- 7 x 120mm ARGB Fans (pre-installed)
- Centro de controladores ARGB
- Caixa de accesorios (parafusos, bridas, separadores)
- Manual de usuario (este documento)
4. Produto rematadoview
The EMPIRE GAMING CL-242 is a mid-tower PC gaming case designed for optimal cooling and aesthetic appeal. It features tempered glass panels and pre-installed ARGB fans.
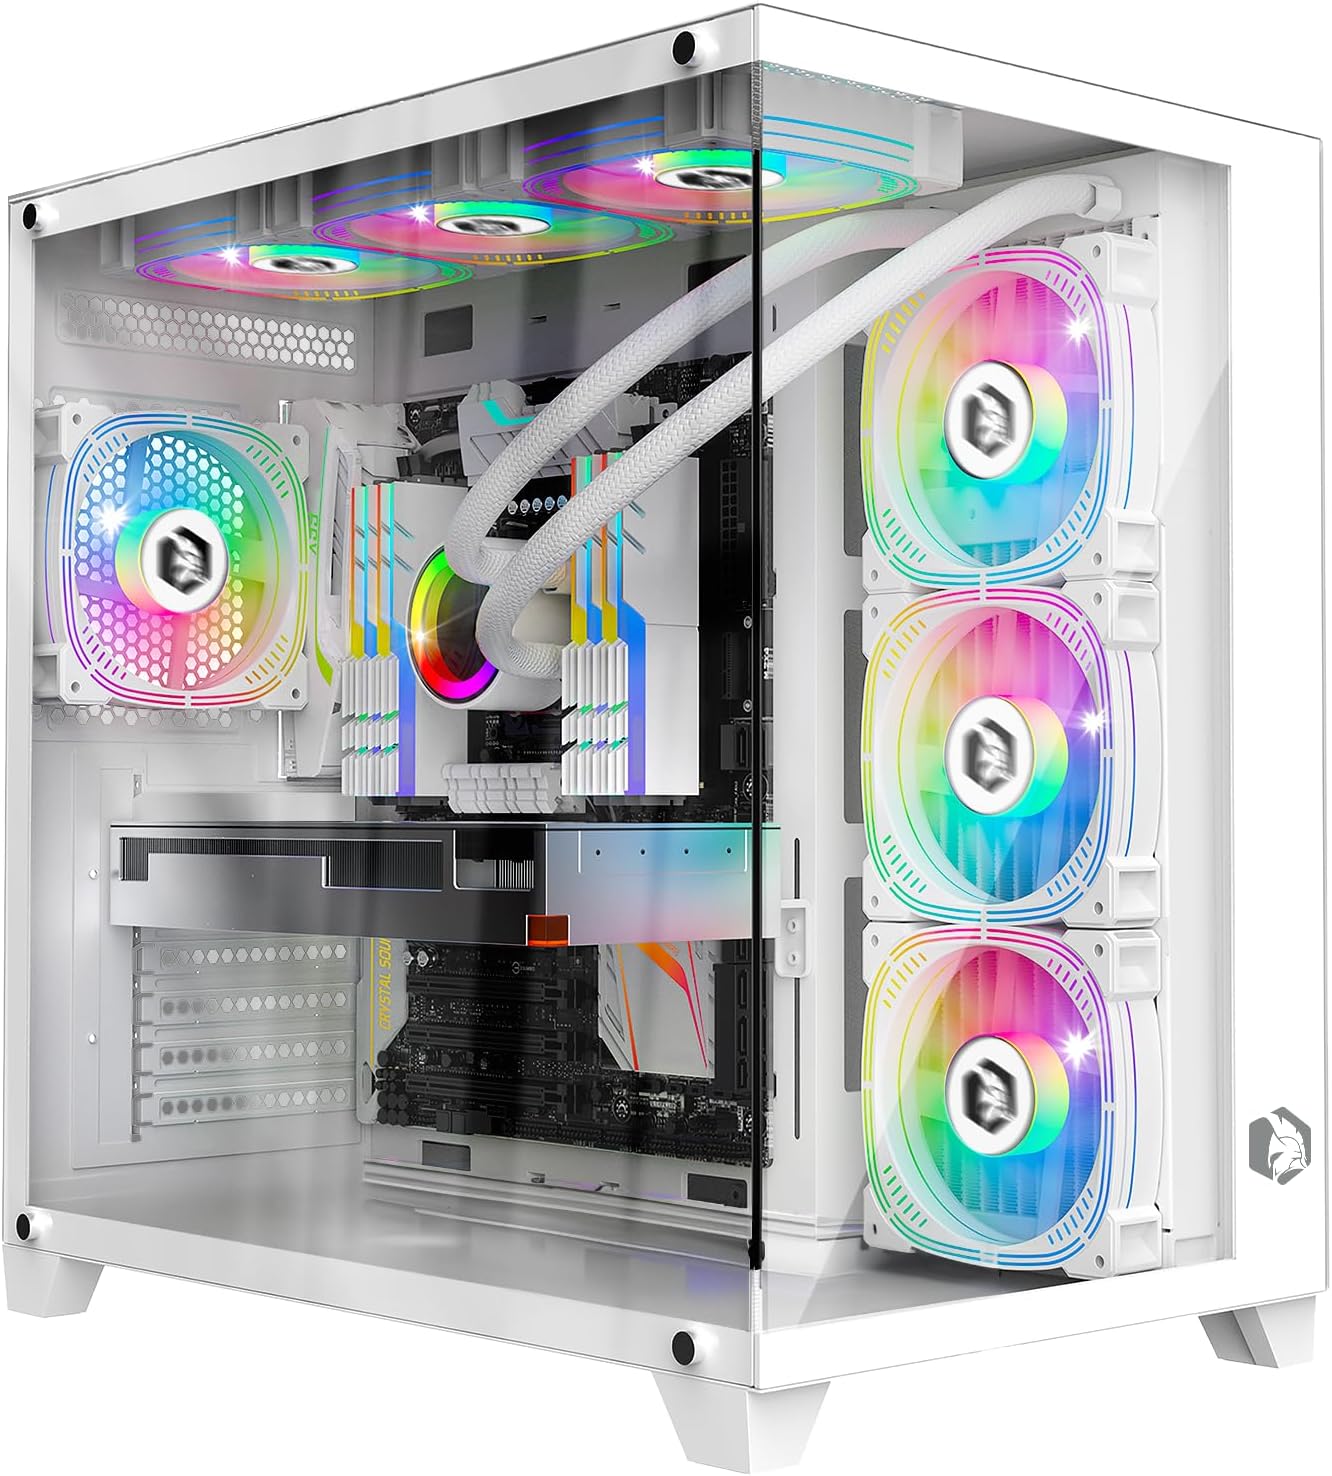
Imaxe: Fronte view of the EMPIRE GAMING CL-242 PC Gaming Case, showcasincos seus paneis de vidro temperado e os ventiladores ARGB preinstalados.

Imaxe: Máis deview of the EMPIRE GAMING CL-242 case, highlighting key features such as fan support, RGB, storage, and compatibility with icons.
Portos de E / S dianteiros
The top panel of the case provides convenient access to essential ports and controls:
- 1 x porto USB 3.0
- 2 x portos USB 2.0
- Conectores de audio HD (auriculares/micrófono)
- LED/Reset Button (for ARGB control or system reset)
- Botón de encendido
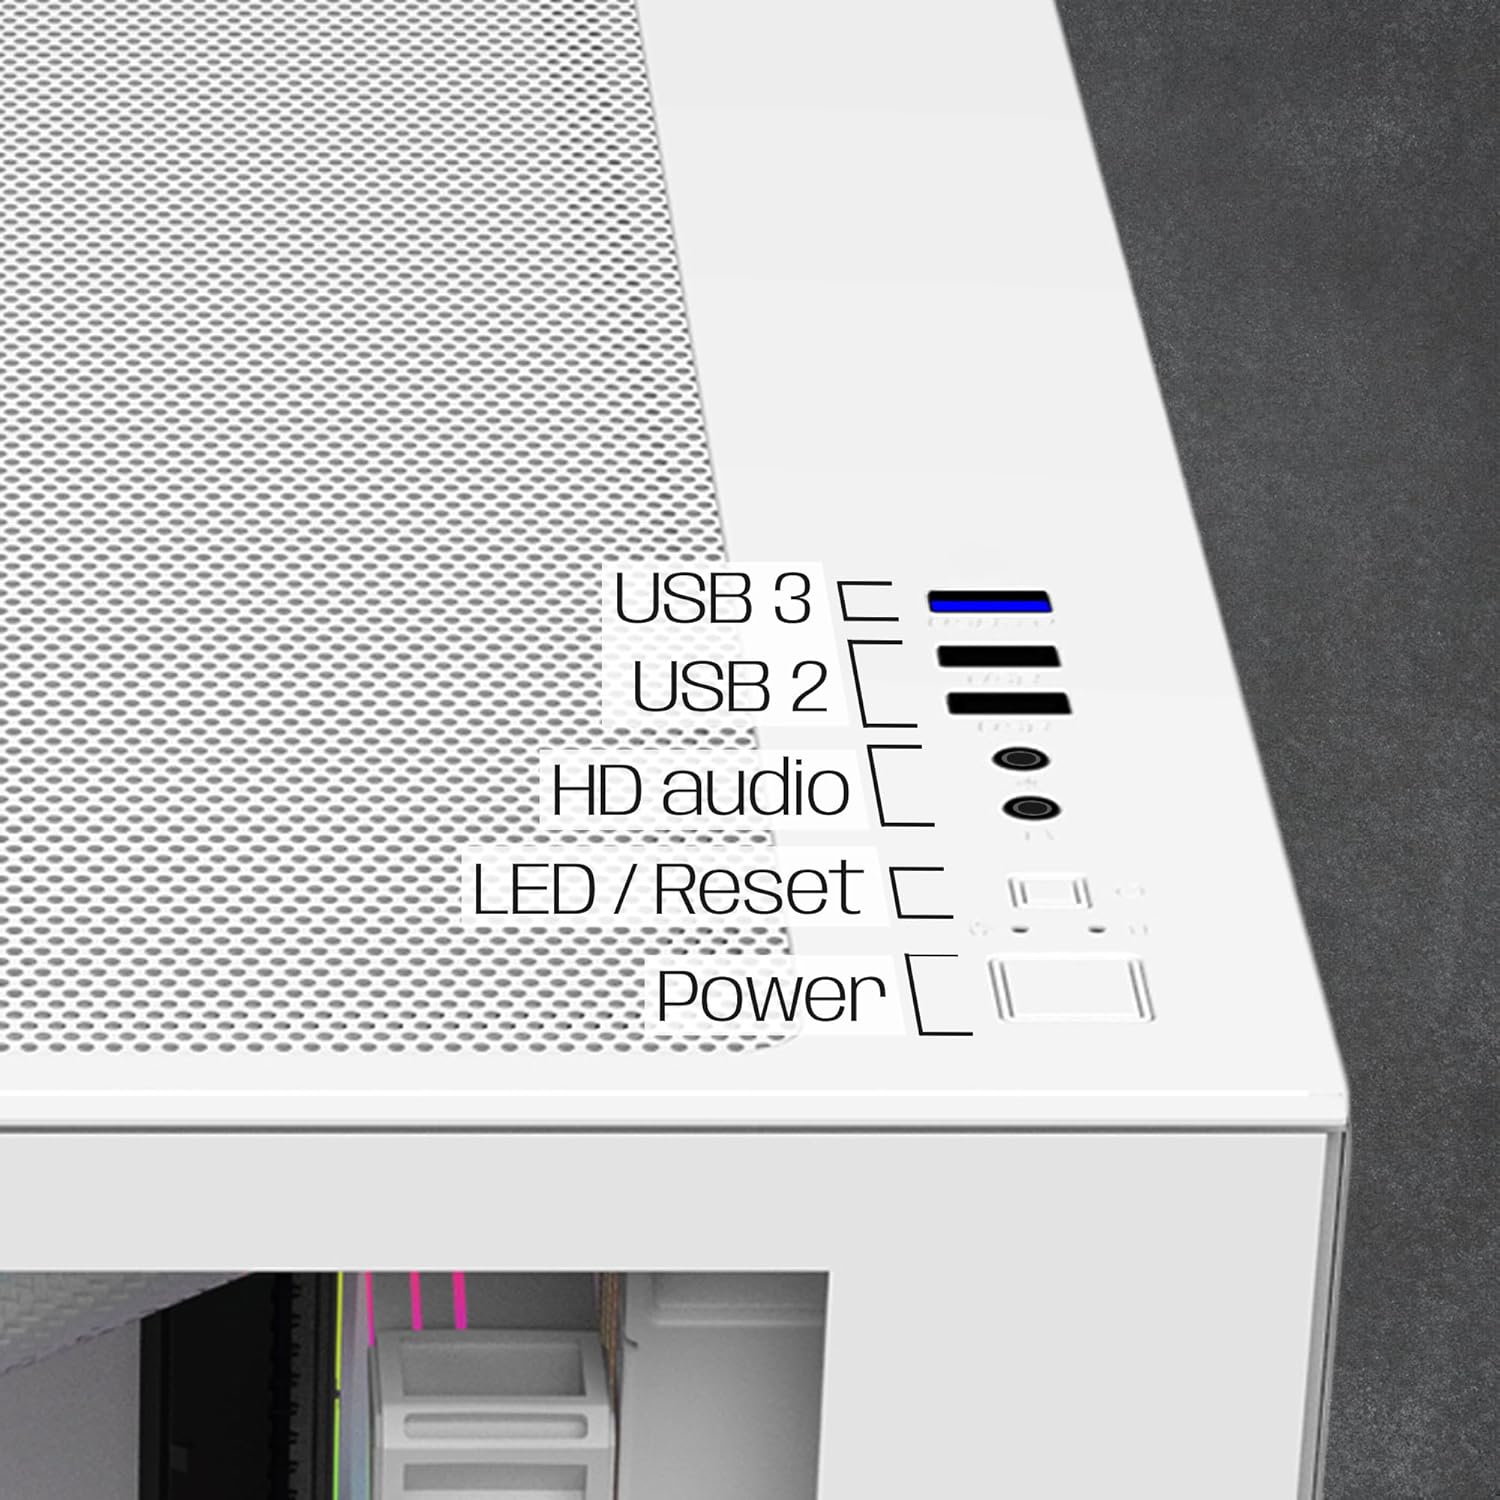
Imaxe: Primeiro plano view of the top I/O panel, indicating the USB 3.0, USB 2.0, HD Audio, LED/Reset, and Power buttons.
5. Instrucións de configuración
Follow these steps to install your PC components into the EMPIRE GAMING CL-242 case.
5.1. Preparación do caso
- Carefully remove the tempered glass side panels. Typically, these are secured with thumbscrews at the rear of the case.
- Lay the case on its side on a flat, stable surface.
5.2. Instalación da placa base
The CL-242 supports ATX, Micro-ATX, and ITX motherboards.
- Instala a protección de E/S (se non está preinstalada na placa base) na abertura traseira da caixa.
- Ensure the correct standoffs are installed for your motherboard form factor. Adjust or add standoffs as needed using the included accessories.
- Coloca con coidado a placa base sobre os separadores, aliñando os orificios dos parafusos.
- Fixa a placa base cos parafusos axeitados. Non os apertes demasiado.
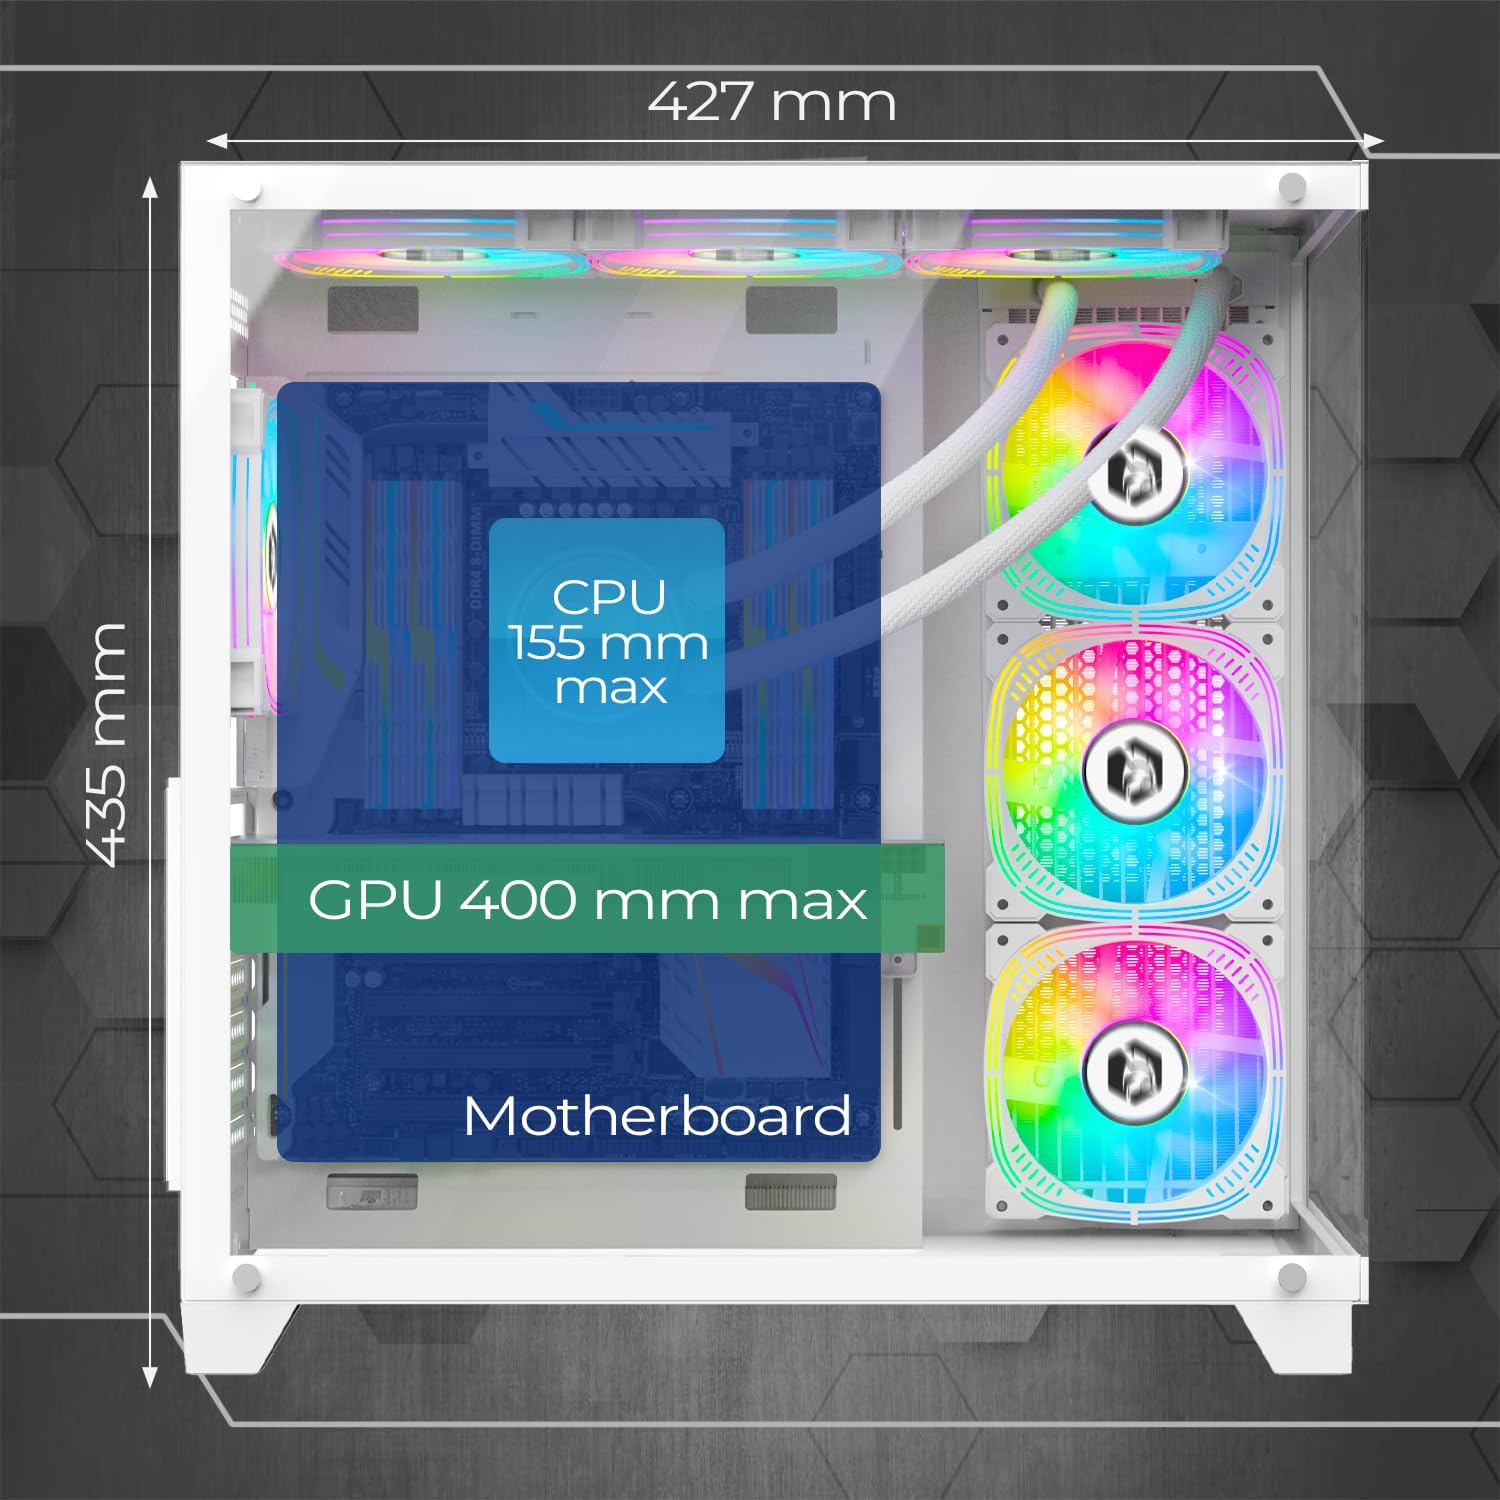
Image: Diagram illustrating the maximum CPU cooler height (155mm) and GPU length (400mm) compatibility within the case.
5.3. Instalación do dispositivo de almacenamento
The case provides 2 dedicated slots for HDDs and 1 slot for an SSD.
- Locate the drive bays/mounts for 3.5" HDDs and 2.5" SSDs. These are typically located behind the motherboard tray or in a dedicated drive cage.
- Mount your storage devices using the provided screws.
5.4. Instalación da fonte de alimentación (PSU)
The CL-242 supports a bottom-mounted PSU.
- Slide your PSU into the designated compartment at the bottom rear of the case.
- Secure the PSU to the case with screws from the rear.
- Route the necessary power cables through the cable management cutouts to reach your motherboard and components.
5.5. Instalación da tarxeta gráfica (GPU)
A carcasa admite tarxetas gráficas de ata 400 mm de lonxitude.
- Retire as tapas das ranuras PCIe necesarias da parte traseira da caixa.
- Insert your graphics card into the appropriate PCIe slot on your motherboard until it clicks into place.
- Fixa a tarxeta gráfica á carcasa con parafusos.
5.6. Fan and ARGB Controller Connection
The case comes with 7 pre-installed 120mm ARGB fans and an ARGB controller hub.

Image: Illustration of the seven 120mm ARGB fans and their 3-pin 5V connectors, highlighting the ARGB connectivity.

Image: Diagram of the ARGB controller hub, showing connection points for fans, power, reset button, and data synchronization.
- Ensure all 7 fans are connected to the ARGB controller hub. The fans use 3-pin 5V ARGB connectors.
- Connect the ARGB controller hub to your power supply via a SATA power connector.
- For motherboard synchronization (MB Sync), connect the data cable from the ARGB controller hub to a compatible 3-pin 5V ARGB header on your motherboard. Nota: Do not connect to a 4-pin 12V RGB header, as this can damage the LEDs.
- Connect the case's front panel LED/Reset button cable to the "Reset" port on the ARGB controller hub to cycle through ARGB effects.
5.7. Xestión de cables
Utilize the cable management cutouts and tie-down points behind the motherboard tray to route and secure cables. This improves airflow and aesthetics.
5.8. Watercooling Installation (Optional)
The case supports watercooling radiators up to 360mm.
- Identify suitable mounting locations for your radiator (e.g., top, front, or side).
- Mount the radiator and its fans according to the watercooling system's instructions.
6. Instrucións de funcionamento
6.1. Acendido
- Ensure all components are correctly installed and all power cables are connected.
- Conecta o monitor, o teclado e o rato.
- Plug the power cable into your PSU and then into a wall outlet.
- Flip the power switch on the PSU to the "ON" position.
- Press the Power button on the top panel of the case to start your computer.
6.2. Control de iluminación ARGB
The ARGB lighting of the pre-installed fans can be controlled in two ways:
- Via Case Button: If the LED/Reset button is connected to the ARGB controller hub, press it to cycle through various pre-programmed ARGB lighting effects.
- Via Motherboard Software (MB Sync): If the ARGB controller hub is connected to a compatible 3-pin 5V ARGB header on your motherboard, you can control the lighting effects using your motherboard's RGB software (e.g., ASUS Aura Sync, MSI Mystic Light Sync, Gigabyte RGB Fusion, ASRock Polychrome Sync). This allows for synchronized lighting across all compatible components.
7. Mantemento
Un mantemento regular axuda a garantir un rendemento óptimo e unha maior duración dos compoñentes do teu PC.
7.1. Limpeza dos filtros de po
The CL-242 case includes dust filters to prevent dust buildup inside your system. Regularly clean these filters:
- Apaga o ordenador e desconéctao da toma de corrente.
- Locate and remove the dust filters (e.g., top, bottom, front).
- Clean the filters using compressed air, a soft brush, or by rinsing them with water (ensure they are completely dry before reinstallation).
- Reinstall the dust filters.

Image: Diagram illustrating the airflow path within the EMPIRE GAMING CL-242 case, showing fresh air intake and hot air exhaust for efficient cooling.
7.2. Limpeza xeral
- Use a microfiber cloth to wipe down the exterior surfaces, including the tempered glass panels.
- For stubborn smudges on glass, use a mild glass cleaner applied to the cloth (not directly to the glass).
- Use compressed air to clear dust from internal components and fan blades periodically.
8 Solución de problemas
If you encounter issues with your EMPIRE GAMING CL-242 case, refer to the following common problems and solutions:
| Problema | Causa posible | Solución |
|---|---|---|
| O PC non se acende. | Conexións de alimentación soltas, fonte de alimentación defectuosa, problema co conector do panel frontal. |
|
| Fans are not spinning or ARGB lighting is not working. | Loose fan/ARGB connections, incorrect ARGB header, faulty controller. |
|
| Mala circulación do aire ou sobrequecemento. | Blocked dust filters, incorrect fan orientation, poor cable management. |
|
9. Especificacións técnicas
| Nome do modelo | CL-242 (OE-CA-F2402W) |
| Marca | EMPIRE GAMING |
| Tipo de caso | Torre media |
| Cor | Branco |
| Material | Metal, vidro temperado |
| Dimensións (L x W x H) | 427 x 280 x 435 mm |
| Peso | 7 quilogramos |
| Compatibilidade da placa base | ATX, Micro-ATX, ITX |
| Ventiladores preinstalados | 7 ventiladores ARGB de 120 mm |
| Control ARGB | Integrated HUB controller (3-pin 5V compatible), MB Sync |
| Soporte radiador | Ata 360 mm |
| Liquidación do refrigerador da CPU | Máximo 155 mm |
| Lonxitude da GPU | Máximo 400 mm |
| Unidade Bays | 2 discos duros de 3.5 polgadas, 1 unidades SSD de 2.5 polgadas |
| Portos de E / S dianteiros | 1 x USB 3.0, 2 x USB 2.0, HD Audio, LED/Reset Button, Power Button |
| Características especiais | LED control button, Dust filters, Integrated fan, RGB lighting |
10. Información da garantía
The EMPIRE GAMING CL-242 PC Gaming Case comes with a 2 anos de garantía do fabricante. This warranty covers defects in materials and workmanship under normal use. It does not cover damage caused by improper installation, accident, abuse, misuse, natural disaster, or unauthorized modification.
Conserve o comprobante de compra para reclamacións de garantía.
11. Atención ao cliente
For technical assistance, troubleshooting beyond this manual, or warranty inquiries, please contact EMPIRE GAMING customer support through their official websitio web ou o vendedor onde compraches o produto.
When contacting support, please have your product model (CL-242 or OE-CA-F2402W) and proof of purchase readily available.


