1. Introdución
This manual provides detailed instructions for the safe installation, operation, and maintenance of your PHORUS 48-inch Modern White Ceiling Fan with Lights and Remote/APP Control. Please read all instructions carefully before beginning installation and retain this manual for future reference.
2. Información de seguridade
- Asegúrese de desconectar a alimentación no disyuntor antes da instalación ou do mantemento.
- Toda a instalación eléctrica debe cumprir as normas eléctricas nacionais e locais. Se non está familiarizado coa instalación eléctrica, consulte cun electricista cualificado.
- O ventilador debe montarse cunha distancia mínima de 2.1 metros (7 pés) desde o chan ata o bordo de saída da pala.
- A estrutura de montaxe debe ser capaz de soportar o peso do ventilador (aproximadamente 13.4 libras).
- Non dobre os porta-láminas durante a instalación ou a limpeza.
- Este ventilador está deseñado para uso en interiores.
3. Contido do paquete
Comprobe que todos os compoñentes estean presentes antes de comezar a instalación:
- Montaxe do motor do ventilador
- Táboa colgante
- 5 aspas de ventilador
- LED Lampsombra
- Mando a distancia (con 2 pilas AAA)
- Parafusos e ferraxes de montaxe
- Manual de instrucións

4. Especificacións
| Característica | Especificación |
|---|---|
| Marca | FORO |
| Nome do modelo | #8907 |
| Tamaño | 48 polgadas |
| Cor | Branco |
| Material | Acrílico, plástico |
| Tipo de motor | DC Motor (30W) |
| Fonte de luz | LED (28 W) |
| Cores claras | 3 (White, Warm, Neutral) |
| Rango de atenuación | Continuo (10%-100%) |
| Velocidades do vento | 6 |
| Método de control | Control remoto, control por aplicación |
| Características especiais | Reversible Function, 2-Hour Timer, Memory Function |
| Nivel de son | Por debaixo de 35 dB |
| Dimensións do produto | 48 cm de longo x 10.83 cm de ancho x 48 cm de alto |
| Peso do elemento | 13.4 libras |
5. Configuración e instalación
5.1 Lista de comprobación previa á instalación
- Ensure the power supply is turned off at the main circuit breaker.
- Confirm you have all necessary tools (screwdriver, drill, wire strippers, etc.).
- Verify that the ceiling junction box is securely mounted and capable of supporting the fan.
5.2 Instalación paso a paso
- Attach Blades to Motor Assembly: Secure each of the five fan blades to the motor assembly using the provided screws. Ensure the 'THIS SIDE UP' marking on the blade attachment is facing upwards.
- Install LED Light Board: Carefully place the LED light board into the designated area on the motor assembly and secure it with screws. Connect the LED wires.
- Attach LED Lampsombra: Coloque o LED lampshade over the light board and twist it clockwise until it is securely fastened.
- Mount Hanging Board: Secure the hanging board to your ceiling junction box using appropriate screws. Ensure it is firmly attached.
- Conectar cableado: Connect the fan's electrical wires to your household wiring. The typical connections are: Black (Live) to Black (Live), White (Neutral) to White (Neutral), and Yellow/Green (Ground) to Green (Ground). Use the provided wire connectors.
- Secure Fan to Hanging Board: Lift the fan assembly and attach it to the hanging board, ensuring all wires are tucked safely inside the canopy. Secure the fan with the provided screws.
6. Instrucións de funcionamento
6.1 Funcións de control remoto
The included remote control allows for convenient operation of your ceiling fan:
- Encendido/apagado: Prema o botón de acendido para acender ou apagar o ventilador e a luz.
- Velocidade do ventilador: Select from 6 wind speeds (1-6) to adjust airflow.
- Luz On/Off: Control the light independently from the fan.
- Temperatura de cor: Cycle through 3 light colors: White (6000K), Neutral (4500K), and Warm (3000K).
- Adormecer: Axusta o brillo da luz do 10 % ao 100 %.
- Función reversible: Press the F/R key to change the blade rotation direction for summer (downdraft) or winter (updraft) modes. The fan will stop briefly before reversing.
- Temporizador: Set a 2-hour timer for automatic shutdown.
- Modo nocturno: Activates a low-speed fan and dim light setting.

6.2 Remote Code Pairing
If the remote control is not responding, it may need to be paired:
- Turn off the main power supply to the fan for one minute.
- Turn on the main power supply and simultaneously long-press the 'Code Key' button on the remote control for 3-5 seconds.
- The fan light will blink 2-3 times, indicating successful code matching. The remote can now be operated normally.
6.3 Control APP
Control your fan using the 'Fan Lamp Pro' mobile application:
- Descargar APP: Scan the QR code provided in the product images or search for "Fan Lamp Pro" na túa tenda de aplicacións.
- Conectar mediante Bluetooth: Asegúrate de que o Bluetooth do teu teléfono estea activado.
- Parear dispositivo: Open the app, add a new device, and follow the on-screen instructions to connect to your fan. The fan light will blink twice upon successful connection.
- Funcións: The app allows control over fan speeds, light colors, dimming, reverse function, and timer settings, similar to the remote control.
6.4 Fan Speed and Airflow
- Niveis 1-2: Low Comfortable Wind, suitable for sleep.
- Niveis 3-4: Medium Natural Wind, suitable for daily life.
- Niveis 5-6: High Cooling Wind, suitable for hot weather.

6.5 Configuración de luz
- The LED light source supports stepless dimming and memory function, retaining your last brightness and color temperature setting.
- Choose from 3 color temperatures: 3000K (Warm Light), 4500K (Natural Light), and 6000K (White Light).

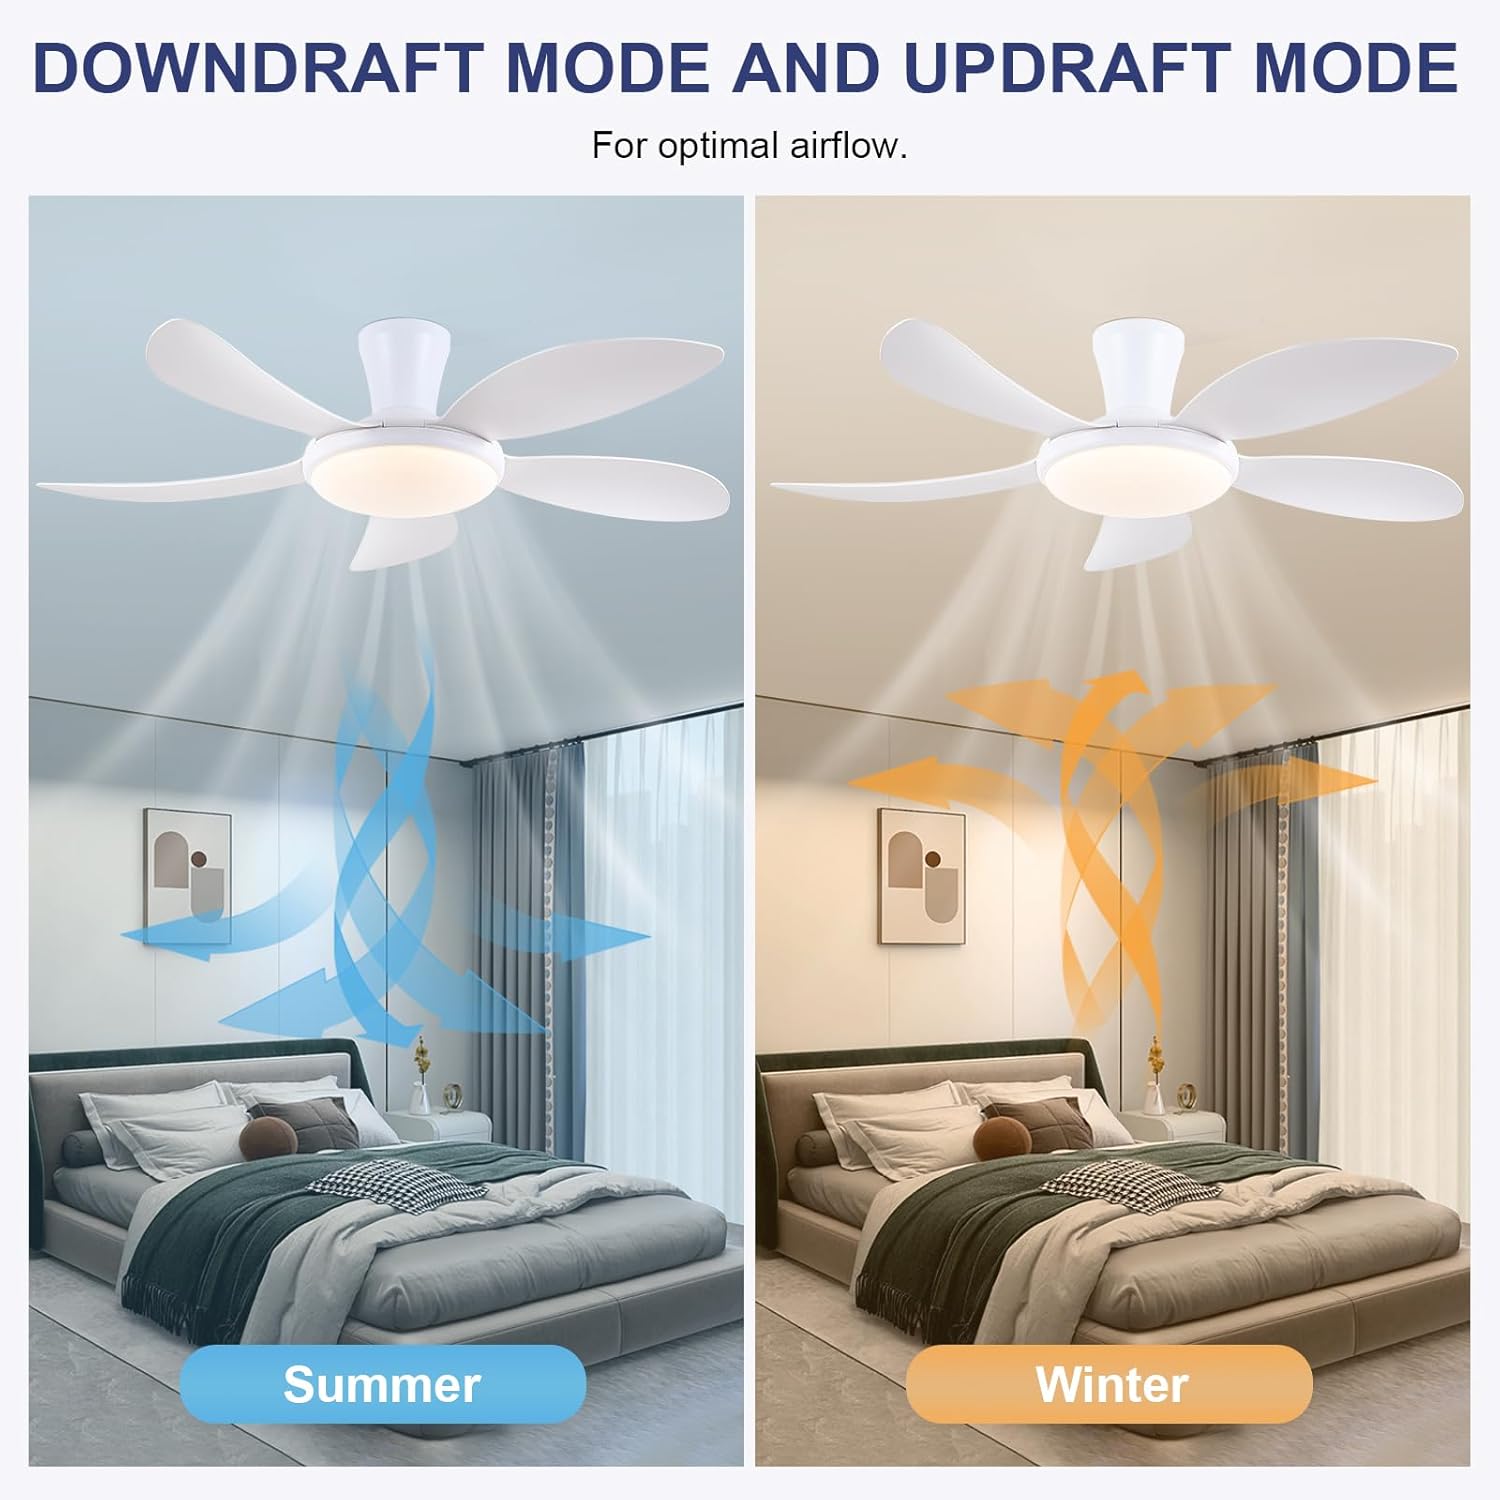
6.6 Función reversible
The reversible DC motor allows you to change the direction of the fan seasonally:
- Modo de verán (corriente descendente): Blades rotate counter-clockwise, pushing cool air downwards.
- Modo inverno (corrente ascendente): Blades rotate clockwise, drawing cool air up and circulating warm air downwards.
7. Mantemento
- Limpeza: Para limpar o ventilador, limpe cun pano suave eamp pano. Non use produtos de limpeza ou disolventes abrasivos.
- Coidados da folla: The ABS blades are designed to be easy to clean and resistant to deformation.
- Comprobacións periódicas: Comprobe periodicamente todas as conexións e os parafusos para asegurarse de que estean ben fixados.
8 Solución de problemas
Se tes problemas co teu ventilador, consulta os seguintes problemas e solucións comúns:
- O ventilador non funciona: Check power supply, ensure all wiring connections are secure, and verify remote control pairing.
- A luz non funciona: Check power supply, ensure light wires are connected, and verify remote control pairing.
- O ventilador é ruidoso: Ensure all screws are tightened, especially on the blades and mounting bracket. Check for any obstructions.
- O control remoto non funciona: Replace batteries, ensure line of sight to the fan, and re-pair the remote control as per section 6.2.
- Problemas de conexión coa aplicación: Ensure Bluetooth is on, the app is updated, and try re-pairing the device.
9. Garantía e soporte
PHORUS provides a one-year quality warranty for this product. For any damage or quality problems, free replacement service is offered. If you have any questions or require assistance, please contact PHORUS customer service. You will receive a satisfactory answer within 24 hours.
For additional support and resources, please visit the official PHORUS websitio web ou consulte a información de contacto proporcionada coa súa compra.


