1. Introdución
This manual provides essential information for the safe and efficient operation of your VISION VP-621 4K Ultra HD Multimedia Projector. Please read this manual thoroughly before using the projector and retain it for future reference.
The VISION VP-621 is a versatile smart projector featuring 4K Ultra HD support, 11000 lumens brightness, 5G WiFi, Bluetooth 5.0, Auto Focus, Wireless Miracast, and an integrated Android 9.0 operating system. It is designed for various applications including home entertainment, business presentations, and educational purposes.
2. Información de seguridade
- Non bloquee as aberturas de ventilación. Asegúrese de que haxa un fluxo de aire axeitado arredor do proxector para evitar o sobrequecemento.
- Non mire directamente á lente do proxector cando estea aceso.amp está acendido. A luz brillante pode causar danos nos ollos.
- Coloque o proxector sobre unha superficie estable e nivelada para evitar que caia.
- Manteña o proxector lonxe da auga, da humidade e das temperaturas extremas.
- Empregue só o adaptador de corrente subministrado co proxector.
- Non intente abrir nin reparar o proxector vostede mesmo. Encargue calquera mantemento a persoal cualificado.
- Desconecte o proxector durante tormentas eléctricas ou cando non o use durante períodos prolongados.
3. Contido do paquete
Verifique que todos os elementos que se indican a continuación estean incluídos no seu paquete:
- VISION VP-621 Projector
- Cable de alimentación
- Adaptador
- Control remoto
- Cabo AV
- Cuberta da lente do proxector
4. Produto rematadoview
Familiarize yourself with the main components and interfaces of your VISION VP-621 projector.

Imaxe: Fronte e lateral view of the VISION VP-621 projector, showcasino seu deseño compacto e a súa lente.
4.1 Panel frontal e superior
- Lente de proxección: Emite a imaxe.
- Receptor de infravermellos: Para sinais de control remoto.
- Botóns de control: Power, Navigation (OK, Up, Down, Left, Right), Back.
- Reixas de ventilación: For cooling the internal components.

Imaxe: Arriba view of the projector highlighting the integrated control buttons for power and navigation.
4.2 Rear Panel and Connectivity Ports
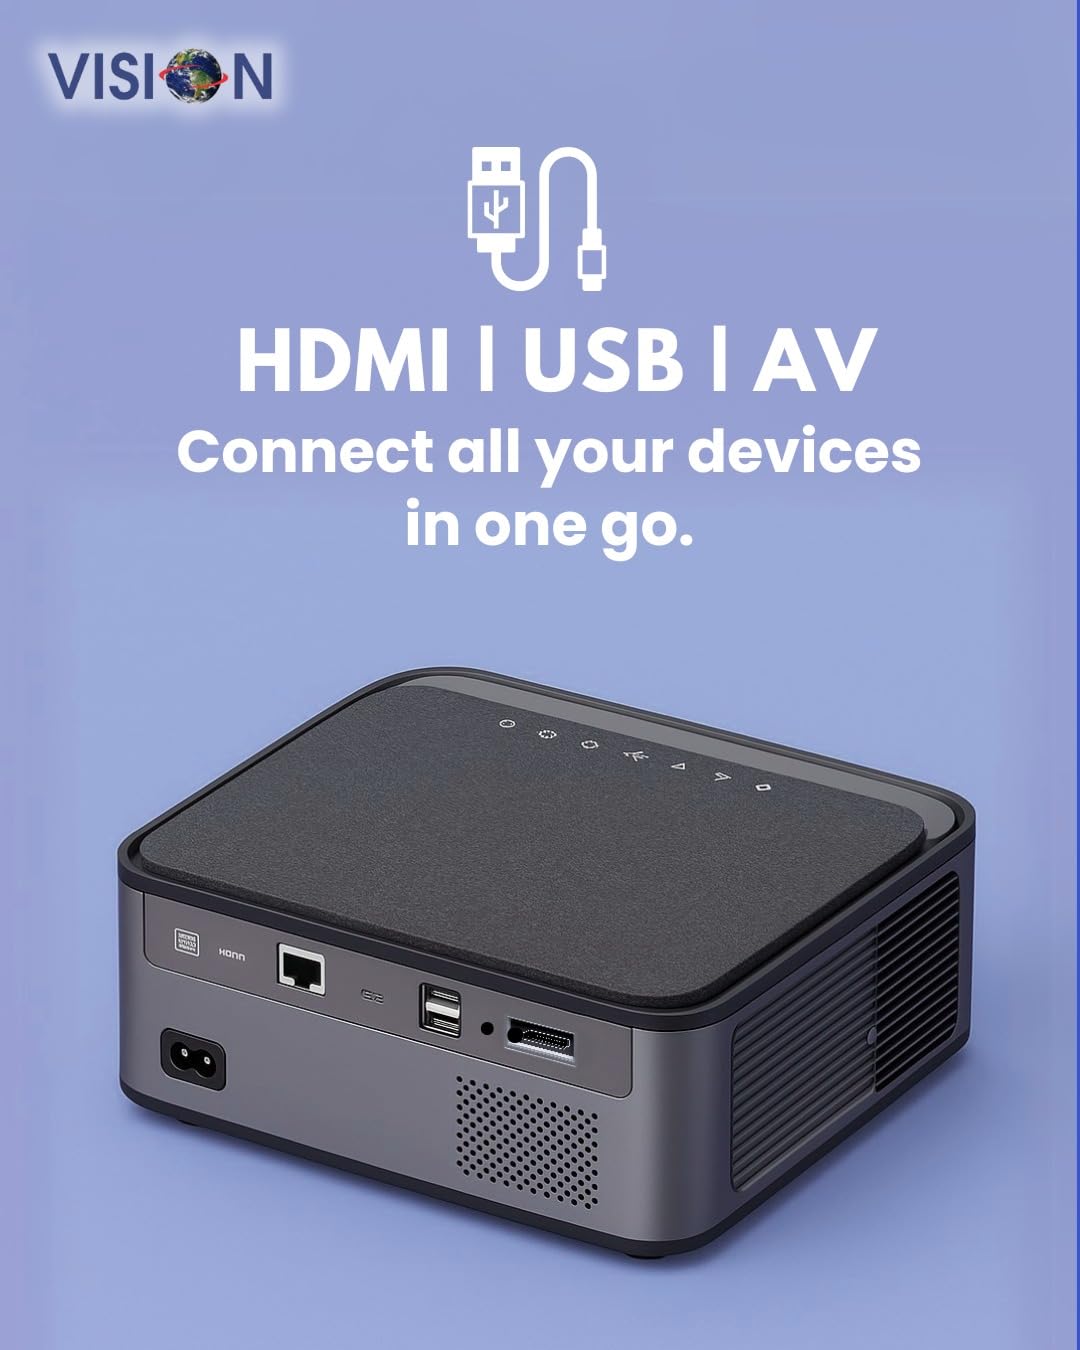
Imaxe: Traseira view of the projector displaying the various input and output ports, including HDMI, USB, and AV.
- Entrada de enerxía: Conecte o adaptador de alimentación aquí.
- Porto HDMI: Connect to HDMI-enabled devices (laptops, gaming consoles, streaming sticks).
- Portos USB (x2): Connect USB drives for media playback or external devices.
- Entrada AV: Connect to older devices using the provided AV cable.
- Saída de son (3.5 mm): Conecta altofalantes ou auriculares externos.
- Porto LAN: For wired internet connection (if available).
5. Configuración
5.1 Colocación do proxector
Choose a flat, stable surface for the projector. Ensure there are no obstructions in front of the lens and that the ventilation grilles are clear.

Image: A projector positioned on a desk, illustrating a typical setup environment.
5.2 Conexión de alimentación
- Conecte o adaptador de corrente ao porto de entrada de alimentación do proxector.
- Conecte o cable de alimentación a unha toma de parede.
- A luz indicadora de acendido do proxector acenderase.
5.3 Encendido inicial
- Preme o botón de acendido do proxector ou do control remoto para acendelo.
- O proxector arrincará e mostrará a pantalla de inicio de Android 9.0.
5.4 Axuste do enfoque e da distorsión trapezoidal
The VISION VP-621 features automatic focus and 4D keystone correction for a clear and properly aligned image.

Image: Illustrates the projector's automatic focus and keystone correction capabilities, ensuring a sharp and aligned picture.
- Foco automático: The projector will automatically adjust the focus for a sharp image upon startup or movement.
- Corrección trapezoidal 4D: The projector automatically corrects image distortion when placed at an angle. Manual adjustments may be available in the settings menu if needed.
6. Instrucións de funcionamento
6.1 Android 9.0 Smart OS
The integrated Android 9.0 system allows direct access to streaming services and apps.
- Navegación: Use the remote control's directional buttons and "OK" button to navigate the interface.
- Instalación da aplicación: Access the Google Play Store to download and install applications like YouTube, Netflix, and Prime Video.
- Conexión de rede: Go to Settings > Network to connect to a 5G WiFi network or a wired LAN connection.
6.2 Conexión de dispositivos externos
Conexión HDMI
- Connect an HDMI cable from your device (laptop, gaming console, Fire TV Stick) to the HDMI port on the projector.
- On the projector's home screen, select the HDMI input source.
Conexión USB
- Insert a USB drive into one of the USB ports on the projector.
- The projector will typically prompt you to open the media player or file browser. If not, navigate to the file manager app on the Android home screen.
Conexión AV
- Connect the provided AV cable to the AV input port on the projector and to your external device.
- Select the AV input source on the projector.
Bluetooth 5.0 Audio Output
- Go to Settings > Bluetooth on the projector.
- Activa o Bluetooth e busca os dispositivos dispoñibles.
- Select your Bluetooth speaker or headphones from the list to pair and connect.
Wireless Miracast (Screen Mirroring)
Miracast allows you to wirelessly mirror the screen of your compatible smartphone, tablet, or laptop.
- On the projector's home screen, select the "Miracast" or "Screen Mirroring" application.
- On your mobile device, enable screen mirroring (often found in quick settings or display settings, named "Cast," "Smart View," "Wireless Display," etc.).
- Seleccione o proxector da lista de dispositivos dispoñibles para establecer a conexión.
7. Mantemento
7.1 Limpeza do proxector
- Lente: Usa un pano suave e sen fiapos deseñado especificamente para lentes ópticas. Non empregues produtos de limpeza abrasivos.
- Casing: Limpar o proxector casing with a soft, dry cloth. For stubborn dirt, slightly dampEnxágüe o pano con auga e logo seque.
- Ventilación: Regularly check and clean the ventilation grilles to ensure proper airflow and prevent dust buildup. Use a soft brush or compressed air.
7.2 Lamp A vida
The VISION VP-621 utilizes advanced LED technology, providing an estimated lamp life of up to 50,000 hours. This significantly reduces the need for lamp substitución en comparación cos proxectores tradicionais.
8 Solución de problemas
| Problema | Causa posible | Solución |
|---|---|---|
| Non se mostra ningunha imaxe |
|
|
| Imaxe borrosa |
|
|
| Sen son |
|
|
| Non se pode conectar á wifi |
|
|
9. Especificacións
| Marca | VISIÓN |
| Nome do modelo | VP-621 AN |
| Tecnoloxía de visualización | LCD |
| Tipo de visualización | LED |
| Brillo | 11000 lúmenes |
| Relación de contraste da imaxe | 18000:1 Pixels |
| Resolución nativa | 1920 x 1280 (Full HD) |
| Resolución admitida | Up to 4K Ultra HD |
| Relación de aspecto | 16:9, 4:3 |
| Sistema Operativo | Android 9.0 |
| Tecnoloxía de conectividade | Bluetooth 5.0, HDMI, USB, Wi-Fi (5G) |
| Interface de hardware | Bluetooth 5, HDMI, USB 3.0 |
| Características especiais | Built-In 3D, Built-In Cooling System, Built-In Speaker, Electric Focus, Wi-Fi Ready, Auto Focus, 4D Keystone Correction, Wireless Miracast |
| Dimensións do produto | 30 x 18 x 7 cm |
| Peso do elemento | 8 kg |
| Lamp A vida | Ata 50,000 horas |

Image: Illustrates the projector's Full HD (1920x1080) resolution capability for crisp visuals.

Image: Highlights the projector's 11000 lumens brightness, ensuring clear visuals in various lighting conditions.
10. Garantía e soporte
For warranty information and technical support, please contact the manufacturer:
- Fabricante: Scorpio Infosolutions
- Localización: Delhi, India
- Teléfono: +91-7982647130
- Websitio: visionsheen.in
Please have your product model (VP-621) and purchase details ready when contacting support.


